- Windows 10: Change Image Thumbnail Size
- Option 1 – Keyboard + Mouse Shortcut
- Menu Options
- Registry Hack Method
- You Might Also Like
- How to Increase Windows Explorer Default Thumbnail Size for Pictures
- Tweak UI
- ThumbnailSize Registry Hack
- Preview Pane in Windows 7/8
- How to use Active Directory user photos in Windows 10
- Follow these steps to use Active Directory user photos in Windows 10
- Importing photos into Active Directory
- Creating a new GPO for your domain
- Adding a logoff script to GPO
- Adding registry key permissions in GPO
Windows 10: Change Image Thumbnail Size
By Mitch Bartlett 15 Comments
The thumbnail size in Microsoft Windows 10 was too small for me. I would have to open each file just to make out what the heck the photo was. I was pleased to discover that you can change the default size of image thumbnails to and make them larger or smaller. You can do this from the Windows menus or via the registry.
Option 1 – Keyboard + Mouse Shortcut
While viewing the photos in a window, hold the “CTRL” key and scroll the wheel on your mouse to enlarge or decrease the size of the icons.
Menu Options
- Select “Start” and open “File Explorer“.
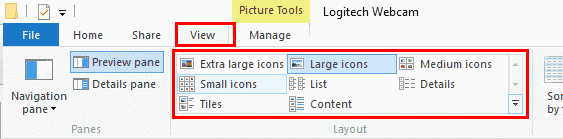
- Select the “View” tab.
- Make sure the ribbon is expanded. Pressing CTRL + F1 will toggle it for you.
- Select the desired setting. “Extra Large Icons“, “Large Icons“, “Medium Icons” or “Small Icons“. If you don’t see these option, look at our FAQ section at the bottom of this page.

Registry Hack Method
- Hold down the “Windows key” and press “R“.
- Type “regedit” and click “OK“.
- Navigate to the following location in the registry.
- HKEY_CURRENT_USER
- Software
- Microsoft
- Windows
- CurrentVersion
- Explorer
- Look for an entry on the right side for “ThumbnailSize“. If you can’t find it, then right-click on “Explorer” and select “New” > “DWORD Value” and type “ThumbnailSize” for the name and press “Enter“.
- Double click “ThumbnailSize” and set the value to a number between “32” and “256“. The higher the number, the larger the image thumbnails.
- Close the registry editor and you’re ready to view your photo thumbnails in the size you wish.
I don’t have the options for icon sizes on my Windows computer. Why?
It should have it. Make sure you aren’t viewing the photos in a different application or viewing the photos in a compressed ZIP or RAR file. The photos need to be extracted first.
Why is my computer not showing me thumbnails for photos at all?
Thumbnail preview may be disabled. Open “Control Panel” > “Folder Options” > “View” and ensure that “Always show icons, never thumbnails” is unchecked.
You Might Also Like
Filed Under: Windows Tagged With: Windows 10
How to Increase Windows Explorer Default Thumbnail Size for Pictures
For those of us tired of squinting
Here’s something about Windows XP that really annoys me: why can’t you increase or decrease the size of thumbnails in Explorer like you can in Windows 7 and Windows 8? If you’re going to have thumbnails in the first place, is it that hard to put in a little slider bar whereby you can increase or decrease the size? I hate going through a folder in Explorer and not being able to clearly see the details of the picture.
I guess Microsoft didn’t think about that issue when the released Windows XP. Nor did they add the option in Service Pack 3, the last major non-security update to XP. By default, the thumbnails in Windows XP look like this:

That size is simply not large enough, especially for anyone with vision problems! Luckily, there’s an easy way to modify these settings so that the thumbnails can be any size you want up to 256×256. Unfortunately, the max size for icons in Explorer is 256×256 pixels. If you want to see them bigger than that, you’ll have to use a third-party program. Scroll down past Tweak UI to learn about adjust thumbnail sizes in Windows 7/8.
Tweak UI
Previously, I had written about a cool little utility that you can get for free from Microsoft called Tweak UI that lets you modify and tweak a bunch of Windows XP settings. Using this program, we can quickly and easily change the default 96 pixels size of thumbnails to something more visible.
Once you install the program, go to the Start Menu and click on All Programs – Powertoys for Windows XP – Tweak UI. After you have opened the program, click on Explorer from the left hand menu and then click on Thumbnails.
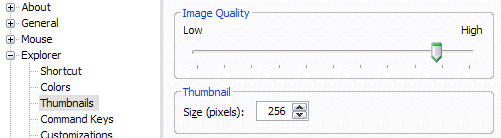
Change the default size from 96 to something higher. In my case, I chose 256. Also, make sure to keep the Image Quality closer to high so that the thumbnails look nice. Of course, it will take more resources when browsing pictures, but if you have a fairly new computer, it should not be a problem.
Now when you browse through your photos in My Pictures or anywhere where you have thumbnails turned on, you should see something like this:

Now that is much better! 😉 I can actually see what’s going on in a picture! Cheers! The second method for changing the thumbnail size is to modify the registry.
ThumbnailSize Registry Hack
If you decide to use the registry hack, then you can change the size of the thumbnails on Windwos XP, Windows Vista, Windows 7 and Windows 8 since the same hacks works for all these versions. The only clear advantage to using the registry hack at all in Windows Vista and higher is if you want to use a custom size for the thumbnails.
By default, in Windows 7 and Windows 8, you can choose from Small, Medium, Large and Extra Large icons. You can adjust the size by moving the slider in Windows 7.

In Windows 8, the Explorer interface has change a little bit and Microsoft removed the whole slider option. Instead, you have to click on the View tab and there you will see the same options in the Layout box.

Anyway, back to the registry hack. If you want a custom size for your icons, you can open the registry editor by going to Start and then typing in regedit. Then navigate to the following registry key in the left pane:
HKEY_CURRENT_USER – Software – Microsoft – Windows – CurrentVersion – Explorer
Now on the right pane, you should look for a key called ThumbnailSize. If it’s not there, you will have to right-click in the right-pane and choose New – DWORD (32-bit) Value. Give it a name of Thumbnail Size and then double-click on it to edit it. Choose Decimal give it a value from 32 to 256.

You should be able to see the effects immediately when you open a new Explorer window. Note that the thumbnail size will apply to all folders and files regardless of what other settings you may have previously chosen. You can still manually change the thumbnail size for a particular folder, but when you browse back to the same folder later, the thumbnails will display with the custom size you set in the registry.
Preview Pane in Windows 7/8
If you’re still not happy with the 256 max size for thumbnails in Windows and you don’t want to install any third-party software, you have one other option. Both Windows 7 and Windows 8 have a Preview Pane option that basically lets you view a preview that is as large as you can make the preview pane itself.

As you can see, the preview is much bigger. You can expand the explorer window to as large as your monitor and the preview will expand as well. In Windows 7, just click on that small little window button at the top right. In Windows 8, click on the View tab and then click on Preview Pane to enable it.
Hopefully, whether you are running Windows XP or Windows 8, you now have enough options to view thumbnails at a desirable size. If you have any questions, post a comment. Enjoy!
Founder of Online Tech Tips and managing editor. He began blogging in 2007 and quit his job in 2010 to blog full-time. He has over 15 years of industry experience in IT and holds several technical certifications. Read Aseem’s Full Bio
How to use Active Directory user photos in Windows 10
[Update] This post was updated on May 22, 2019
User photos stored in Active Directory can be used by applications like Outlook, Skype for Business (Lync) or SharePoint to display the picture of currently logged-in user in their interface. However, you can take even more advantage of Active Directory photos and use them as account pictures in Windows 10 (and other versions of Windows as well, starting from Windows 7). All you have to do is make sure that you already have user photos added in Active Directory (or add them yourself) and create a Group Policy object (GPO) that will execute a script to change users’ account pictures in your domain automatically. Optionally, you may also need to globally change some of the users’ privileges, but we’ll get back to that later. Some of these steps can easily be done using CodeTwo Active Directory Photos, which is completely free! As for the other steps, this article will guide you through them smoothly.
Take a good look at this default account picture, as you will probably see it for the last time:

Follow these steps to use Active Directory user photos in Windows 10
Importing photos into Active Directory
There is a simple Set-ADUser cmdlet that can be used to import user photos to Active Directory. It saves an image file in the thumbnailPhoto Active Directory attribute. An example of the command that needs to be run in PowerShell looks as follows:
-Encoding byte)
Set-ADUser -Replace @
Just remember to provide an exact path to the image file and the user’s name (learn about other ways of identifying your Active Directory users in this Microsoft article), for example:
$ADphoto = [byte[]](Get-Content C:\AD_Photos\ad-brian-johnson -Encoding byte)
Set-ADUser BrianJ -Replace @
Of course, this is a no-go when you want to import photos for a lot of users. A similar command can be used to import multiple pictures into Active Directory. But first, you need to prepare a CSV file with the list of users and their respective photos. Here’s an example content of such a file:
AD_user, path_to_file
AlexD , C:\AD_Photos\ad-alex-darrow.jpg
AnneW, C:\ AD_Photos\ad-anne-wallace.jpg
BrianJ, C:\ AD_Photos\ad-brian-johnson.png
Once the file is ready, use the following command:
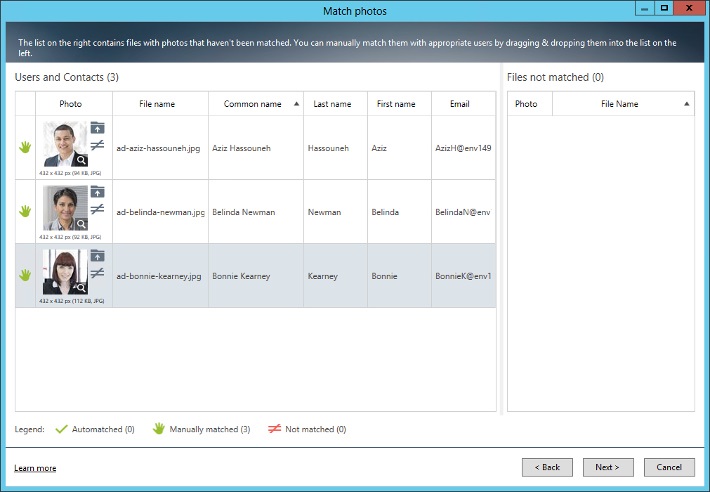
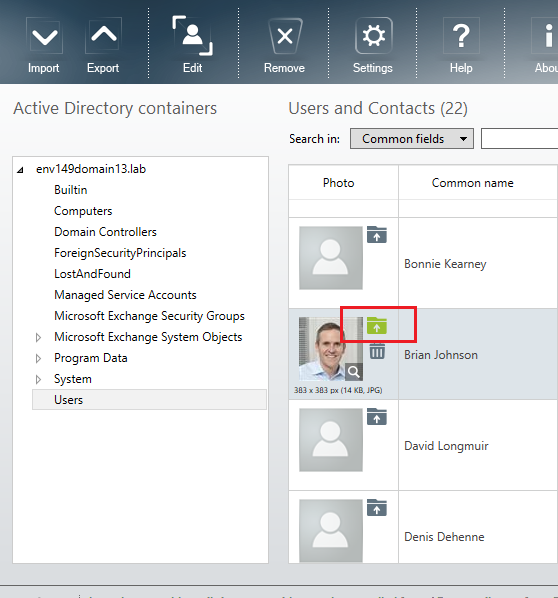
Creating such a file can also be quite time-consuming. This is where CodeTwo Active Directory Photos comes into play. The program not only allows you to quickly connect to Active Directory and import (single or multiple) files, but it comes with the ability to match photos automatically with respective Active Directory users. Plus, you can do all that from an intuitive and user-friendly interface.
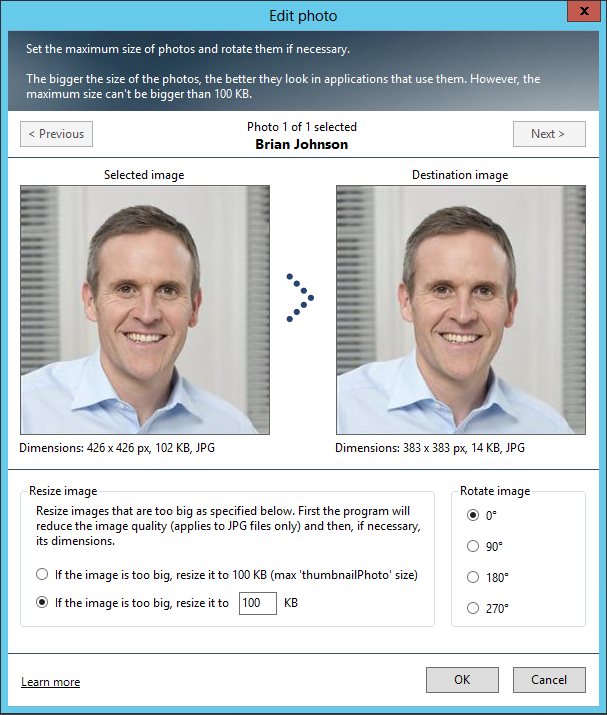
There is also one important aspect that hasn’t been mentioned yet – the photo stored in the thumbnailPhoto attribute cannot be bigger than 100 kB, and the recommended size is 96 x 96 pixels. Here you can also make use of CodeTwo Active Directory Photos, as it lets you adjust both the size of the file as well as its dimensions.
With this program, you will also instantly know which users don’t have their photos added to Active Directory by merely looking at the user’s list.
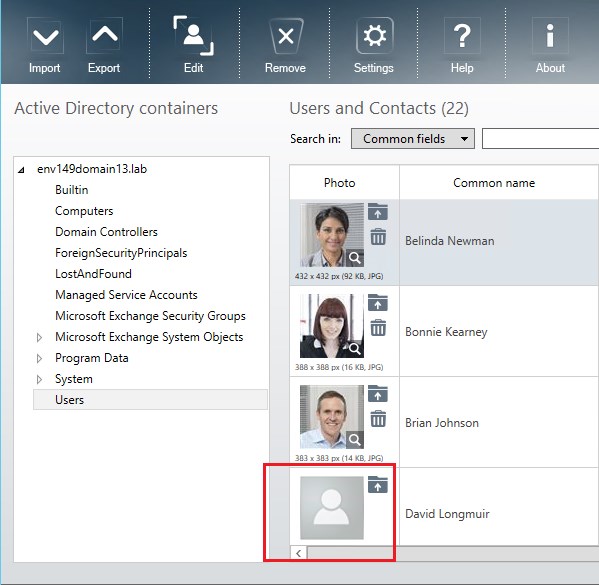
Otherwise, you can, for example, open the Active Directory Users and Computers tool and check if the thumbnailPhoto attribute shows any value. If you see , it means there is no photo there.
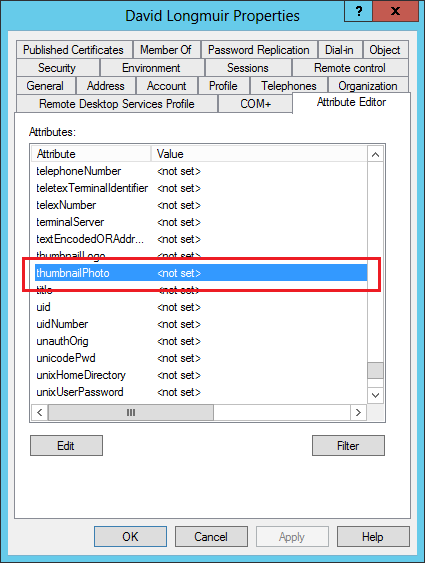
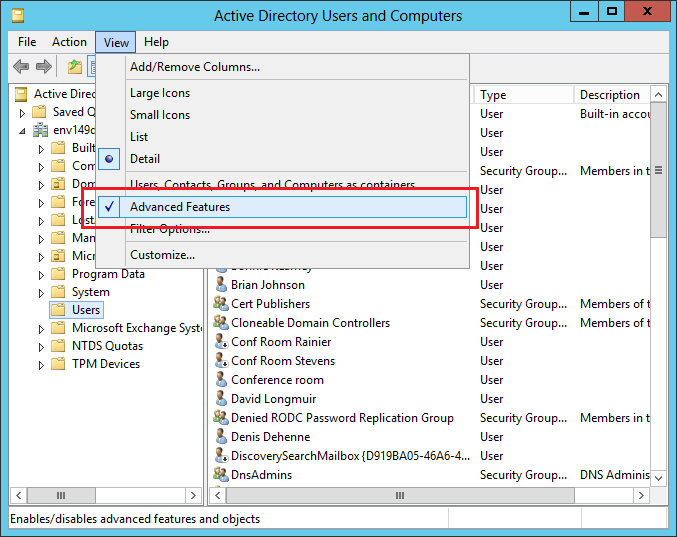
If you can’t find the Attribute Editor tab in the Properties window, make sure the Advanced Features options on the View menu is checked.
Creating a new GPO for your domain
Now, to propagate these Active Directory photos as Windows 10 account pictures, you can make use of Group Policy objects. Or more specifically – a Group Policy logoff scripts. They are used to perform automated tasks on each machine in a specified domain when a user logs off in Windows. That way, changes are introduced without any conflicts and even without any interaction on users’ part.
The script that we’re going to use was found on this site. You can adjust this code to your needs, or just copy it as it is and paste it into an empty text document. Save the file and change its extension from .txt to .ps1. Next, copy the file to a network location, e.g. %logonserver%\netlogon.
[CmdletBinding(SupportsShouldProcess=$true)]Param()
function Test-Null($InputObject) < return !([bool]$InputObject) >
Function ResizeImage() <
param([String]$ImagePath, [Int]$Quality = 90, [Int]$targetSize, [String]$OutputLocation)
Add-Type -AssemblyName «System.Drawing»
$img = [System.Drawing.Image]::FromFile($ImagePath)
$CanvasWidth = $targetSize
$CanvasHeight = $targetSize
#Encoder parameter for image quality
$ImageEncoder = [System.Drawing.Imaging.Encoder]::Quality
$encoderParams = New-Object System.Drawing.Imaging.EncoderParameters(1)
$encoderParams.Param[0] = New-Object System.Drawing.Imaging.EncoderParameter($ImageEncoder, $Quality)
# get codec
$Codec = [System.Drawing.Imaging.ImageCodecInfo]::GetImageEncoders() | Where <$_.MimeType -eq 'image/jpeg'>
#compute the final ratio to use
$ratioX = $CanvasWidth / $img.Width;
$ratioY = $CanvasHeight / $img.Height;
$ratio = $ratioY
if ($ratioX -le $ratioY) <
$ratio = $ratioX
>
$newWidth = [int] ($img.Width * $ratio)
$newHeight = [int] ($img.Height * $ratio)
$bmpResized = New-Object System.Drawing.Bitmap($newWidth, $newHeight)
$graph = [System.Drawing.Graphics]::FromImage($bmpResized)
$graph.InterpolationMode = [System.Drawing.Drawing2D.InterpolationMode]::HighQualityBicubic
$graph.Clear([System.Drawing.Color]::White)
$graph.DrawImage($img, 0, 0, $newWidth, $newHeight)
#save to file
$bmpResized.Save($OutputLocation, $Codec, $($encoderParams))
$bmpResized.Dispose()
$img.Dispose()
>
#get sid and photo for current user
$user = ([ADSISearcher]»(&(objectCategory=User)(SAMAccountName=$env:username))»).FindOne().Properties
$user_photo = $user.thumbnailphoto
$user_sid = [System.Security.Principal.WindowsIdentity]::GetCurrent().User.Value
Write-Verbose «Updating account picture for $($user.displayname). »
#continue if an image was returned
If ((Test-Null $user_photo) -eq $false)
<
Write-Verbose «Success. Photo exists in Active Directory.»
#set up image sizes and base path
$image_sizes = @(32, 40, 48, 96, 192, 200, 240, 448)
$image_mask = «Image<0>.jpg»
$image_base = «C:\ProgramData\AccountPictures»
#set up registry
$reg_base = «HKLM:\SOFTWARE\Microsoft\Windows\CurrentVersion\AccountPicture\Users\<0>»
$reg_key = [string]::format($reg_base, $user_sid)
$reg_value_mask = «Image<0>»
If ((Test-Path -Path $reg_key) -eq $false) < New-Item -Path $reg_key >
#save images, set reg keys
ForEach ($size in $image_sizes)
<
#create hidden directory, if it doesn’t exist
$dir = $image_base + «\» + $user_sid
If ((Test-Path -Path $dir) -eq $false) < $(mkdir $dir).Attributes = "Hidden" >
#save photo to disk, overwrite existing files
$file_name = ([string]::format($image_mask, $size))
$pathtmp = $dir + «\_» + $file_name
$path = $dir + «\» + $file_name
Write-Verbose » saving: $file_name»
$user_photo | Set-Content -Path $pathtmp -Encoding Byte -Force
ResizeImage $pathtmp $size $size $path
Remove-Item $pathtmp
#save the path in registry, overwrite existing entries
$name = [string]::format($reg_value_mask, $size)
$value = New-ItemProperty -Path $reg_key -Name $name -Value $path -Force
>
Write-Verbose «Done.»
> else
What does this script do? Generally, it exports the photo stored in the thumbnailPhoto attribute and saves it on your machine, in a specified folder (in this case: C:\ProgramData\AccountPictures\ ). You will notice that there will be eight JPG files stored in this folder, each of different size (from 32×32 px to 448×448 px), and name, specifying photo’s size (Image32.jpg, Image96.jpg, etc.). Additionally, new registry keys will be created under MACHINE\SOFTWARE\Microsoft\Windows\CurrentVersion\AccountPicture\Users\ in the Windows registry, with paths to these photos.
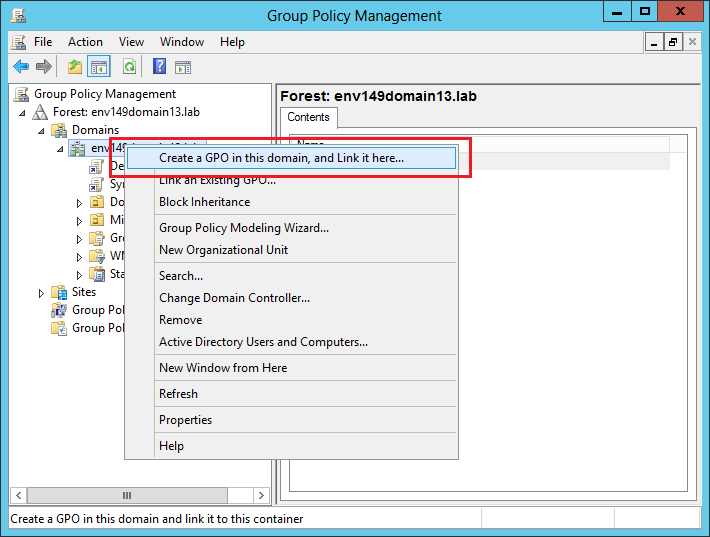
To create a new GPO, open Group Policy Management console (if you can’t find it, follow these steps to install it), find your domain in the console tree, right-click it and select Create a GPO in this domain, and Link it here.
Provide any name you want and click OK. A new GPO will appear under Group Policy Objects.

Adding a logoff script to GPO
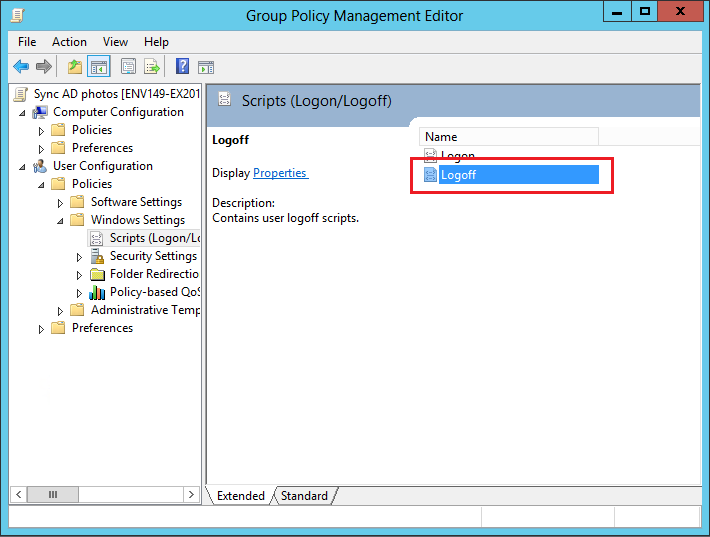
Right-click this GPO and choose Edit. The Group Policy Management Editor window will open. Navigate to User Configuration > Policies > Windows Settings > Scripts (Logon/Logoff), and then double-click Logoff in the right pane.
In the Logoff Properties window, go to the PowerShell Scripts tab. Click Add > Browse and point to the PS1 script file in the %logonserver%\netlogon path. Leave the Script Parameters field empty.
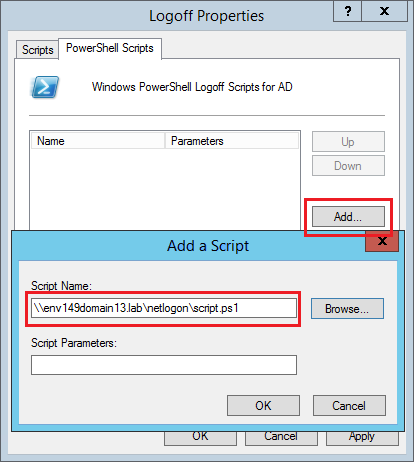
When done, just click OK two times.
And this should do the trick. The next time a user logs off from any machine in this domain and logs in again, the account picture should update automatically. However, this will only work if users in your domain have local administrative privileges assigned. If not, there is one more thing you need to do. And it also involves GPO.

Adding registry key permissions in GPO
Remember the registry key mentioned before? The key MACHINE\SOFTWARE\Microsoft\Windows\CurrentVersion\AccountPicture\Users is where the information about the account picture is stored. Users cannot change their account pictures unless they are granted Full Control permission to that key. This can also be done via GPO. You can even use the same one you’ve created to run the logoff script.
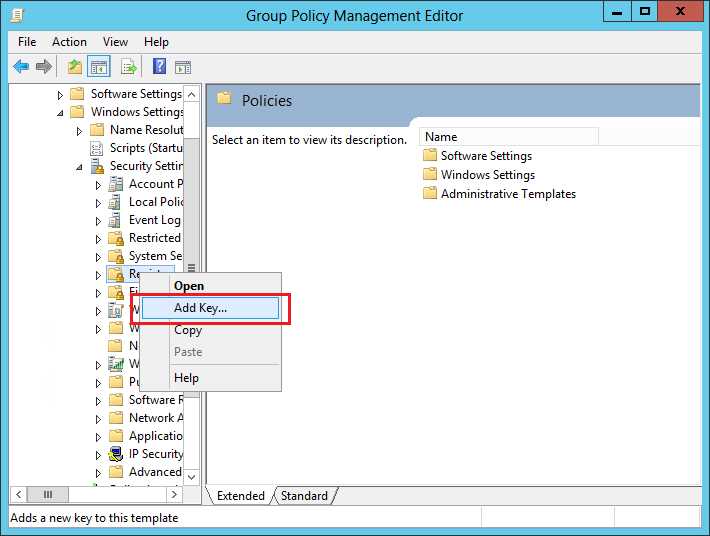
Back in the Group Policy Management Editor, go to Computer Configuration > Policies > Windows Settings > Security Settings, right-click the Registry node and select Add Key.
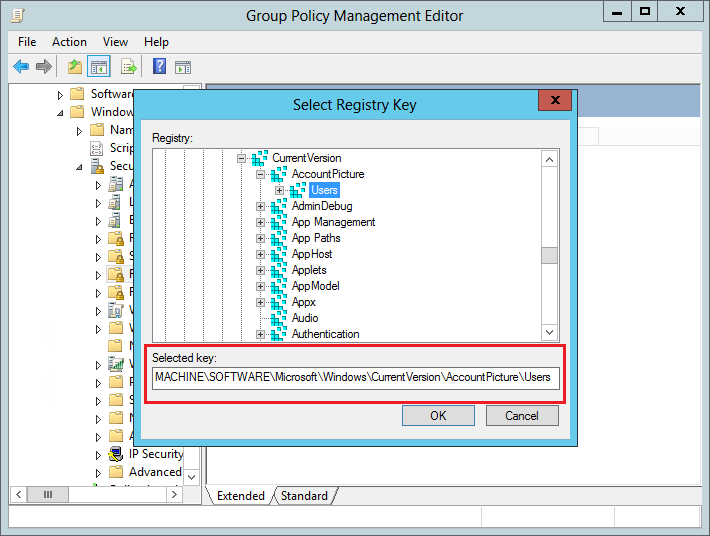
Navigate to MACHINE\SOFTWARE\Microsoft\Windows\CurrentVersion\AccountPicture\Users (or just copy this key and paste it under the Selected key field) and click OK.
Select Users under Group or user names and tick the Allow checkbox next to Full Control.
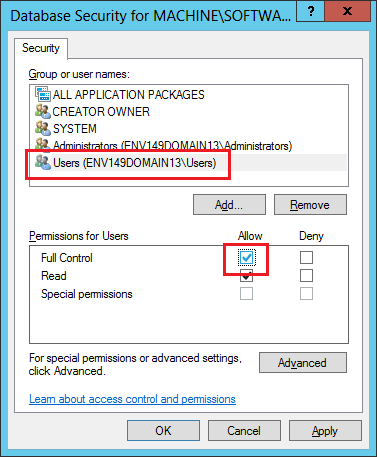
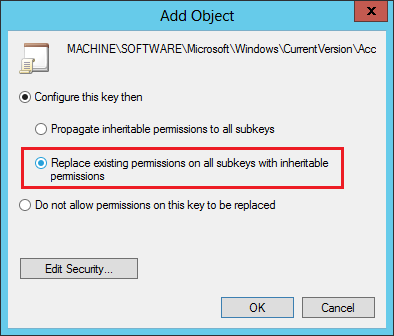
Once you click OK, another window will open. Select the Replace existing permissions on all subkeys with inheritable permissions option and click OK.
Now, it may take some time for the GPO to make the change in the Registry Editor – it is usually also required to restart the client machine. But once a non-admin user has full access to the registry key in question, and once they sign out and in again, their profile picture should be updated.
But there is one more thing CodeTwo Active Directory Photos can do for you. Once you have deployed the logoff script, it will be executed every time a user logs off (until you delete this GPO). Thanks to that, you can use this free tool to quickly change user photos in the Active Directory, and the account pictures will also change automatically.
You can use this feature to, for example, change user photos for the upcoming holiday season or any important events affecting your company.
To sum up, using Active Directory user photos to personalize profile pictures in Windows 10 is quite an easy task that won’t take long to complete. Plus, as mentioned at the beginning of this article, these photos will also be used in programs like Skype or Outlook. Use this opportunity to personalize your email signatures as well!


