- Restart your Mac in macOS or Windows
- How to start up in macOS from Windows
- How to start up in Windows from macOS
- Learn more
- Move your data from a Windows PC to your Mac
- Before you begin
- Move your data
- How to move your information from a PC to your Mac
- After you move your data
- If you have issues moving your data
- What data can I transfer?
- Как настроить общий доступ к файлам на ПК с Windows 7/8/10 для macOS и наоборот с macOS на Windows
- Как настроить общий доступ файлов и папок ПК с Windows на Mac
- Как поделиться файлами с Mac на ПК
- Как делиться файлами через сторонний софт
Restart your Mac in macOS or Windows
After installing Microsoft Windows on your Mac, you can choose whether your Mac starts up in macOS or Windows.
How to start up in macOS from Windows
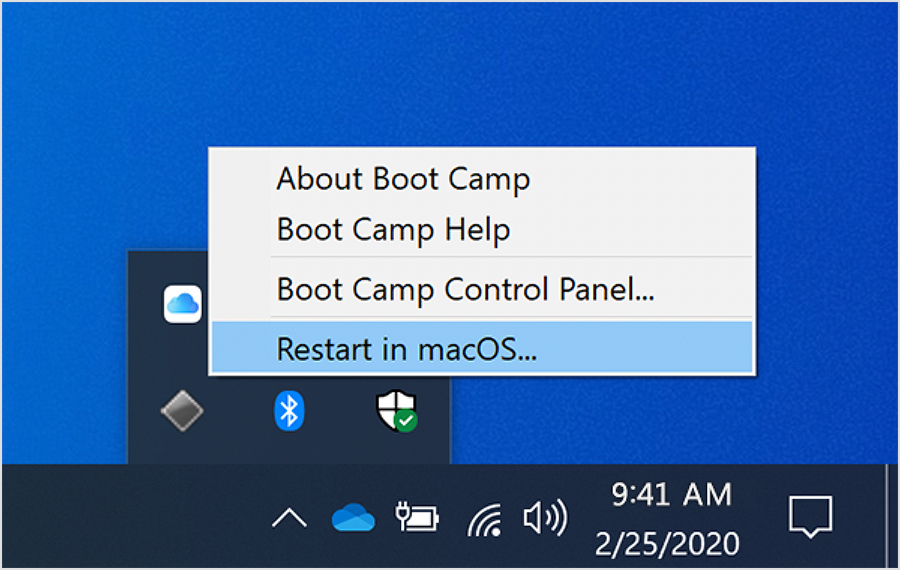
- From the notification area on the right side of the Windows taskbar, click to show hidden icons.
- Click the Boot Camp icon .
- From the menu shown, choose Restart in macOS.
If you haven’t installed the latest Boot Camp updates, you might get the message ”Could not locate the OS X boot volume.»
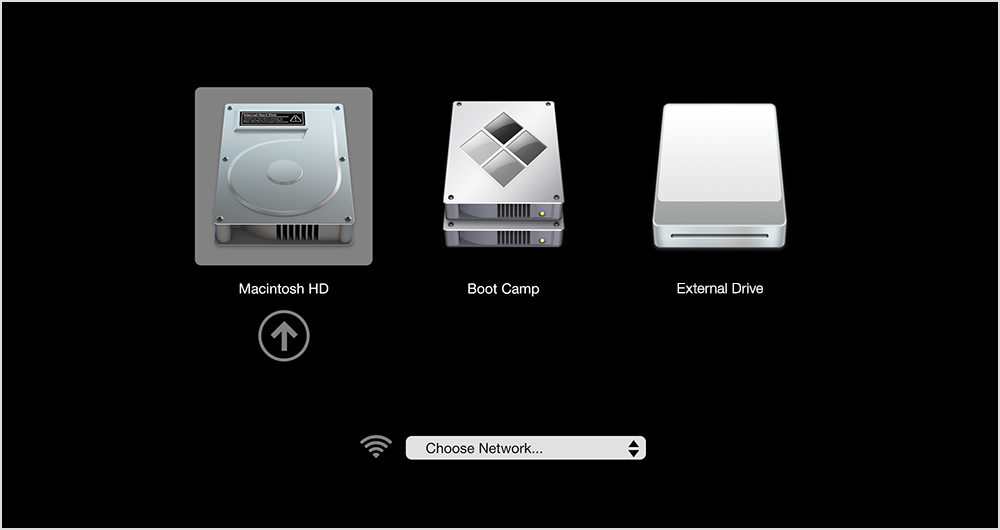
Or use Startup Manager as your Mac starts up:
- Restart your Mac from the Start menu in Windows.
- Press and hold the Option (or Alt) ⌥ key as your Mac begins to restart.
- Select your Mac startup volume (Macintosh HD) in the Startup Manager window, then press Return or click the up arrow:
How to start up in Windows from macOS
- Use Startup Manager to choose your Windows (Boot Camp) volume during startup.
- Or select your Boot Camp volume in Startup Disk preferences, then restart.
Learn more
- If you’re having difficulty using VoiceOver or another screen reader to complete these steps, please contact Apple Support.
- Learn how to install Windows 10 on your Mac.
Information about products not manufactured by Apple, or independent websites not controlled or tested by Apple, is provided without recommendation or endorsement. Apple assumes no responsibility with regard to the selection, performance, or use of third-party websites or products. Apple makes no representations regarding third-party website accuracy or reliability. Contact the vendor for additional information.
Move your data from a Windows PC to your Mac
Use Windows Migration Assistant to transfer your pictures, documents, and other data from a Windows PC to your Mac.
Windows Migration Assistant transfers your contacts, calendars, email accounts, and more from a PC. It migrates this data to the appropriate places on your Mac. After migrating data to your Mac, authorize your computer for iTunes Store purchases. It’s important to authorize before you sync or play content that you download from the iTunes Store.
If you’re migrating from one Mac to another Mac, follow the steps to move your content to a new Mac.
Before you begin
To prepare for a smooth migration:
- Make sure that Windows is up to date. Migration Assistant works with Windows 7 and later.
- Make sure that you know the name and password of an administrator account on your PC.
- Connect your Mac and PC to the same network, such as your home Wi-Fi network. Or connect an Ethernet cable between the ports on your Mac and PC to create a direct network connection. Some Mac models require an Ethernet adapter, such as the Belkin USB-C to Gigabit Ethernet Adapter or Apple Thunderbolt to Gigabit Ethernet Adapter.
- If you’re using Microsoft OneDrive on your PC, follow Microsoft’s instructions for uninstalling OneDrive before continuing. You can reinstall OneDrive after migration is complete.
Then use the check disk (chkdsk) utility on your PC to make sure that your Windows hard drive doesn’t have any issues:
- Right-click the Start button, then click Run.
- Type cmd and press Enter. Command Prompt opens.
- At the prompt, type chkdsk and press Enter.
- If the utility reports that it found problems, type the following, where drive is the letter that represents your Windows startup disk, such as D:
- Press Enter.
- At the prompt, type Y , then restart your PC.
- Repeat this process until the check disk utility reports no issues. If the utility can’t fix every issue that it finds, you might need to have your PC serviced. Then migrate your data to your Mac.
Move your data
This section guides you through migration, post-migration, and what to do if the steps don’t work for you.
How to move your information from a PC to your Mac
- On your PC, download and install the appropriate Windows Migration Assistant, based on the version of macOS on your Mac:
- Windows Migration Assistant for macOS Big Sur
- Windows Migration Assistant for macOS Mojave and macOS Catalina
- Windows Migration Assistant for macOS Sierra and High Sierra
- Windows Migration Assistant for OS X El Capitan or earlier
- Quit any open Windows apps.
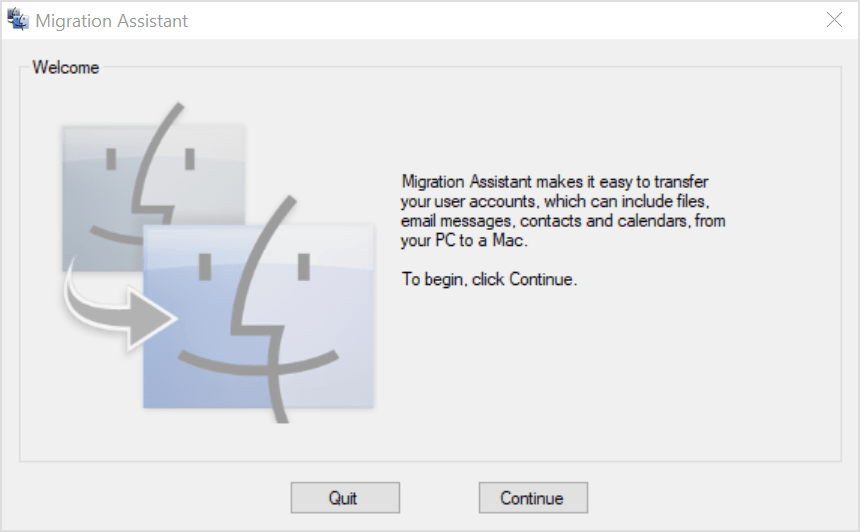
- Open Windows Migration Assistant, then click Continue.
- Start up your Mac. Setup Assistant automatically opens the first time you turn on your Mac. If you’ve already set up your Mac, open Migration Assistant, which is in the Utilities folder of your Applications folder.
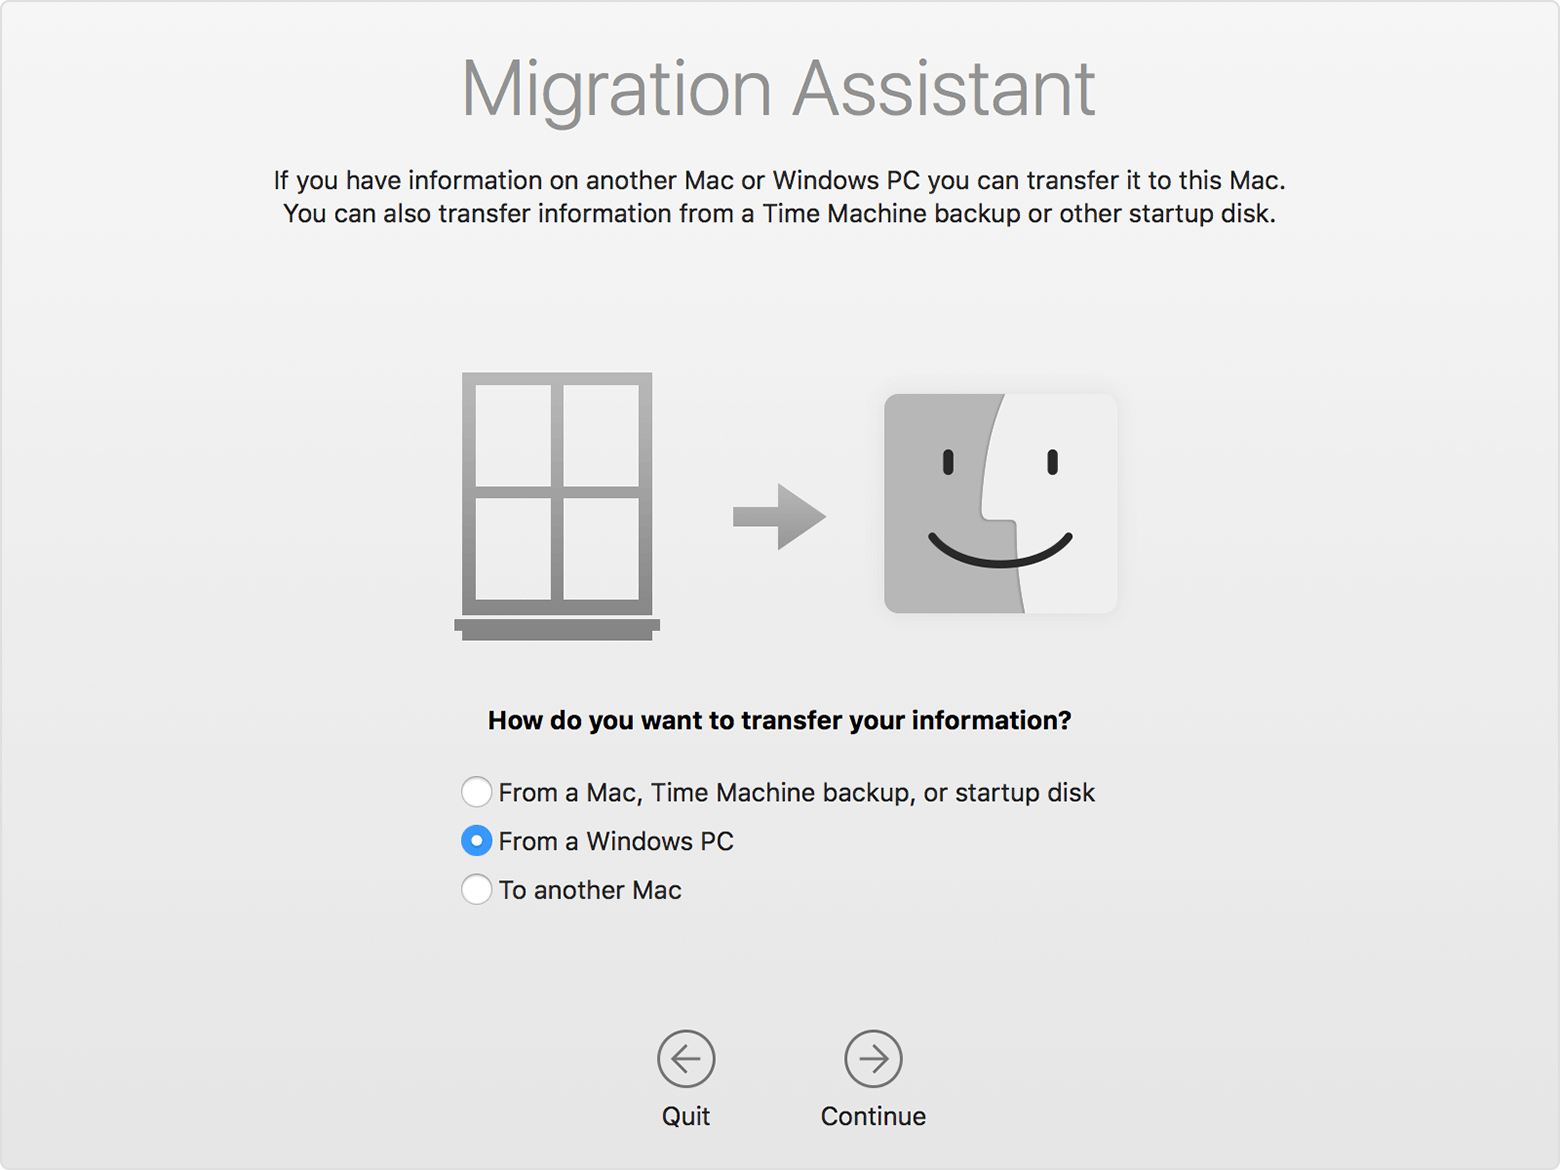
- On your Mac, follow the onscreen prompts until you get to the migration pane of the assistant. Select the option to transfer your information “From a Windows PC,” then click Continue.
- When prompted, enter an administrator name and password.
- Click Continue to close any other open apps.
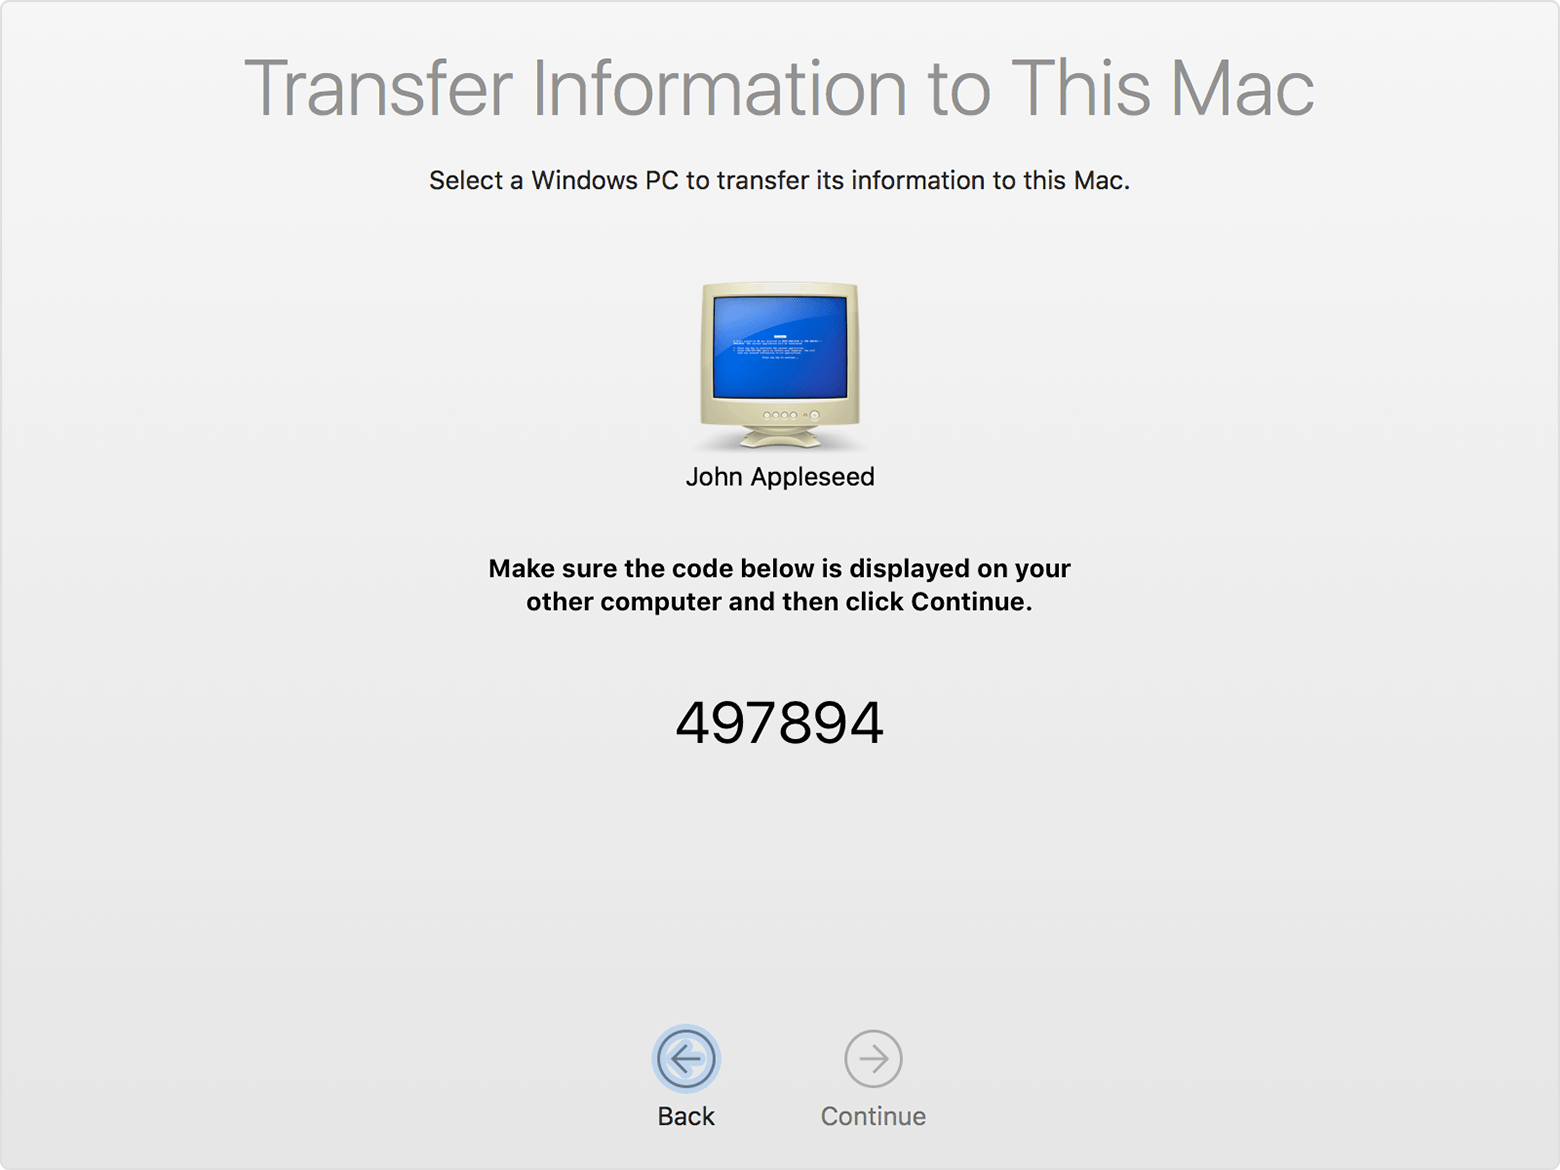
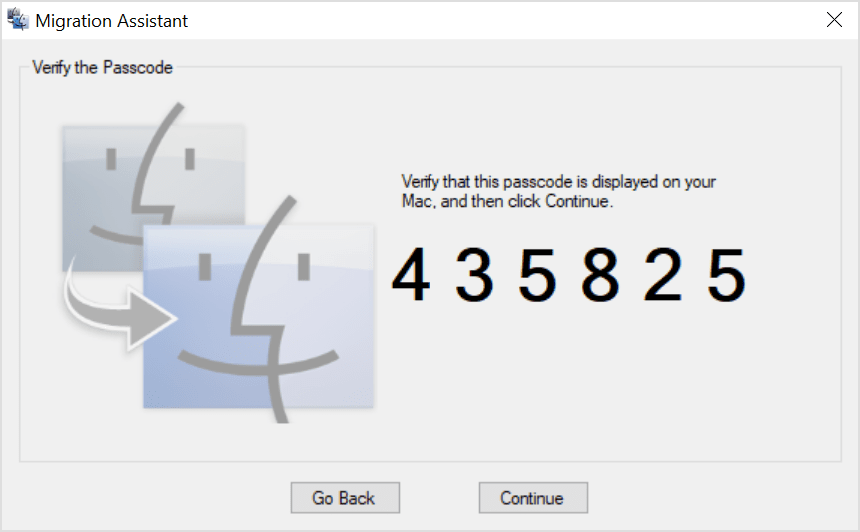
- In the migration window on your Mac, select your PC from the list of available computers. Then wait for the PC to show the same passcode that your Mac shows.
- When both computers display the same passcode, click Continue on your PC and Mac.
- Your Mac scans the drives on your PC to build a list of information to migrate. When the scan completes, select the information that you want to migrate to your Mac and click Continue. Learn about some of the data that you can transfer.
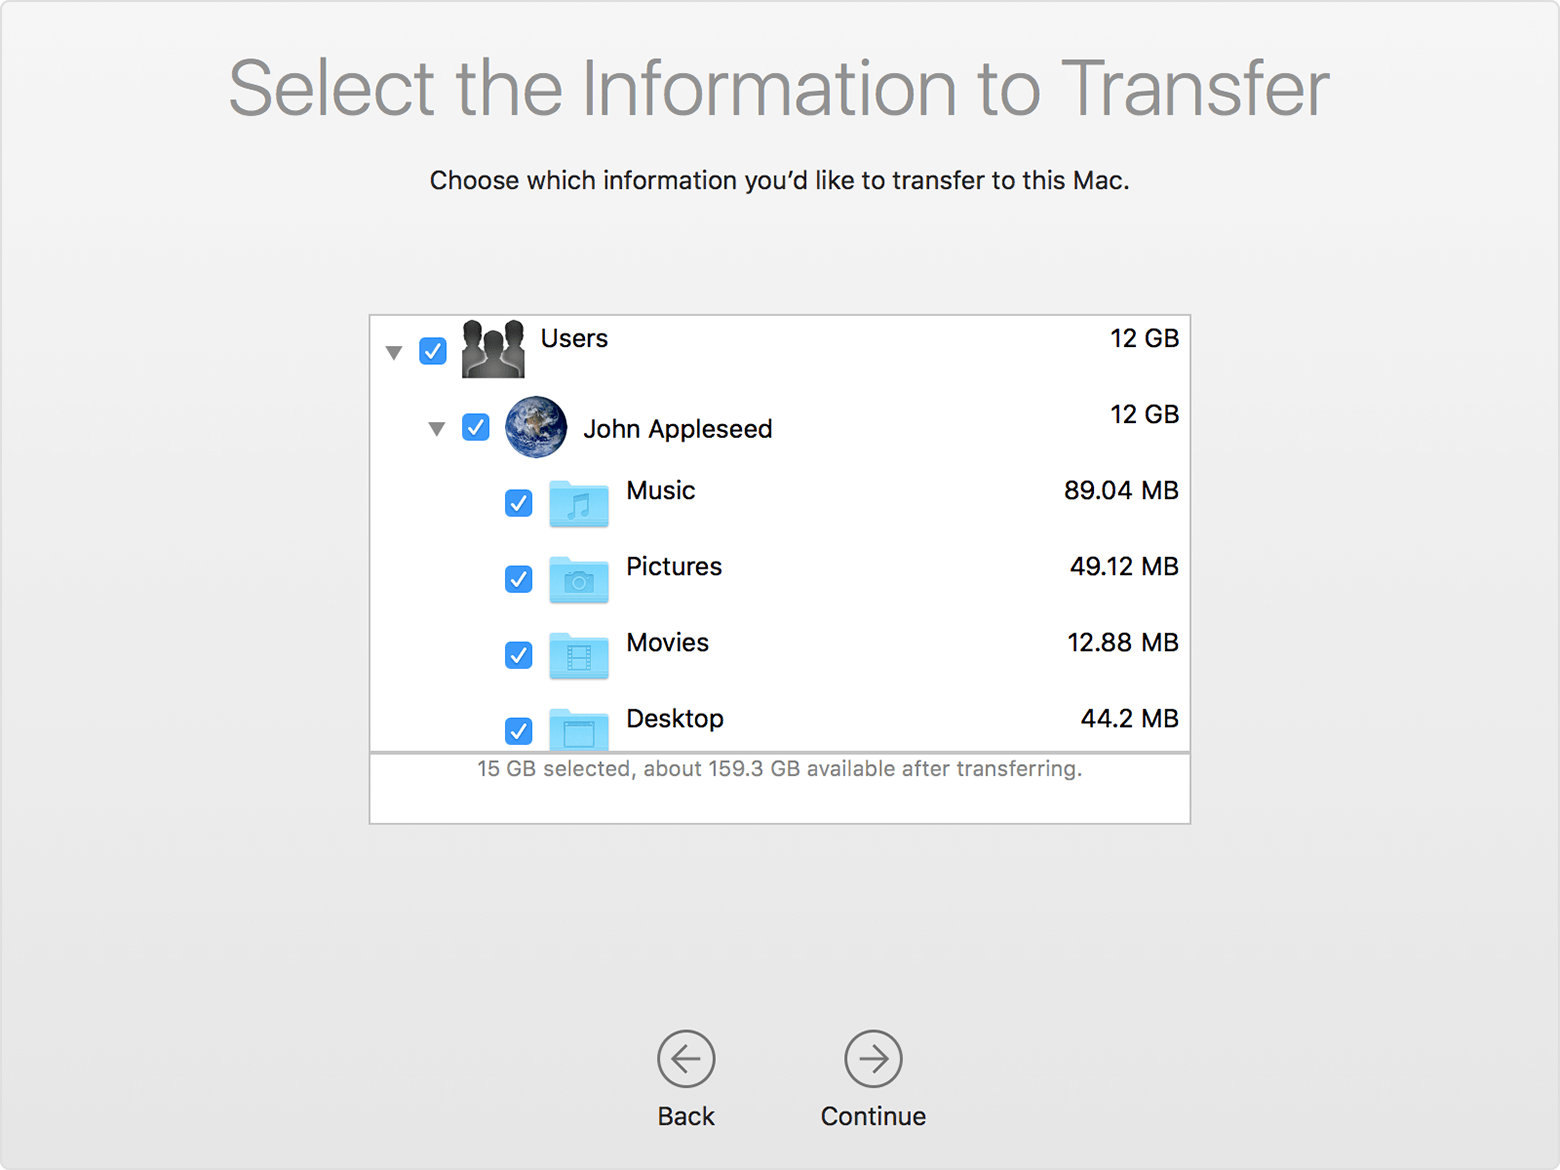
You can watch the progress and estimated time remaining on both the PC and your Mac. They tell you when migration is complete.
After you move your data
When migration completes, close Windows Migration Assistant on your PC. Then log in to the new user account on your Mac. The first time you log in to a user account migrated from your PC, you’re asked to set a password. You can use the same password that you used on your PC, or create a new password.
After logging in to the user account that you migrated, authorize your computer for iTunes Store purchases. It’s important to authorize before you sync or play content downloaded from the iTunes Store.
If you have issues moving your data
- Quit all open apps on your PC, then try migrating your content again. For example, you can press Alt-Tab to choose an open application, then press Alt-F4 to quit it.
- If your PC doesn’t appear in the Setup Assistant or Migration Assistant window on your Mac, make sure the computers are connected to the same network. You can create a network by connecting a single Ethernet cable between your Mac and PC. If that doesn’t help, check for firewall software on your PC and turn it off. After migration completes, you can turn firewall software on again.
- If Migration Assistant doesn’t open on your PC, turn off any antivirus software on your PC. Then try to open Migration Assistant again. After migration completes. You can turn that software on again.
- If you still can’t migrate your information successfully, you can use an external drive or file sharing to manually copy important data to your Mac.
What data can I transfer?
Migration Assistant lets you choose the data to move to your Mac. Here’s what moves over for specific apps and data types:
Email, contacts, and calendar information
Email messages, email-account settings, contacts, and appointments move based on which version of Windows you’re using and which accounts you have.
Outlook 1
Data from 32-bit versions of Outlook in Windows 7 and later move as follows:
- People move to Contacts 2
- Appointments move to the Calendar app
- IMAP and Exchange settings and messages move to the Mail app
- POP settings and messages move to Mail 2
Windows Live Mail
Data from Windows Live Mail in Windows 7 and later moves as follows:
- IMAP settings and messages move to Mail
- POP settings and messages move to Mail 2
Windows Mail
Data from Windows Mail in Windows 7 and later (excluding Windows 8) move as follows:
- IMAP settings and messages move to Mail
- POP settings and messages move to Mail 2
- People move to Contacts
Bookmarks
Bookmarks from Internet Explorer, Safari for Windows, and Firefox move to Safari.
System settings
Language and location settings, and custom desktop pictures move to System Preferences. Your web browser homepage moves to Safari preferences.
Pictures
Photos and other images move to your home folder. You can then add them to Photos, or open Photos and let it search your Mac for photos to import.
iTunes content
Migration Assistant transfers your iTunes media as follows: music to the Apple Music app, videos to the Apple TV app, podcasts to the Apple Podcasts app, and audiobooks to the Apple Books app.
Other files
Migration Assistant also moves these files:
- Files from the top-level folder of the currently logged-in user’s home directory
- Non-system files located in the Windows or Program Files folders
- Top-level folders located on the Windows system disk and other attached disks
1. Migration Assistant doesn’t support 64-bit versions of Outlook. You can manually migrate Mail, Contacts, or Calendars from Outlook 2013 or Outlook 2016 by signing in and entering the content on your Mac manually.
2. Migration Assistant transfers only the Mail or Contacts data that belongs to the logged-in Windows user. To transfer data from another user account, use Migration Assistant again while you’re logged in to another Windows account. Each time you migrate, your Mac creates a new user account.
Information about products not manufactured by Apple, or independent websites not controlled or tested by Apple, is provided without recommendation or endorsement. Apple assumes no responsibility with regard to the selection, performance, or use of third-party websites or products. Apple makes no representations regarding third-party website accuracy or reliability. Contact the vendor for additional information.
Как настроить общий доступ к файлам на ПК с Windows 7/8/10 для macOS и наоборот с macOS на Windows
Общие файлы на разных платформах звучит как сложная задача, но на самом деле это не так. Сегодня мы расскажем, как делиться файлами между ПК и Mac.
Для этого у вас должны быть установлены версии Windows 8.1 – 10 и OS X Yosemite – High Sierra. Инструкция должна сработать и с предыдущими, и с новыми версиями, но процесс может немного отличаться.
Как настроить общий доступ файлов и папок ПК с Windows на Mac
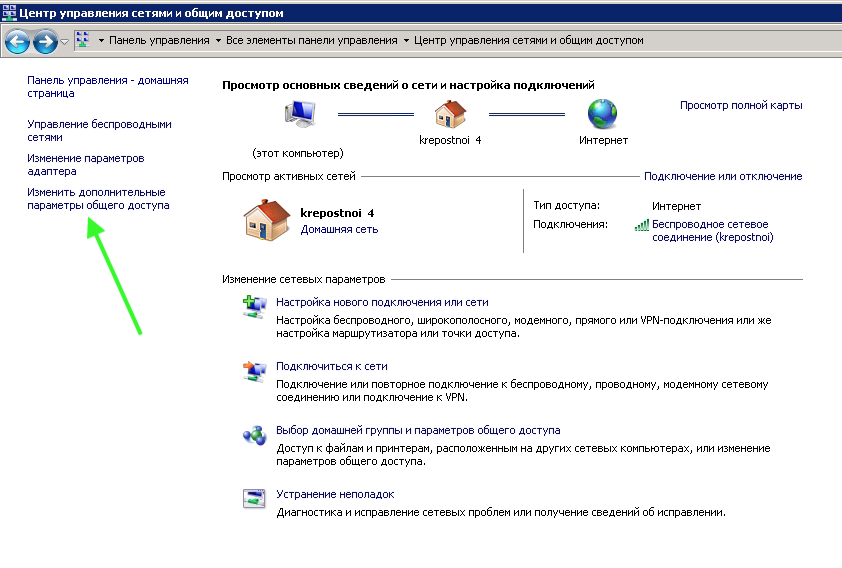
Всё очень просто, но сначала нужно включить общий доступ. Для этого откройте Панель управления, зайдите в пункт Сеть, а затем нажмите вверху окна «Центр управления сетями и общим доступом». После этого выберите дополнительные параметры и включите Общий доступ к файлам и принтерам для своей сети.

Самое сложное позади. Теперь на своём ПК с Windows нажмите правой кнопкой мыши на папку, которой хотите поделиться, и выберите пункт Общий доступ. Выберите группу пользователей, с которыми хотите поделиться файлами.


Здесь мы закончили, теперь берите свой Mac. Откройте Finder, и в меню слева перейдите в раздел “Сеть”.
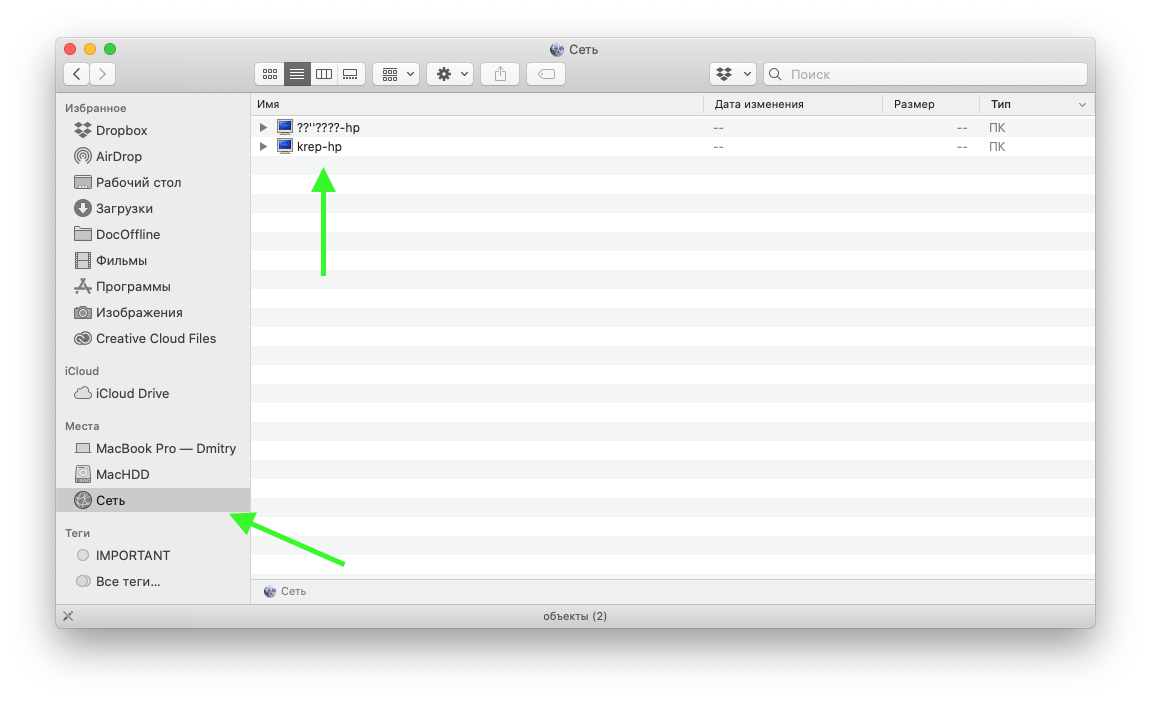
Здесь дважды щелкните по компьютеру, к файлам которого вы хотите получить общий доступ. Затем в правом верхнем углу нажмите “Подключиться как…”
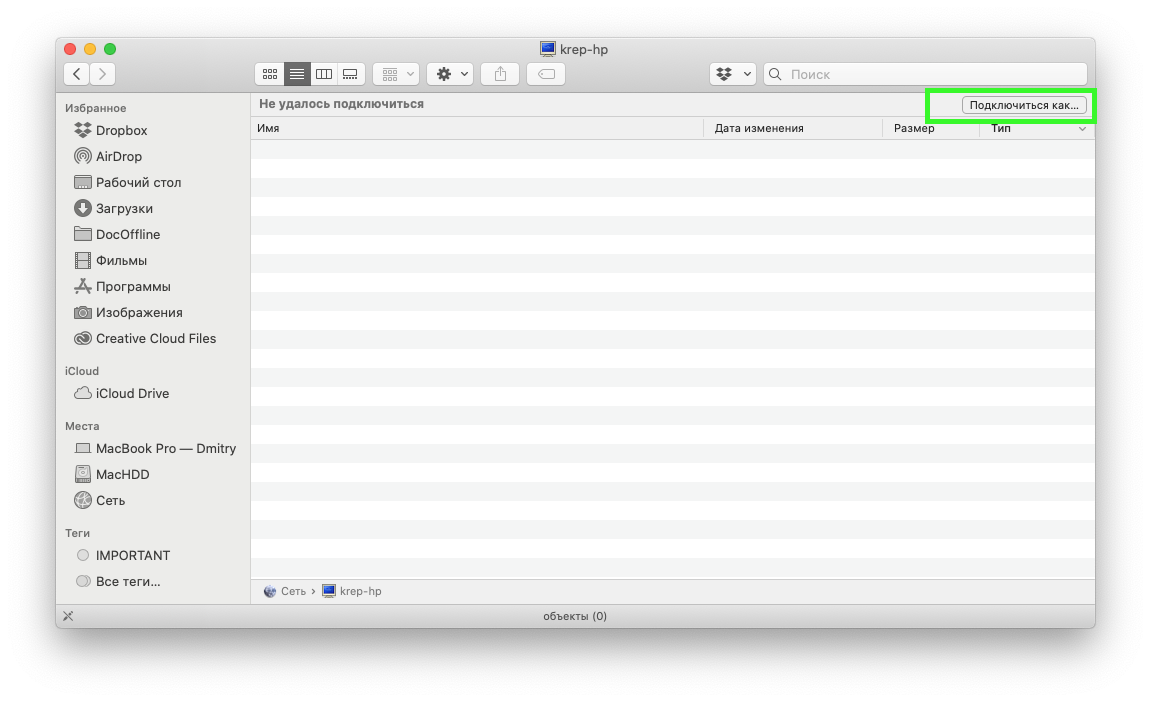
 Нажмите “Подключиться”

На следующем шаге введите имя пользователя Windows и пароль, либо если у вас активирован пользователь Гость на компьютере с Windows выберите его.
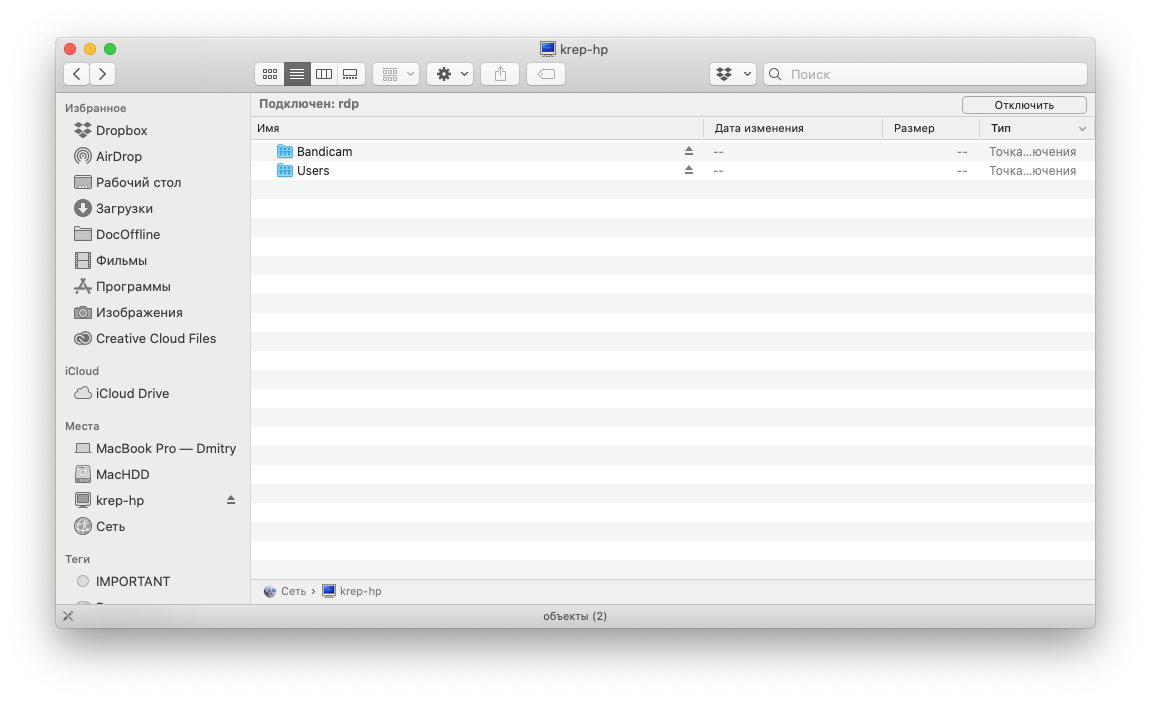
После этого вы можете начать использовать общие файлы. В следующий раз вам не понадобится заходить в раздел “Сеть”, сетевой компьютер теперь появился в левом меню как отдельный каталог.
Вы настроили общий доступ к файлам на ПК с Windows и открыли их на Mac. Теперь попробуем наоборот.
Как поделиться файлами с Mac на ПК
На своём Mac откройте Системные настройки и выберите Общий доступ.

Запомните название компьютера сверху окна и его IP-адрес, они вам пригодятся. Здесь же вы можете добавить любую папку, которую вы хотите сделать общей. Для этого под разделом “Общие папки” нажмите плюсик и выберите необходимый каталог.
Нажмите на галочку рядом с «Общий доступ к файлам», и функция будет активирована. Теперь выберите Параметры.

Убедитесь, что включен первый пункт – “Предоставить общий доступ к файлам и папкам с помощью SMB”. Также нужно включить доступ для Windows, поставив галочку возле учетной записи, через которую вы будете получать доступ к общим файлам, по умолчанию здесь будет ваша единственная учетная запись, но вы также можете активировать пользователя гость и подключаться к общей папке без ввода пароля.
Теперь идите к ПК с Windows и откройте на нём Мой компьютер. Там слева вы должны увидеть свой Mac.

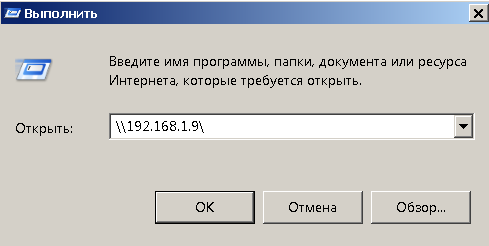
Если его там нет, то перейдите в меню «Пуск» и в поиске наберите «Выполнить» или нажмите Windows + R на рабочем столе Windows
- Введите IP-адрес Mac в формате “\192.168.1.9” или наберите “\” и вам будет предложено выбрать название вашего Mac, нажмите «ОК».
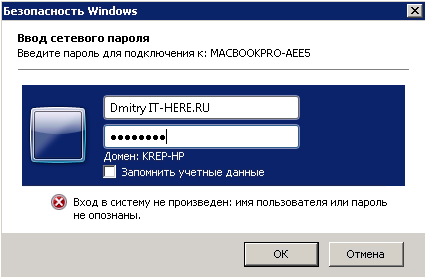
- Введите пользователя macOS и пароль, затем нажмите «ОК».
На этом всё, у вас есть доступ к файлам.
Обратите внимание! Если компьютер Windows находится в рабочей группе, а не в домене, то возможно перед названием пользователя нужно будет добавить обратный слэш – “”.
То есть нужно будет вводить User. Если вы входите под пользователем гостя и получаете ошибку аутентификации, то попробуйте ввести Guest, вместо Гость. Пароль для гостя вводить не нужно.
Как делиться файлами через сторонний софт
Если вы не хотите настраивать общие файлы в системе, есть другие варианты. К примеру, программа Dukto позволяет локально делиться файлами между двумя любыми компьютерами.
Установите её на свой Mac и ПК с Windows и сможете быстро отправлять файлы с одного компьютера на другой. Помимо этой программы есть ещё множество подобных.
Большинство пользователей предпочитает синхронизацию файлов через BitTorrent. Программа позволяет синхронизировать целые папки на разных платформах, и компьютеры даже не должны быть подключены к одной сети.
Если вы уже настроили общий доступ к папкам Windows и Mac, то вы также можете подключиться к ним с вашего iPhone через программу Файлы.


