- Windows User Home Folders
- Namespaces
- Page actions
- Contents
- Introduction
- Setting up the Share on the Samba File Server
- Using Windows ACLs
- Using POSIX ACLs
- Creating the Home Folder for a New User
- Using Windows ACLs
- Using POSIX ACLs
- Assigning a Home Folder to a User
- In an Active Directory
- Using Active Directory Users and Computers
- Using a Group Policy Preference
- Using ldbedit on a Domain Controller
- In an NT4 Domain
- In a Non-domain Environment
- Using a Windows Professional or Higher Edition
- Using Windows Home Edition
- Где находится папка Users в Windows 10 путь зачем она нужна?
- Зачем нужна данная папочка?
- Назначение данной папки
- Место нахождения этой папочки
- Папка «Пользователи» исчезла, как такое может быть?
Windows User Home Folders
Namespaces
Page actions
Contents
Introduction
Home folders contain files of an individual account. Using Samba, you can share the directories to enable network users to store own files on their home folder on the file server.
This documentation does not use the Samba built-in [homes] section that dynamically shares the user’s home directory using the \\server\user_name\ path. While this can be helpful in certain scenarios, it has some disadvantages:
- Windows does not support this feature, and certain settings, such as folder redirection in an Active Directory (AD), require a workaround instead and you cannot use the official solution.
- You must create each new user’s home directory manually.
- Whilst The [homes] feature is supported on a Samba Active Directory (AD) domain controller (DC), it will not work for Windows users home directories. It will work for Unix home directories, but this setup is not shown here.
In the following, the directory containing the home folders are shared using the users share name. Each user’s home directory is created as a subdirectory on the \\server\users\ share, such as, \\server\users\user_name . This is the same format used in a Microsoft Windows environment and requires no additional work to set up.
Setting up the Share on the Samba File Server
Using Windows ACLs
Setting extended access control lists (ACL) on the share that hosts home directories enables you to create new users in the Active Directory Users and Computers application without manually creating the user’s home folder and setting permissions.
To create a share, for example, users for hosting the user home folders on a Samba file server:
- Create a new share. For details, see Setting up a Share Using Windows ACLs. Set the following permissions:
- Share permissions:
| Principal | Access |
|---|---|
| Domain Users | Change |
| Domain Admins | Full Control |
- File system permissions on the root of the users share:
| Principal | Access | Applies to |
|---|---|---|
| Domain Users* | Read & execute | This folder only |
| CREATOR OWNER | Full control | Subfolders and files only |
| Domain Admins | Full control | This folder, subfolders and files |
* You can alternatively set other groups, to enable the group members to store their user profile on the share. When using different groups, apply the permissions as displayed for Domain Users in the previous example. Verify that permission inheritance is disabled on the root of the share. If any permission entry in the Advanced Security Settings window displays a path in the Inherited from column, click the Disable inheritance button. On Windows 7, unselect the Include inheritable permissions from this object’s parent check box to set the same setting. 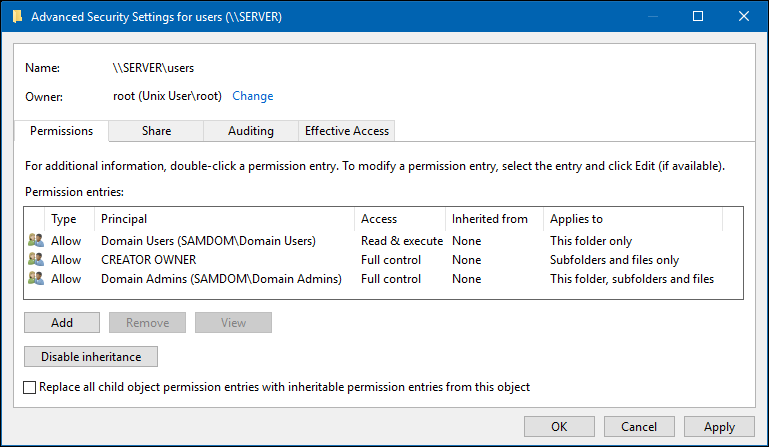 On a Samba share, you can omit the SYSTEM account in the file system ACLs. For details, see The SYSTEM Account.
These settings enable members of the Domain Admins group to set the user home folder in the Active Directory Users and Computers application, that automatically creates the home folder and sets the correct permissions.
Using POSIX ACLs
Instead of using Windows access control lists (ACL), you can set up a share using POSIX ACLs on your Samba server. However, when using POSIX ACL to set permissions, you must create the home directory for each new user manually and set permissions.
| When setting up the share on a Samba Active Directory (AD) domain controller (DC), you cannot use POSIX ACLs. On an Samba DC, only shares using extended ACLs are supported. For further details, see Enable Extended ACL Support in the smb.conf File. To set up the share on a Samba AD DC, see Setting up the Home Folder Share on the Samba File Server — Using Windows ACLs. |
For example, to create the users share:
- Add the following share configuration section to your smb.conf file:
For details about the parameters used, see the descriptions in the smb.conf(5) man page. Do not use homes as name of the share. For further details, see Introduction.
- Create the directory and set the correct permissions:
In a domain, the Domain Users group is a group, all domain user accounts are member of. Alternatively, or if you are running a non-domain environment, you can set it to any group that exists locally. However, user accounts must be member of this group to access the share.
- Reload Samba:
Creating the Home Folder for a New User
Using Windows ACLs
If you are using the Active Directory Users and Computers application, the user’s home directory is automatically created and the correct permissions applied when you set the path to the user folder in the application.
If you are not using Active Directory Users and Computers , you must create the folder manually and set the correct permissions. For example:
- Log in to a Windows machine using an account that has permissions to create new folders on the \\server\users\ share.
- Navigate to the \\server\users\ share.
- Create a new home folder for the user.
- Add the user to the access control list (ACL) of the folder and grant Full control to the user. For details, see Setting ACLs on a Folder.
Using POSIX ACLs
When you set up the users share using POSIX access control lists (ACL), you must create the home folder for each new user manually. To create the home folder for the demo user:
- Create the directory:
- Set the following permissions to only enable the demo user to access the directory:
Assigning a Home Folder to a User
In an Active Directory
Using Active Directory Users and Computers
In an Active Directory, you can use the Active Directory Users and Computers Windows application to set the path to the user home folder and the assigned drive letter. If you do not have the Remote Server Administration Tools (RSAT) installed, see Installing RSAT.
To assign the \\server\users\demo\ path as home folder to the demo account:
- Log in to a computer using an account that is able to edit user accounts.
- Open the Active Directory Users and Computers application.
- Navigate to the directory container that contains the demo account.
- Right-click to the demo user account and select Properties .
- Select the Profile tab.
- Select Connect , the drive letter Windows assigns the mapped home folder to, and enter the path to the home folder into the To field.
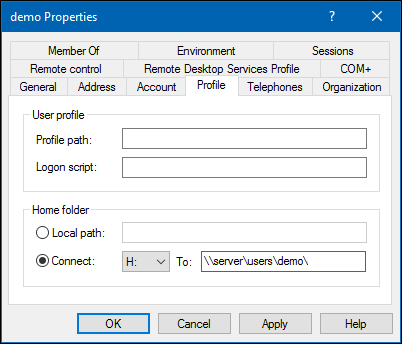 .
.
- Click OK .
If a warning is displayed when saving the settings that the home folder was not created:
- the permissions on the users share were incorrectly set when you set up the share using Windows access control lists (ACL). To fix the problem, set the permissions described in Using Windows ACLs.
- you set up the share using POSIX ACL. To fix the problem, create the directory manually. See Creating the Home Folder for a New User — Using POSIX ACLs.
Using a Group Policy Preference
Using group policy preferences, you can assign settings to organizational units (OU) or to a domain. This enables you, for example, to automatically assign home folder paths to all users in the OU or domain. If you move the account to a different OU or domain, the setting is removed or updated. Using this way, you do not have to assign manually the setting to each user account.
To create a group policy object (GPO) for the domain that automatically assigns the \\server\users\user_name path as home folder to each user:
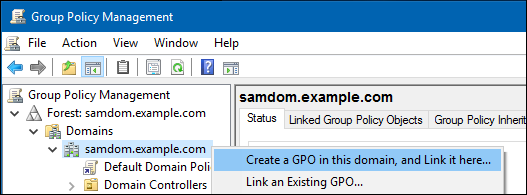
- Log in to a computer using an account that is allowed you to edit group policies, such as the AD domain Administrator account.
- Open the Group Policy Management Console . If you are not having the Remote Server Administration Tools (RSAT) installed on this computer, see Installing RSAT.
- Right-click to your AD domain and select Create a GPO in this domain, and Link it here .
- Enter a name for the GPO, such as Home folders on server . The new GPO is shown below the domain entry.
- Right-click to the newly-created GPO and select Edit to open the Group Policy Management Editor .
- Navigate to the User Configuration → Preferences → Windows Settings → Drive Maps entry.
- Right-click to the Drive Maps entry and select New → Mapped Drive .
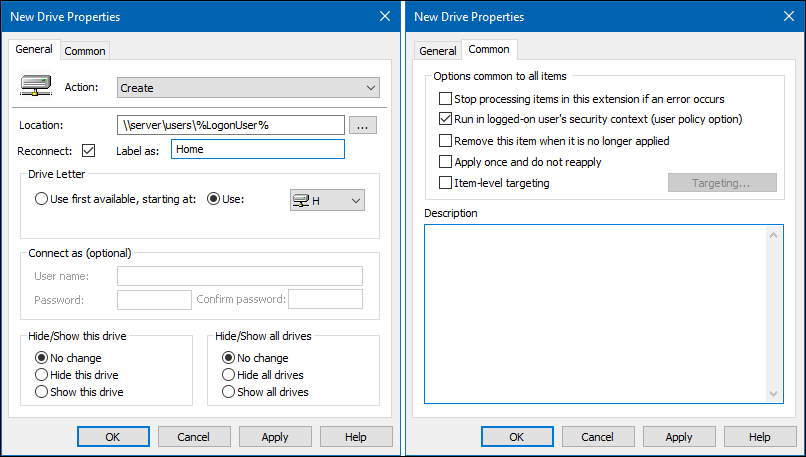
- Set the following:
- On the General tab:
- Action: Create
- Location: \\server\users\%LogonUser%
Windows automatically replaces the %LogonUser% variable when a user logs in
- Select Reconnect
- Label: Enter a string. For example: Home
- Use: Select a drive letter the home folder is mapped to.
- On the Common tab:
- Select Run in logged-on user’s security context (user policy option)
- Click OK .
- Close the Group Policy Management Editor . The GPOs are automatically saved on the Sysvol share on the domain controller (DC).
- Close the Group Policy Management Console .
The policy is applied to users in the OU or domain, the policy is assigned to, during the next log in.
Using ldbedit on a Domain Controller
On a domain controller (DC), for example, to assign the \\server\users\demo path as home folder to the demo account and set the assigned drive letter to H:
- Edit the demo user account:
- The accounts attributes are displayed in an editor. Append the following attributes and values to the end of the list:
- Save the changes.
The setting is applied the next time the user logs in.
In an NT4 Domain
In an Samba NT4 domain, to set \\server\users\%U as path to the home folder and to map the drive to the H: drive letter:
- Add the following parameters to the [global] section in your smb.conf file:
During logging in to the domain member, Samba automatically replaces the %U variable with the session user name. For further details, see the Variable Substitutions section in the smb.conf(5) man page.
- Reload Samba:
In a Non-domain Environment
Using a Windows Professional or Higher Edition
If your Samba server and clients are not part of a domain, set the user home folder mapping in the local user account’s properties:
- Log on to the Windows machine using an account that is member of the local Administrators group.
- Open the lusrmgr.msc (Local User and Groups) application.
The lusrmgr.msc application is not available in Windows Home editions.
- Click Users in the navigation on the left side.
- Right-click the account you want to assign a home folder to, and select Properties
- Navigate to the Profile tab.
- Select Connect , the drive letter Windows assigns the mapped home folder to, and enter the path to the home folder into the To field.
- Click OK .
You must set the mapping for each user on every Windows client manually.
Using Windows Home Edition
Windows Home editions do not provide the necessary application to set the user home folder mapping in the local account properties. Instead each user must map the drive manually:
- Log on to the Windows machine as the user that should get the home folder mapped
- Open a command prompt.
- For example, to map the \\server\users\demo\ folder to the H: drive letter, enter:
The user home folder is automatically connected when the user logs in. To stop the automatic mapping, disconnect the drive. For example:
Где находится папка Users в Windows 10 путь зачем она нужна?

Добрый день, друзья. Чтобы настроить часть параметров в ОС Виндовс 10 человеку нужен доступ к элементам системы. Отсюда, человек должен знать, где находится папка Users в Windows 10 и как её можно найти? Также, желательно понять, зачем она необходима, её суть.
Зачем нужна данная папочка?
Папка, которая называется Users (что по-английски значит «Пользователи») является частью каталога внутренних папок ОС Windows 10.
Назначение данной папки

- Возникает на автомате сразу за тем, как человек авторизовался в системе;
- В ней содержатся такие папочки, как «Program Files», «Администратор» и «Общие»;
- Папочка «Администратор» системы Виндовс включает в себя такие папочки, как «AppData», «Рабочий стол», «Загрузки» и «Документы».
Запомните: с большинством из данных папок есть возможность заниматься различными манипуляциями, вроде переноса, копирования, изменения имени. Но, с папочкой «Program Files» такие действия недопустимы, так как это чревато разнообразными сбоями и ошибками.
В папочке «Users» находятся данные про аккаунт пользователя – как он использует браузер, по каким сайтам путешествует, различные параметры, производимые пользователем профиля в процессе функционирования компьютера.
Место нахождения этой папочки
Если вы хотите узнать данные, которые хранятся в этом каталоге Users, нужно точно знать, где она находится. Разумеется, на системном диске С. Адрес – С:\Users (может называться «Пользователи»). Есть несколько вариантов, используя которые вы сможете отыскать эту папку и взять из неё нужные данные:
- Разумеется, открыв «Проводник» и выбрав системный диск С. На данном диске нужно внимательно просмотреть все папки, и вы её найдёте (у меня она называется по-русски «Пользователи»);

- Применив строку поиска (расположена рядышком с кнопкой «Пуск».
Разумеется, до того, как внести свои поправки в папку «Пользователи», нужно знать, чем чревато её изменение или даже её перенос:
- Том, в который вы планируете перенести папочку Users, должен иметь формат NTFS;
- Не стоит как-то корректировать или переносить папочку, если она содержит информацию об иной ОС;
- Если вы создали аккаунт до настоящей ОС, в этом случае часть ссылок может элементарно перестать функционировать при переносе папки.
Я имею в виду ссылки, которые вы создали ещё до системы Vista (хотя сомнительно, что вы их содержите). По большей части ссылок из Висты у пользователей нет.
Папка «Пользователи» исчезла, как такое может быть?
Бывает такое, люди замечают, что данная папка исчезает и её на видно в привычном месте. Так происходит довольно часто. Если этой папочки нет на привычном месте, значит система сделала её «Скрытой». Убрать элемент скрытности можно самому, без посторонней помощи специалиста. Давайте рассмотрим, как её найти (данные шаги подходят для ОС Windows 7, 8.1, 10):
- Входим через «Проводник» на системный диск;
- Затем выбираем меню «Вид»;
- Далее справа нужно выбрать ярлык «Параметры»;
- После этого у нас откроется отдельное окно, где нам следует выбрать меню «Вид». Затем, прокрутить бегунок вниз.
- Внизу нужно убрать галочку от строки «Скрывать защищенные системные…» и поставить чикбокс над строкой «Показывать скрытые файлы…». Затем нажимаем «Применить» и ОК;
- Теперь можно войти в «Проводник» и посмотреть, появилась папочка, или нет?
- Затем, нам нужно пройти по знакомому адресу, и мы видим, что папочка «Пользователи» находится на прежнем месте.
Есть и более быстрый способ открыть скрытые элементы:
- Нужно просто нажать на кнопочки Win+R и в появившееся окошко вписать «%appdata%» без кавычек. Затем, нажимаем ОК.
Эффект будет таким же, как через «Проводник», но более быстрым.
Вывод: как вы видите, понять, где находится папка Users в Windows 10 довольно просто. Советую поступать с данной папкой осторожнее. Ведь недаром система сделала её «Скрытой»? Успехов!


