- Как восстановить содержимое файла Hosts по умолчанию
- Аннотация
- Что такое файл Hosts?
- Решение
- How To Block Websites On Windows Using The Hosts File
- What Is The Hosts File?
- How Does The Hosts File Work?
- Blocking Websites With The Hosts File
- Is The Website Blocked?
- I Don’t Want to See an Error Page
- What Else Can I Do With The Hosts File?
Как восстановить содержимое файла Hosts по умолчанию
Аннотация
Рекомендации, приведенные в этой статье, позволяют вернуть содержимое файла hosts к используемому по умолчанию.
Что такое файл Hosts?
Файл hosts используется операционной системой для сопоставления удобных для человека имен узлов с номерами IP-адресов, которые определяют и обнаруживают узел в IP-сети. Файл hosts — это один из нескольких системных ресурсов, которые связаны с сетевыми узлами в компьютерной сети, и является общей частью реализации IP-адреса операционной системы.
Файл hosts содержит текстовые строки, которые состоят из IP-адреса, указанного в текстовом поле, и одного или нескольких имен узлов. Каждое поле отделено пробелом (по историческим причинам часто предпочтение отдают знакам табуляции, но пробелы также используются). Файл также может включать строки с примечаниями, обозначенные символом #, который ставится в начале каждой такой строки. Пустые строки в файле игнорируются.
Если файл Hosts изменяется с по умолчанию, сброс может помочь устранить некоторые проблемы подключения.
Решение
Чтобы восстановить параметры файла Hosts по умолчанию, выполните указанные ниже действия в зависимости от используемой версии операционной системы.
Чтобы восстановить параметры файла hosts по умолчанию, выполните указанные ниже действия.
Откройте приложение «Блокнот». Для этого выполните поиск «Блокнота» с помощью Cortana, а затем коснитесь или щелкните значок «Блокнот».
Скопируйте приведенный ниже текст и вставьте его в файл: # Copyright (c) 1993-2006 Microsoft Corp. # # This is a sample HOSTS file used by Microsoft TCP/IP for Windows. # # This file contains the mappings of IP addresses to host names. Each # entry should be kept on an individual line. The IP address should # be placed in the first column followed by the corresponding host name. # The IP address and the host name should be separated by at least one # space. # # Additionally, comments (such as these) may be inserted on individual # lines or following the machine name denoted by a ‘#’ symbol. # # For example: # # 102.54.94.97 rhino.acme.com # source server # 38.25.63.10 x.acme.com # x client host # localhost name resolution is handle within DNS itself. # 127.0.0.1 localhost # ::1 localhost
В меню Файл выберите команду Сохранить как, введите «hosts» в поле Имя файла (как показано на рисунке ниже) и сохраните файл на рабочий стол. 
Закройте приложение «Блокнот».
Найдите %WinDir%\System32\Drivers\Etc с помощью Cortana, а затем выберите значок папки «Файл ».
Коснитесь и удерживайте файл Hosts (или щелкните на нем правой кнопкой мыщи), выберите команду Переименовать и присвойте файлу имя «Hosts.old».
Скопируйте или переместите файл Hosts, созданный на этапе 3, с рабочего стола в папку %WinDir%\System32\Drivers\Etc. Если система предложит ввести пароль администратора, нажмите кнопку Продолжить.
Чтобы восстановить параметры файла hosts по умолчанию, выполните указанные ниже действия.
Откройте приложение «Блокнот». Для этого проведите пальцем от правого края экрана, коснитесь элемента Поиск, введите запрос Блокнот и коснитесь значка Блокнот. Если вы используете мышь, наведите указатель на правый верхний угол экрана, переместите его вниз и щелкните кнопку Поиск, введите запрос Блокнот и щелкните значок Блокнот.
Скопируйте приведенный ниже текст и вставьте его в файл: # Copyright (c) 1993-2006 Microsoft Corp. # # This is a sample HOSTS file used by Microsoft TCP/IP for Windows. # # This file contains the mappings of IP addresses to host names. Each # entry should be kept on an individual line. The IP address should # be placed in the first column followed by the corresponding host name. # The IP address and the host name should be separated by at least one # space. # # Additionally, comments (such as these) may be inserted on individual # lines or following the machine name denoted by a ‘#’ symbol. # # For example: # # 102.54.94.97 rhino.acme.com # source server # 38.25.63.10 x.acme.com # x client host # localhost name resolution is handle within DNS itself. # 127.0.0.1 localhost # ::1 localhost
В меню Файл выберите команду Сохранить как, введите «hosts» в поле Имя файла (как показано на рисунке ниже) и сохраните файл на рабочий стол. 
Закройте приложение «Блокнот».
Откройте папку %WinDir%\System32\Drivers\Etc. Для этого выполните следующие действия:
Проведите пальцем от правого края экрана, коснитесь кнопки Поиск, введите слово выполнить, а затем коснитесь значка Выполнить. Если вы используете мышь, наведите указатель на правый верхний угол экрана, переместите его вниз, щелкните Поиск, введите выполнить и щелкните значок Выполнить.
В поле Открыть введите команду %WinDir%\System32\Drivers\Etc и нажмите кнопку ОК.
Выберите файл Hosts, выберите команду Переименовать и присвойте файлу имя «Hosts.old».
Скопируйте или переместите файл Hosts, созданный на этапе 3, в папку %WinDir%\System32\Drivers\Etc. Если будет предложено ввести пароль администратора, нажмите или коснитесь кнопки Продолжить.
Чтобы самостоятельно восстановить параметры файла hosts до значений по умолчанию, сделайте следующее:
Нажмите кнопку Пуск, щелкните команду Выполнить, введите слово «Блокнот», а затем нажмите кнопку ОК.
Скопируйте в файл приведенный ниже текст.
Windows 7 # Copyright (c) 1993-2006 Microsoft Corp. # # This is a sample HOSTS file used by Microsoft TCP/IP for Windows. # # This file contains the mappings of IP addresses to host names. Each # entry should be kept on an individual line. The IP address should # be placed in the first column followed by the corresponding host name. # The IP address and the host name should be separated by at least one # space. # # Additionally, comments (such as these) may be inserted on individual # lines or following the machine name denoted by a ‘#’ symbol. # # For example: # # 102.54.94.97 rhino.acme.com # source server # 38.25.63.10 x.acme.com # x client host # localhost name resolution is handle within DNS itself. # 127.0.0.1 localhost # ::1 localhost Windows Vista или Windows Server 2008 # Copyright (c) 1993-2006 Microsoft Corp. # # This is a sample HOSTS file used by Microsoft TCP/IP for Windows. # # This file contains the mappings of IP addresses to host names. Each # entry should be kept on an individual line. The IP address should # be placed in the first column followed by the corresponding host name. # The IP address and the host name should be separated by at least one # space. # # Additionally, comments (such as these) may be inserted on individual # lines or following the machine name denoted by a ‘#’ symbol. # # For example: # # 102.54.94.97 rhino.acme.com # source server # 38.25.63.10 x.acme.com # x client host 127.0.0.1 localhost ::1 localhost Windows XP или Windows Server 2003 # Copyright (c) 1993-1999 Microsoft Corp. # # This is a sample HOSTS file used by Microsoft TCP/IP for Windows. # # This file contains the mappings of IP addresses to host names. Each # entry should be kept on an individual line. The IP address should # be placed in the first column followed by the corresponding host name. # The IP address and the host name should be separated by at least one # space. # # Additionally, comments (such as these) may be inserted on individual # lines or following the machine name denoted by a ‘#’ symbol. # # For example: # # 102.54.94.97 rhino.acme.com # source server # 38.25.63.10 x.acme.com # x client host 127.0.0.1 localhost
В меню Файл выберите команду Сохранить как, введите «hosts» в поле Имя файла, а затем сохраните файл на рабочий стол.
Нажмите кнопку Пуск и выберите элемент Выполнить, введите команду %WinDir%\System32\Drivers\Etc и нажмите кнопку ОК.
Выберите файл hosts и переименуйте его в hosts.old.
Скопируйте или переместите файл Hosts, созданный на этапе 3, в папку %WinDir%\System32\Drivers\Etc. Если система предложит ввести пароль администратора, нажмите кнопку Продолжить.
Поддержка Windows XP прекращена
Корпорация Майкрософт прекратила поддержку Windows XP с 8 апреля 2014 г. Это могло повлиять на безопасность и своевременную установку обновлений для вашего программного обеспечения. Что это значит и как обеспечить защиту.
Поддержка Windows Server 2003 завершилась 14 июля 2015 г.
Поддержка Windows Server 2003 завершилась 14 июля 2015 г. Это могло повлиять на безопасность и своевременную установку обновлений для вашего программного обеспечения. Что это значит и как обеспечить защиту.
How To Block Websites On Windows Using The Hosts File
Protect your kids, stop trackers, eliminate distractions
Why would you want to know how to block websites? Maybe you want to keep your kids safe on the Internet? Maybe you want to block distracting websites so you don’t procrastinate? It can also be used to block tracking sites that are embedded in ads.
Whatever your reason, you can simply block websites on Windows 10 using something called the hosts file.

The text below can get a bit technical, especially if you have never gotten into the nuts and bolts of Windows system files. If you want a quick overview, be sure to check out our short and easy to follow YouTube video first.
What Is The Hosts File?
Have you heard the term DNS (Domain Name System)? It refers to a system of files distributed around the Internet that help resolve domain names like helpdeskgeek.com into its actual Internet Protocol (IP) address which happens to be 13.225.198.106. That helps your computer know what server to talk to when you want to view this site.

Before DNS came into being in 1984, this was done through a local file on your computer called the hosts file. Back then computers weren’t connected to many other computers. At most, we may have connected to a few dozen. It was easy to keep all that information in a plain old text file. The host file lives on today.
How Does The Hosts File Work?
The hosts file allows the computer to look up other computer names, like localhost, or domain names, like helpdeskgeek.com and the IP number for them is right beside the name in the file. It’s a bit like how your friends’ names are associated with their phone numbers in your phone. You don’t need to remember or punch in the number, just find the person’s name.
Before we go further it’s important to understand that some IP addresses are reserved for local use. That means that they can only be used to point to your computer and devices within your immediate network. That means anything before your communication connects to the Internet.

For example, the IP address 127.0.0.1 always means the computer you’re working on, also known as localhost. Try typing that in your web browser. It will likely bring up a blank page.
Also understand that www.website.com and website.com are not the exact same thing. For both of them to take us to the same website both must resolve to the same IP address.
Blocking Websites With The Hosts File
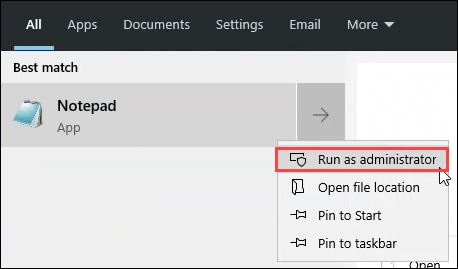
- Open Notepad as Administrator.
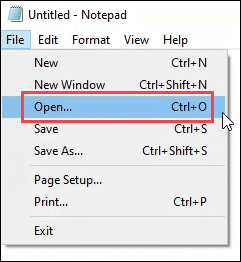
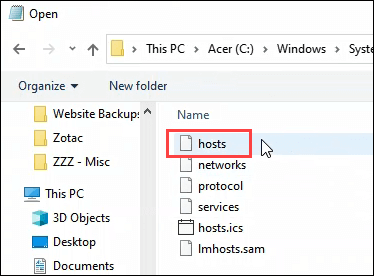
- Click on File >Open.
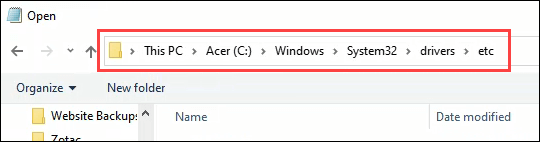
- Navigate to C:\Windows\System32\Drivers\etc
- Once there, change file type from Text Documents (*.txt) to All Files (*.*).
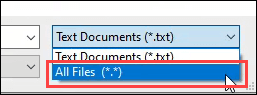
- Now you can see the hosts file. Open it.
- Go to the last line of the page and add your own line. Let’s say we’re blocking Facebook.

Enter the localhost IP of 127.0.0.1. Press the tab key and enter facebook.com. Press Enter to go to the next line. Create a second line like the one above, but use www.facebook.com instead of just facebook.com.

Is The Website Blocked?
Open the command prompt and run ping facebook.com then run ping www.facebook.com. You should see that the IP address it’s trying to ping is 127.0.0.1.

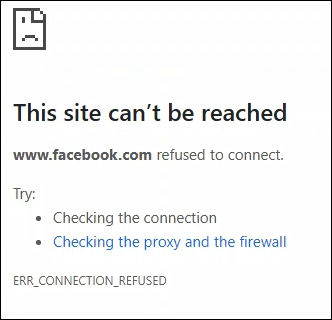
Now open your web browser and go to facebook.com. It might still load! Why? Facebook’s real IP may still be sitting in the browser cache and the browser will use that IP first. Delete your browser’s cache and try Facebook again. You should now see an error page.
I Don’t Want to See an Error Page
You could try redirecting the site to another IP address, but these days that won’t work well. Maliciously editing the hosts file used to be a common attack by hackers. Now, web browsers check carefully for certificates to prevent this. But, you can still try.

Another way to not see an error page is to install and set up a web server on your computer and have the hosts file point to that. Maybe have it display a page that says, “Get back to work!” or lists some of your goals as motivation to stay off social media.
What Else Can I Do With The Hosts File?
You can use the same technique but paste in the URLs of various malware and tracking ad sites. There is a pre–made hosts file of malware and ad sites that you can copy and paste into your hosts file. As of writing this, it was last updated in March, 2020.
Guy has been published online and in print newspapers, nominated for writing awards, and cited in scholarly papers due to his ability to speak tech to anyone, but still prefers analog watches. Read Guy’s Full Bio


