- Panes in Windows Terminal
- Creating a new pane
- Using the keyboard
- Using the new tab button and dropdown menu
- Switching between panes
- Resizing a pane
- Closing a pane
- Customizing panes using key bindings
- Duplicating a pane
- Zooming a pane
- Marking a pane as read-only
- New terminal arguments
- screen view — vertical to horizontal
- FIX: Vertical or horizontal lines messing up the screen
- How can I fix the vertical lines on my PC monitor?
- 1. Update your graphics driver
- DriverFix
- 2. Check your screen resolution display settings
- Run a System Scan to discover potential errors
- 3. Downgrade the video card driver to an older version
- 4. Use Display Quality Troubleshooter
- 5. Check whether the vertical lines appear in the BIOS
- 6. Perform a clean boot
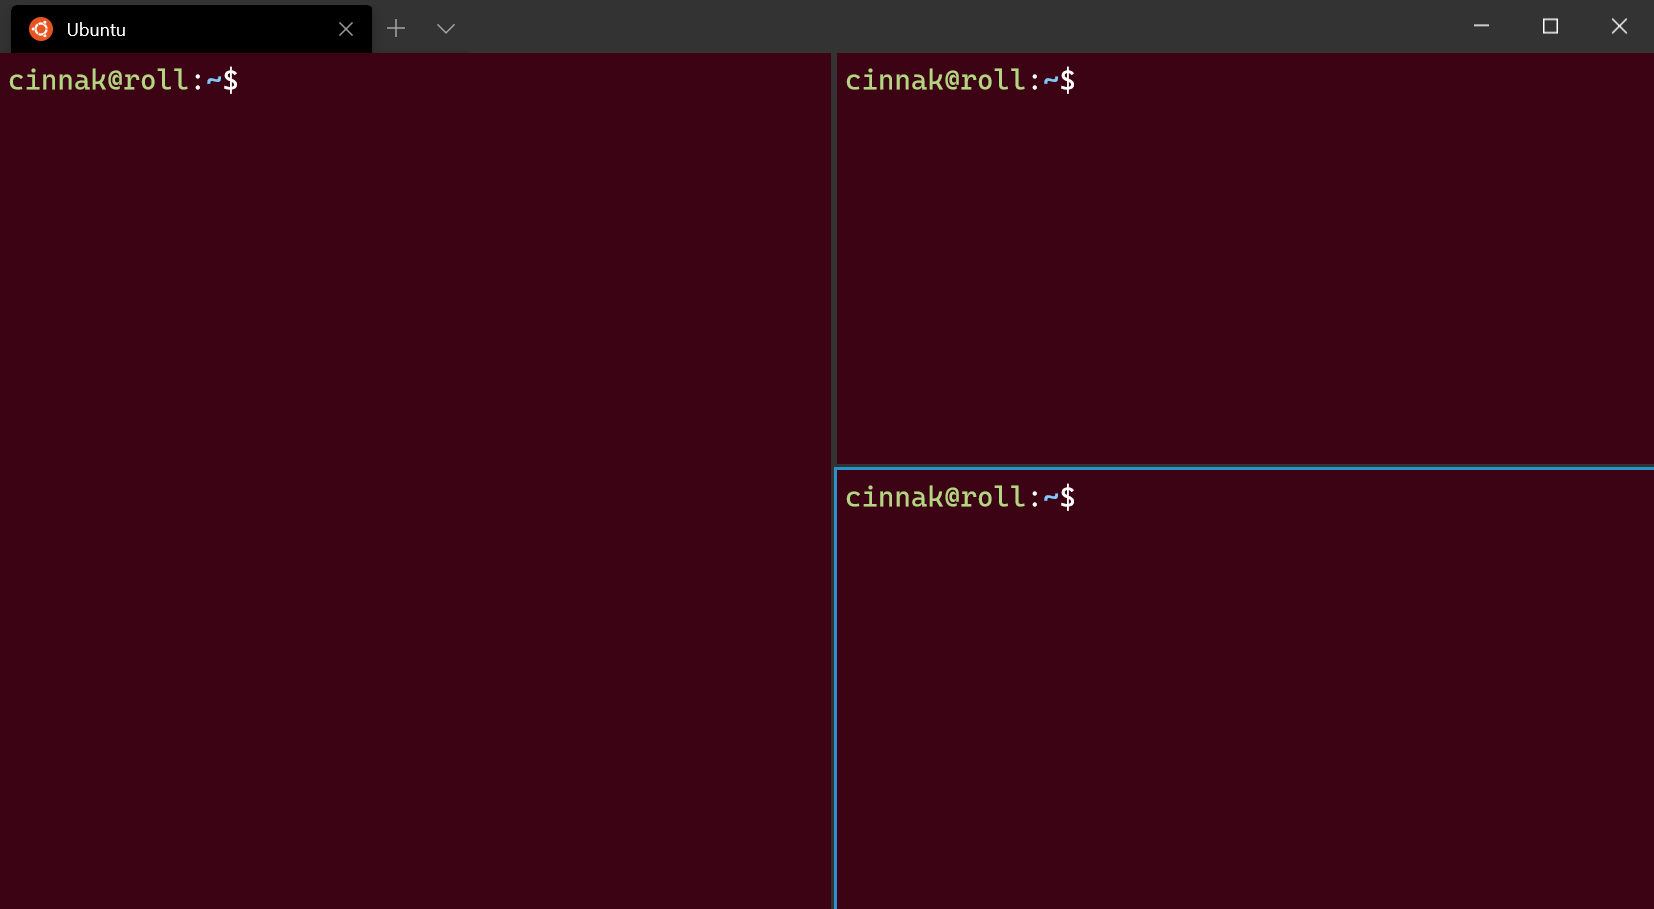
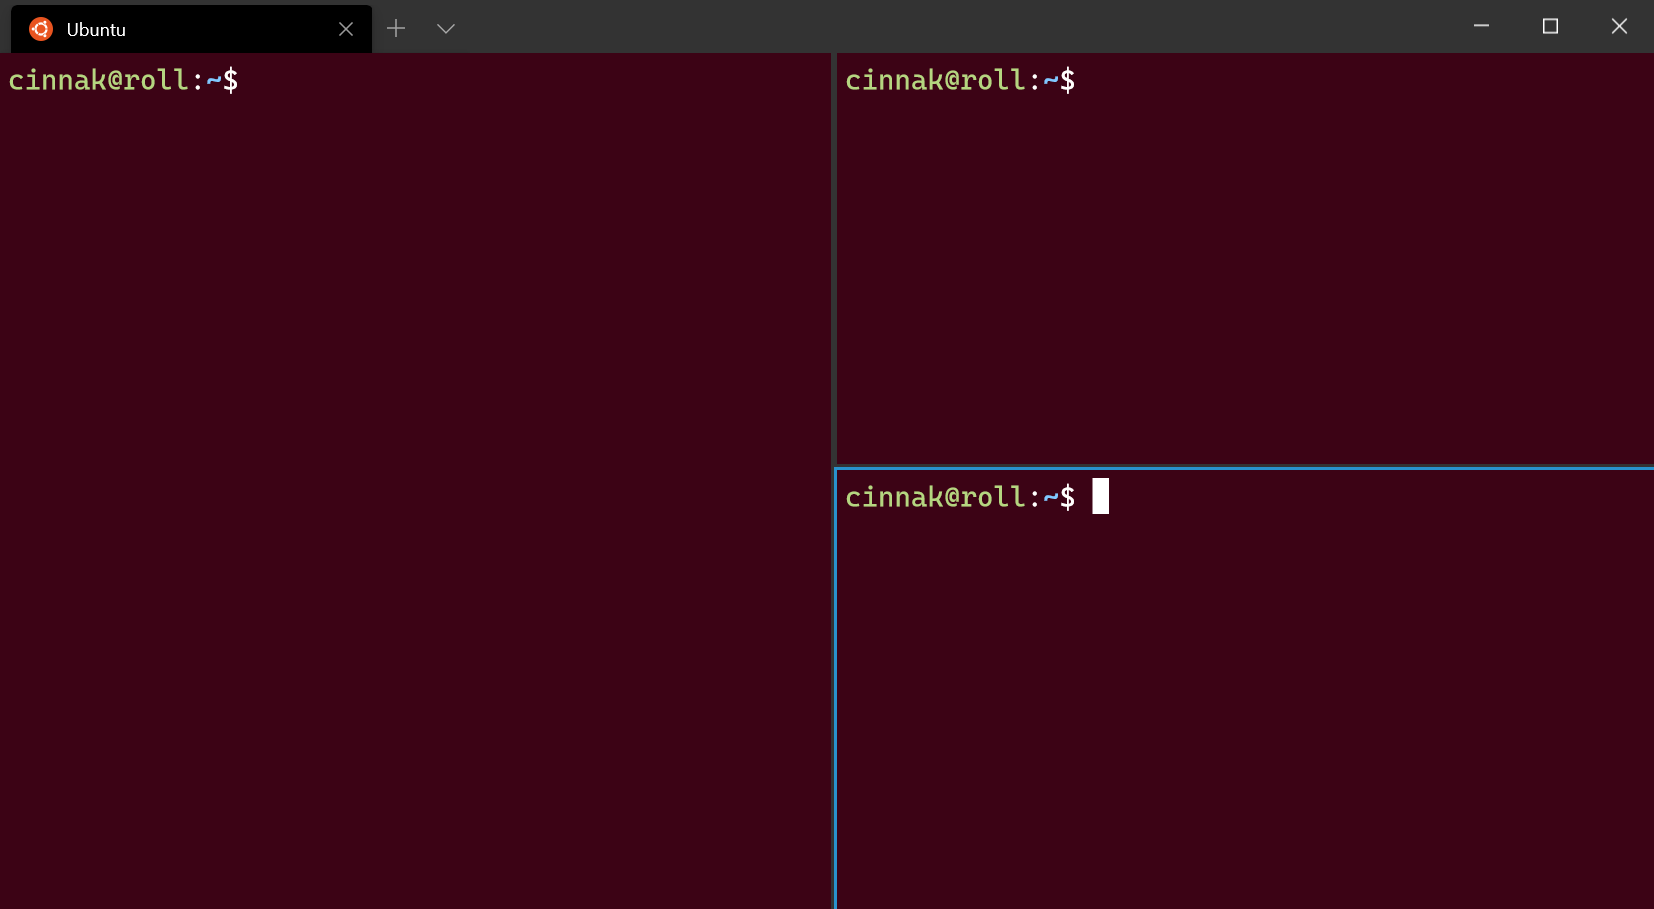
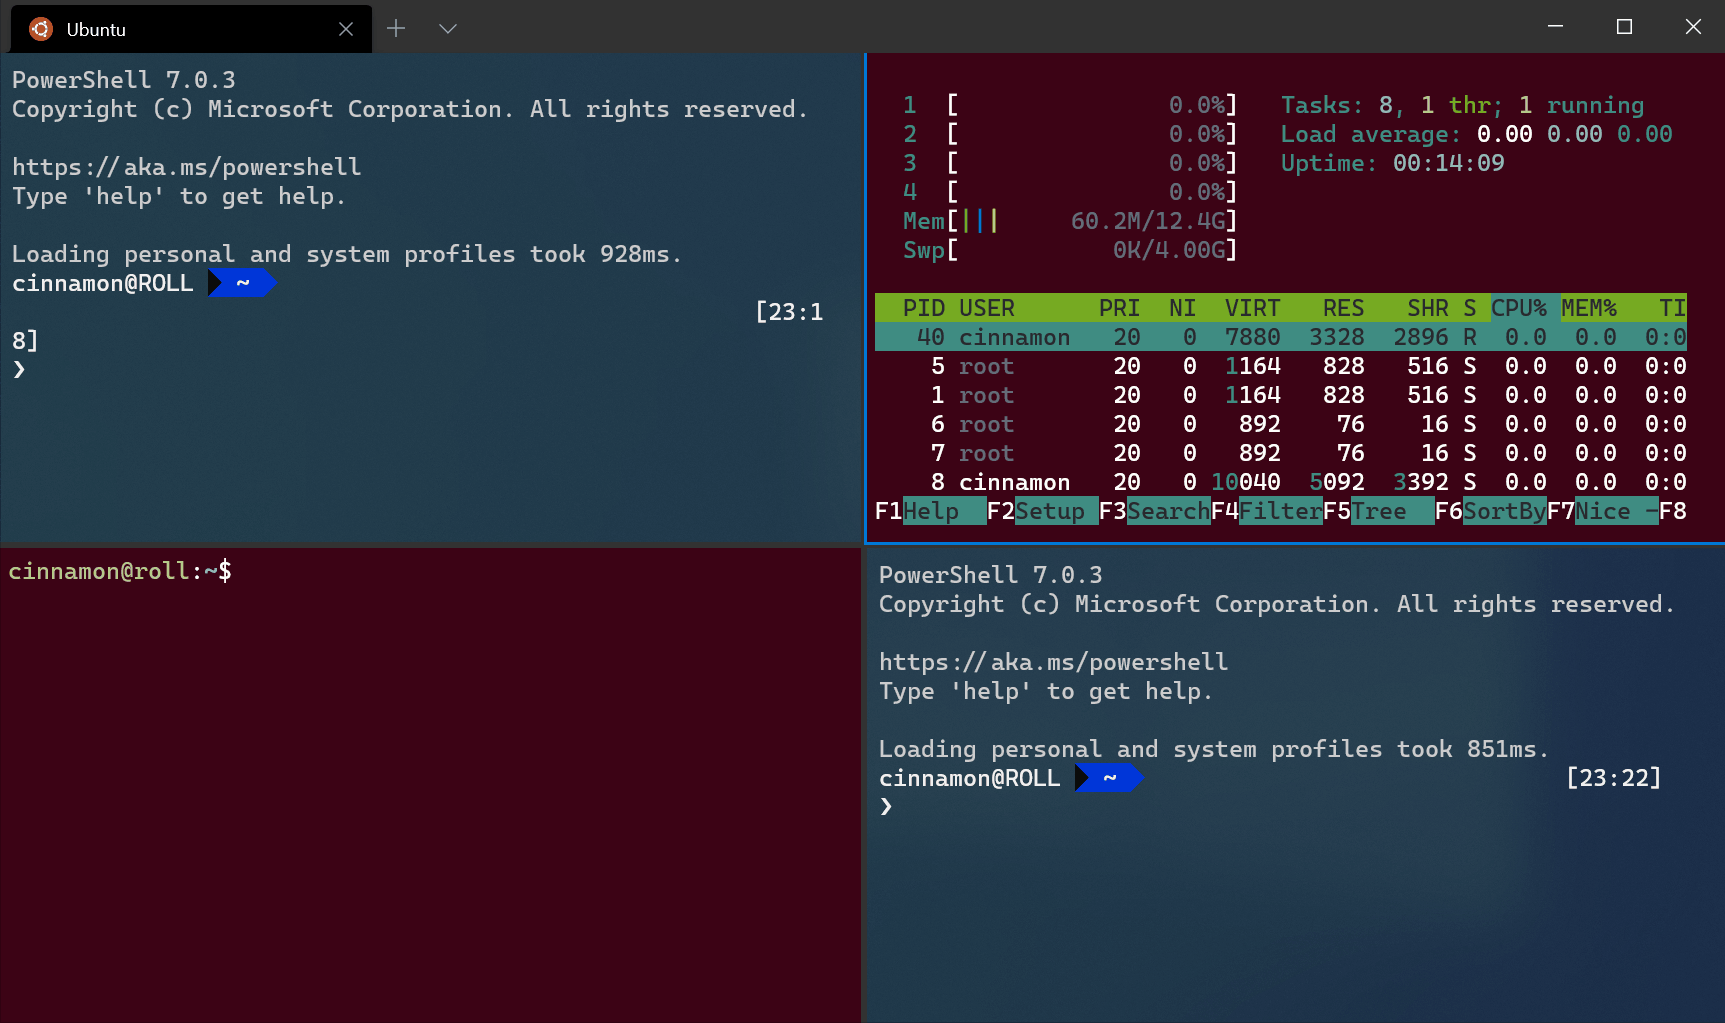
Panes in Windows Terminal
Panes give you the ability to run multiple command-line applications next to each other within the same tab. This minimizes the need to switch between tabs and lets you see multiple prompts at once.
Creating a new pane
Using the keyboard
You can either create a new vertical or horizontal pane in Windows Terminal. Splitting vertically will open a new pane to the right of the focused pane and splitting horizontally will open a new pane below the focused pane. To create a new vertical pane of your default profile, you can press the Alt + Shift + = key combination. For a horizontal pane of your default profile, you can use Alt + Shift + — .
 Configuration: Raspberry Ubuntu
If you would like to change these key bindings, you can create new ones using the splitPane action and vertical , horizontal , or auto values for the split property in your profiles.json file. The auto method will choose the direction that gives you the squarest panes. To learn more about key bindings, visit the Actions page.
Using the new tab button and dropdown menu
If you’d like to open a new pane of your default profile, you can hold the alt key and click the new tab button. If you’d like to open a new pane through the dropdown menu, you can hold alt and click on your desired profile. Both of these options will auto split the active window or pane into a new pane of the selected profile. The auto split mode splits in the direction that has the longest edge to create a pane.
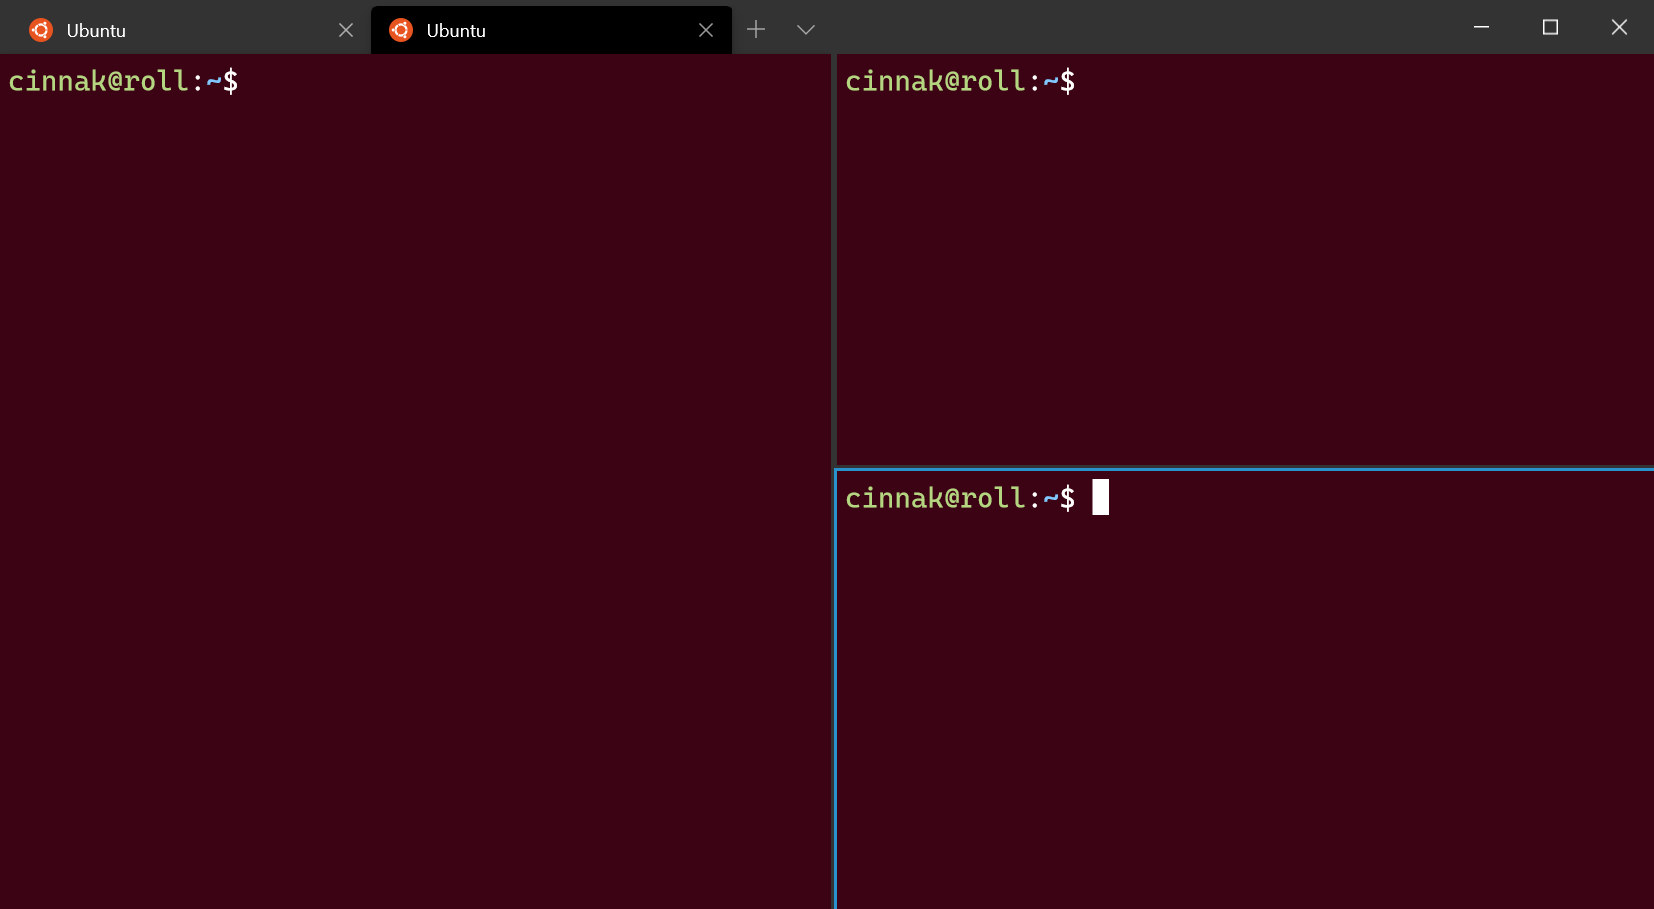
Switching between panes
The terminal allows you to navigate between panes by using the keyboard. If you hold the Alt key, you can use your arrow keys to move your focus between panes. You can identify which pane is in focus by the accent color border surrounding it. Note that this accent color is set in your Windows color settings.
You can customize this by adding key bindings for the moveFocus command and setting the direction to either down , left , right or up .
Resizing a pane
You can adjust the size of your panes by holding Alt + Shift and using your arrow keys to resize the focused pane.
To customize this key binding, you can add new ones using the resizePane action and setting the direction to either down , left , right , or up .
Closing a pane
You can close the focused pane by typing Ctrl + Shift + W . If you only have one pane, Ctrl + Shift + W will close the tab. As always, closing the last tab will close the window.
You can change which keys close the pane by adding a key binding that uses the closePane command.
Customizing panes using key bindings
You can customize what opens inside a new pane depending on your custom key bindings.
Duplicating a pane
The terminal allows you to duplicate the focused pane’s profile into another pane.

This can be done by adding the splitMode property with duplicate as the value to a splitPane key binding.
Zooming a pane
You can zoom the focused pane to fill the entire contents of the window.
This can be done by using the togglePaneZoom command.
Marking a pane as read-only
You can mark a pane as read-only, which will prevent input from going into the text buffer. If you attempt to close or input text into a read-only pane, the terminal will display a popup warning instead.
You can toggle read-only mode on a pane with the toggleReadOnlyMode command.
New terminal arguments
When opening a new pane or tab with a key binding, you can specify which profile is used by including the profile’s name, guid, or index. If none are specified, the default profile is used. This can be done by adding profile or index as an argument to a splitPane or newTab key binding. Note that indexing starts at 0.
Additionally, you can override certain aspects of the profile such as the profile’s command line executable, starting directory, or tab title. This can be accomplished by adding commandline , startingDirectory , and/or tabTitle to a splitPane or newTab key binding.
screen view — vertical to horizontal
Press CTRL + ALT + the Up Arrow Key . If that doesn’t work try CTRL + ALT + one of the other Arrow keys.
Try right click on the desktop, select Graphic Options | Rotation | Normal
Microsoft® Security MVP, 2004 — 2011
139 people found this reply helpful
Was this reply helpful?
Sorry this didn’t help.
Great! Thanks for your feedback.
How satisfied are you with this reply?
Thanks for your feedback, it helps us improve the site.
How satisfied are you with this reply?
Thanks for your feedback.
1. Click on Start then Control Panel.
2. Click on Display.
3. Click on Adjust Resolution (left side of screen).
4. Against Orientation use the dropdown menu to select Landscape.
5. Hit OK.
All answers and suggestions are provided by an enthusiastic amateur and are therefore without warranty either explicit or implicit. Basically you use my suggestions at your own risk.
21 people found this reply helpful
Was this reply helpful?
Sorry this didn’t help.
Great! Thanks for your feedback.
How satisfied are you with this reply?
Thanks for your feedback, it helps us improve the site.
FIX: Vertical or horizontal lines messing up the screen

- Vertical lines on a PC screen may be a result of hardware failure, or a problem with your graphics card .
- If the lines are different colors , or with changes when you add pressure from the panel, then the issue is probably your PC ’s LCD screen .
- Check out our Peripherals Hub for more helpful troubleshooting guides from our tech experts.
- Take a look at our Fix section to find the troubleshooting guide you need.

- Download Restoro PC Repair Tool that comes with Patented Technologies (patent available here).
- Click Start Scan to find Windows issues that could be causing PC problems.
- Click Repair All to fix issues affecting your computer’s security and performance
- Restoro has been downloaded by 0 readers this month.
You may have encountered lines running from the top to the bottom of your PC screen, either blue, white or multi-colored.
This may create a lot of anxiety especially when you fear that your PC may be crashing.
In order to fix this problem, we prepared a list of possible solutions that should come in handy. Make sure to check them out below.
How can I fix the vertical lines on my PC monitor?
1. Update your graphics driver
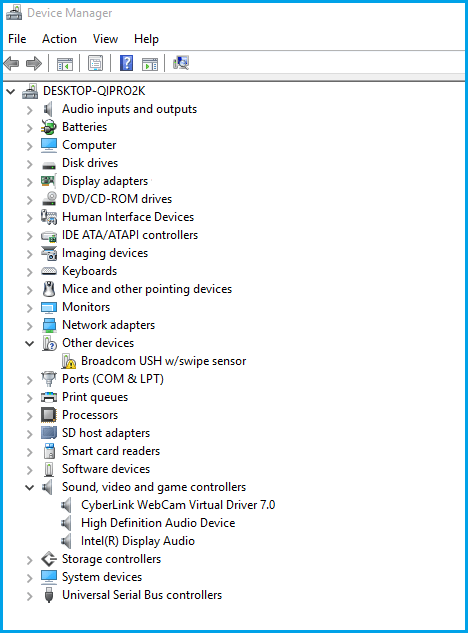
- Right-click Start button, and select Device Manager.
- Check for graphics or video card drivers with either a yellow exclamation mark/ question mark/ down-arrow mark/ error notification.
- If the driver has a yellow exclamation mark on it, double-click on it.
- Open Properties.
- Under Drivers tab, choose Update Driver.
- Restart your PC.
Note: You may need to know the name of your video card, for instance, if it is NVIDIA, AMD or Intel, because then you’d have to download directly from the website of either of these.
Keeping your drivers updated is crucial if you want to achieve maximum performance.
New drivers usually bring various improvements, such as new features and improved stability, so you can see why it’s important to keep your drivers up to date.
This is especially important for graphics driver because newer versions can offer better performance for your screen.

We strongly recommend the DriverFix t ool to update your drivers in order to avoid the damage to your computer by manually downloading the wrong driver versions.
This great program looks for new drivers for your hardware and downloads updates automatically.
It scans your system and lists all existing and possibly missing drivers. The tool also detects if there is already a new version for current records.
Already installed drivers can also be stored in an archive and used, for example, when the system is restored.
However, we recommend you to download this driver updater tool (100% safe and tested by us) to do it automatically. Thus, you will prevent the occurrence of the vertical lines on your PC screen.
DriverFix
2. Check your screen resolution display settings
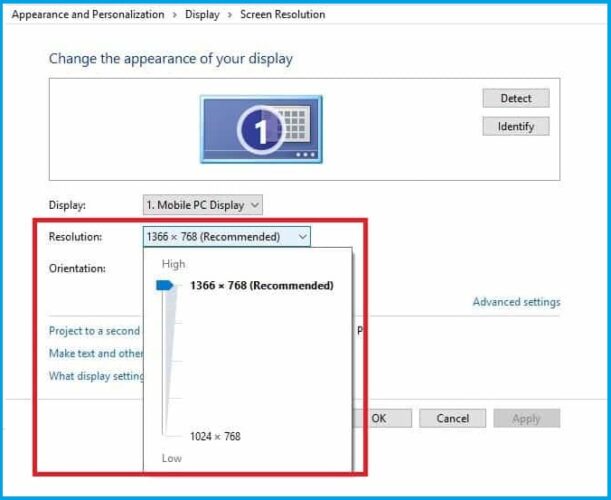
- Right-click Start, and select Control Panel.
- Navigate to Appearance and Personalization.
- Click Adjust screen resolution.
- Go to Resolution and click the drop down arrow.
- The resolution marked Recommended is the one suitable for your laptop screen’s native resolution (the highest your monitor can support)
- You can set brightness and contrast from monitor controls.
For a laptop screen, these are adjusted within Windows under Power Options:
Run a System Scan to discover potential errors


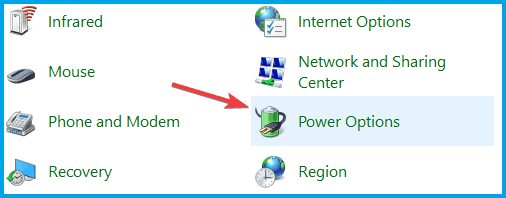
- Right-click Start and select Control Panel.
- Go to the top right corner and change View by option to Large icons.
- Click Power Options.
Didn’t work? Try the next solution.
3. Downgrade the video card driver to an older version
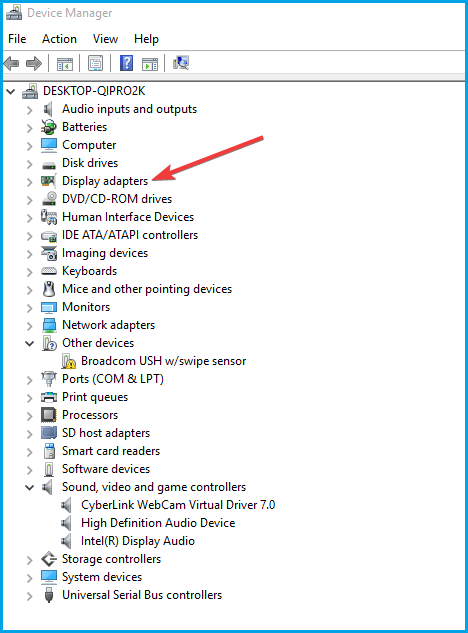
- Press Windows key + X and choose Device Manager.
- Right-click on Display Adapters.
- Select Properties and check the version.
- Find a previous version and install it.
4. Use Display Quality Troubleshooter

- Press Windows key + R, type control panel, and click OK .
- Click View by on the right corner and select Large icons.
- Choose Troubleshooting.
- Go to the left pane and click View All.
- Select Display Quality.
- Type in a password for admin, or give permissions when prompted.
Has this worked? If not, try the next solution.
5. Check whether the vertical lines appear in the BIOS
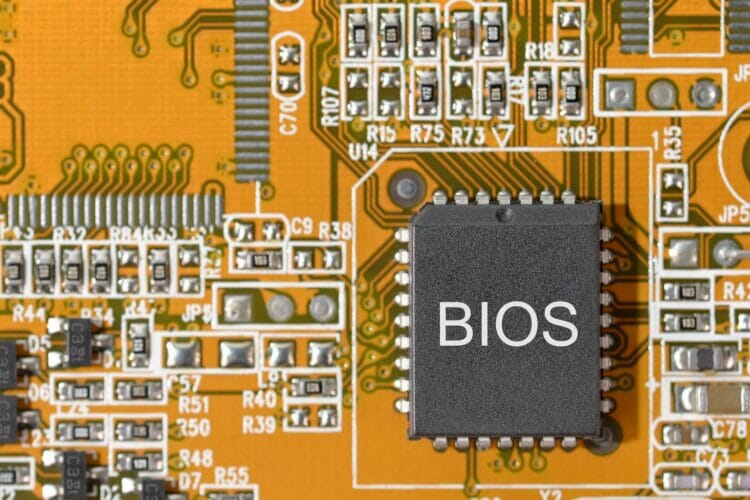
- Shut down your PC, but keep the power cable connected.
- Turn it on again.
- Press F10 repeatedly.
If you get to the BIOS settings and the lines are still displaying, it may be a hardware failure. In this situation, perform a hard or forced reset, then a BIOS update.
Keep in mind not to interrupt the process as it might cause more damage that’s harder to fix. If updating BIOS seems scary, you can make things way easier with the help from our tech experts.
If you don’t get any vertical lines displayed in the BIOS, it is a software related issue such as outdated drivers. In this case you need to update the display drivers by following:
- Start your computer on Safe mode.
- Uninstall your current display adapter.
- Check for driver updates.
- Exit Safe Mode.
6. Perform a clean boot

- Type msconfigin the search box and press Enter.
- Find Services tab, and check the Hide all Microsoft services box.
- Click Disable all.
- Go to the Startuptab, and select Open Task Manager.
- Close Task manager then click Ok.
- Reboot your PC.
Performing a clean boot for your computer reduces conflicts related to software that can bring up the root causes of the Startup repair incompatibility with your operating system.
These conflicts can be caused by applications and services that start up and run in the background whenever you start Windows normally.
If you can’t open Task Manager, then we’ve got the right solution for you.
You will have a clean boot environment after all these steps are carefully followed, after which you can try booting your computer again.
Did any of these solutions work? Let us know by dropping your comment in the section below.


