- Steps to Check active network connections in Windows
- Viewing and killing TCP IP connections Windows
- Password Recovery
- How can I see all active connections?
- 6 Answers 6
- Understanding and configuring Windows Connection Manager
- Connection management policies
- Minimize simultaneous connections
- Versions of Windows before Windows 10, version 1809, build 17763.404
- Windows 10, version 1809, build 17763.404 and later
- Soft disconnect
- Initial connection
- Prohibit interconnect between domain and non-domain networks
- Multiple wireless networks
- Ethernet
- Effect on soft disconnect
- Prohibit roaming on mobile broadband networks
- Network preferences
- Connection priorities
- Signal strength
- Preferred network list
- Automatic generation
- Group Policy
- Carrier-provisioning metadata
- Manual modification
- User interface
- Win32 APIs
- Command-line
- Conflict resolution
Steps to Check active network connections in Windows

www.Office.Com/Setup — Enter Office Product Key —
May 6, 2019 · 2 min read
If you want to see the active network connections in your Windows computer, then you can check it in Network and Sharing Menu, Network connections folder, and by using ‘netstat’ command. In all the versions of Microsoft Windows, you check active network connections with these methods. Windows 10 users can open the Network and Sharing Center. And the ‘netstat’ command can be used in all other versions of Windows. With this command tool, you can check the problems and the network traffic.
How to access Network and Sharing Menu in Windows (Windows 7 & 10)
Netwo r k and Sharing Center is where you can check the type of connection you’re connected to and the status of the network.
2. Click ‘Settings’.
3. Under Network & Internet, click ‘Ethernet.’
4. On the right side, click ‘Network & Sharing Center.’
5. Click the ‘icon’ next to “Connections:” It should correspond to the type of connection your device is connected with like Ethernet or Wireless.
6. On the connection status windows, click the ‘Details…’ button.
Here you can check the details of the network connection you’ve.
How to access the network connections folder in Windows (Windows 7)
1. Click the ‘Start’ button.
2. Enter ‘ncpa.cpl’ in the search bar.
4. Open ‘ncpa.cpl’ from the result.
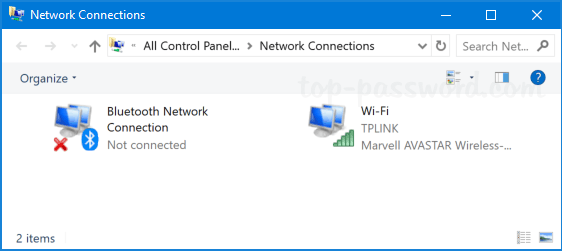
5. Network connections folder will open. Here you can see all the connections available on your network.
6. Select the connection you want to enable or disable and check its status.
7. Right click on the connection and select ‘Status’ from the options.
8. On the connection status windows, here you can see the details of the network connection.
9. Click the ‘Details…’ button for more information.
How to use the netstat command to view network connections
1. Click the ‘Start’ button.
2. Enter ‘cmd’ into the search bar to open the command prompt.
3. Wait for command prompt (black window) to appear. This is the window where you’ll enter the ‘netstat’ command.
4. Enter ‘netstat -a’ to view current connections.
When you run netstat command, a list of current TCP (Transmission Control Protocol connections and ports) with the details like computer name, local address, remote address, state, etc. will display.
5. Enter ‘netstat -b’ to see the programs using connections.
6. Enter ‘netstat -n’ to see the IP addresses.
When you run this command, it will also show the TCP list but with the IP address of the computers or services instead of their name.
7. Enter ‘netstat /?’ to view the more commands available for you.
That’s it! Check the active network connections in any version of Windows computer with this command.
Howdy, I’m Ela Thomas. I’m a software engineer living in Ohio. I am a fan of technology, photography, and design. I’m also interested in music and blogging.
Viewing and killing TCP IP connections Windows
Many time in troubleshooting or needing to view network traffic information or connection information, seeing your TCP/IP connections in Windows can provide valuable insight into problems or issues that may be going on in Windows with connectivity. Also, viewing connection information is a great way to narrow down on possible backdoor traffic to a workstation if malware is suspected. In this guide, we want to look at several tools and utilities to both view connection information as well as kill TCP connections in Windows that may be problematic or malicious.
Windows itself has many really nice tools built-in that will enable you to see TCP and UDP connections right out of the box via the commandline. Especially the later versions of Windows which include Powershell expand these capabilities as well.
Commandline Tools
Powershell

With powershell we have a whole new array of commandlets to peer inside of and control what is going on with Network connections in Windows. There are two commands in general among others that provide really powerful monitoring inside of Powershell and that is the get-nettcpconnection and get-udpendpoint. Take a look at the whole list of new powershell commands for monitoring and controlling TCP activity here: https://technet.microsoft.com/en-us/library/hh826123.aspx
Get-NetTcpConnection – cmdlet gets current TCP connections. Use this cmdlet to view TCP connection properties such as local or remote IP address, local or remote port, and connection state.

Get-NetUDPEndpoint – gets current statistics for a UDP endpoint. The cmdlet returns UDP end point properties, such as local and remote UDP ports. If you do not specify any parameters, the cmdlet gets statistics for all UDP end points.
Netstat
Displays active TCP connections, ports on which the computer is listening, Ethernet statistics, the IP routing table, IPv4 statistics (for the IP, ICMP, TCP, and UDP protocols), and IPv6 statistics (for the IPv6, ICMPv6, TCP over IPv6, and UDP over IPv6 protocols). Used without parameters, netstat displays active TCP connections.
Below the command was issued netstat -ano

With the PID information you see above in the netstat output, you can use this number to correlate with PID information in Task Manager to identify the exact process and kill if need be.
Wkillcx is a small command-line utility to close any TCP connection under Windows XP/Vista/Seven as well as Windows Server 2003/2008. This is a great little commandline program that allows you to kill the remote IP:port connection information without knowing the PID. You simply issue the command, feed the appropriate connection information, it searches for that connection and kills it. Download wkillcx here: https://wkillcx.sourceforge.net/
GUI Tools
Along with the commandline tools included in Windows there are also a couple of really nice GUI tools that allow ones to see TCP activity as well as kill those TCP connections via killing the process that is spawning the TCP connections.
TCPView
TCPView is a Windows SysInternals Tool that is designed to basically show detailed listings of all TCP and UDP endpoints on your system, including the local and remote addresses and state of TCP connections. The download of the utility also includes a commandline version of the tool in tcpvcon. Download TCPView here: https://technet.microsoft.com/en-us/sysinternals/bb897437.aspx

Another really nice feature of TCPView is that you can right-click on any connection entry and then Kill the process that is using it:

Microsoft Message Analyzer 1.0
Microsoft Message Analyzer is a new tool for capturing, displaying, and analyzing protocol messaging traffic and other system messages. This is a relatively new tool that also can import data from the legacy Microsoft Network Protocol Analyzer 3.4.
This is a more full blown protocol analyzer, but can do many of the basic things we are referring too in the above guide. Download the Microsoft Message Analyzer here: https://www.microsoft.com/en-us/download/details.aspx?id=40308
Final Thoughts
Using the tools listed above, one can view network connection information via either the commandline or using GUI tools. This is extremely helpful when you are tracking down a rogue connection or a problematic process that has network hooks.
Password Recovery
Network Connections is the most commonly used Control Panel applet for network administrators. From there you can view and manage all your wired / wireless adapters in one place. In this tutorial we’ll show you 3 quickest ways to open Network Connections in Windows 10.
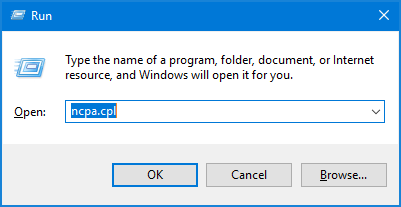
Method 1: Open Network Connections via Run or Command Prompt
Press the Windows key and the R key at the same time to open the Run box. Type ncpa.cpl and hit Enter and you can access Network Connections immediately.
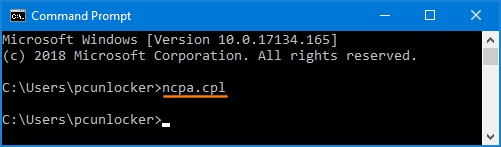
A similar way of opening Network Connections is to run ncpa.cpl at the Command Prompt.
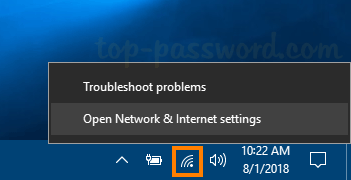
Method 2: Open Network Connections via Taskbar
Right-click the network icon which is located at the notification area of taskbar, and then select “Open Network & Internet settings” from the popup menu.
In the resulting pop-up window, click the “Change adapter options” in the right pane.
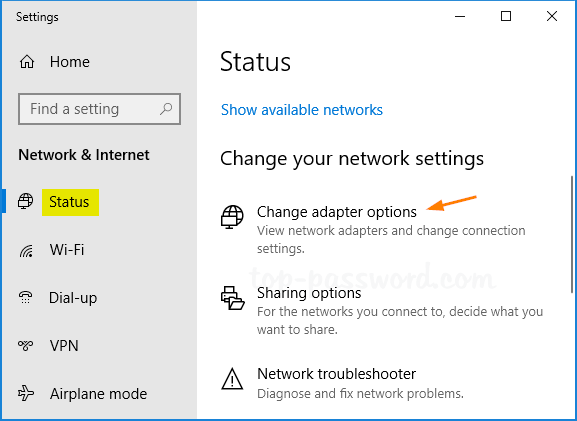
It will open Network Connections in no time.
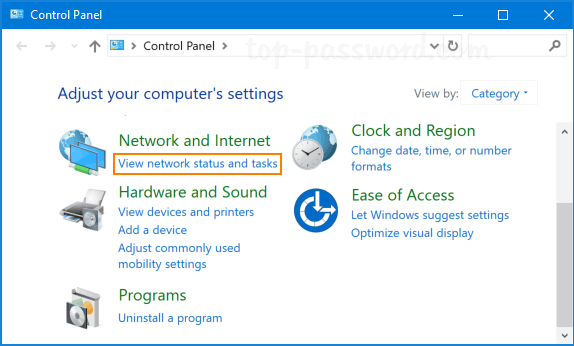
Method 3: Open Network Connections via Control Panel
Open the Control Panel in category view, click the “View network status and tasks” link beneath the “Network and Internet” heading.
In the resulting window, click “Change adapter settings” on the left-hand side.
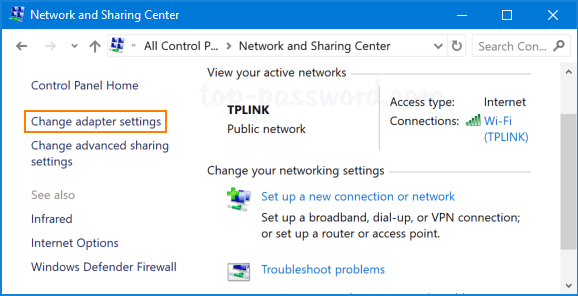
Now you can view a list of network connections on your system.
How can I see all active connections?
My Internet connection has been slow lately, and I think it might be a possible attack. A friend has told me to use Wireshark, but it is a big install, and I do not have the time to learn how to use it. Is there an easier way to see all the connections on my PC so I can take further action?

6 Answers 6
You are looking for the netstat command. This command should provide what you’re looking for:
if you would also like to see what programs are using the specified ports you can use:
to use the netstat program:
- Go to the start menu (or press Win + r and skip to step 3)
- If on XP, click «Run», If on vista or later, search for cmd in the search box and skip to step 4.
- type cmd
- after cmd opens, type netstat -a
- a list of all open connections with their ports will be displayed
more info about netstat:
I would also recommend running Autoruns and Process Explorer, also in the Sysinternals Suite to help diagnose your problem.
If you’re looking for a simple look at which connections are hungry on Windows 7 onwards, then bring up Task Manager, Performance tab, Resource Monitor, Network tab.
Prio (http://www.prnwatch.com/prio.html) can provide, as part of the Windows Task Manager, an updating list connections with some additional context that may help you make sense of what is going on.
You can see the active ports aligned with the processes in use.
It adds a lot of functionality to the task manager and it is all contained in one area.
I am not a computer scientist but I find that netstat is a bit slow and many connections pass through unrecorded, wireshark is fast but has too many packets to filter through and windows resource monitor is too hard to look through the list to see who is making connections.
Understanding and configuring Windows Connection Manager
This topic is intended for Microsoft’s mobile operator (MO) partners who can configure how Windows connects to their networks. If you are a customer who is experiencing Windows network connection issues, see Fix network connection issues in Windows.
Automatic connection management, introduced in WindowsВ 8, makes connection decisions by looking at Ethernet, Wi-Fi, and mobile broadband interfaces. These decisions lead to automatic connect and disconnect actions on Wi-Fi and mobile broadband interfaces.
Windows responds to Ethernet connections but does not automatically manage Ethernet connections.
This topic describes how Windows automatically manages physical wireless connectivity and does not consider these connections:
Dial-up connections, such as modems
Pure virtual interfaces, such as VPNs and tunneled IP connections
Connection management policies
WindowsВ 8, WindowsВ 8.1, and WindowsВ 10 include a number of policies to control connection management. These policies are not exposed in the Windows user interface but can be configured by using the WcmSetProperty API or Group Policy.
Minimize simultaneous connections
This policy is configured using the fMinimizeConnections Group Policy. It is on by default for WindowsВ 8, WindowsВ 8.1, and WindowsВ 10.
Versions of Windows before Windows 10, version 1809, build 17763.404
In Windows 8, Windows 8.1, and versions of Windows 10 before Windows 10, version 1809, build 17763.404, this policy is a boolean value that can be modified using either Group Policy or the WcmSetProperty API.
If this policy is disabled, the behavior is similar to that for WindowsВ 7 in which each interface connects to the most preferred network in range, regardless of the connectivity state of other interfaces.
If this policy is enabled, Windows attempts to maintain the smallest number of concurrent connections that offer the best available level of connectivity. Windows maintains connectivity to the following networks:
Any Ethernet network
Any networks that were manually connected during the current user session
The most preferred connection to the Internet
The most preferred connection to the Active Directory domain, if the PC is joined to a domain
All remaining networks are soft-disconnected, as described in the next section. This is also used to evaluate available networks that are not connected. Windows will not connect to a new network from which it would immediately soft-disconnect.
Windows 10, version 1809, build 17763.404 and later
In Windows 10, version 1809, build 17763.404 and later, this value is an enumeration that is only available through Group Policy.
This policy setting determines if a computer can have multiple connections to the Internet, to a Windows domain, or to both. If multiple connections are allowed, the policy then determines how network traffic is routed.
If this policy is set to 0, a computer can have simultaneous connections to the Internet, to a Windows domain, or to both. Internet traffic can be routed over any connection, including a cellular connection or any metered network. This was previously the Disabled state for this policy setting in builds of Windows before Windows 10, version 1809, build 17663.404. This option was first available in Windows 8.
If this policy is set to 1, any new automatic Internet connection is blocked when the computer has at least one active Internet connection to a preferred type of network. The order of preference is as follows:
Ethernet is always preferred when connected. Users can still manually connect to any network. This was previously the Enabled state for this policy setting in builds of Windows before Windows 10, version 1809, build 17763.404. This option was first available in Windows 8.
If this policy setting is set to 2, the behavior is similar to when it is set to 1. However, if a cellular data connection is available, that connection will always stay connected for services that require a cellular connection. When the user is connected to a WLAN or Ethernet connection, no Internet traffic is routed over the cellular connection. This option was first available in Windows 10, version 1703.
If this policy setting is set to 3, the behavior is similar to when it is set to 2. However, if there is an Ethernet connection, Windows does not permit users to connect to a WLAN manually. A WLAN can only be connected (automatically or manually) when there is no Ethernet connection.
Soft disconnect
The soft disconnect policy works as follows:
When Windows decides that a network should no longer be connected, it does not immediately disconnect. Abrupt disconnections degrade the user experience without providing an appreciable benefit and are avoided when possible.
As soon as Windows decides to soft-disconnect an interface, it informs the TCP stack that the network should no longer be used. The existing TCP sessions will continue uninterrupted, but new TCP sessions will use this interface only if explicitly bound or if no other interface routes to the desired destination.
This notification to the TCP stack generates a network status change. Networking applications should listen for these events and proactively move their connections to the new network, if possible.
Windows then checks the traffic level on the interface every 30 seconds. If the traffic level is above a certain threshold, no further action is taken. This allows ongoing active use of the interface, such as from a file transfer or VoIP call, to avoid disruption.
When the traffic drops below this threshold, the interface will be disconnected. Applications that keep long-lived idle connections, such as an e-mail client, may be interrupted and should re-establish their connections over a different interface.
Initial connection
Windows automatically connects and then immediately soft-disconnects in one circumstance. When a PC first starts or resumes from standby, all interfaces simultaneously attempt to connect in order to ensure that the user obtains network connectivity as quickly as possible. If multiple interfaces successfully connect, Windows begins soft-disconnecting interfaces immediately.
Prohibit interconnect between domain and non-domain networks
This policy is off by default for WindowsВ 8, WindowsВ 8.1, and WindowsВ 10. When this policy is enabled, Windows attempts to prevent a PC from being interconnected between a domain network and a non-domain network. Enterprise administrators may use this when they are concerned about potential security breaches using a multi-homed machine as an attack point.
This policy does not affect system behavior when all connected networks route to the domain or when no connected network routes to the domain.
Multiple wireless networks
Many Windows 8, Windows 8.1, and Windows 10 mobile devices have an external Internet connection available to them at all times, even when in range of their enterprise Wi-Fi networks. When this policy is enabled, users may freely connect to either their public mobile broadband network or to the enterprise’s private Wi-Fi network and switch between them at will. However, manually connecting one will automatically cause the other to disconnect immediately.
Ethernet
Because WindowsВ 8, WindowsВ 8.1, and WindowsВ 10 cannot automatically connect Ethernet cables to or disconnect them from a PC, they can only enforce the policy by allowing or prohibiting wireless connections. When a PC has an Ethernet connection to the domain network, wireless networks that do not connect to the domain cannot be connected, and vice versa. Attempts to do so will result in the following error:
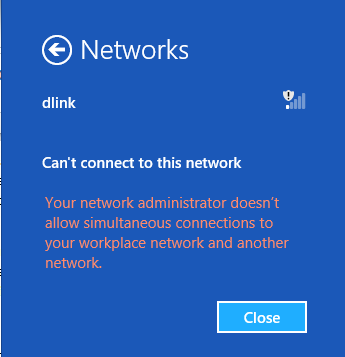
For PCs that have multiple Ethernet ports, Windows cannot prevent an interconnection that is created by physically connecting the PC to two different Ethernet networks.
Effect on soft disconnect
Because prohibiting interconnections is a security consideration, any disconnections that comply with this policy take effect immediately, even if there is ongoing activity. Users will experience a connectivity disruption when transitioning between public and corporate networks, even if the two networks overlap.
For example, a user engaged in a VoIP call over a mobile broadband network with a laptop docked to a corporate Ethernet connection will lose the call, although the app may be able to automatically recover over the new connection. If the policy was not enabled, Windows would instead soft-disconnect the mobile broadband connection by waiting for the call to complete. On the other hand, a VoIP call started over a corporate Wi-Fi network will not be disrupted when docked to the corporate network because both networks connect to the domain. The Wi-Fi network is disconnected after the call is completed.
Prohibit roaming on mobile broadband networks
This policy prevents Windows from connecting to mobile broadband networks that are in a roaming state. By default, this policy is disabled, and the user may choose to manually connect to a mobile broadband network while roaming or to enable automatically connecting to such a network. When this policy is enabled, the user cannot choose a roaming mobile broadband network from Connection Manager.
Network preferences
When considering which multiple connections to maintain, Windows uses a number of traits to determine the preferred networks. This is used only when determining whether to maintain a connection to a given interface, not for routing. If a connected interface is not in the process of being soft-disconnected, routing is determined by the metric in the routing table. If the route metric is not specified manually, Windows will automatically assign a route metric based on the link speed of the adapter.
Connection priorities
Windows prioritizes connections in the following order:
Networks manually connected during the current user session
Networks that connect to both the Internet and the Active Directory domain to which the PC is joined
Signal strength of the currently connected Wi-Fi network
The PC’s preferred network list
Even though the link speed influences routing behavior among currently connected interfaces, Windows does not make connectivity decisions based on the link speed or throughput of a network. It is not possible to configure Windows to change its connection preference between a mobile broadband network and a Wi-Fi network based on the current speed of the mobile broadband network. If both are connected, the user or a desktop app can change route metrics to influence routing preferences.
Signal strength
For Windows 8 and Windows 8.1, if Windows detects that the currently connected Wi-Fi network has very low signal strength, it may choose to connect a mobile broadband network (if permitted by policy) to avoid disrupting network connectivity. This helps to smooth the transition when a user is moving away from a wireless access point.
Windows does not disconnect a more preferred Wi-Fi network until the signal strength cannot maintain the connection. If signal strength improves, Windows may soft-disconnect the mobile broadband adapter.
Windows 10 does not use the Wi-Fi signal strength.
Preferred network list
In most situations, the preferred network list determines which wireless network profiles Windows will use to connect. Prior to WindowsВ 8, this list applied to Wi-Fi networks only. In WindowsВ 8, WindowsВ 8.1, and WindowsВ 10, it can also include mobile broadband networks.
Automatic generation
WindowsВ 8, WindowsВ 8.1, and WindowsВ 10 automatically update the preferred network list based on user actions. Any manual connection or disconnection will update the network list so that the same behavior will occur automatically in the future.
The following user actions modify the preferred network list:
Initially connecting to a network The new network is added to the network list. The user specifies whether the network will automatically connect in the future.
Connecting to a new Wi-Fi network for the first time makes the network the most preferred network in the list.
Connecting to a new mobile broadband network for the first time makes the network the least preferred network in the list.
Manually connecting to a Wi-Fi network Any other Wi-Fi network in range that is higher on the list is moved below the newly connected network in the list. The user specifies whether the network automatically connects in the future.
Disconnecting from a network Windows will not automatically connect to this network in the future. It remains on the network list in case the user modifies this setting in the future.
Group Policy
Wi-Fi profiles created by Group Policy are at the top of the network list. The user may manually disconnect from these networks or manually connect to other networks, but these networks remain at the highest position on the network list until removed by Group Policy.
Carrier-provisioning metadata
Mobile broadband and Wi-Fi hotspot operators provide Windows with a series of mobile broadband and Wi-Fi profiles by using the ProvisioningAgent or msProvisionNetworks APIs.
When initially provisioned, the operator-created profiles are added to the top (Wi-Fi only) or bottom (if mobile broadband is included) of the existing network list. You cannot influence the position of the networks the user provisions in the network list. However, you can define the relative order of their networks in the network list.
The user’s actions may modify the network list between applications of provisioning metadata. When provisioning metadata is reapplied, your desired network order is restored. However, the reordered set of networks is moved to the lowest position to which the user had moved any of your networks.
The preference between networks in the provisioning metadata is determined by the following:
The optional priority attribute on each network profile
Media type (Wi-Fi is more preferred than mobile broadband)
Order specified in the XML file
Manual modification
Prior to WindowsВ 8, the Wi-Fi preferred network list was accessible to the user through the Manage Wireless Networks control panel. Telemetry indicates that very few users ever accessed this functionality. Additionally, this user interface was tied to Wi-Fi only and could not incorporate preferences between Wi-Fi and mobile broadband.
Most users will not need to manually modify the network list. However, certain users or applications may find it necessary to do so.
User interface
To remove a profile from the preferred network list while it is in range, select and hold (or right-click) the network and choose Forget this network. A network that is not in range cannot be removed from the list through the user interface.
Win32 APIs
An application may create new profiles in the network list using the appropriate media-specific API:
For Wi-Fi networks, use the WlanSetProfile function.
To modify the order of the network list, use the WcmSetProfileList function. We do not recommend using the WlanSetProfileList function, as it may disturb the position of mobile broadband profiles in the network list in unintended ways.
To delete profiles from the network list, use the appropriate media-specific API:
Command-line
A user or script may create new profiles in the network list by using the appropriate media-specific commands:
For Wi-Fi networks, use the netsh wlan add profile command.
For mobile broadband networks, use the netsh mbn add profile command.
The order of the Wi-Fi profiles in the network list may be modified using the netsh wlan set profileorder command. However, this is not recommended and can disturb the position of mobile broadband profiles in the list in unintended ways.
To delete profiles from the network list, use the appropriate media-specific commands:
For Wi-Fi networks, use the netsh wlan delete profile command.
For mobile broadband networks, use the netsh mbn delete profile command.
Conflict resolution
When multiple profiles exist for the same network, WindowsВ 8 and Windows 8.1 use the following logic to determine which profile should be used:
Profile Type
Group Policy profiles are preferred over user-created profiles.
All-user profiles are preferred over single-user profiles.
Interface Arrival The profile on the most recently installed interface will be used.


