- How to: View certificates with the MMC snap-in
- View certificates in the MMC snap-in
- View certificates with the Certificate Manager tool
- To view certificates for the local device
- To view certificates for the current user
- Пошаговое руководство. Просмотр сертификатов с помощью оснастки MMC How to: View certificates with the MMC snap-in
- Просмотр сертификатов в оснастке MMC View certificates in the MMC snap-in
- Просмотр сертификатов с помощью средства диспетчера сертификатов View certificates with the Certificate Manager tool
- Просмотр сертификатов для локального устройства To view certificates for the local device
- Просмотр сертификатов для текущего пользователя To view certificates for the current user
- Certify your desktop application
- Step 1: Prepare for certification
- Step 2: Test your app with the Windows App Certification Kit
- Step 3: Use the Windows Certification Dashboard
- Step 4: Promote your desktop app
- See also:
- Управление сертификатами для программно определяемых сетей Manage certificates for Software Defined Networking
- Создание и регистрация сертификата X. 509 Creating and Enrolling an X.509 Certificate
- Создание самозаверяющего — сертификата X. 509 Creating a Self-Signed X.509 Certificate
- Несколько узлов Multiple node
- Один узел Single node
- Создание — сертификата X. 509, подписанного центром сертификации Creating a CA-Signed X.509 Certificate
- Требования к конфигурации сертификата Certificate configuration requirements
- Настройка шаблона сертификата To configure the certificate template
- Запрос сертификата из центра сертификации To request a certificate from the CA
- Экспорт и копирование сертификата в библиотеку SCVMM Exporting and Copying the Certificate to the SCVMM Library
- Проверка подлинности устройств и служб Подсистемамми Authenticating Southbound devices and services
- Взаимодействие узла Hyper-V с сетевым контроллером Hyper-V Host Communication with Network Controller
- Связь по Load Balancer МУЛЬТИПЛЕКСОРа с сетевым контроллером Software Load Balancer MUX Communication with Network Controller
How to: View certificates with the MMC snap-in
When you create a secure client or service, you can use a certificate as the credential. For example, a common type of credential is the X.509 certificate, which you create with the X509CertificateInitiatorClientCredential.SetCertificate method.
There are three different types of certificate stores that you can examine with the Microsoft Management Console (MMC) on Windows systems:
Local computer: The store is local to the device and global to all users on the device.
Current user: The store is local to the current user account on the device.
Service account: The store is local to a particular service on the device.
View certificates in the MMC snap-in
The following procedure demonstrates how to examine the stores on your local device to find an appropriate certificate:
Select Run from the Start menu, and then enter mmc.
The MMC appears.
From the File menu, select Add/Remove Snap In.
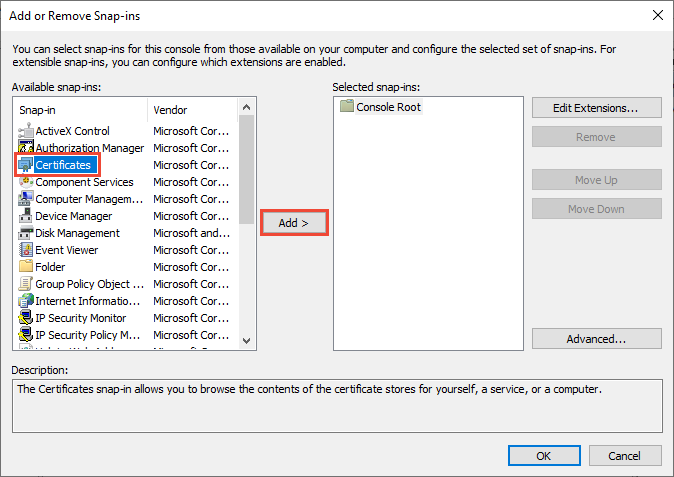
The Add or Remove Snap-ins window appears.
From the Available snap-ins list, choose Certificates, then select Add.

In the Certificates snap-in window, select Computer account, and then select Next.
Optionally, you can select My user account for the current user or Service account for a particular service.
If you’re not an administrator for your device, you can manage certificates only for your user account.
In the Select Computer window, leave Local computer selected, and then select Finish.
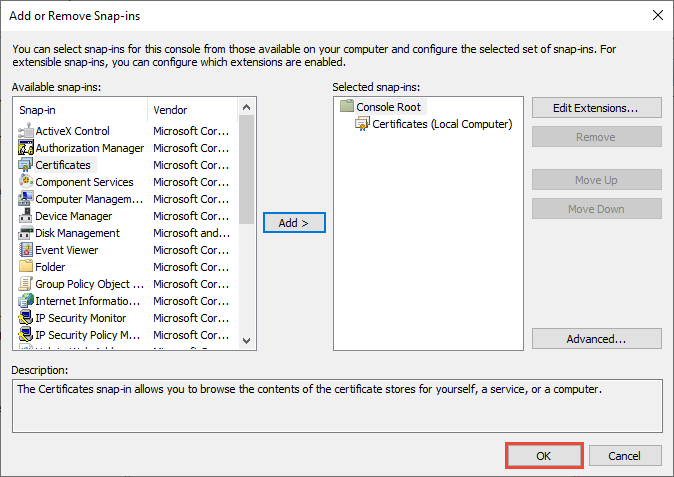
In the Add or Remove Snap-in window, select OK.

Optional: From the File menu, select Save or Save As to save the MMC console file for later use.
To view your certificates in the MMC snap-in, select Console Root in the left pane, then expand Certificates (Local Computer).
A list of directories for each type of certificate appears. From each certificate directory, you can view, export, import, and delete its certificates.
View certificates with the Certificate Manager tool
You can also view, export, import, and delete certificates by using the Certificate Manager tool.
To view certificates for the local device
Select Run from the Start menu, and then enter certlm.msc.
The Certificate Manager tool for the local device appears.
To view your certificates, under Certificates — Local Computer in the left pane, expand the directory for the type of certificate you want to view.
To view certificates for the current user
Select Run from the Start menu, and then enter certmgr.msc.
The Certificate Manager tool for the current user appears.
To view your certificates, under Certificates — Current User in the left pane, expand the directory for the type of certificate you want to view.
Пошаговое руководство. Просмотр сертификатов с помощью оснастки MMC How to: View certificates with the MMC snap-in
При создании защищенного клиента или службы можно использовать сертификат в качестве учетных данных. When you create a secure client or service, you can use a certificate as the credential. Например, общий тип учетных данных — это сертификат X. 509, который создается с помощью X509CertificateInitiatorClientCredential.SetCertificate метода. For example, a common type of credential is the X.509 certificate, which you create with the X509CertificateInitiatorClientCredential.SetCertificate method.
Существует три разных типа хранилищ сертификатов, которые можно проверить с помощью консоли управления (MMC) в системах Windows: There are three different types of certificate stores that you can examine with the Microsoft Management Console (MMC) on Windows systems:
Локальный компьютер. хранилище является локальным для устройства и является глобальным для всех пользователей на устройстве. Local computer: The store is local to the device and global to all users on the device.
Текущий пользователь: хранилище является локальным по отношению к текущей учетной записи пользователя на устройстве. Current user: The store is local to the current user account on the device.
Учетная запись службы. хранилище является локальным для определенной службы на устройстве. Service account: The store is local to a particular service on the device.
Просмотр сертификатов в оснастке MMC View certificates in the MMC snap-in
В следующей процедуре показано, как проверить магазины на локальном устройстве, чтобы найти соответствующий сертификат: The following procedure demonstrates how to examine the stores on your local device to find an appropriate certificate:
В меню Пуск выберите пункт выполнить и введите MMC. Select Run from the Start menu, and then enter mmc.
Откроется консоль MMC. The MMC appears.
В меню файл выберите команду Добавить или удалить оснастку. From the File menu, select Add/Remove Snap In.
Откроется окно Добавление или удаление оснасток . The Add or Remove Snap-ins window appears.
В списке Доступные оснастки выберите Сертификаты, а затем щелкните добавить. From the Available snap-ins list, choose Certificates, then select Add.
В окне оснастки «сертификаты » выберите учетная запись компьютера, а затем нажмите кнопку Далее. In the Certificates snap-in window, select Computer account, and then select Next.
При необходимости можно выбрать учетную запись пользователя для текущего пользователя или учетной записи службы для конкретной службы. Optionally, you can select My user account for the current user or Service account for a particular service.
Если вы не являетесь администратором устройства, вы можете управлять сертификатами только для учетной записи пользователя. If you’re not an administrator for your device, you can manage certificates only for your user account.
В окне Выбор компьютера оставьте выбранным параметр локальный компьютер и нажмите кнопку Готово. In the Select Computer window, leave Local computer selected, and then select Finish.
В окне Добавление или удаление оснастки нажмите кнопку ОК. In the Add or Remove Snap-in window, select OK.
Необязательно. в меню файл выберите сохранить или Сохранить как , чтобы сохранить файл консоли MMC для последующего использования. Optional: From the File menu, select Save or Save As to save the MMC console file for later use.
Чтобы просмотреть сертификаты в оснастке MMC, выберите корень консоли в левой области, а затем разверните узел Сертификаты (локальный компьютер). To view your certificates in the MMC snap-in, select Console Root in the left pane, then expand Certificates (Local Computer).
Появится список каталогов для каждого типа сертификатов. A list of directories for each type of certificate appears. Из каждого каталога сертификатов можно просматривать, экспортировать, импортировать и удалять свои сертификаты. From each certificate directory, you can view, export, import, and delete its certificates.
Просмотр сертификатов с помощью средства диспетчера сертификатов View certificates with the Certificate Manager tool
Вы также можете просматривать, экспортировать, импортировать и удалять сертификаты с помощью средства диспетчера сертификатов. You can also view, export, import, and delete certificates by using the Certificate Manager tool.
Просмотр сертификатов для локального устройства To view certificates for the local device
В меню Пуск выберите пункт выполнить , а затем введите certlm. msc. Select Run from the Start menu, and then enter certlm.msc.
Откроется средство диспетчера сертификатов для локального устройства. The Certificate Manager tool for the local device appears.
Для просмотра сертификатов в разделе Сертификаты — локальный компьютер в левой области разверните каталог для типа сертификата, который нужно просмотреть. To view your certificates, under Certificates — Local Computer in the left pane, expand the directory for the type of certificate you want to view.
Просмотр сертификатов для текущего пользователя To view certificates for the current user
В меню Пуск выберите пункт выполнить , а затем введите CertMgr. msc. Select Run from the Start menu, and then enter certmgr.msc.
Появится средство диспетчера сертификатов для текущего пользователя. The Certificate Manager tool for the current user appears.
Чтобы просмотреть сертификаты, в разделе Сертификаты — текущий пользователь в левой области разверните каталог для типа сертификата, который нужно просмотреть. To view your certificates, under Certificates — Current User in the left pane, expand the directory for the type of certificate you want to view.
Certify your desktop application
Certification for Win32 desktop apps is deprecated. Instead, submit files here.
Follow these steps to get your desktop app certified for Windows 7, Windows 8, Windows 8.1, and Windows 10.
If you wish to convert your desktop app to be compatible with the Universal Windows Platform and Windows Store, you will use the Windows Desktop Bridge, in which case you should follow the Desktop Bridge guidance for certification steps.
If you are developing and certifying a UWP app from the start, see Guidance for Windows App Certification in UWP for info on certification.
Step 1: Prepare for certification
| Topic | Description |
|---|---|
| What are the benefits? | Certifying your desktop app provides several benefits for you and your customers. |
| Read the requirements | Review the technical requirements and eligibility qualifications that a desktop app must meet. |
Step 2: Test your app with the Windows App Certification Kit
| Topic | Description |
|---|---|
| Get the Kit | To certify your app, you have to install and run the Windows App Certification Kit (included in the Windows SDK). |
| Using the Kit | Before you can submit your app, you must test it for readiness. You can also download a copy of the app certification white paper. |
| Review test details | Get the list of the tests your app needs to pass to qualify for compatibility with the latest Windows operating system. |
Step 3: Use the Windows Certification Dashboard
To submit your app for certification, you’ll need to log in or register a company account on the Windows Certification Dashboard. Once you do, not only will you be able to get your app certified, but you’ll also gain access to tools to review and manage your app at all stages of the process.
| Topic | Description |
|---|---|
| Set up your account | If your company isn’t already registered, you must register it through the Windows Certification Dashboard. |
| Get a code signing certificate | Before you can establish a Windows Certification Dashboard account, you need to get a code signing certificate to secure your digital information. |
| Test locally and upload the results | After your run the Windows App Certification Kit tests, upload the results to the Windows Certification Dashboard. |
| Manage your submission | After you submit your app for certification, you can review your submission through the Windows Certification Dashboard. |
Step 4: Promote your desktop app
| Topic | Description |
|---|---|
| Check app compatibility | If you are building an app for Windows 8.1, investigate compatibility concerns. |
| Use the logo with your app | Display the logo on packaging and in ads and other promotional materials according to the guidelines. For Windows 7 only. |
See also:
App compatibility forum: Find support from the community about compatibility and logo certification.
Windows SDK blog: Find tips and news related to app certification.
Windows Server forum: Visit the Certification forum to get answers.
Compatibility cookbook: Get info about what’s new or changed in the latest version of Windows.
Управление сертификатами для программно определяемых сетей Manage certificates for Software Defined Networking
Применяется к: Windows Server 2019, Windows Server 2016 Applies to: Windows Server 2019, Windows Server 2016
С помощью этого раздела вы узнаете, как управлять сертификатами для сетевого контроллера обмена и Подсистемамми при развертывании программно определяемой сети ( Sdn ) в Windows Server 2019 или 2016 Datacenter и использовать System Center Virtual Machine Manager ( SCVMM в ) качестве клиента управления Sdn. You can use this topic to learn how to manage certificates for Network Controller Northbound and Southbound communications when you deploy Software Defined Networking (SDN) in Windows Server 2019 or 2016 Datacenter and you are using System Center Virtual Machine Manager (SCVMM) as your SDN management client.
Общие сведения о сетевом контроллере см. в разделе сетевой контроллер. For overview information about Network Controller, see Network Controller.
Если Kerberos не используется для защиты связи сетевого контроллера, можно использовать сертификаты X. 509 для проверки подлинности, авторизации и шифрования. If you are not using Kerberos for securing the Network Controller communication, you can use X.509 certificates for authentication, authorization, and encryption.
SDN в Windows Server 2019 и 2016 Datacenter поддерживает как самозаверяющие — , так и ( ) сертификаты X. 509, подписанные центром сертификации. SDN in Windows Server 2019 and 2016 Datacenter supports both self-signed and Certification Authority (CA)-signed X.509 certificates. В этом разделе приводятся пошаговые инструкции по созданию этих сертификатов и их применению к защищенному сетевому контроллеру обмена каналам связи с клиентами управления и Подсистемамми связью с сетевыми устройствами, такими как программное обеспечение Load Balancer ( SLB ) . This topic provides step-by-step instructions for creating these certificates and applying them to secure Network Controller Northbound communication channels with management clients and Southbound communications with network devices, such as the Software Load Balancer (SLB). . . При использовании — проверки подлинности на основе сертификатов необходимо зарегистрировать один сертификат на узлах сетевого контроллера, который используется следующими способами. When you are using certificate-based authentication, you must enroll one certificate on Network Controller nodes that is used in the following ways.
- Шифрование связи обмена с SSL ( SSL ) между узлами сетевого контроллера и клиентами управления, например System Center Virtual Machine Manager. Encrypting Northbound Communication with Secure Sockets Layer (SSL) between Network Controller nodes and management clients, such as System Center Virtual Machine Manager.
- Проверка подлинности между узлами сетевого контроллера и Подсистемамми устройствами и службами, такими как узлы Hyper-V и программные подсистемы балансировки нагрузки ( слбс ) . Authentication between Network Controller nodes and Southbound devices and services, such as Hyper-V hosts and Software Load Balancers (SLBs).
Создание и регистрация сертификата X. 509 Creating and Enrolling an X.509 Certificate
Вы можете создать и зарегистрировать самозаверяющий — сертификат или сертификат, выданный центром сертификации. You can create and enroll either a self-signed certificate or a certificate that is issued by a CA.
При использовании SCVMM для развертывания сетевого контроллера необходимо указать сертификат X. 509, используемый для шифрования связи обмена во время настройки шаблона службы сетевого контроллера. When you are using SCVMM to deploy Network Controller, you must specify the X.509 certificate that is used to encrypt Northbound communications during the configuration of the Network Controller Service Template.
Конфигурация сертификата должна включать следующие значения. The certificate configuration must include the following values.
- Значение текстового поля рестендпоинт должно быть полным доменным именем ( (FQDN) ) или IP-адресом сетевого контроллера. The value for the RestEndPoint text box must either be the Network Controller Fully Qualified Domain Name (FQDN) or IP address.
- Значение рестендпоинт должно соответствовать ( общему имени субъекта, CN ) сертификата X. 509. The RestEndPoint value must match the subject name (Common Name, CN) of the X.509 certificate.
Создание самозаверяющего — сертификата X. 509 Creating a Self-Signed X.509 Certificate
Вы можете создать самозаверяющий сертификат X. 509 и экспортировать его с закрытым ключом, ( защищенным паролем, выполнив ) следующие действия для — развертывания сетевого контроллера в одном узле и нескольких — узлах. You can create a self-signed X.509 certificate and export it with the private key (protected with a password) by following these steps for single-node and multiple-node deployments of Network Controller.
При создании самозаверяющих — сертификатов можно использовать следующие рекомендации. When you create self-signed certificates, you can use the following guidelines.
- Для параметра DnsName можно использовать IP-адрес конечной точки RESTFUL сетевого контроллера, но это не рекомендуется, так как необходимо, чтобы узлы сетевого контроллера размещались в одной подсети управления, ( например в одной стойке.) You can use the IP address of the Network Controller REST Endpoint for the DnsName parameter — but this is not recommended because it requires that the Network Controller nodes are all located within a single management subnet (e.g. on a single rack)
- Для нескольких развертываний с полным доменным именем DNS-имя, которое вы указали, будет превышено до полного доменного имени ( узла DNS для кластера сетевого контроллера. записи A создаются автоматически.) For multiple node NC deployments, the DNS name that you specify will become the FQDN of the Network Controller Cluster (DNS Host A records are automatically created.)
- Для развертывания сетевого контроллера с одним узлом DNS-имя может быть именем узла сетевого контроллера, за которым следует полное доменное имя. For single node Network Controller deployments, the DNS name can be the Network Controller’s host name followed by the full domain name.
Несколько узлов Multiple node
Для создания самозаверяющего сертификата можно использовать команду Windows PowerShell New-SelfSignedCertificate — . You can use the New-SelfSignedCertificate Windows PowerShell command to create a self-signed certificate.
Синтаксис Syntax
Пример использования Example usage
Один узел Single node
Для создания самозаверяющего сертификата можно использовать команду Windows PowerShell New-SelfSignedCertificate — . You can use the New-SelfSignedCertificate Windows PowerShell command to create a self-signed certificate.
Синтаксис Syntax
Пример использования Example usage
Создание — сертификата X. 509, подписанного центром сертификации Creating a CA-Signed X.509 Certificate
Чтобы создать сертификат с помощью центра сертификации, необходимо предварительно развернуть инфраструктуру открытого ключа ( PKI ) с Active Directory служб сертификации ( AD CS ) . To create a certificate by using a CA, you must have already deployed a Public Key Infrastructure (PKI) with Active Directory Certificate Services (AD CS).
Для создания сертификата для использования с сетевым контроллером можно использовать сторонние ЦС или средства, такие как OpenSSL, однако инструкции, приведенные в этом разделе, относятся только к AD CS. You can use third party CAs or tools, such as openssl, to create a certificate for use with Network Controller, however the instructions in this topic are specific to AD CS. Дополнительные сведения об использовании стороннего центра сертификации или средства см. в документации по используемому программному обеспечению. To learn how to use a third party CA or tool, see the documentation for the software you are using.
Создание сертификата с помощью ЦС включает следующие шаги. Creating a certificate with a CA includes the following steps.
- Вы или ваш домен или администратор безопасности вашей организации настраиваете шаблон сертификата. You or your organization’s Domain or Security Administrator configures the certificate template
- Вы или администратор сетевого контроллера или администратор SCVMM вашей организации запрашивает новый сертификат из центра сертификации. You or your organization’s Network Controller Administrator or SCVMM Administrator requests a new certificate from the CA.
Требования к конфигурации сертификата Certificate configuration requirements
Настроив шаблон сертификата на следующем шаге, убедитесь, что настраиваемый шаблон включает следующие обязательные элементы. While you are configuring a certificate template in the next step, ensure that the template you configure includes the following required elements.
- Имя субъекта сертификата должно быть полным доменным именем узла Hyper-V The certificate subject name must be the FQDN of the Hyper-V host
- Сертификат должен быть размещен в личном хранилище на локальном компьютере (My-CERT: \ LocalMachine\MY) The certificate must be placed in the local machine personal store (My – cert:\localmachine\my)
- Сертификат должен иметь политики приложения проверки подлинности сервера (EKU: 1.3.6.1.5.5.7.3.1) и проверки подлинности клиента (EKU: 1.3.6.1.5.5.7.3.2). The certificate must have both Server Authentication (EKU: 1.3.6.1.5.5.7.3.1) and Client Authentication (EKU: 1.3.6.1.5.5.7.3.2) Application policies.
Если личное ( хранилище сертификатов My-CERT: \ LocalMachine\MY ) на — узле Hyper V имеет более одного сертификата X. 509 с именем субъекта (CN) в качестве полного доменного имени узла ( ) , убедитесь, что сертификат, который будет использоваться Sdn, имеет дополнительное свойство расширенного использования ключа с идентификатором OID 1.3.6.1.4.1.311.95.1.1.1. If the Personal (My – cert:\localmachine\my) certificate store on the Hyper-V host has more than one X.509 certificate with Subject Name (CN) as the host Fully Qualified Domain Name (FQDN), ensure that the certificate that will be used by SDN has an additional custom Enhanced Key Usage property with the OID 1.3.6.1.4.1.311.95.1.1.1. В противном случае обмен данными между сетевым контроллером и узлом может не работать. Otherwise, the communication between Network Controller and the host might not work.
Настройка шаблона сертификата To configure the certificate template
Перед выполнением этой процедуры необходимо ознакомиться с требованиями к сертификатам и доступными шаблонами сертификатов в консоли Шаблоны сертификатов. Before you perform this procedure, you should review the certificate requirements and the available certificate templates in the Certificate Templates console. Можно либо изменить существующий шаблон, либо создать дубликат существующего шаблона, а затем изменить копию шаблона. You can either modify an existing template or create a duplicate of an existing template and then modify your copy of the template. Рекомендуется создать копию существующего шаблона. Creating a copy of an existing template is recommended.
- На сервере, где установлена служба AD CS, в диспетчер сервера выберите Сервис, а затем щелкните центр сертификации. On the server where AD CS is installed, in Server Manager, click Tools, and then click Certification Authority. Откроется консоль управления ( (MMC) центр сертификации ) . The Certification Authority Microsoft Management Console (MMC) opens.
- В консоли управления (MMC) дважды щелкните имя ЦС, щелкните правой кнопкой мыши шаблоны сертификатов, а затем выберите пункт Управление. In the MMC, double-click the CA name, right-click Certificate Templates, and then click Manage.
- Откроется консоль Шаблоны сертификатов. The Certificate Templates console opens. Все шаблоны сертификатов отображаются в области сведений. All of the certificate templates are displayed in the details pane.
- В области сведений щелкните шаблон, который необходимо дублировать. In the details pane, click the template that you want to duplicate.
- В меню действие выберите пункт дублировать шаблон. Click the Action menu, and then click Duplicate Template. Откроется диалоговое окно Свойства шаблона. The template Properties dialog box opens.
- В диалоговом окне Свойства шаблона на вкладке имя субъекта щелкните указать в запросе. In the template Properties dialog box, on the Subject Name tab, click Supply in the request. (Этот параметр необходим для SSL-сертификатов сетевого контроллера.) (This setting is required for Network Controller SSL certificates.)
- В диалоговом окне Свойства шаблона на вкладке Обработка запроса установите флажок Разрешить экспорт закрытого ключа . In the template Properties dialog box, on the Request Handling tab, ensure that Allow private key to be exported is selected. Также убедитесь, что выбрано назначение подписи и шифрования . Also ensure that the Signature and encryption purpose is selected.
- В диалоговом окне Свойства шаблона на вкладке расширения выберите Использование ключа и нажмите кнопку изменить. In the template Properties dialog box, on the Extensions tab, select Key Usage, and then click Edit.
- Убедитесь, что в подписи выбрана Цифровая подпись . In Signature, ensure that Digital Signature is selected.
- В диалоговом окне Свойства шаблона на вкладке расширения выберите политики приложений и нажмите кнопку изменить. In the template Properties dialog box, on the Extensions tab, select Application Policies, and then click Edit.
- В политиках приложений убедитесь, что в списке указаны проверка подлинности клиента и сервера . In Application Policies, ensure that Client Authentication and Server Authentication are listed.
- Сохраните копию шаблона сертификата с уникальным именем, например шаблоном сетевого контроллера. Save the copy of the certificate template with a unique name, such as Network Controller template.
Запрос сертификата из центра сертификации To request a certificate from the CA
Для запроса сертификатов можно использовать оснастку «сертификаты». You can use the Certificates snap-in to request certificates. Можно запросить любой тип сертификата, предварительно настроенный и предоставленный администратором центра сертификации, который обрабатывает запрос на сертификат. You can request any type of certificate that has been preconfigured and made available by an administrator of the CA that processes the certificate request.
Пользователи или локальные Администраторы являются минимальным членством в группе, необходимым для выполнения этой процедуры. Users or local Administrators is the minimum group membership required to complete this procedure.
- Откройте оснастку «сертификаты» для компьютера. Open the Certificates snap-in for a computer.
- В дереве консоли щелкните Сертификаты ( локальный компьютер ). In the console tree, click Certificates (Local Computer). Выберите хранилище личных сертификатов. Select the Personal certificate store.
- В меню действие наведите указатель мыши на пункт * * Все задачи , а затем нажмите кнопку * * Запросить новый сертификат, чтобы запустить мастер регистрации сертификатов. On the Action menu, point to** All Tasks, and then click **Request New Certificate to start the Certificate Enrollment wizard. Нажмите кнопку Далее. Click Next.
- Выберите политику, настроенную политикой регистрации сертификатов администратора, и нажмите кнопку Далее. Select the Configured by your administrator Certificate Enrollment Policy and click Next.
- Выберите Active Directory политику регистрации ( на основе шаблона ЦС, настроенного в предыдущем разделе ) . Select the Active Directory Enrollment Policy (based on the CA template that you configured in the previous section).
- Разверните раздел сведения и настройте следующие элементы. Expand the Details section and configure the following items.
- Убедитесь, что Использование ключа включает в себя цифровые подписи * * и * * шифрование ключей. Ensure that Key usage includes both Digital Signature **and **Key encipherment.
- Убедитесь, что политики приложений включают как 1.3.6.1.5.5.7.3.1 проверки подлинности сервера ( ) , так и 1.3.6.1.5.5.7.3.2 проверки подлинности клиента ( ) . Ensure that Application policies includes both Server Authentication (1.3.6.1.5.5.7.3.1) and Client Authentication (1.3.6.1.5.5.7.3.2).
- Нажмите кнопку Свойства. Click Properties.
- На вкладке субъект в поле имя субъекта в поле Тип выберите Общее имя. On the Subject tab, in Subject name, in Type, select Common name. В списке значение укажите конечную точку сети сетевого контроллера. In Value, specify Network Controller REST Endpoint.
- Щелкните Применить и нажмите кнопку ОК. Click Apply, and then click OK.
- Нажмите кнопку Регистрация. Click Enroll.
В консоли «сертификаты» щелкните личное хранилище, чтобы просмотреть сертификат, который вы зарегистрировали в центре сертификации. In the Certificates MMC, click on the Personal store to view the certificate you have enrolled from the CA.
Экспорт и копирование сертификата в библиотеку SCVMM Exporting and Copying the Certificate to the SCVMM Library
После создания самозаверяющего — или — подписанного сертификата ЦС необходимо экспортировать сертификат с закрытым ключом ( в формате PFX ) и без закрытого ключа ( в формате Base-64. cer ) из оснастки «сертификаты». After creating either a self-signed or CA-signed certificate, you must export the certificate with the private key (in .pfx format) and without the private key (in Base-64 .cer format) from the Certificates snap-in.
Затем необходимо скопировать два экспортированных файла в папки ServerCertificate.CR и NCCertificate.CR , указанные во время импорта шаблона службы NC. You must then copy the two exported files to the ServerCertificate.cr and NCCertificate.cr folders that you specified at the time when you imported the NC Service Template.
- Откройте оснастку «сертификаты» (certlm. msc) и выберите сертификат в личном хранилище сертификатов для локального компьютера. Open the Certificates snap-in (certlm.msc) and locate the certificate in the Personal certificate store for the local computer.
- Щелкните сертификат правой кнопкой мыши — , выберите пункт все задачи, а затем щелкните Экспорт. Right-click the certificate, click All Tasks, and then click Export. Откроется мастер экспорта сертификатов. The Certificate Export Wizard opens. Нажмите кнопку Далее. Click Next.
- Выберите Да, экспортировать параметр закрытый ключ и нажмите кнопку Далее. Select Yes, export the private key option, click Next.
- Выберите файл обмена личной информацией — PKCS #12 (. PFX) и примите значение по умолчанию, чтобы включить все сертификаты в путь сертификации, если это возможно. Choose Personal Information Exchange — PKCS #12 (.PFX) and accept the default to Include all certificates in the certification path if possible.
- Назначьте Пользователей и группы, а также пароль для экспортируемого сертификата, после чего нажмите кнопку Далее. Assign the Users/Groups and a password for the certificate you are exporting, click Next.
- На странице Имя экспортируемого файла перейдите к расположению, куда следует поместить экспортируемый файл, и присвойте ему имя. On the File to export page, browse the location where you want to place the exported file, and give it a name.
- Аналогичным образом Экспортируйте сертификат в. Формат CER. Similarly, export the certificate in .CER format. Примечание. Для экспорта в формате CER снимите флажок Да, экспортировать закрытый ключ. Note: To export to .CER format, uncheck the Yes, export the private key option.
- Скопируйте PFX-файл в папку ServerCertificate.cr. Copy the .PFX to the ServerCertificate.cr folder.
- Скопируйте CER-файл в папку NCCertificate.cr. Copy the .CER file to the NCCertificate.cr folder.
По завершении обновите эти папки в библиотеке SCVMM и убедитесь, что эти сертификаты скопированы. When you are done, refresh these folders in the SCVMM Library and ensure that you have these certificates copied. Продолжайте настройку и развертывание шаблона службы сетевого контроллера. Continue with the Network Controller Service Template Configuration and Deployment.
Проверка подлинности устройств и служб Подсистемамми Authenticating Southbound devices and services
Связь сетевого контроллера с узлами и устройствами МУЛЬТИПЛЕКСОРа SLB использует сертификаты для проверки подлинности. Network Controller communication with hosts and SLB MUX devices uses certificates for authentication. Обмен данными с узлами осуществляется по протоколу ОВСДБ, а связь с устройствами МУЛЬТИПЛЕКСОРа SLB осуществляется по протоколу WCF. Communication with the hosts is over OVSDB protocol while communication with the SLB MUX devices is over the WCF protocol.
Взаимодействие узла Hyper-V с сетевым контроллером Hyper-V Host Communication with Network Controller
Для связи с узлами Hyper-V через ОВСДБ сетевой контроллер должен представлять сертификат для хост-компьютеров. For communication with the Hyper-V hosts over OVSDB, Network Controller needs to present a certificate to the host machines. По умолчанию SCVMM выбирает SSL-сертификат, настроенный на сетевом контроллере, и использует его для связи подсистемамми с узлами. By default, SCVMM picks up the SSL certificate configured on the Network Controller and uses it for southbound communication with the hosts.
Это причина, по которой SSL-сертификат должен иметь настроенное EKU проверки подлинности клиента. That is the reason why the SSL certificate must have the Client Authentication EKU configured. Этот сертификат настраивается на ресурсе «серверы» (узлы Hyper-V представлены в сетевом контроллере как ресурс сервера), и его можно просмотреть, выполнив команду Windows PowerShell Get-нетворкконтроллерсервер. This certificate is configured on the “Servers” REST resource (Hyper-V hosts are represented in Network Controller as a Server resource), and can be viewed by running the Windows PowerShell command Get-NetworkControllerServer.
Ниже приведен частичный пример ресурса «Серверная часть». Following is a partial example of the server REST resource.
Для взаимной проверки подлинности узел Hyper-V также должен иметь сертификат для взаимодействия с сетевым контроллером. For mutual authentication, the Hyper-V host must also have a certificate to communicate with Network Controller.
Сертификат можно зарегистрировать из ЦС центра сертификации ( ) . You can enroll the certificate from a Certification Authority (CA). Если на хост-компьютере не найден сертификат на основе центра сертификации, то SCVMM создает самозаверяющий сертификат и подготавливает его на хост-компьютере. If a CA based certificate is not found on the host machine, SCVMM creates a self-signed certificate and provisions it on the host machine.
Сетевой контроллер и сертификаты узла Hyper-V должны быть доверенными друг от друга. Network Controller and the Hyper-V host certificates must be trusted by each other. Корневой сертификат сертификата узла Hyper-V должен присутствовать в хранилище доверенных корневых центров сертификации сетевого контроллера для локального компьютера и наоборот. The Hyper-V host certificate’s root certificate must be present in the Network Controller Trusted Root Certification Authorities store for the Local Computer, and vice versa.
Если вы используете самозаверяющие — сертификаты, SCVMM проверяет наличие необходимых сертификатов в хранилище доверенных корневых центров сертификации для локального компьютера. When you’re using self-signed certificates, SCVMM ensures that the required certificates are present in the Trusted Root Certification Authorities store for the Local Computer.
Если для узлов Hyper-V используются сертификаты на основе ЦС, необходимо убедиться, что корневой сертификат ЦС находится в хранилище доверенных корневых центров сертификации сетевого контроллера для локального компьютера. If you are using CA based certificates for the Hyper-V hosts, you need to ensure that the CA root certificate is present on the Network Controller’s Trusted Root Certification Authorities store for the Local Computer.
Связь по Load Balancer МУЛЬТИПЛЕКСОРа с сетевым контроллером Software Load Balancer MUX Communication with Network Controller
Мультиплексор и сетевой контроллер мультиплексора программного обеспечения Load Balancer ( ) взаимодействуют по протоколу WCF, используя сертификаты для проверки подлинности. The Software Load Balancer Multiplexor (MUX) and Network Controller communicate over the WCF protocol, using certificates for authentication.
По умолчанию SCVMM выбирает SSL-сертификат, настроенный на сетевом контроллере, и использует его для подсистемамми связи с устройствами мультиплексора. By default, SCVMM picks up the SSL certificate configured on the Network Controller and uses it for southbound communication with the Mux devices. Этот сертификат настраивается в ресурсе Нетворкконтроллерлоадбаланцермукс, и его можно просмотреть, выполнив командлет PowerShell Get-нетворкконтроллерлоадбаланцермукс. This certificate is configured on the “NetworkControllerLoadBalancerMux” REST resource and can be viewed by executing the Powershell cmdlet Get-NetworkControllerLoadBalancerMux.
Пример частичного ресурса МУЛЬТИПЛЕКСОРа в части ( ) : Example of MUX REST resource (partial):
Для взаимной проверки подлинности также необходим сертификат на устройствах МУЛЬТИПЛЕКСОРа SLB. For mutual authentication, you must also have a certificate on the SLB MUX devices. Этот сертификат автоматически настраивается SCVMM при развертывании программной подсистемы балансировки нагрузки с помощью SCVMM. This certificate is automatically configured by SCVMM when you deploy software load balancer using SCVMM.
На узлах узла и SLB крайне важно, чтобы хранилище сертификатов доверенных корневых центров сертификации не включало сертификаты, для которых «выдан» не совпадает с «выдан». On the host and SLB nodes, it is critical that the Trusted Root Certification Authorities certificate store does not include any certificate where “Issued to” is not the same as “Issued by”. В этом случае происходит сбой связи между сетевым контроллером и устройством подсистемамми. If this occurs, communication between Network Controller and the southbound device fails.
Сетевой контроллер и сертификаты МУЛЬТИПЛЕКСОРа SLB должны быть доверенными друг от друга ( . корневой сертификат сертификата мультиплексора SLB должен присутствовать в хранилище доверенных корневых центров сертификации компьютера сетевого контроллера и наоборот ) . Network Controller and the SLB MUX certificates must be trusted by each other (the SLB MUX certificate’s root certificate must be present in the Network Controller machine Trusted Root Certification Authorities store and vice versa). При использовании самозаверяющих — сертификатов SCVMM обеспечивает присутствие необходимых сертификатов в в хранилище доверенных корневых центров сертификации для локального компьютера. When you’re using self-signed certificates, SCVMM ensures that the required certificates are present in the in the Trusted Root Certification Authorities store for the Local Computer.


