- How to View and Close Open Files in Windows Server SMB Share?
- View Open Files on a Shared Network Folder on Windows Server
- How to Find Out Who is Locking a File in a Shared Folder?
- How to Forcibly Close an Open File on a SMB Share?
- Get-SMBOpenFile: Find and Close Open File Handlers Using PowerShell
- How to Close Open Files on Remote Computer Using PowerShell?
- How to show File Extensions in Windows 10
- What are File Extensions & how are they useful
- Show File Extensions in Windows 10
- 1] Through Folder or File Explorer Options
- 2] Via Windows File Explorer
- 3] Using the Registry Editor
- How to use the File Explorer views in Windows 10 like a pro
- About File Explorer views and how to access them in Windows 10
- The Extra large icons view in File Explorer
- The Large icons view in Windows 10’s File Explorer
- The Medium icons layout in File Explorer
- The Small icons view in Windows 10
- The List layout in Windows 10’s File Explorer
- The Details view in Windows 10
- The Tiles layout in File Explorer
- The Content view in Windows 10’s File Explorer
- Which view(s) do you prefer and why?
How to View and Close Open Files in Windows Server SMB Share?
Windows file server administrators often have to force close the shared files that are open simultaneously by multiple users. This usually happens if the desktop software doesn’t work as expected, the user logs off incorrectly, or when the user opened a file and forgot to close it (went home, on vacation, etc.). In all these cases, the file on the shared network folder is still open (and locked) and cannot be modified by other users. Other users can see such a message when trying to open a locked file (depending on the application used): The document filename is locked for editing by another user. To open a read-only copy of his document, click…
In this article we’ll show you how to get the list of open files on a Windows file server, find out which user locked a file on a shared folder, and how to close (reset) file sessions to unlock open files.
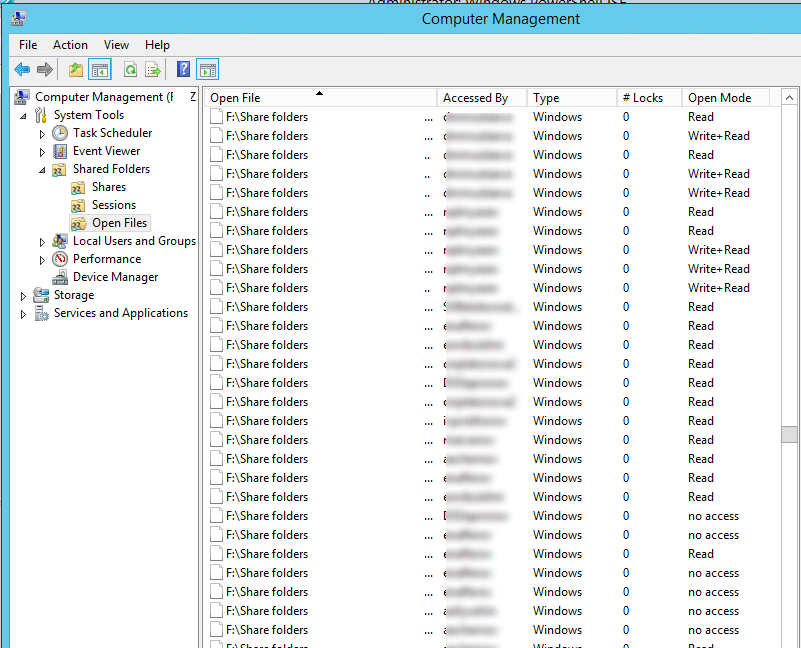
View Open Files on a Shared Network Folder on Windows Server
You can get the list of files opened by users on Windows file server using the built-in Computer Management ( compmgmt.msc ) graphic snap-in.
Open the Computer Management console on your file server (or connect to the server remotely from the management console running on your computer) and go to System Tools -> Shared Folders -> Open files. A list of open files on current SMB server is displayed on the right side of the window. The list contains the local path to the file, the name of the user account that opens the file, the number of locks and the mode in which the file is opened (Read or Write+Read).
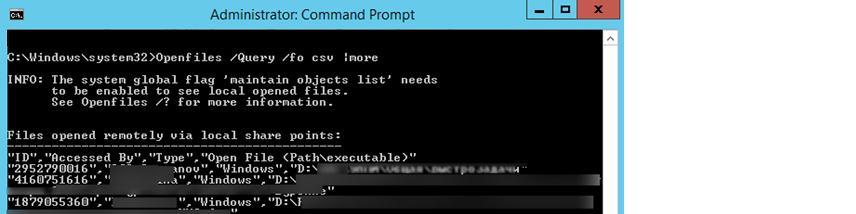
You can get the same list of open files using the built-in openfiles.exe console tool. For example, using the following command you can get the Session ID, username and full local path to the open file:
openfiles /Query /fo csv |more
You can display a list of open files on a remote server. For example, you need to list all open files in shared folders on the lon-fs01 host:
openfiles /Query /s lon-fs01 /fo csv
How to Find Out Who is Locking a File in a Shared Folder?
To identify the user who opened (locked) the filename.docx file on the shared network folder on the remote server lon-fs01, run this command:
openfiles /Query /s lon-fs01 /fo csv | find /i «filename.docx»
You can specify only a part of the file name. For example, you need to find out who opened an XLSX file containing “sale_report” in its name. Use the following pipe:
openfiles /Query /s lon-fs01 /fo csv | find /i «sale_report»| find /i «xlsx»
Of course you can find this file in the Computer Management GUI, but it’s less convenient (this console doesn’t provide search feature).
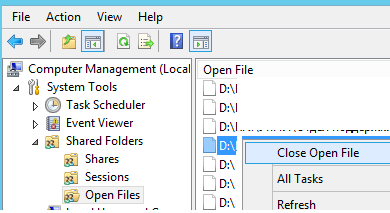
How to Forcibly Close an Open File on a SMB Share?
To close an open file, find it in the list of files in Open File section and select Close Open File in the context menu.
If there are hundreds of open files on your file server, it won’t be easy to find the specific file in the console. It is more convenient to use the Openfiles command line tool. As we have already told, it returns the session ID of the open file. Using this session ID you can force close the file by resetting the SMB connection.
First, you need to find the session ID of the open file:
openfiles /Query /s lon-fs01 /fo csv | find /i «farm»| find /i «.xlsx»
Disconnect the user from file using the received SMB session ID:
openfiles /Disconnect /s lon-fs01 /ID 617909089

You can forcefully reset all sessions and unlock all files opened by a specific user:
openfiles /disconnect /s lon-fs01/u corp\mjenny /id *
Get-SMBOpenFile: Find and Close Open File Handlers Using PowerShell
New cmdlets to manage shares and files on an SMB server appeared in PowerShell version for Windows Server 2012/Windows 8. These cmdlets can be used to remotely close network connections to an open file.
You can get a list of open files using the Get-SMBOpenFile cmdlet. Close-SmbOpenFile is used to close/reset the connection to a remote file.
To display a list of open files on the Windows SMB server, run the command:
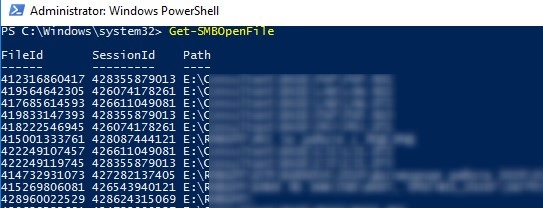
The command returns the file ID, session ID and full file name(path).
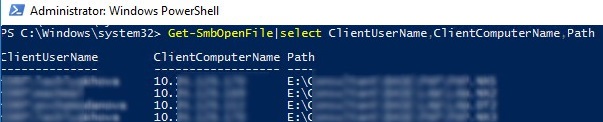
You can display a list of open files with user and computer names (IP addresses):
You can list all files opened by a specific user:
Get-SMBOpenFile –ClientUserName «corp\mjenny»|select ClientComputerName,Path
or from a specific computer/server:
Get-SMBOpenFile –ClientComputerName 192.168.1.190| select ClientUserName,Path
You can display a list of open files by pattern. For example, to list all exe files opened from the shared folder:
or open files with a specific name:
The Close-SmbOpenFile cmdlet is used to close the open file handler. You can close the file by ID:
Close-SmbOpenFile -FileId 4123426323239
But it is usually more convenient to close the file by name:
Get-SmbOpenFile | where <$_.Path –like "*annual2020.xlsx">| Close-SmbOpenFile -Force
With the Out-GridView cmdlet, you can make a simple GUI form for finding and closing open files. The following script will list open files. You should use the built-in filters in the Out-GridView table to find open files for which you want to reset the SMB sessions. Then you need to select the required files and click OK. As a result, the selected files will be forcibly closed.
Get-SmbOpenFile|select ClientUserName,ClientComputerName,Path,SessionID| Out-GridView -PassThru –title “Select Open Files”|Close-SmbOpenFile -Confirm:$false -Verbose

How to Close Open Files on Remote Computer Using PowerShell?
The Get-SMBOpenFile and Close-SmbOpenFile cmdlets can be used to remotely find and close open (locked) files. First, you need to connect to a remote Windows SMB server via a CIM session:
$sessn = New-CIMSession –Computername lon-fs01
The following command will find the SMB session for the open file pubs.docx and close the file session.
Get-SMBOpenFile -CIMSession $sessn | where <$_.Path –like "*pubs.docx">| Close-SMBOpenFile -CIMSession $sessn
Confirm closing of the file by pressing Y . As a result, you have unlocked the file. Now other users can open it.

With PowerShell, you can close SMB sessions and unlock all files that a specific user has opened (a user went home and didn’t release the open files). For example, to reset all file sessions of the user mjenny, run this command:
Get-SMBOpenFile -CIMSession $sessn | where <$_.ClientUserName –like "*mjenny*">|Close-SMBOpenFile -CIMSession $sessn
How to show File Extensions in Windows 10
File Extension is that which identifies the file type. If you are a regular Windows user, then it is not at all a problem to identify the file type. For it is very important to see file extension to identify the type of file you are trying to open from a security point of view. So in this post, we will see how to hide or show File Extensions in Windows 10/8/7 and why you should show them.
Since file names allow you to use multiple full stops, the real name of a malware file could be realword .docx.exe . But because you have not set Windows to show file extensions, you would see only realword .docx . Thinking its a Word document, you could well end up clicking on it and infecting your computer. If you had, on the other hand, set your PC to show file extensions, you would see its full name – realword .docx.exe , which would help you to identify that it was actually an executable file and in all probability a malware file.
What are File Extensions & how are they useful
Different file types have different extensions. Audio files have .mp3, .wav, .wma, and more based on the program used to open that file. File extensions also help the operating system to identify the corresponding program to open that particular file. So, you should be able to see file extensions to be at the safer side, and we will let you know how to enable options to see file extensions in Windows.
As mentioned earlier, by default Windows does not show file extensions and they are hidden. But, you can toggle the option to see them.
Show File Extensions in Windows 10
There are five ways how you can go about accessing this setting:
- Through the File Explorer Options
- Through Windows Explorer Ribbon
- Using the Registry
- Using Command Prompt
- Using Group Policy Editor.
1] Through Folder or File Explorer Options
Open Control Panel > Appearance and Personalization. Now, click on Folder Options or File Explorer Option, as it is now called > View tab.
In this tab, under Advanced Settings, you will see the option Hide extensions for known file types. Uncheck this option and click on Apply and OK.
Windows 10 users may also search for File Explorer Options in Start search box and open this box.
Now, you can see file extensions for all files anywhere on your Windows system.
In Windows 10/8.1 Explorer, you can access File Explorer Options via Explorer.
Click View > Options > Change folder and search options.
Once here, you can do the needful as explained above.
In Windows 7, open Explorer, press Alt on your keyboard to make the Classic bar appear. Next, click on Tools > Folder Options. Now follow the steps mentioned above.
These are very simple steps to follow, and you do not need any third-party software to view file extensions. Windows provides us with everything which can be easily achieved, and the point lies in knowing and implementing them. This is the first way to see file extensions in Windows 7.
2] Via Windows File Explorer
Open Explorer and click on the View tab. Simply select the File name extensions checkbox, and you are all set.
3] Using the Registry Editor
Hit the WINKEY + R button combination to launch the Run utility, type in regedit and hit Enter. Once Registry Editor opens, navigate to the following key-
Look up for a DWORD entry labeled as HideFileExt.
Double click on the mentioned DWORD entry and set its value as 0. This will show up the hidden file extensions.
A value of 0 will hide the file extensions.
Exit the Registry Editor and then reboot your computer for the changes to take effect.
4] Use Windows Command Prompt
This fix can be used in both the scenarios mentioned above. Insert a bootable drive of Windows 10 installer.
Start by hitting the WINKEY + X combinations and select Command Prompt (Admin) to launch Command Prompt with Administrator Privileges.
Navigate to the root location of that bootable device inside the Command Prompt command line. Once you get there, type in the following to show the file extensions-
And then hit Enter.
You can also enter the following command to hide the file extensions,
5] Using Group Policy Editor
You can also use the Group Policy Editor and change the setting here:
User Configuration > Preferences > Control Panel Settings > Folder Options.
Set “Show hidden files and folders” and uncheck “Hide extensions for known file types”.
Thus, you can set your Windows to show file extensions in Windows 10/8. If you have anything to add, please do share it with us through comments.
Date: March 22, 2020 Tags: Explorer, Features
How to use the File Explorer views in Windows 10 like a pro
One of the strengths of File Explorer is the number of different ways you can view the content of a folder on your Windows 10 PC. Whether it is a bare-bones listing of file names or a view that shows graphics in large-sized thumbnails, File Explorer makes it easy to see data in the layout you prefer. You can use your mouse, touchscreen, or shortcuts to change views and decide how your files and folders are displayed in Windows 10. In this tutorial, we explain the different views of File Explorer and how to use them like a pro in Windows 10:
About File Explorer views and how to access them in Windows 10
The views or layouts change the way files and folders appear in your active File Explorer window. This can be helpful if you want an overview of the items in a location or when you know a file is in a certain folder but have difficulties finding it.
To begin, open File Explorer. If you access the Views tab, it’s impossible to miss the gallery in the Layout section.
The views are displayed in the Layout section of the View tab
Depending on the size of your File Explorer window, the views gallery can be compact, as you can see above, or expanded, as shown in the image below.
The expanded gallery in File Explorer
TIP: Hovering your mouse pointer over any gallery option shows a preview of that choice in the window below.
If the gallery is compact, you don’t have to maximize File Explorer to access all the available views. Use the top two arrows on the right to scroll through the options instead.
Use the arrows to go through the views
You can also click or tap the More arrow underneath to expand the gallery.
Press More to for other options to Change your view
This shows all the views available in Windows 10, regardless of File Explorer’s current size.
The views gallery expands
TIP: Learn what else the View tab has to offer in Windows 10 by reading about 10 ways to view files like a Pro in File Explorer.
Another way to reach the views is to right-click or press-and-hold on a free area within the File Explorer window. Then, in the subsequent contextual menu, click or tap on Views to see the same available layout options. A dot indicates which view is currently applied.
Access Views from the right-click menu
Regardless of how you access them, File Explorer provides eight ways to view the contents of a folder: Extra large icons, Large icons, Medium icons, Small icons, List, Details, Tiles, and Content.
The eight views in Windows 10’s File Explorer
Some of these layouts display thumbnails with the content of your items, while others show standard icons based on file types. The different views to preview files and folders are Extra large icons, Large icons, Medium icons, Tiles, and Content.
You can click or tap on the desired view to use it. Alternatively, find out more about the shortcuts for each layout from the following chapters of this guide, which also cover what each view does and how it can help your productivity in Windows 10.
NOTE: A folder’s default layout is determined by its view template, so it can also be modified by changing the folder’s view template in File Explorer. To learn more about different folder view templates and their layouts, read our tutorial about configuring the default templates to suit your preferences.
The Extra large icons view in File Explorer
If you’re wondering which view displays the gigantic icons of files and folders, the answer is “Extra large icons.” Unsurprisingly, this layout offers the best previews of graphic and video files, and we recommended it when it comes to pictures, media files, and PowerPoint presentations. However, when it comes to other regular files, this view does not offer more data than the other icon size layouts.
The Extra large icons view displays gigantic previews
To access the “Extra large icons” view, use the keyboard shortcut Ctrl + Shift + 1.
The Large icons view in Windows 10’s File Explorer
One of the two default views in Windows 10, the Large icons layout is also useful to see your photos without having to open them. While its thumbnails are not as big as the ones you get with the previous option, they are larger compared to the other views, so this layout gives you a pretty clear picture of what’s inside your media files. When it comes to generic icons for items like PDF files and executables, enlarging them in File Explorer does not tell you any more than the smaller icons do.
File Explorer uses Large icons as its default view for media folders
Windows 10 also makes it easy to reach the Large icons view by showing a shortcut for it in the bottom-right corner of your File Explorer windows.
File Explorer displays by default a shortcut for Large icons
As you can also see in the image above, to display your files and folders in the Large icons view, you have to simultaneously press the following on your keyboard: Ctrl + Shift + 2.
NOTE: If you’re frequently using one of File Explorer’s large views, you can also change the folder icons in Windows 10 to avoid drowning in a sea of yellow. 🙂
The Medium icons layout in File Explorer
When you apply it in File Explorer, the Medium icons view gives you an idea about the contents of media items in a folder. However, its thumbnails are hardly big enough to distinguish among several similar graphics files, so you’re better off using the two previous layouts if you are trying to find a particular image or video. Due to its adequate size, the Medium icons view offers a good overview of the items within a folder, so we recommend it when you need to select multiple files in Windows 10.
The Medium icons layout is useful to manage multiple items
On your keyboard, simultaneously press Ctrl + Shift + 3 to use the Medium icons view.
The Small icons view in Windows 10
The last of the four icon size layouts in File Explorer, Small icons, is different from the other three. Not only are items displayed in columns, but there are no thumbnails shown in this view, and, instead, the icons next to your files are only representative of their type (Microsoft Word Document, PDF, executable, graphic file, etc.).
Small icons is the only icon size layout that does not show a preview
The keyboard shortcut to use the Small icons layout is Ctrl + Shift + 4.
TIP: If you’re wondering which view displays your files and folders as small icons, this layout is not the only one. The next two views we discuss, List and Details, are using the same size icons.
The List layout in Windows 10’s File Explorer
As you’d expect from its name, the List layout shows very little details, displaying your files and folders as small icons, which makes it nearly indistinguishable from the Small icons view. However, even if neither of them shows a preview of actual content, one way to tell them apart is by their columns, which are wider and don’t truncate item names in the List view. Also, like any list, you can read its entries from top to bottom, while the Small icons layout shows everything left to right.
List everything in your folder to thoroughly look through item names
You can use the List view with the keyboard shortcut Ctrl + Shift + 5.
The Details view in Windows 10
If you experiment with layouts when using File Explorer, which view provides the most information at a glance is obvious. While the previous options focused on either thumbnails or providing an overview to help you identify items faster, Details view displays each file and folder on a separate row, along with detailed information.
This default layout is easy to read, and its initial columns depend on the view template used, showing relevant data about the items in your active File Explorer window. That is why, despite every item showing a small icon, this view is used to view the detailed information about files and folders in Windows 10. The screenshot below shows the most common scenario, when the columns are Name, Date modified, Type, and Size.
See everything about your files with the Details view
If you need a fast way to see your items in the Details layout, you can click or tap on its shortcut, which is always shown in File Explorer’s lower-right corner.
A shortcut for Details is displayed by default in File Explorer
As also shown in the shortcut’s tooltip above, the Details view can also be accessed with the keyboard shortcut Ctrl + Shift + 6.
The main reason we use and recommend the Details layout, especially when working with many files at once, is that you can add more columns to it. On top of that, you can use this view in File Explorer to sort files by column heading or easily group and filter them based on the criteria you need. If you want to learn more, the Details view is heavily featured in our tutorial on How to sort, group, and filter files & folders in Windows 10’s File Explorer.
The Tiles layout in File Explorer
The Tiles view shows medium-sized icons for your items, as well as basic details. You can use it to display thumbnails and information about the type and size of your files. While not as detailed as the Content or Details views, the Tiles layout is a useful mix between Medium icons and Content.
Get basic information about your files with the Tiles view
You can apply the Tiles layout by pressing Ctrl + Shift + 7 simultaneously on your keyboard.
The Content view in Windows 10’s File Explorer
The Content view lists files and folders on separate rows, displaying, for each item, additional details like Type, Size, Date modified, Dimensions, or Authors. This layout is a mix between the Tiles and Details options, although its thumbnails are slightly smaller than those used by the Tiles view. If you wish to quickly check extra data about files when browsing with File Explorer, the Content view layout could be the best choice.
Use the Content view to quickly find information about the authors and content of your files
Predictably, the keyboard shortcut for the Content view is Ctrl + Shift + 8.
TIP: There are plenty of other things you can change about the way files and folders are displayed in Windows 10, and we included some of them in our article about 15 ways to improve File Explorer.
Which view(s) do you prefer and why?
The views in File Explorer help you change what data you see by taking charge of your layout options. Luckily, Windows 10 provides more than enough views to satisfy any user. We mostly use the Details, Content, and Large icons layouts. After reading this extensive guide, we’re curious about which view you prefer in File Explorer and why. Let us know in the comments below.


