- How to view all network shares in Windows
- Access your computer on the network
- View your computer through «Network neighborhood» or «My Network Places»
- Use the MS-DOS «net share» command
- Команда NET VIEW — показ списка сетевых ресурсов
- Синтаксис утилиты NET VIEW
- Примеры команды NET VIEW
- Видео — Работа с командой NET VIEW
- Manage User Accounts in Windows Server Essentials
- Managing user accounts
- Add a user account
- Remove a user account
- View user accounts
- Change the display name for the user account
- Activate a user account
- Deactivate a user account
- Understand user accounts
- Manage user accounts using the Dashboard
- User account tasks in the Dashboard
- Managing passwords and access
How to view all network shares in Windows
Below are different methods of how a Microsoft Windows users may view their shares.
Access your computer on the network
To view visible shares in Windows, open the network path to your computer. For example, if your computer was named hope, you could view your computer by clicking Start, Run, and typing \\hope. Running this command opens a window and displays all available network shares. It is important to realize that this method does not show hidden shares. You need to use the net share command explained below to view hidden shares.
View your computer through «Network neighborhood» or «My Network Places»
Opening your computer through «Network neighborhood» or «My Network Places» allows you to view your computer’s shares and any other computer’s shares in your network.
«Network neighborhood» or «My Network Places» is accessible through the desktop. If you double-click one of these icons, and then double-click the workgroup belonging to your computer, you can view your computer’s shares.
Hidden shares are not displayed.
Use the MS-DOS «net share» command
Microsoft Windows users can use the «net share» command to view all shares (including the hidden shares) on a computer. To use this command, follow the steps below.
- Click Start, Run, type cmd, and press Enter .
- At the MS-DOS prompt, type net share and press Enter . Each of the shares, the location of the resource, and any remarks for that share are displayed. Below is an example of how this may look.
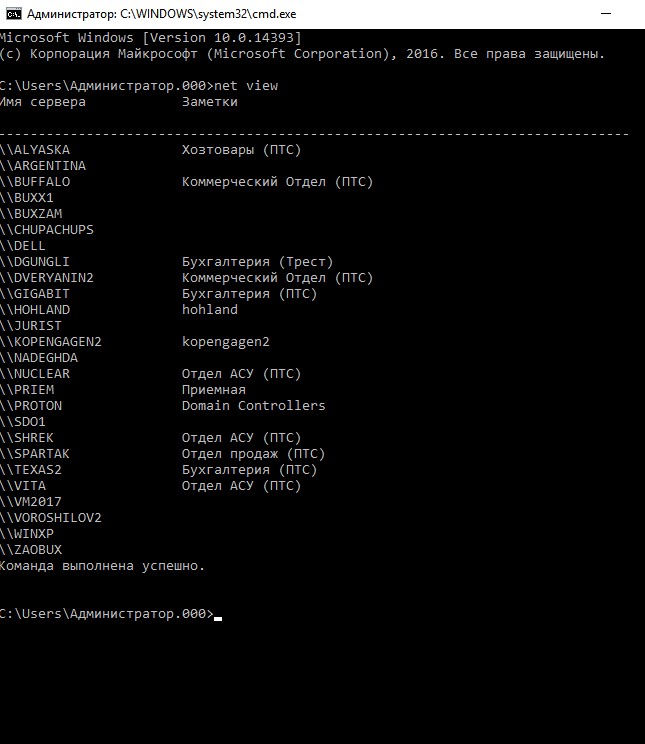
Команда NET VIEW — показ списка сетевых ресурсов
Команда net view выводит список доменов, компьютеров или общих ресурсов на данном компьютере. Вызванная без параметров, команда net view выводит список компьютеров в текущем домене.
А для управления сетевыми ресурсами используется уже другая команда — net share .
Синтаксис утилиты NET VIEW
net view [\\имя_компьютера] [/domain[:имя_домена]]
net view /network:nw [\\имя_компьютера], где
- \\имя_компьютера — задает имя компьютера для просмотра расположенных на нем общих ресурсов.
- /domain[:имя_домена]— задает домен, для которого выводится список компьютеров. Если параметр имя_домена не задан, команда выводит список всех доменов сети.
- /network:nw— выводит список всех доступных серверов сети NetWare. При указании имени компьютера команда отображает все доступные ресурсы на данном компьютере. Кроме того, можно указать дополнительные сети.

Примеры команды NET VIEW
- Вызов помощи по команде — net help view;
- Просмотр списка компьютеров текущего домена — net view;
- Список общих ресурсов компьютера \\PC1 может быть получен с помощью команды: net view \\PC1;
- Для просмотра ресурсов сервера NetWare с именем \\Marketing служит команда: net view /network:nw \\marketing;
- Для вывода списка компьютеров в домене или рабочей группе sales служит команда: net view /domain:sales;
- Для вывода списка всех серверов в сети NetWare можно использовать следующую команду: net view /network:nw.
Видео — Работа с командой NET VIEW
Manage User Accounts in Windows Server Essentials
Applies To: Windows Server 2016 Essentials, Windows Server 2012 R2 Essentials, Windows Server 2012 Essentials
The Users page of the Windows Server Essentials Dashboard centralizes information and tasks that help you manage the user accounts on your small business network. For an overview of the Users Dashboard, see Dashboard Overview.
Managing user accounts
The following topics provide information about how to use the Windows Server Essentials Dashboard to manage the user accounts on the server:
Add a user account
When you add a user account, the assigned user can log on to the network, and you can give the user permission to access network resources such as shared folders and the Remote Web Access site. Windows Server Essentials includes the Add a User Account Wizard that helps you:
Provide a name and password for the user account.
Define the account as either an administrator or as a standard user.
Select which shared folders the user account can access.
Specify if the user account has remote access to the network.
Select email options if applicable.
Assign a Microsoft Online Services account (referred to as a Microsoft 365 account in Windows Server Essentials) if applicable.
Assign user groups ( Windows Server Essentials only).
- Non-ASCII characters are not supported in Microsoft Azure Active Directory (Azure AD). Do not use any non-ASCII characters in your password, if your server is integrated with Azure AD.
- The email options are only available if you install an add-in that provides email service.
To add a user account
Open the Windows Server Essentials Dashboard.
On the navigation bar, click Users.
In the Users Tasks pane, click Add a user account. The Add a User Account Wizard appears.
Follow the instructions to complete the wizard.
Remove a user account
When you choose to remove a user account from the server, a wizard deletes the selected account. Because of this, you can no longer use the account to log on to the network or to access any of the network resources. As an option, you can also delete the files for the user account at the same time that you remove the account. If you do not want to permanently remove the user account, you can deactivate the user account instead to suspend access to network resources.
If a user account has a Microsoft online account assigned, when you remove the user account, the online account also is removed from Microsoft Online Services, and the user’s data, including email, is subject to data retention policies in Microsoft Online Services. If you want to retain user data for the online account, deactivate the user account instead of removing it. For more information, see Manage Online Accounts for Users.
To remove a user account
Open the Windows Server Essentials Dashboard.
On the navigation bar, click Users.
In the list of user accounts, select the user account that you want to remove.
In the Tasks pane, click Remove the user account. The Delete a User Account Wizard appears.
On the Do you want to keep the files? page of the wizard, you can choose to delete the user’s files, including File History backups and the redirected folder for the user account. To keep the user’s files, leave the check box empty. After making your selection, click Next.
Click Delete account.
After you remove a user account, the account no longer appears in the list of user accounts. If you chose to delete the files, the server permanently deletes the user’s folder from the Users server folder and from the File History Backups server folder.
If you have an integrated email provider, the email account assigned to the user account will also be removed.
View user accounts
The Users section of the Windows Server Essentials Dashboard displays a list of network user accounts. The list also provides additional information about each account.
To view a list of user accounts
Open the Windows Server Essentials Dashboard.
On the main navigation bar, click Users.
The Dashboard displays a current list of user accounts.
To view or change properties for a user account
In the list of user accounts, select the account for which you want to view or change properties.
In the Tasks pane, click View the account properties. The Properties page for the user account appears.
Click a tab to display the properties for that account feature.
To save any changes that you make to the user account properties, click Apply.
Change the display name for the user account
The display name is the name that appears in the Name column on the Users page of the Dashboard. Changing the display name does not change the logon or sign-in name for a user account.
To change the display name for a user account
Open the Windows Server Essentials Dashboard.
On the navigation bar, click Users.
In the list of user accounts, select the user account that you want to change.
In the Tasks pane, click View the account properties. The Properties page for the user account appears.
On the General tab, type a new First name and Last name for the user account, and then click OK.
The new display name appears in the list of user accounts.
Activate a user account
When you activate a user account, the assigned user can log on to the network and access network resources to which the account has permission, such as shared folders and the Remote Web Access site.
You can only activate a user account that is deactivated. You cannot activate a user account after you remove it from the server.
To activate a user account
Open the Windows Server Essentials Dashboard.
On the navigation bar, click Users.
In the list view, select the user account that you want to activate.
In the Tasks pane, click Activate the user account.
In the confirmation window, click Yes to confirm your action.
After you activate a user account, the status for the account displays Active. The user account regains the same access rights that were assigned prior to account deactivation.
If you have an integrated email provider, the email account assigned to the user account will also be activated.
Deactivate a user account
When you deactivate a user account, account access to the server is temporarily suspended. Because of this, the assigned user cannot use the account to access network resources such as shared folders or the Remote Web Access site until you activate the account.
If the user account has a Microsoft online account assigned, the online account is also deactivated. The user cannot use resources in Microsoft 365 and other online services that you subscribe to, but the user’s data, including email, is retained in Microsoft Online Services.
You can only deactivate a user account that is currently active.
To deactivate a user account
Open the Windows Server Essentials Dashboard.
On the navigation bar, click Users.
In the list view, select the user account that you want to deactivate.
In the Tasks pane, click Deactivate the user account.
In the confirmation window, click Yes to confirm your action.
After you deactivate a user account, the status for the account displays Inactive.
If you have an integrated email provider, the email account assigned to the user account will also be deactivated.
Understand user accounts
A user account provides important information to Windows Server Essentials, which enables individuals to access information that is stored on the server, and makes it possible for individual users to create and manage their files and settings. Users can log on to any computer on the network if they have a Windows Server Essentials user account and they have permissions to access a computer. Users access their user accounts with their user name and password.
There are two main types of user accounts. Each type gives users a different level of control over the computer:
Standard accounts are for everyday computing. The standard account helps protect your network by preventing users from making changes that affect other users, such as deleting files or changing network settings.
Administrator accounts provide the most control over a computer network. You should assign the administrator account type only when necessary.
Manage user accounts using the Dashboard
Windows Server Essentials makes it possible to perform common administrative tasks by using the Windows Server Essentials Dashboard. By default, the Users page of the Dashboard includes two tabs: Users and Users Groups.
- If you integrate your server that is running Windows Server Essentials with Microsoft 365, a new tab called Distribution Groups is also added within the Users page of the Dashboard.
- In Windows Server Essentials, the Users page of the Dashboard includes only a single tab — Users.
The Users tab includes the following:
A list of user accounts, which displays:
The name of the user.
The Logon name for the user account.
Whether the user account has Anywhere Access permission. Anywhere Access permission for a user account is either Allowed or Not allowed.
Whether the File History for this user account is managed by the server running Windows Server Essentials. The File History status for a user account is either Managed or Not managed.
The level of access that is assigned to the user account. You can assign either Standard user access or Administrator access for a user account.
The user account status. A user account can be Active, Inactive, or Incomplete.
In Windows Server Essentials, if the server is integrated with Microsoft 365 or Windows Intune, the Microsoft online account is displayed.
In Windows Server Essentials, if the server is integrated with Microsoft 365, the status of the account (known in Windows Server Essentials as the Microsoft online account) for the user account is displayed.
A details pane with additional information about a selected user account.
A tasks pane that includes:
A set of user account administrative tasks such as viewing and removing user accounts, and changing passwords.
Tasks that allow you to globally set or change settings for all user accounts in the network.
The following table describes the various user account tasks that are available from the Users tab. Some of the tasks are user account-specific, and they are only visible when you select a user account in the list.
If you integrate Microsoft 365 with Windows Server Essentials, additional tasks will become available. For more information, see Manage Online Accounts for Users.
User account tasks in the Dashboard
| Task name | Description |
|---|---|
| View the account properties | Enables you to view and change the properties of the selected user account, and to specify folder access permissions for the account. |
| Deactivate the user account | A user account that is deactivated cannot log on to the network or access network resources such as shared folders or printers. |
| Activate the user account | A user account that is activated can log on to the network and can access network resources as defined by the account permissions. |
| Remove the user account | Enables you to remove the selected user account. |
| Change the user account password | Enables you to reset the network password for the selected user account. |
| Add a user account | Starts the Add a User Account Wizard, which enables you to create a single new user account that has either standard user access or administrator access. |
| Assign a Microsoft online account | Adds a Microsoft online account to the local network user account that is selected. |
This task is displayed when your server is integrated with Microsoft online services, such as Microsoft 365.
This task is displayed when your server is integrated with Microsoft online services, such as Microsoft 365.
This task is displayed when your server is integrated with Microsoft online services, such as Microsoft 365.
This task is applicable to Windows Server Essentials.
This task is applicable to Windows Server Essentials.
Managing passwords and access
The following topics provide information about how to use the Windows Server Essentials Dashboard to manage user account passwords and user access to the shared folders on the server:


