- Working Set
- Virtual Memory Functions
- How to Increase Virtual Memory in Windows 10: A Quick Guide
- How to Set Virtual Memory on Windows 8 Computer
- Steps to set virtual memory on Windows 8 computer:
- Adjust Virtual Memory on windows 10 October 2020 update (A Quick Guide)
- Virtual memory a combination computer’s physical RAM with temporary space on hard disk. Here how to customize or Adjust Virtual Memory windows 10
- Increasing Virtual Memory in Windows 10
- How To Calculate pagefile size
Working Set
The working set of a process is the set of pages in the virtual address space of the process that are currently resident in physical memory. The working set contains only pageable memory allocations; nonpageable memory allocations such as Address Windowing Extensions (AWE) or large page allocations are not included in the working set.
When a process references pageable memory that is not currently in its working set, a page fault occurs. The system page fault handler attempts to resolve the page fault and, if it succeeds, the page is added to the working set. (Accessing AWE or large page allocations never causes a page fault, because these allocations are not pageable .)
A hard page fault must be resolved by reading page contents from the page’s backing store, which is either the system paging file or a memory-mapped file created by the process. A soft page fault can be resolved without accessing the backing store. A soft page fault occurs when:
- The page is in the working set of some other process, so it is already resident in memory.
- The page is in transition, because it either has been removed from the working sets of all processes that were using the page and has not yet been repurposed, or it is already resident as a result of a memory manager prefetch operation.
- A process references an allocated virtual page for the first time (sometimes called a demand-zero fault).
Pages can be removed from a process working set as a result of the following actions:
- The process reduces or empties the working set by calling the SetProcessWorkingSetSize, SetProcessWorkingSetSizeEx or EmptyWorkingSet function.
- The process calls the VirtualUnlock function on a memory range that is not locked.
- The process unmaps a mapped view of a file using the UnmapViewOfFile function.
- The memory manager trims pages from the working set to create more available memory.
- The memory manager must remove a page from the working set to make room for a new page (for example, because the working set is at its maximum size).
If several processes share a page, removing the page from the working set of one process does not affect other processes. After a page is removed from the working sets of all processes that were using it, the page becomes a transition page. Transition pages remain cached in RAM until the page is either referenced again by some process or repurposed (for example, filled with zeros and given to another process). If a transition page has been modified since it was last written to disk (that is, if the page is «dirty»), then the page must be written to its backing store before it can be repurposed. The system may start writing dirty transition pages to their backing store as soon as such pages become available.
Each process has a minimum and maximum working set size that affect the virtual memory paging behavior of the process. To obtain the current size of the working set of a specified process, use the GetProcessMemoryInfo function. To obtain or change the minimum and maximum working set sizes, use the GetProcessWorkingSetSizeEx and SetProcessWorkingSetSizeEx functions.
The process status application programming interface (PSAPI) provides a number of functions that return detailed information about the working set of a process. For details, see Working Set Information.
Virtual Memory Functions
The virtual memory functions enable a process to manipulate or determine the status of pages in its virtual address space. They can perform the following operations:
- Reserve a range of a process’s virtual address space. Reserving address space does not allocate any physical storage, but it prevents other allocation operations from using the specified range. It does not affect the virtual address spaces of other processes. Reserving pages prevents needless consumption of physical storage, while enabling a process to reserve a range of its address space into which a dynamic data structure can grow. The process can allocate physical storage for this space, as needed.
- Commit a range of reserved pages in a process’s virtual address space so that physical storage (either in RAM or on disk) is accessible only to the allocating process.
- Specify read/write, read-only, or no access for a range of committed pages. This differs from the standard allocation functions that always allocate pages with read/write access.
- Free a range of reserved pages, making the range of virtual addresses available for subsequent allocation operations by the calling process.
- Decommit a range of committed pages, releasing their physical storage and making it available for subsequent allocation by any process.
- Lock one or more pages of committed memory into physical memory (RAM) so that the system cannot swap the pages out to the paging file.
- Obtain information about a range of pages in the virtual address space of the calling process or a specified process.
- Change the access protection for a specified range of committed pages in the virtual address space of the calling process or a specified process.
For more information, see the following topics.
How to Increase Virtual Memory in Windows 10: A Quick Guide
What is Virtual Memory?
In computing, virtual memory is a memory management technique that provides an «idealized abstraction of the storage resources that are actually available on a given machine» which «creates the illusion to users of a very large memory.» The computer’s operating system, using a combination of hardware and software, maps memory addresses used by a program, called virtual addresses, into physical addresses in computer memory.
Step 1: Go to Start Menu and click on Settings.
Step 2: Now type performance on search bar and select Adjust the appearance and performance of Windows.
Step 3: A new Window will open before you. Go to Advanced tab in it.
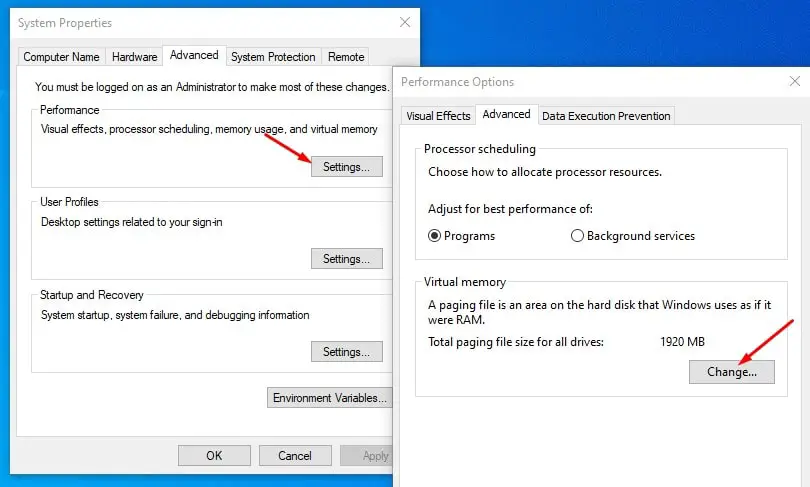
Step 4: You’ll see a Virtual memory section in it. Click on Change

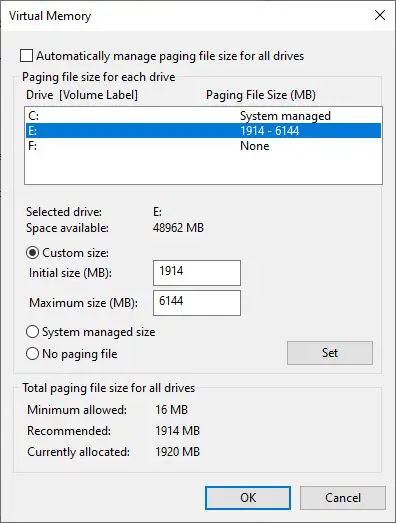
Step 5: If the current setting is considerably less than the recommended, unselect the Automatically manage paging file size for all drives box on this window and click on Custom size.
Step 6: Now enter the recommended value in the Initial Size box, and a larger figure in the Maximum size
Step 7: Click on OK to save the changes.
How to Set Virtual Memory on Windows 8 Computer
Virtual Memory can be created to make up for the lack of computer physical memory. Meanwhile, it is applicable in analyzing the sources of errors when the computer system stops because of serious errors. Therefore, more and more people tend to manually set virtual memory in their computers instead of letting it automatically set by the computer system. Now, if you are curious about how to set it in the computer, you can refer to the lucid steps illustrated below.
Video guide on how to set virtual memory on Windows 8:
Steps to set virtual memory on Windows 8 computer:
Step 1: Open Control Panel.
You can press the composite key of WIN key+X to open the Quick Access Menu and select Control Panel in it, as the following screen shot exhibits.
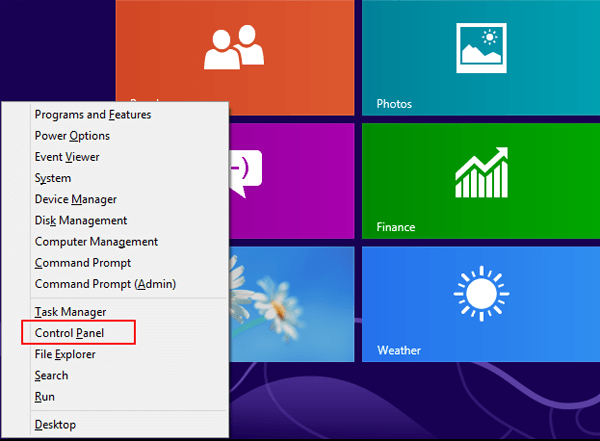
Tips: If you want to learn more methods to open Control Panel, you can refer to Three Ways to Access Control Panel on Windows 8.
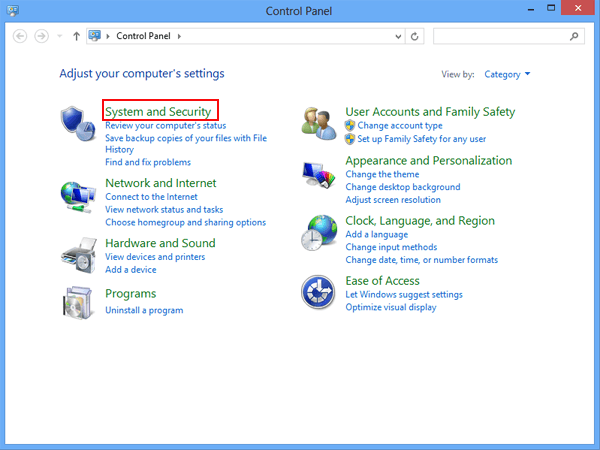
Step 2: Enter System and Security
In Control Panel window, click System and Security on the top left.
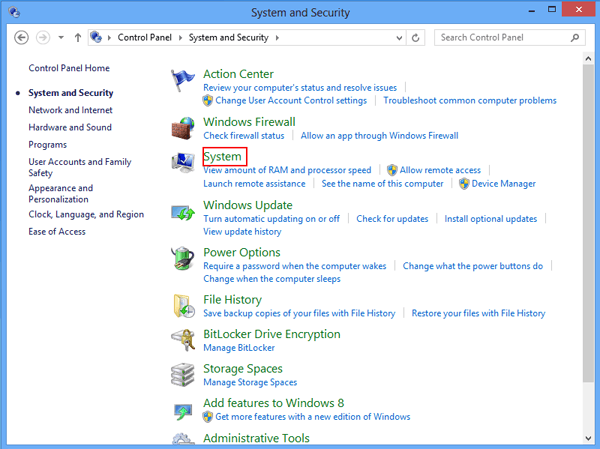
Step 3: Get in System.
Tap System on the right in the System and Security window.
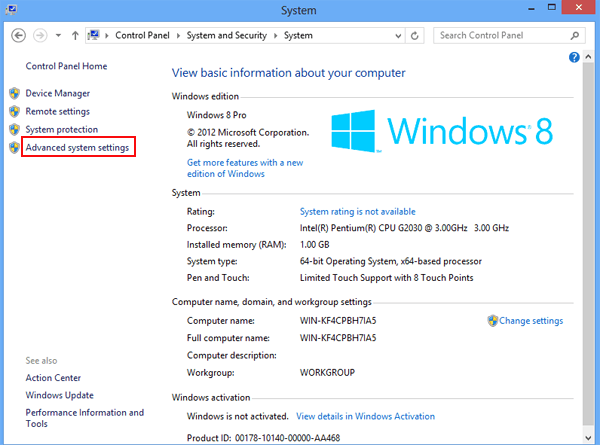
Step 4: Enter Advanced system settings.
In the left list of System window, select Advanced system settings.
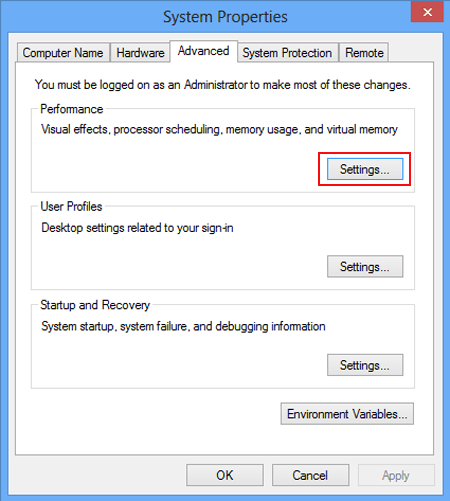
Step 5: Go to the Settings of Performance.
After entering System Properties, in Advanced, click Settings under Performance.
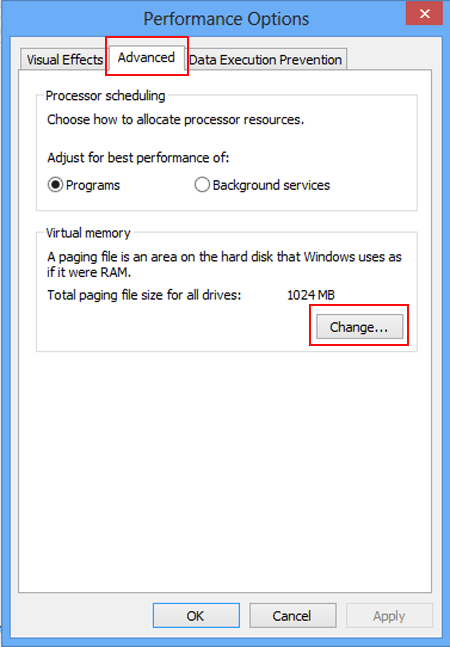
Step 6: Change virtual memory settings.
In the Performance Options window, choose Advanced on the top and tap Change button under Virtual memory.
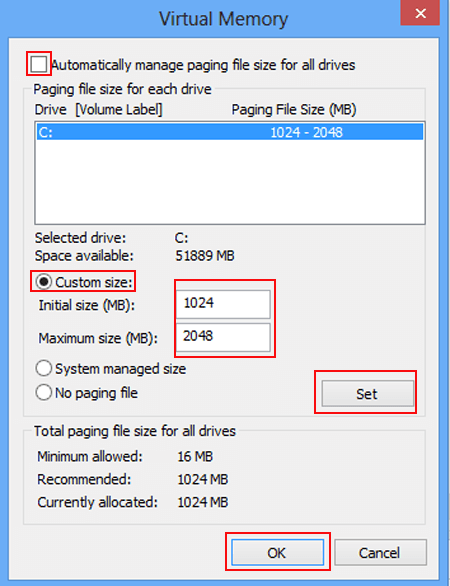
Step 7: Set virtual memory size.
Uncheck the box before Automatically manage paging file size for all drives, select Custom size, set the numerical values of initial size and maximum size, click Set to finish the setting and tap OK. In the meantime time, you can make reference to the screen shot below.
Tips: Both the initial size and the maximum size of virtual memory can be set as 1.5 to 2 times of computer physical memory. And if you are wondering where the information of computer memory is, you can find the answer in How to Check Computer Memory Windows 8.
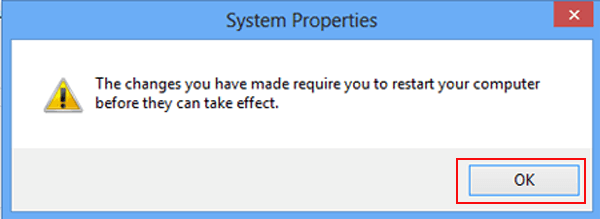
Step 8: Tap OK in the following window to restart the computer before the setting takes effect.
Just practice these steps and see whether you can easily and smoothly set virtual memory on your Windows 8 computer.
Adjust Virtual Memory on windows 10 October 2020 update (A Quick Guide)
Virtual memory a combination computer’s physical RAM with temporary space on hard disk. Here how to customize or Adjust Virtual Memory windows 10
In Windows System Virtual memory is used in place of the physical RAM when it runs out of usable space. Virtual memory combines your computer’s RAM with temporary space on your hard disk called the Swap file, Paging file or Pagefile. Whenever RAM is not enough to complete task windows move data to the paging file and frees up RAM so that your computer can complete its task. And prevent issues like slow down of the machine, Blue Screen of Death (BSOD), Low Memory problem, App Crash Etc.
Virtual memory can be considered as being an extension of the computer’s physical memory.
Your computer has two types of memory: The hard drive or solid-state drive, used for your operating system, photos, music and documents, and RAM (Random Access Memory) used for storing program-specific data. The hard drive is perfect for long-term storage, while RAM much faster and more volatile, acting as a working area for the programs and files you have open.
Every time you open more applications than the RAM on your PC can accommodate, the programs already present in the RAM are automatically transferred to the Pagefile. This process is technically called Paging. Because the Pagefile works as a secondary RAM, many times it is also referred to as virtual memory windows 10.
Increasing Virtual Memory in Windows 10
Windows 10 manages Virtual memory itself only, But at times you might be required to alter the memory allocated. It is always said to customize the virtual memory into a size which is within the permissible limit. Here Fallow To manually Adjust Virtual memory for windows 10.
- First press the combination of Win + R keys together to open the Run dialog box.
- Here type sysdm.cpl on it and then click on the OK button.
- This will open “System Properties” of your computer.
- Go to the Advanced tab and click on the Settings option. Which is available under the “Performance” section.
- Now On the “Performance Options” window, go to the Advanced tab and click on the Change button located under the “Virtual Memory” section.
- You will see the Virtual Memory window on your computer screen.
- Here you have to uncheck the “Automatically manage paging file size for all drive” option at the top of the same windows.
- Select any of the Drive letter where you allow to create the paging file and then click on Custom size.
- Then enter custom fields in the “Initial size (MB)” and “Maximum size (MB)” fields.
How To Calculate pagefile size
To Calculate the pagefile size always recommended amount (Refer above image) of total system memory. The maximum size is three (1.5) x the initial size. So let’s say you have 4 GB (1 GB = 1,024 MB x 4 = 4,096 MB) of memory. The and the maximum size would be 1.5 x 4,096 = 6144 MB.
After Set the Initial size (MB)” and “Maximum size (MB)” Value and click on set, Now Click on the OK button and then on the Apply button to save changes. This will prompt to Restart the windows ” you must restart your computer to apply these changes. ”
This is the Best and simple way to Increase Virtual Memory in Windows 10.


