- Пошаговая настройка OpenVPN в Windows
- Настраиваем сервер.
- Пора создавать сертификаты
- Настройка клиента
- How To Connect To A VPN Server With OpenVPN Connect
- HOW TO: Connect to Server Client Configuration
- OpenVPN Connect v3 downloads
- Launching OpenVPN Connect v3
- Starting a connection
- Connecting to OpenVPN Access Server
- Connecting to OpenVPN Cloud
- Import a configuration profile from the server
- Connecting to OpenVPN open source
- Import a configuration profile from a file
Пошаговая настройка OpenVPN в Windows
Появилась у меня необходимость подключаться к компьютеру, находящемуся в локальной сети офиса из дома. Как варианты, рассматривал различные решения, будь то Team Viewer ,ssh-тунель и т.д., но в итоге было решено остановиться на OpenVpn, ввиду гарантированной безопасности, надежности соединения и фриварности софта.
Но к своему удивлению любую инструкцию, приходилось в той или иной степени дорабатывать. Поэтому решил предложить вашему вниманию свой вариант. Инструкция «сухая» без особых объяснений конфигов, рассчитанная на то, что можно особо не вдаваясь в смысл поднять шифрованный туннель.
Для начала, конечно, скачиваем программу с официального сайта(http://openvpn.net/index.php/download/community-downloads.html). Далее рекомендую установить её в директорию «c:\openvpn», дабы потом не возникало лишних проблем с путями. Также сразу надо создать «c:\openvpn\ssl», после поместим сюда все наши «ключики», «с:\OpenVPN\log\openvpn.log» и «с:\OpenVPN\log\openvpn-status.log» — для записи логов.
Приступаем к редактированию всех наших конфигов.Чтобы офисный файервол не мешал будущему соединению настроим серверную часть дома на ПК, а клиентскую на рабочем.
Настраиваем сервер.
#
# OpenSSL example configuration file.
# This is mostly being used for generation of certificate requests.
#
# This definition stops the following lines choking if HOME isn’t
# defined.
HOME =.
RANDFILE = $ENV::HOME/.rnd
# Extra OBJECT IDENTIFIER info:
#oid_file = $ENV::HOME/.oid
oid_section = new_oids
# To use this configuration file with the «-extfile» option of the
# «openssl x509» utility, name here the section containing the
# X.509v3 extensions to use:
# extensions =
# (Alternatively, use a configuration file that has only
# X.509v3 extensions in its main [= default] section.)
# We can add new OIDs in here for use by ‘ca’ and ‘req’.
# Add a simple OID like this:
# testoid1=1.2.3.4
# Or use config file substitution like this:
# testoid2=$
dir = $ENV::KEY_DIR # Where everything is kept
certs = $dir # Where the issued certs are kept
crl_dir = $dir # Where the issued crl are kept
database = $dir/index.txt # database index file.
new_certs_dir = $dir # default place for new certs.
certificate = $dir/ca.crt # The CA certificate
serial = $dir/serial # The current serial number
crl = $dir/crl.pem # The current CRL
private_key = $dir/ca.key # The private key
RANDFILE = $dir/.rand # private random number file
x509_extensions = usr_cert # The extentions to add to the cert
# Extensions to add to a CRL. Note: Netscape communicator chokes on V2 CRLs
# so this is commented out by default to leave a V1 CRL.
# crl_extensions = crl_ext
default_days = 3650 # how long to certify for
default_crl_days= 30 # how long before next CRL
default_md = md5 # which md to use.
preserve = no # keep passed DN ordering
# A few difference way of specifying how similar the request should look
# For type CA, the listed attributes must be the same, and the optional
# and supplied fields are just that 🙂
policy = policy_match
# For the CA policy
[ policy_match ]
countryName = match
stateOrProvinceName = match
organizationName = match
organizationalUnitName = optional
commonName = supplied
emailAddress = optional
# For the ‘anything’ policy
# At this point in time, you must list all acceptable ‘object’
# types.
[ policy_anything ]
countryName = optional
stateOrProvinceName = optional
localityName = optional
organizationName = optional
organizationalUnitName = optional
commonName = supplied
emailAddress = optional
####################################################################
[ req ]
default_bits = $ENV::KEY_SIZE
default_keyfile = privkey.pem
distinguished_name = req_distinguished_name
attributes = req_attributes
x509_extensions = v3_ca # The extentions to add to the self signed cert
# Passwords for private keys if not present they will be prompted for
# input_password = secret
# output_password = secret
# This sets a mask for permitted string types. There are several options.
# default: PrintableString, T61String, BMPString.
# pkix: PrintableString, BMPString.
# utf8only: only UTF8Strings.
# nombstr: PrintableString, T61String (no BMPStrings or UTF8Strings).
# MASK:XXXX a literal mask value.
# WARNING: current versions of Netscape crash on BMPStrings or UTF8Strings
# so use this option with caution!
string_mask = nombstr
# req_extensions = v3_req # The extensions to add to a certificate request
[ req_distinguished_name ]
countryName = Country Name (2 letter code)
countryName_default = $ENV::KEY_COUNTRY
countryName_min = 2
countryName_max = 2
stateOrProvinceName = State or Province Name (full name)
stateOrProvinceName_default = $ENV::KEY_PROVINCE
localityName = Locality Name (eg, city)
localityName_default = $ENV::KEY_CITY
0.organizationName = Organization Name (eg, company)
0.organizationName_default = $ENV::KEY_ORG
# we can do this but it is not needed normally 🙂
#1.organizationName = Second Organization Name (eg, company)
#1.organizationName_default = World Wide Web Pty Ltd
organizationalUnitName = Organizational Unit Name (eg, section)
#organizationalUnitName_default =
commonName = Common Name (eg, your name or your server\’s hostname)
commonName_max = 64
emailAddress = Email Address
emailAddress_default = $ENV::KEY_EMAIL
emailAddress_max = 40
# SET-ex3 = SET extension number 3
[ req_attributes ]
challengePassword = A challenge password
challengePassword_min = 4
challengePassword_max = 20
unstructuredName = An optional company name
# These extensions are added when ‘ca’ signs a request.
# This goes against PKIX guidelines but some CAs do it and some software
# requires this to avoid interpreting an end user certificate as a CA.
# Here are some examples of the usage of nsCertType. If it is omitted
# the certificate can be used for anything *except* object signing.
# This is OK for an SSL server.
# nsCertType = server
# For an object signing certificate this would be used.
# nsCertType = objsign
# For normal client use this is typical
# nsCertType = client, email
# and for everything including object signing:
# nsCertType = client, email, objsign
# This is typical in keyUsage for a client certificate.
# keyUsage = nonRepudiation, digitalSignature, keyEncipherment
# This will be displayed in Netscape’s comment listbox.
nsComment = «OpenSSL Generated Certificate»
# PKIX recommendations harmless if included in all certificates.
subjectKeyIdentifier=hash
authorityKeyIdentifier=keyid,issuer:always
# This stuff is for subjectAltName and issuerAltname.
# Import the email address.
# subjectAltName=email:copy
# Copy subject details
# issuerAltName=issuer:copy
#nsCaRevocationUrl = www.domain.dom/ca-crl.pem
#nsBaseUrl
#nsRevocationUrl
#nsRenewalUrl
#nsCaPolicyUrl
#nsSslServerName
# JY ADDED — Make a cert with nsCertType set to «server»
basicConstraints=CA:FALSE
nsCertType = server
nsComment = «OpenSSL Generated Server Certificate»
subjectKeyIdentifier=hash
authorityKeyIdentifier=keyid,issuer:always
# Extensions to add to a certificate request
basicConstraints = CA:FALSE
keyUsage = nonRepudiation, digitalSignature, keyEncipherment
# Extensions for a typical CA
# This is what PKIX recommends but some broken software chokes on critical
# extensions.
#basicConstraints = critical,CA:true
# So we do this instead.
basicConstraints = CA:true
# Key usage: this is typical for a CA certificate. However since it will
# prevent it being used as an test self-signed certificate it is best
# left out by default.
# keyUsage = cRLSign, keyCertSign
# Some might want this also
# nsCertType = sslCA, emailCA
# Include email address in subject alt name: another PKIX recommendation
# subjectAltName=email:copy
# Copy issuer details
# issuerAltName=issuer:copy
# DER hex encoding of an extension: beware experts only!
# obj=DER:02:03
# Where ‘obj’ is a standard or added object
# You can even override a supported extension:
# basicConstraints= critical, DER:30:03:01:01:FF
# CRL extensions.
# Only issuerAltName and authorityKeyIdentifier make any sense in a CRL.
Копируем index.txt.start в index.txt, а serial.start в serial в папку ssl
Пора создавать сертификаты
Отправляем CA.crt, klient.crt, klient.key, ta.key из «c:\openvpn\ssl» нашим клиентам (помещаем их в такую же директорию « c:\openvpn\ssl»).
Настройка клиента
На сервере запускаем файл server.ovpn(кнопка «StartOpenvpn…» в контекстном меню), на клиенте clientVPN.ovpn. При необходимости изменяем тип запуска нашей службы(OpenVPN Service) на «Автоматически». Туннель поднят, можете смело заходить на работу, допустим по RDP. Адрес сервера в нашей виртуальной сети будет 192.168.0.1. Надеюсь, этот пост сократит время для настройки OpenVpn, даже для самых начинающих до нескольких минут.
Данная статья не подлежит комментированию, поскольку её автор ещё не является полноправным участником сообщества. Вы сможете связаться с автором только после того, как он получит приглашение от кого-либо из участников сообщества. До этого момента его username будет скрыт псевдонимом.
Это «Песочница» — раздел, в который попадают дебютные посты пользователей, желающих стать полноправными участниками сообщества.
Если у вас есть приглашение, отправьте его автору понравившейся публикации — тогда её смогут прочитать и обсудить все остальные пользователи Хабра.
Чтобы исключить предвзятость при оценке, все публикации анонимны, псевдонимы показываются случайным образом.
Не надо пропускать:
- рекламные и PR-публикации
- вопросы и просьбы (для них есть Хабр Q&A);
- вакансии (используйте Хабр Карьеру)
- статьи, ранее опубликованные на других сайтах;
- статьи без правильно расставленных знаков препинания, со смайликами, с обилием восклицательных знаков, неоправданным выделением слов и предложений и другим неуместным форматированием текста;
- жалобы на компании и предоставляемые услуги;
- низкокачественные переводы;
- куски программного кода без пояснений;
- односложные статьи;
- статьи, слабо относящиеся к или не относящиеся к ней вовсе.
How To Connect To A VPN Server With OpenVPN Connect
HOW TO: Connect to Server Client Configuration
This guide covers how to connect to a server with the OpenVPN Connect Client.
OpenVPN Connect v3 allows you to connect to:
- OpenVPN Access Server
- OpenVPN Cloud
- Almost any other OpenVPN open source based server
Note: For our Private Tunnel product, there is a special Private Tunnel app available.
OpenVPN Connect v3 downloads
OpenVPN Connect v3 is available for Windows, macOS, Android, and iOS. Click on the icon of your preferred OS below to download.


For the Linux operating system, there is a command line client available.
Launching OpenVPN Connect v3
After installing the program on your respective OS, the first time you start it, you will receive some one-time messages:
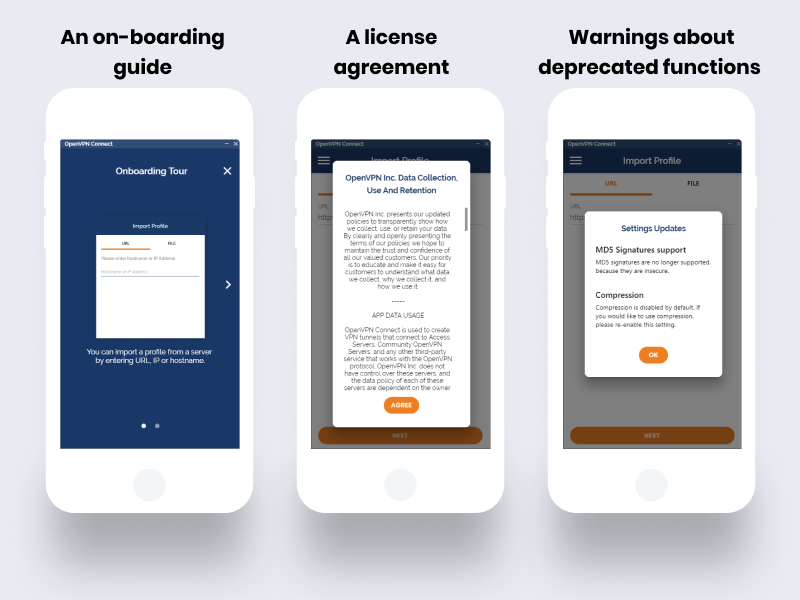
Starting a connection
On the program’s main screen, any configuration profile already loaded displays.
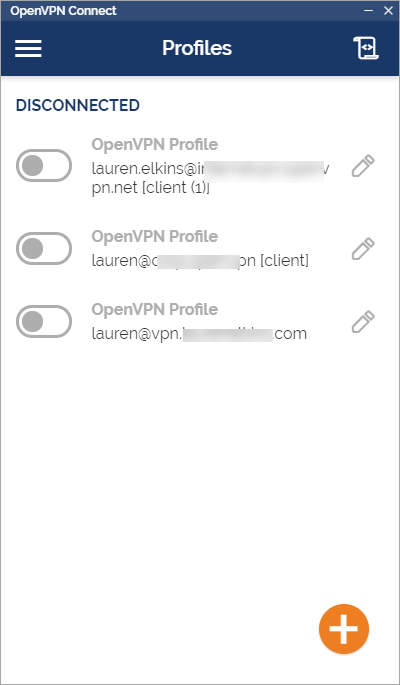
Note: If you don’t see a configuration profile, skip to the section below to import one.
By clicking on the toggle next to a profile, you can start or stop a connection at any time. Once the connection is established, statistics and information about the connection display.
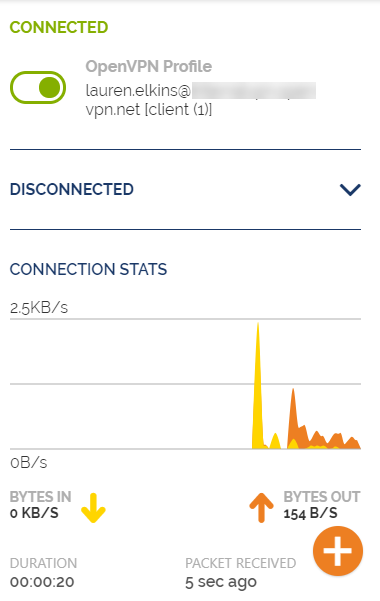
You can easily disconnect at any time and return to the main screen.
Connecting to OpenVPN Access Server
To make a connection to an OpenVPN Access Server with a Windows or macOS computer, we recommend a direct download. This is done by using the OpenVPN Access Server’s client web interface. When you download and install the OpenVPN Connect v3 client from there, it is pre-installed with the necessary configuration profile. You or your user can start the connection immediately after installation.
If you prefer to download the Connect client directly from our site, follow the instructions below. To connect with an already installed client, simply import a configuration profile directly from your server or using a file on your computer.
Connecting to OpenVPN Cloud
Download the client from our website, then use the instructions below to import a configuration profile directly from the server. When a new user gets an invite to OpenVPN Cloud, they can follow the instructions in their email to connect as well.
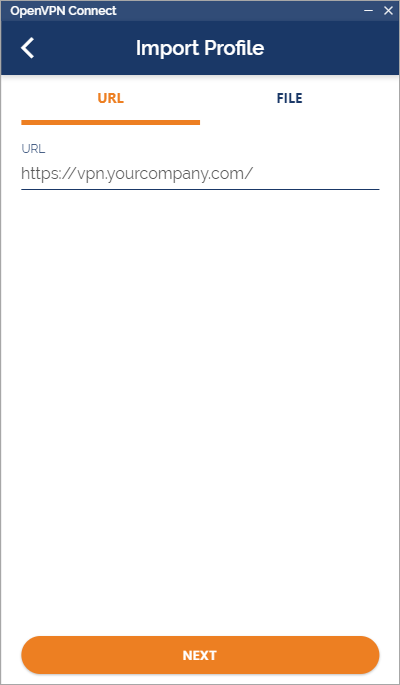
Import a configuration profile from the server
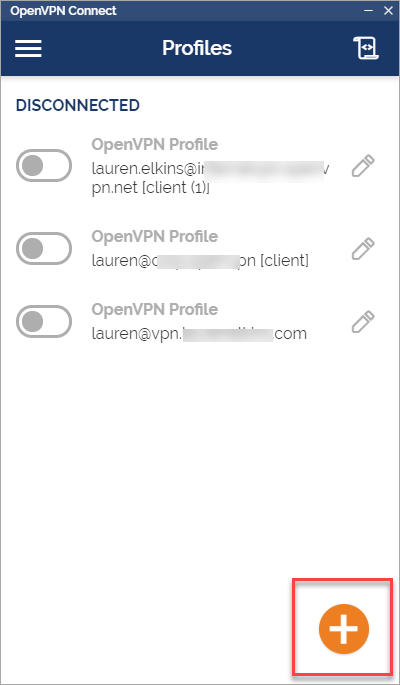
You can import a configuration profile directly from a server for our official business VPN products, OpenVPN Access Server and OpenVPN Cloud. To do this, open the program and click on the + icon on the main screen.
In the Import Profile window, enter the address of your server. For Access Server this could be https://vpn.yourcompany.com/. For OpenVPN Cloud, this is your cloud tenant ID with ‘openvpn.cloud’ such as https://yourcompany.openvpn.cloud/.
Note: When you create a new user from your OpenVPN Cloud portal, they receive an email invitation with instructions for downloading the client and connecting with their assigned username and a temporary password.
Click Next and you will be prompted to login with your credentials.
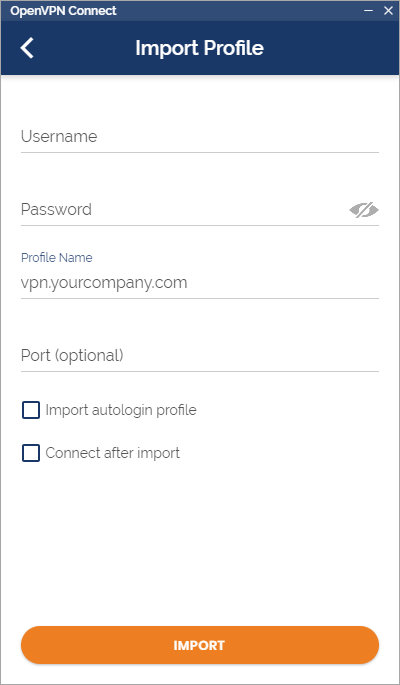
Note: For a new cloud user authenticating with a temporary password, they will be prompted to create a new password within OpenVPN Connect.
After successful authentication, the new profile will be added to the list of profiles on your main screen. You can now easily connect and disconnect at any time.
Connecting to OpenVPN open source
If you are connecting to an OpenVPN open source based server, you may download the client from our website and use the instructions below to import a configuration profile from a file on your computer.
Import a configuration profile from a file
Importing a configuration profile from a file works for almost any OpenVPN server. You simply need the necessary file(s) saved to your device. Start by clicking on the + icon, then choose File.
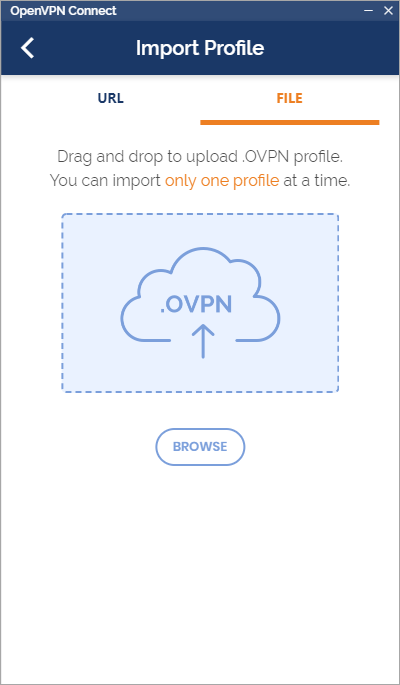
Either drag the profile file to the window, or point the program to is by clicking on Browse and then Open.
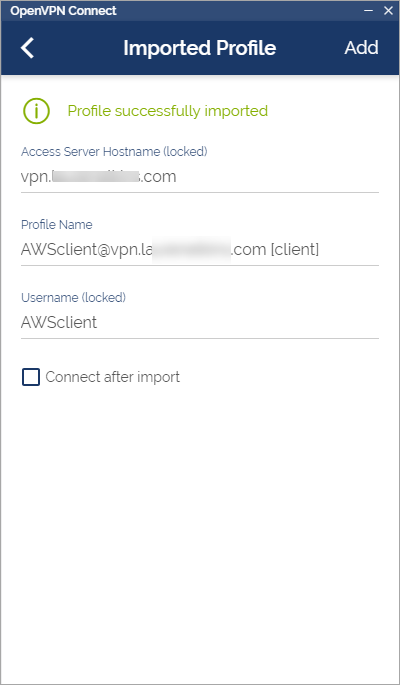
Make sure to click on Add and the profile will now display on the main screen where you can easily connect or disconnect.


