- “An operating system wasn’t found” error when booting Windows
- Symptoms
- Resolution
- Ошибка загрузки Windows: An operating system wasn’t found
- Причины ошибки “Operating System not found”
- Определение разметки диска и диска с установленной Windows
- Восстановление загрузчика Windows на MBR диске BIOS системы
- Восстановление загрузчика Windows на GPT разделе UEFI системы
- Windows found errors on this drive that need to be repaired [Fix]
- How can I fix Windows found errors on this drive that need to be repaired error?
- 1. Check disk
- 2. Use PowerShell
- Run a System Scan to discover potential errors
- 3. Security and Maintenance Check
- 4. Using your installation disk
“An operating system wasn’t found” error when booting Windows
Symptoms
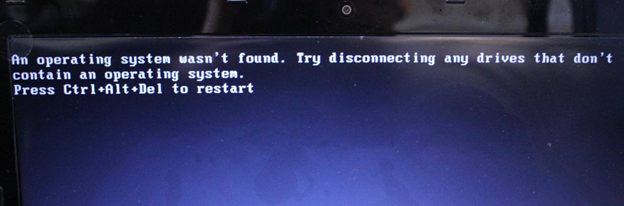
When trying to boot Windows, you receive the error:
An operating system wasn’t found. Try disconnecting any drives that don’t contain an operating system.
Press Ctrl+Alt+Del to restart
Resolution
A bootable USB or DVD with Windows 7 or higher is needed to bring up the Command Prompt. If you don’t have a bootable media available, you can obtain one by following the create installation media steps found here.
Bring up the command prompt:
Boot from any DVD or USB Windows 7, 8, or 10 media.
Once you have reached the Windows Setup screen (where you select the Language, Time and Keyboard settings), press the SHIFT + F10 keys to bring up the Command Prompt.
Find out whether your disk is set to GUID Partition Table (GPT) or Master Boot Record (MBR):
In the Command Prompt, type diskpartand press Enter.
Type list disk and press Enter.
Look for your disk and see if the GPT column has an asterisk (*) – this will indicate the disk is GPT. If no asterisk is found, then the disk is set as MBR.
Type exit and press Enter.
If the type is MBR:
From the Command Prompt, type dir a: and press Enter.
If drive A: is found and a directory is displayed, check for the \Windows folder in the directory. If it is there, that is the System Drive. Skip to step 2.
If the drive is not found or it doesn’t contain the \Windows folder, type dir b: and press Enter. Continue through the alphabet until the drive with the \Windows folder is found, but skip the X: drive. That will be the install files from the USB or DVD you are using. The most common location is the C: drive, so that example will be used in the rest of the article.
Once it is found, type:bcdboot C:\Windows /S C:
In this case, C is the drive where Windows folder was found. If the Windows folder is on a different drive, use that drive letter instead of “C” in the bcdboot command above.
The message Boot files successfully created must be shown before you can continue.
Type: diskpart and press Enter.
Type: list disk and press Enter.
Type: sel disk C and press Enter.
In this case, C is the drive where Windows folder was found. If the Windows folder is on a different drive, use that drive letter instead of “C” in the sel disk command above.
Type: list vol and press Enter.
Type: sel vol C and press Enter.
In this case, C is the drive where Windows folder was found. If the Windows folder is on a different drive, use that drive letter instead of “C” in the sel disk command above.
Type: active and press Enter.
You should get a confirmation that the volume has been successfully set as active. If you don’t get the confirmation, it means that either the disk is set to GPT (not MBR), or there is a problem with the disk. Make sure you are working with the right disk.
Type: exit and press Enter.
Reboot the device — you can do this quickly from the command prompt by typing: shutdown -f -r -t 00 and press Enter.
If the type is GPT:
From the Command Prompt, type dir a: and press Enter.
If drive A: is found and a directory is displayed, check for the \Windows folder in the directory. If it is there, that is the System Drive. Skip to step 2.
If the drive is not found or it doesn’t contain the \Windows folder, type dir b: and press Enter. Continue through the alphabet until the drive with the \Windows folder is found, but skip the X: drive. That will be the install files from the USB or DVD you are using. The most common location is the C: drive, so that example will be used in the rest of the article.
Type: diskpart and press Enter.
Type: list disk and press Enter
Type: sel disk C and press Enter.
In this case, C is the drive where Windows folder was found. If the Windows folder is on a different drive, use that drive letter instead of “C” in the sel disk command above.
Type: list part and press Enter.
Look for the partition labeled as System.
Once it is found, assign the letter R to the partition. If the letter R is already taken, you can choose any unassigned letter. To assign the letter type: assign letter=r: and press Enter.
Type: exit and press Enter.
Return to the command prompt, type the following one line at a time, pressing Enter after each line:
cd /d r:\EFI\Microsoft\Boot\
bcdboot c:\Windows /l en-us /s m: /f UEFI
Note The /l en-us part of the command sets the Windows language to English. To set a different language, replace en-us with a different language code (such as de-de for German).
Reboot the device — you can do this quickly from the command prompt by typing: shutdown -f -r -t 00 and pressing Enter.
Ошибка загрузки Windows: An operating system wasn’t found
Сообщение “ Operating System not found ” на компьютере говорит о том, что на текущем диске не найден загрузчик ни одной операционной системы. Соответственно ваш компьютер не может найти и запустить загрузчик Windows (или другой ОС, установленной на компьютере).
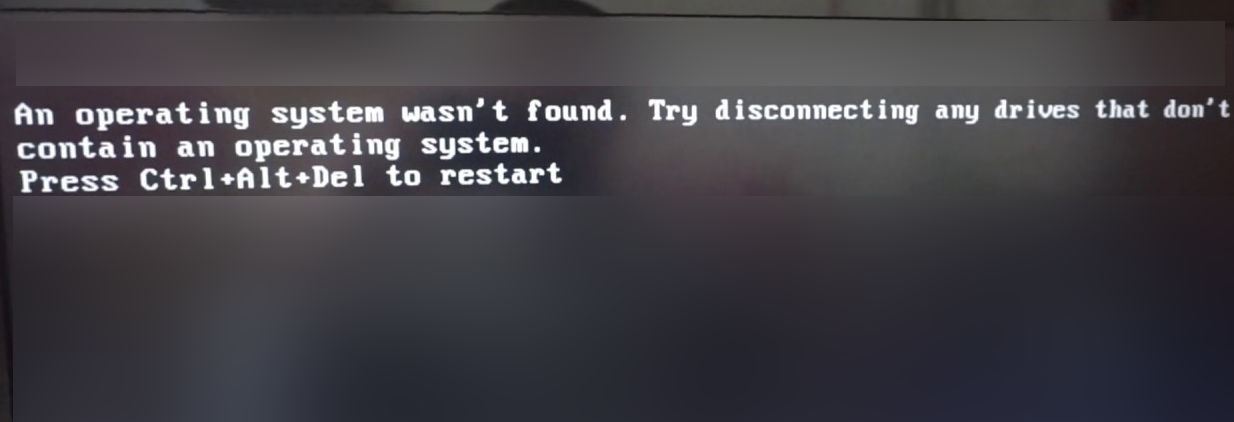
Ошибка при загрузке также может выглядеть так:
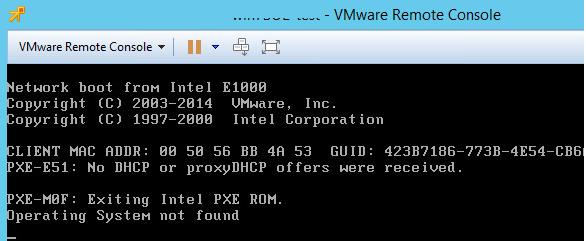
На компьютерах и ноутбуках Lenovo аналогичная ошибка выглядит так:

Причины ошибки “Operating System not found”
Самый частые причины, из-за которых не загружается ОС на компьютере с ошибкой “ОС не найдена”:
- испорченный системный раздел, отсутствует или повреждена MBR запись, нет активных разделов (или неверный раздел диска помечен активным );
- поврежден загрузчик BCD;
- не подключен HDD с установленной ОС (сюда могу входить такие проблемы, как плохое соединение шлейфа, аппаратные проблемы с диском, RAID или контроллером).
В первую очередь необходимо убедиться:
- что жесткий диск с ОС подключен к компьютеру (отключите все дополнительные диски, USB накопители – именно с этого просят начать на первом скриншоте);
- проверьте надежность подключения кабелей питания и шлейфов;
- убедитесь, что это жесткий диск определяется в BIOS/UEFI и выставите его в качестве первичного загрузочного устройства;
- проверьте настройки Secure Boot в UEFI, возможно он были изменены (проверьте загружается ли Windows с включенным и отключенным режимом Secure Boot и в Legacy режиме).
Если все это выполнено, а Windows не загружается, нужно восстановить загрузчик и загрузочную запись Windows.
Определение разметки диска и диска с установленной Windows
Для восстановления загрузчика вам понадобится установочный или загрузочный диск (USB флешка) с Windows (не ниже той версии, которая у вас установлена).
Измените порядок загрузки в BIOS (UEFI) и загрузитесь с вашего загрузочного или установочного диска и запустите командную строку (если у вас установочный диск, на экране выбора языковых параметров нажмите сочетание клавиш Shift+F10 ). 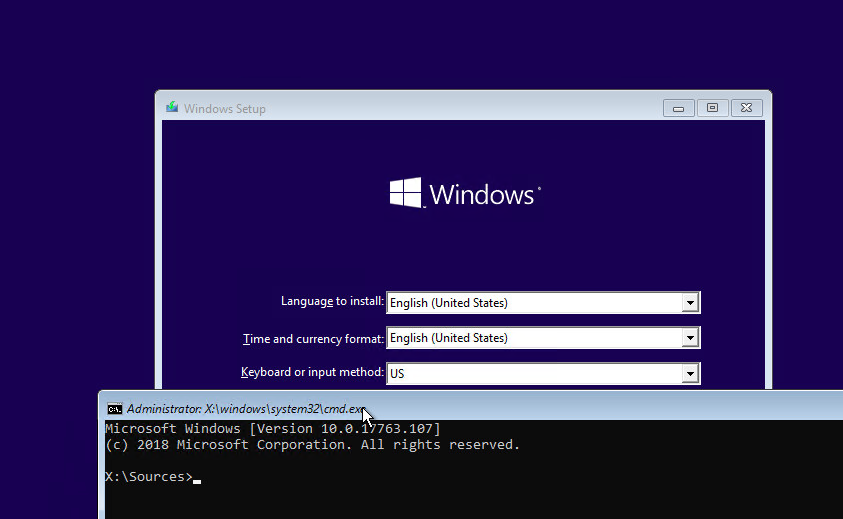
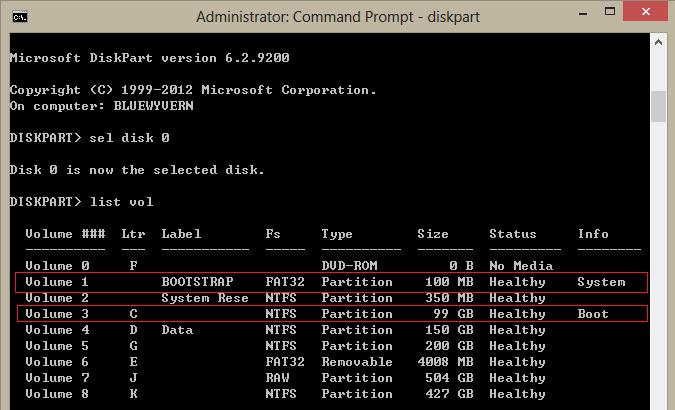
В первую очередь нужно определить тип таблицы разделов на вашем диске: GPT или MBR. От этого зависит способ восстановления загрузчика Windows.
Запустите:
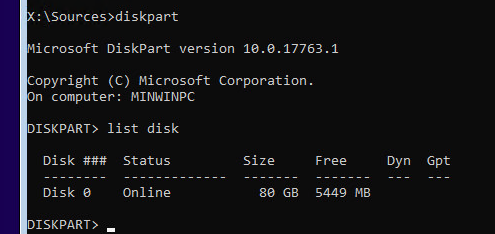
diskpart
Выполните: list disk
Если у диска в столбце Gpt указана звездочка (*), тогда используется таблица разделов GPT, если нет – MBR.
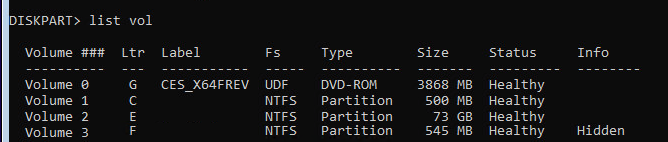
Выведите список томов на диске:
Завершите сеанс:
exit
Судя по размеру дисков, Windows скорее всего установлена на диске E:. Проверим этом, выполнив команду:
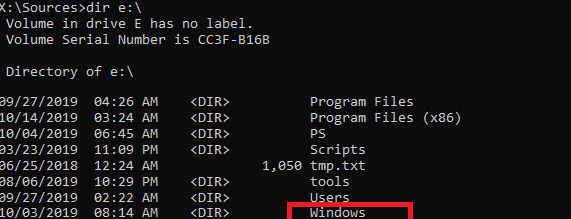
dir e:
Как вы видите, на диске имеются каталоги Windows , Program Files , Users и прочие.
Итак, мы определили тип разметки диска и букву раздела, на котором установлена Windows. В зависимости от типа разметки перейдите в соответствующий раздел статьи.
Восстановление загрузчика Windows на MBR диске BIOS системы
Итак, мы предполагаем, что на вашем компьютер используется BIOS.
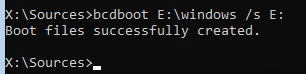
Создадим конфигурационные файлы загрузчика на диске E:\ :
bcdboot E:\Windows /S E:
Должно появится сообщение Boot files successfully created .
Пересоздадим MBR (Master Boot Record) запись:
bootrec.exe /FixMbr
bootrec.exe /FixBoot
bootrec.exe /RebuildBcd
Теперь нужно сделать активным раздел с Windows (BIOS передает управлению загрузчику ОС с активного MBR раздела):
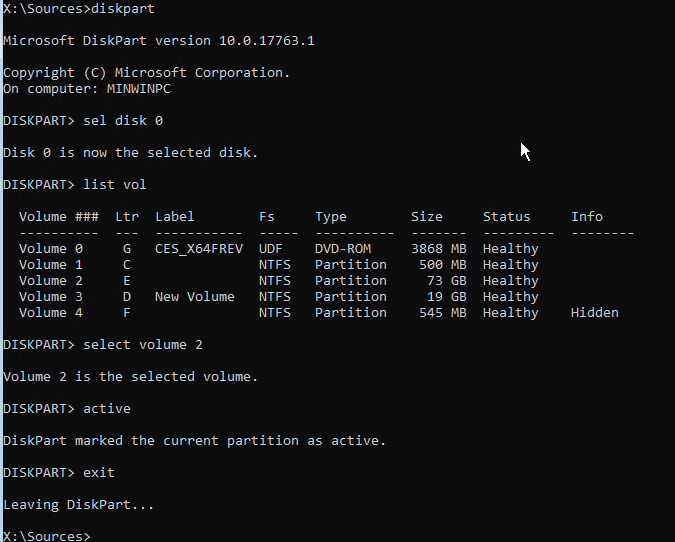
diskpart
list disk
sel disk 0
list vol
select volume 2 (ранее мы определили, что Windows установлена на этом томе)
active
exit
Перезагрузите компьютер, и убедитесь, что Windows загрузилась корректно без ошибки “Operating System not found”.
Восстановление загрузчика Windows на GPT разделе UEFI системы
Если ваш диск размечен в таблице разделов GPT, значит компьютер использует UEFI архитектуру вместо BIOS. Полный гайд по восстановлению загрузчика Windows 10 на UEFI компьютере содержится в статье: Восстановление загрузчика в Windows 10 (UEFI). Вкратце рассмотрим основные шаги.
Сначала нужно найти и назначить букву скрытому разделу с файловой системой FAT32 (размер раздела 100-300 Мб, используется для хранения загрузчика Windows, который вызывается EFI загрузчиком).
Например, вы определили, что у вас это том Volume 2 с меткой System .
Выберите этот EFI раздел и назначьте букву диска:
select volume 2
assign letter M:
exit
Пересоздадим конфигурации загрузчика:
cd /d m:\efi\microsoft\boot\
ren BCD BCD.bak
bcdboot E:\Windows /l en-us /s M: /f ALL
Перезагрузите компьютер, извлеките загрузочный диск (флешку) и проверьте, что Windows загрузилась корректно
Windows found errors on this drive that need to be repaired [Fix]

- Download Restoro PC Repair Tool that comes with Patented Technologies (patent available here).
- Click Start Scan to find Windows issues that could be causing PC problems.
- Click Repair All to fix issues affecting your computer’s security and performance
- Restoro has been downloaded by 0 readers this month.
Hard drives are susceptible to occasional failures some leading to a total hard disk crash and subsequently, costly data losses. Fortunately, modern day hard drives have built-in self-checks and intelligent failure prevention mechanisms that issue warnings each time they detect that your drive is at risk.
Regarding the hard drive issues, many users reported Windows found errors on this drive that need to be repaired warning message. And just like the fatal error external hard drive problem, it’s important to act before the disk suffers serious damage forcing you to replace your hard drive completely.
The question is: what actions should you take to rescue your data and disk as soon as you receive the Windows found errors on this drive that need to be repaired problem notification? Well, that’s what we’re discussing in the rest of the article.
How can I fix Windows found errors on this drive that need to be repaired error?
- Check disk
- Use PowerShell
- Security and Maintenance Check
- Using your installation disk
1. Check disk
Chkdsk (Check Disk in full) is a command-line utility used in DOS and Windows-based operating systems to inspect file systems metadata and the overall status of your system’s hard drives. It lists and automatically corrects existing disk errors. Try running the chkdsk operation.
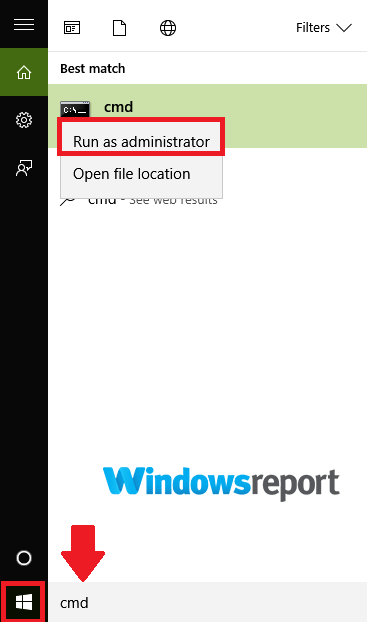
- Click start and type Command Prompt in your Windows 10 search box.

- Locate the Command Prompt (Desktop app) option from the results (see above) and click it. Also, select Yes when prompted by UAC.
- In the next window, enter chkdsk d: /f /r /x (notice the spaces) then select Y to accept the procedure (replace D with the letter representing your drive).
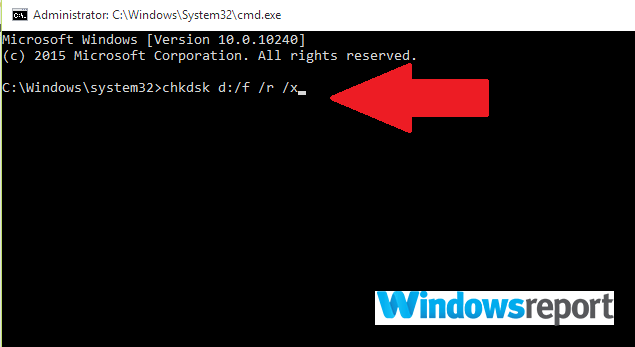
The f parameter instructs the utility to fix found errors while r advises it to discover and recover all the bad sectors. Lastly, x tells your hard drive to dismount to allow the exercise to start.
You may also start error checking from GUI (graphical user interface) as follows.
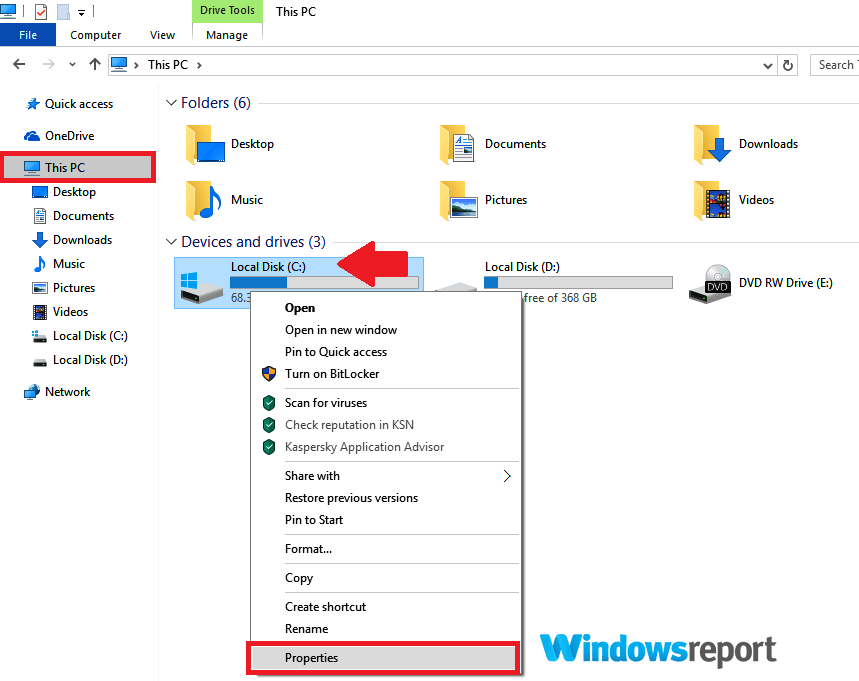
- Open File Explorer (CTRL+E).
- Click this PC to expand it (see screenshot below).
- Right-click on the target hard drive (C,D, etc.).
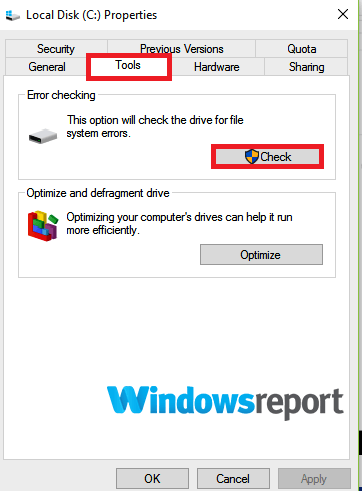
- Choose Properties then select the Tools
- Click Check.
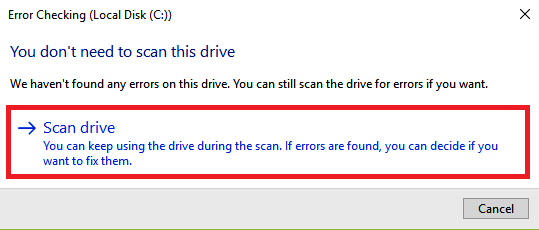
- Now press Scan drive and allow it to complete.
- ALSO READ: 100% disk usage in Windows 10: How to fix it in 2019
2. Use PowerShell
Run a System Scan to discover potential errors


Windows 10 PowerShell is another task-based command-line shell/scripting language designed to help system administration matters including discharging hard drive maintenance routines. You can as well use it to scrutinize your drive and repair probable errors.
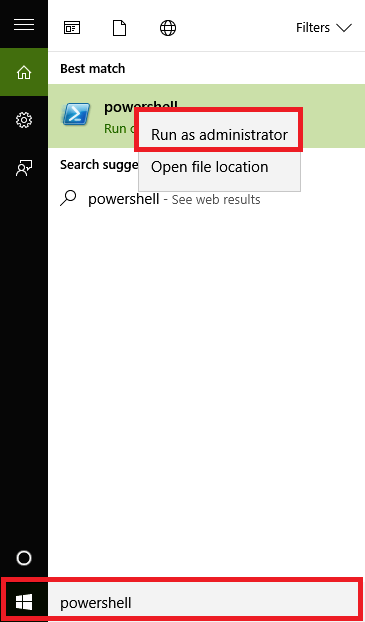
- Click on the Start button, then type PowerShell.
- Right-click on the Windows PowerShell option and click Run as administrator. Also, select yes when prompted by UAC.
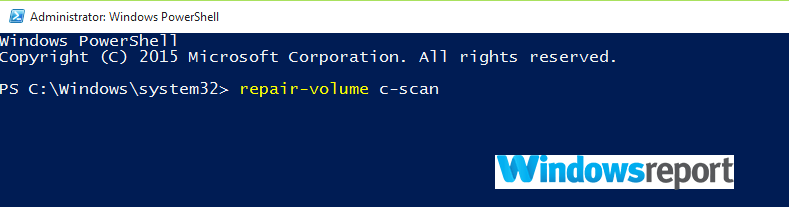
- Once the command line loads, type Repair-Volume C –Scan(replace C with your own drive letter) then press Enter. You will be required to run the next command if any errors are noted.
- Now type Repair-Volume C –OfflineScanAndFix then press Enter to commence an offline scan and remove errors on the drive.
- Restart the PC and check if the problem has been fixed.

3. Security and Maintenance Check
Windows 10 Security and Maintenance section keeps you up to date of issues that affect your computer’s general health. It can thus help you identify problems with the hard drive hardware and software as long as your PC is booting.
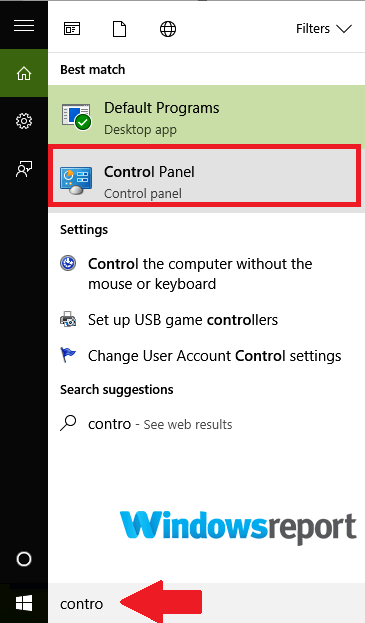
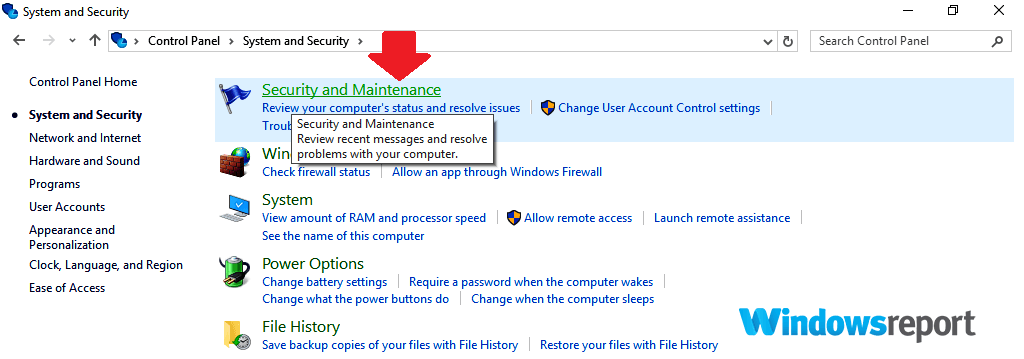
- In Windows 10 search box (right next to Start the start button) type control panel.
- Click the Control Panelfrom the results.
- Choose system and security.
- Go to Security and Maintenance.
- Click to expand the Maintenance tab then locate the Drive Status option.
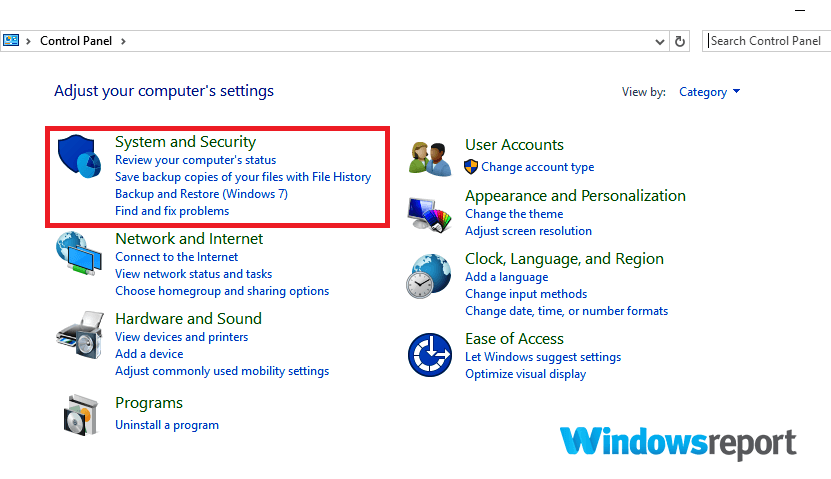
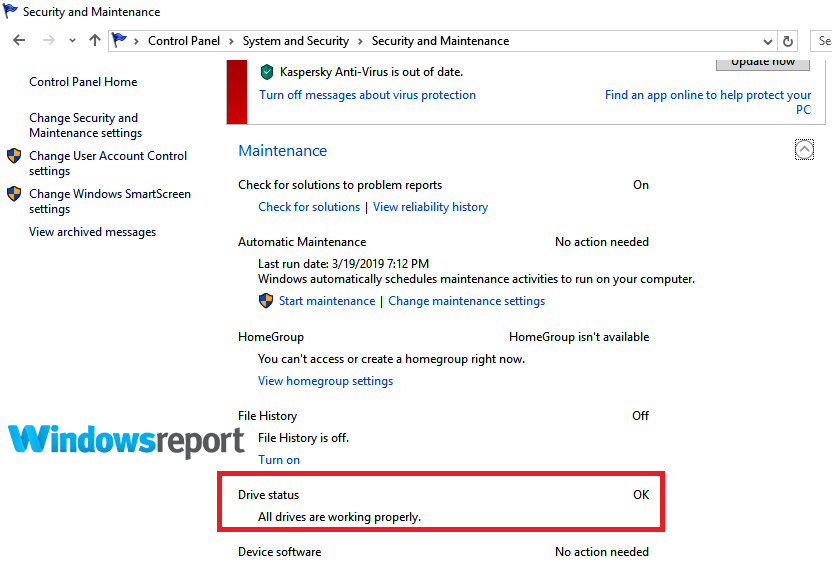
All issues pertaining to your hard drive will be listed here.
4. Using your installation disk
This is how to repair your disk if Windows won’t boot due to the Windows found errors on this drive that need to be repaired message.
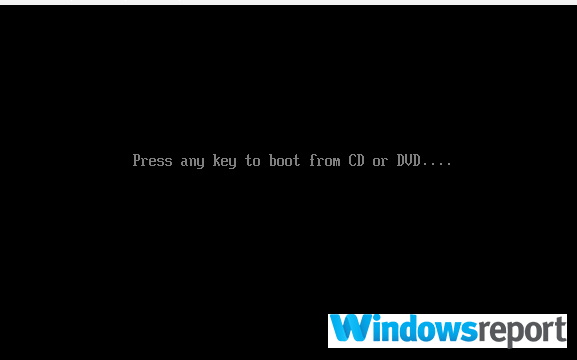
- Insert your Windows 10 installation disc/USB flash drive then restart the PC.
- Press any key (when prompted) then follow the subsequent instructions.
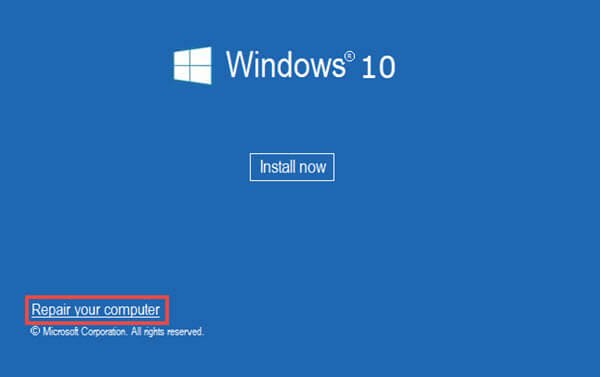
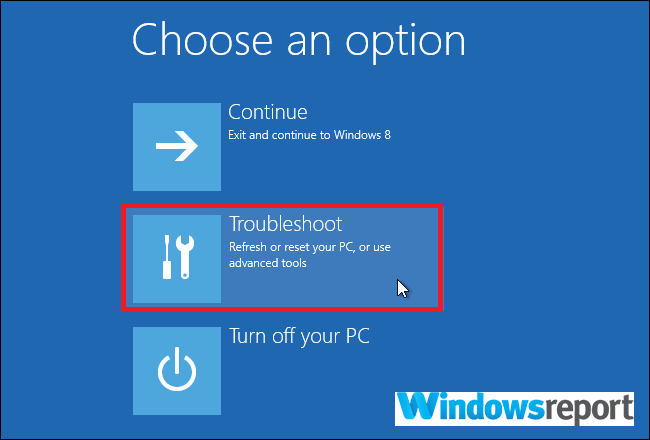
- The Install Windows page will appear. Select Repair your computer(lower left corner of your screen). This opens the various system recovery options.
- Select Troubleshoot under Choose an option.
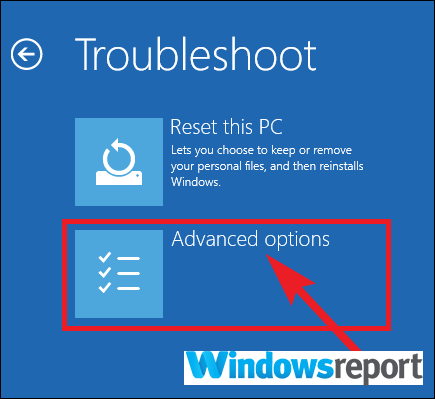
- Click Advanced Options in the new Troubleshoot screen.
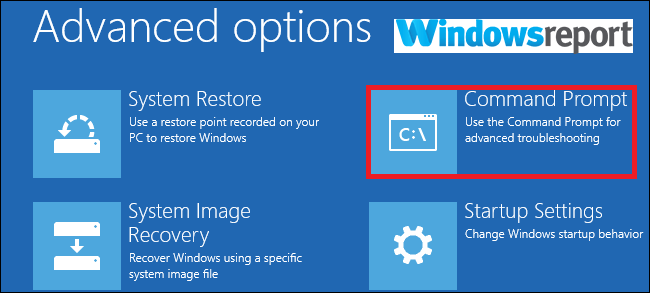
- Click Command Prompt.
- Now type chkdsk c: /f /r then press Enter.
Wait while it runs, and reboot your PC once the scan is finished.
That’s it. Your Windows found errors on this drive that need to be repaired error should be gone.
RELATED ARTICLES THAT YOU NEED TO CHECK OUT:


