- Entering Debugger Commands in WinDbg
- Opening the Debugger Command Window
- Using the Debugger Command Window
- Using Debugger Commands
- Debugger Command Window Prompt
- Kinds of Commands
- Editing, Repeating, and Canceling Commands
- Expression Syntax
- Aliases
- Self-Repeating Commands
- Debugging Tools for Windows (WinDbg, KD, CDB, NTSD)
- Install Debugging Tools for Windows
- Get started with Windows Debugging
- Debugging environments
- Windows debuggers
- Symbols and symbol files
- Blue screens and crash dump files
- Tools and utilities
- Additional documentation
- Download Debugging Tools for Windows
- Download WinDbg Preview
- Debugging Tools for Windows 10 (WinDbg)
- Adding the Debugging Tools for Windows if the SDK is already installed
- Looking for the debugging tools for earlier versions of Windows?
- Learn more about the debuggers
Entering Debugger Commands in WinDbg
The Debugger Command window is the primary debugging information window in WinDbg. You can enter debugger commands and view the command output in this window.
NoteВ В This window displays «Command» in the title bar. However, this documentation always refers to this window as «the Debugger Command window» to avoid confusing it with the Command Prompt windows that are used to issue Microsoft MS-DOS commands.
Opening the Debugger Command Window
To open the Debugger Command window, choose Command from the View menu. (You can also press ALT+1 or select the Command button ( ) on the toolbar. ALT+SHIFT+1 closes the Debugger Command window.)
The following screen shot shows an example of a Debugger Command window.
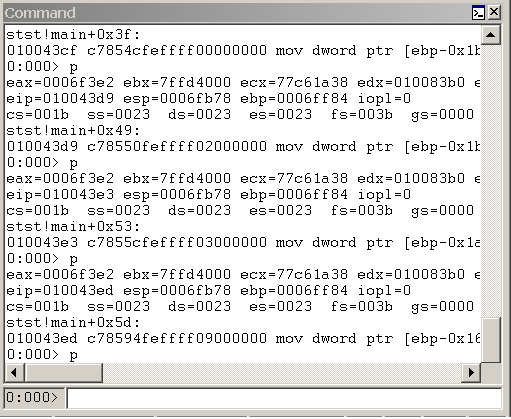
Using the Debugger Command Window
The Debugger Command window is split into two panes. You type commands in the smaller pane (the command entry pane) at the bottom of the window and view the output in the larger pane at the top of the window.
In the command entry pane, use the UP ARROW and DOWN ARROW keys to scroll through the command history. When a command appears, you can edit it or press ENTER to run the command.
The Debugger Command window contains a shortcut menu with additional commands. To access this menu, select and hold (or right-click) the title bar of the window or select the icon near the upper-right corner of the window (). The following list describes some of the menu commands:
Add to command output adds a comment to the command output, similar to the Edit | Add to Command Output command.
Clear command output deletes all of the text in the window.
Choose text color and recolor selection. opens a dialog box that enables you to choose the text color in which to display the text that is selected in the Debugger Command window.
Word wrap turns the word wrap status on and off. This command affects the whole window, not only commands that you use after this state is selected. Because many commands and extensions produce formatted displays, it is not recommended that you use word wrap.
Mark current location sets a marker at the current cursor location in the command window. The name of the mark is the contents of the line to the right of the cursor.
Go to mark causes the window to scroll so that the line that contains the chosen mark is positioned at the top of the window.
Always floating causes the window to remain undocked, even if it is dragged to a docking location.
Move with frame causes the window to move when the WinDbg frame is moved, even if the window is undocked. For more information about docked, tabbed, and floating windows, see Positioning the Windows.
Using Debugger Commands
For KD or CDB, «Debugger Command window» refers to the whole window. You enter commands at the prompt at the bottom of the window. If the commands have any output, the window displays the output and then displays the prompt again.
For Visual Studio, «Debugger Command window» refers to a window that is labeled «Debugger Immediate Window» in the title bar. This window has two panes:
In the small, bottom pane, you enter commands.
In the large, upper pane, you view command output.
For WinDbg, «Debugger Command window» refers to the window that is labeled «Command» in the title bar. This window contains two panes:
In the small, bottom pane, you enter commands.
In the large, upper pane, you view command output.
This window is always open at the beginning of a debugging session. You can reopen or switch to this window by selecting Command on the View menu, pressing ALT+1, or selecting the Command (Alt+1) button () on the toolbar.
You can use the UP ARROW and DOWN ARROW keys to scroll through the command history. When a previous command appears, you can edit it and then press ENTER to execute the previous command (or the edited version of the previous command). The cursor does not have to be at the end of the line for this procedure to work correctly.
Debugger Command Window Prompt
When you are performing user-mode debugging, the prompt in the Debugger Command window looks like the following example.
In the preceding example, 2 is the current process number, and 005 is the current thread number.
If you attach the debugger to more than one computer, the system number is included before the process and thread number, as in the following example.
In this example, 3 is the current system number, 2 is the current process number, and 005 is the current thread number.
When you are performing kernel-mode debugging on a target computer that has only one processor, the prompt looks like the following example.
However, if the target computer has multiple processors, the number of the current processor appears before the prompt, as in the following example.
If the debugger is busy processing a previously issued command, new commands will temporarily not be processed, although they can be added to the command buffer. In addition, you can still use control keys in KD and CDB, and you can still use menu commands and shortcut keys in WinDbg. When KD or CDB is in this busy state, no prompt is displayed. When WinDbg is in this busy state, the following indicator will appear in place of the prompt:
You can use the .pcmd (Set Prompt Command) command to add text to this prompt.
Kinds of Commands
WinDbg, KD, and CDB support a variety of commands. Some commands are shared between the debuggers, and some are available only on one or two of the debuggers.
Some commands are available only in live debugging, and other commands are available only when you debug a dump file.
Some commands are available only during user-mode debugging, and other commands are available only during kernel-mode debugging.
Some commands are available only when the target is running on certain processors. For more information about all of the commands and their restrictions, see Debugger Commands.
Editing, Repeating, and Canceling Commands
You can use standard editing keys when you enter a command:
Use the UP ARROW and DOWN ARROW keys to find previous commands.
Edit the current command with the BACKSPACE, DELETE, INSERT, and LEFT ARROW and RIGHT ARROW keys.
Press the ESC key to clear the current line.
You can press the TAB key to automatically complete your text entry. In any of the debuggers, press the TAB key after you enter at least one character to automatically complete a command. Press the TAB key repeatedly to cycle through text completion options, and hold down the SHIFT key and press TAB to cycle backward. You can also use wildcard characters in the text and press TAB to expand to the full set of text completion options. For example, if you type fo*!ba and then press TAB, the debugger expands to the set of all symbols that start with «ba», in all modules with module names that start with «fo». As another example, you can complete all extension commands that have «prcb» in them by typing !*prcb and then pressing TAB.
When you use the TAB key to perform text completion, if your text fragment begins with a period (.), the text is matched to a dot command. If your text fragment begins with an exclamation point (!), the text is matched to an extension command. Otherwise, the text is matched with a symbol. When you usee the TAB key to enter symbols, pressing the TAB key completes code and type symbols and module names. If no module name is apparent, local symbols and module names are completed. If a module or module pattern is given, symbol completion completes code and type symbols from all matches.
You can select and hold (or right-click) in the Debugger Command window to automatically paste the contents of the clipboard into the command that you are typing.
The maximum command length is 4096 characters. However, if you are controlling the user-mode debugger from the kernel debugger, the maximum line length is 512 characters.
In CDB and KD, press the ENTER key by itself to repeat the previous command. In WinDbg, you can enable or disable this behavior. For more information about this behavior, see ENTER (Repeat Last Command).
If the last command that you issued presents a long display and you want to cut it off, use the CTRL+C key in CDB or KD. In WinDbg, use Debug | Break or press CTRL+BREAK.
In kernel-mode debugging, you can cancel commands from the keyboard of the target computer by pressing CTRL+C.
You can use the .cls (Clear Screen) command to clear all of the text from the Debugger Command window. This command clears the whole command history. In WinDbg, you can clear the command history by using the Edit | Clear Command Output command or by selecting Clear command output on the shortcut menu of the Debugger Command window.
Expression Syntax
Many commands and extension commands accept expressions as their arguments. The debugger evaluates these expressions before executing the command. For more information about expressions, see Evaluating Expressions.
Aliases
Aliases are text macros that you can use to avoid having to retype complex phrases. There are two kinds of aliases. For more information about aliases, see Using Aliases.
Self-Repeating Commands
You can use the following commands to repeat an action or conditionally execute other commands:
Debugging Tools for Windows (WinDbg, KD, CDB, NTSD)
Start here for an overview of Debugging Tools for Windows. This tool set includes WinDbg and other debuggers.
Install Debugging Tools for Windows
You can get Debugging Tools for Windows as part of a development kit or as a standalone tool set:
As part of the WDK
Debugging Tools for Windows is included in the Windows Driver Kit (WDK). To get the WDK, see Download the Windows Driver Kit (WDK).
As part of the Windows SDK
Debugging Tools for Windows is included in the Windows Software Development Kit (SDK). To download the installer or an ISO image, see Windows 10 SDK on Windows Dev Center.
As a standalone tool set
You can install the Debugging Tools for Windows alone, without the Windows SDK or WDK, by starting installation of the Windows SDK and then selecting only Debugging Tools for Windows in the list of features to install (and clearing the selection of all other features). To download the installer or an ISO image, see Windows 10 SDK on Windows Dev Center.
Get started with Windows Debugging
To get started with Windows debugging, see Getting Started with Windows Debugging.
To get started with debugging kernel-mode drivers, see Debug Universal Drivers — Step by Step Lab (Echo Kernel-Mode). This is a step-by-step lab that shows how to use WinDbg to debug Echo, a sample driver that uses the Kernel-Mode Driver Framework (KMDF).
Debugging environments
If your computer has Visual Studio and the WDK installed, then you have six available debugging environments. For descriptions of these environments, see Debugging Environments.
All of these debugging environments provide user interfaces for the same underlying debugging engine, which is implemented in the Windows Symbolic Debugger Engine (Dbgeng.dll). This debugging engine is also called the Windows debugger, and the six debugging environments are collectively called the Windows debuggers.
Visual Studio includes its own debugging environment and debugging engine, which together are called the Visual Studio debugger. For information on debugging in Visual Studio, see Debugging in Visual Studio. For debugging managed code, such as C#, using the Visual Studio debugger is often the easiest way to get started.
Windows debuggers
The Windows debuggers can run on x86-based, x64-based, or ARM-based processors, and they can debug code that is running on those same architectures. Sometimes the debugger and the code being debugged run on the same computer, but other times the debugger and the code being debugged run on separate computers. In either case, the computer that is running the debugger is called the host computer, and the computer that is being debugged is called the target computer. The Windows debuggers support the following versions of Windows for both the host and target computers.
- WindowsВ 10 and Windows ServerВ 2016
- WindowsВ 8.1 and Windows ServerВ 2012В R2
- WindowsВ 8 and Windows ServerВ 2012
- WindowsВ 7 and Windows ServerВ 2008В R2
Symbols and symbol files
Symbol files store a variety of data that are not required when running the executable binaries, but symbol files are very useful when debugging code. For more information about creating and using symbol files, see Symbols for Windows debugging (WinDbg, KD, CDB, NTSD).
Blue screens and crash dump files
If Windows stops working and displays a blue screen, the computer has shut down abruptly to protect itself from data loss and displays a bug check code. For more information, see Bug Checks (Blue Screens). You analyze crash dump files that are created when Windows shuts down by using WinDbg and other Windows debuggers. For more information, see Crash dump analysis using the Windows debuggers (WinDbg).
Tools and utilities
In addition to the debuggers, Debugging Tools for Windows includes a set of tools that are useful for debugging. For a full list of the tools, see Tools Included in Debugging Tools for Windows.
Additional documentation
For additional information related to Debugging Tools for Windows, see Debugging Resources. For information on what’s new in Windows 10, see Debugging Tools for Windows: New for Windows 10.
Download Debugging Tools for Windows
The Windows Debugger (WinDbg) can be used to debug kernel-mode and user-mode code, analyze crash dumps, and examine the CPU registers while the code executes.
To get started with Windows debugging, see Getting Started with Windows Debugging.
Download WinDbg Preview
WinDbg Preview is a new version of WinDbg with more modern visuals, faster windows, and a full-fledged scripting experience. It is built with the extensible object-orientated debugger data model front and center. WinDbg Preview is using the same underlying engine as WinDbg today, so all the commands, extensions, and workflows still work as they did before.
Download WinDbg Preview from the Microsoft Store: WinDbg Preview.
Learn more about installation and configuration in WinDbg Preview — Installation.
Debugging Tools for Windows 10 (WinDbg)
Get Debugging Tools for Windows (WinDbg) from the SDK: Windows 10 SDK. Use the download link on the Windows 10 SDK page, as the Debugging Tools for Windows are not available as part of Visual Studio.
If you just need the Debugging Tools for Windows, and not the Windows Driver Kit (WDK) for Windows 10, you can install the debugging tools as a standalone component from the Windows Software Development Kit (SDK).
In the SDK installation wizard, select Debugging Tools for Windows, and deselect all other components.
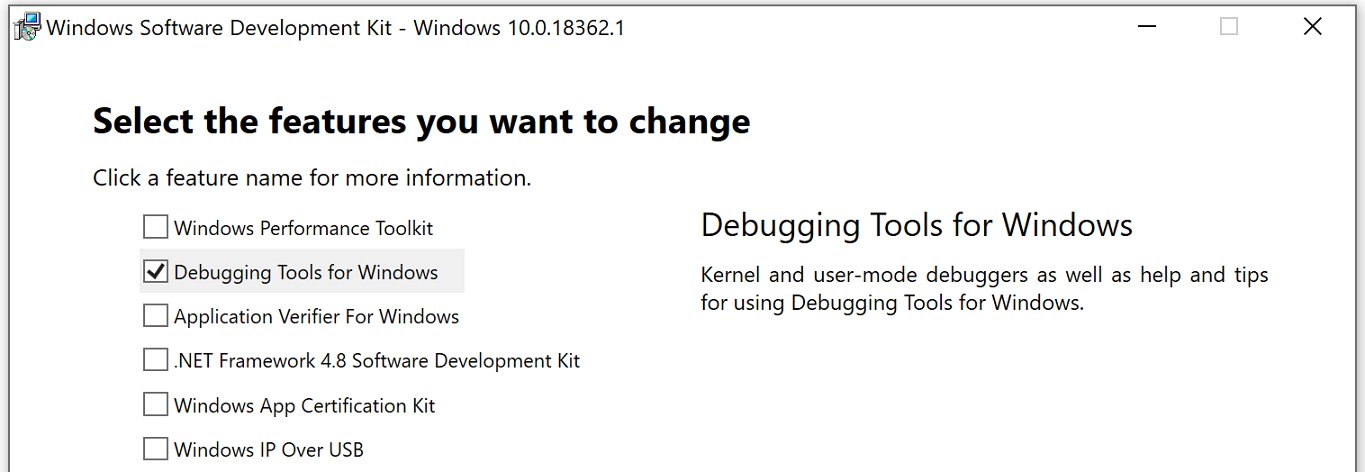
Adding the Debugging Tools for Windows if the SDK is already installed
If the Windows SDK is already installed, open Settings, navigate to Apps & features, select Windows Software Development Kit, and then select Modify to change the installation to add Debugging Tools for Windows.
Looking for the debugging tools for earlier versions of Windows?
To download the debugger tools for previous versions of Windows, you need to download the Windows SDK for the version you are debugging from the Windows SDK and emulator archive. In the installation wizard of the SDK, select Debugging Tools for Windows, and deselect all other components.
Learn more about the debuggers
Learn more about WinDbg and other debuggers in Debugging Tools for Windows (WinDbg, KD, CDB, NTSD).


