- Find files by date modified in Windows
- How to find the date of modified files
- How can I find out which process and user is modifying a file?
- How To Know Which Process is Using a File or Folder in Windows
- Resource Monitor
- Process Explorer
- My Take
- Programmatically determine user who last modified file on Windows?
- 2 Answers 2
- Auditing User Access of Files, Folders, and Printers
- Specifying Files, Folders, and Printers to Audit
Find files by date modified in Windows
Using the date modified feature in Windows File Explorer allows you to find any files that were modified on a specific date or over a range of dates. Using this tip can be helpful for anyone who had lost a file, but knows when they last modified it.
How to find the date of modified files
- Press the Windows key + E on the keyboard to open File Explorer.
- On the left side scrolling menu, select the drive or folder where you’d like to view dates ( 1 ).

- Then, on the right side of the screen, type datemodified: (make sure to include the colon) into the search box ( 2 ).
- Once done, a menu similar to the one shown below should appear.

- From here, you have a few options:
- View a single day — Navigate to the day you’re interested in and click it.
- View a range within a month — Click and hold down your left mouse button on the starting date, and then drag your mouse cursor to the ending date.
- View a range over a long period — If you need information that spans more than one month or year, you utilize a specific format in the search box. As an example, if you’d like to view the modified dates between October 13, 2018, and November 10, 2018, you would type: datemodified:10/31/2018 .. 11/10/2018 exactly as it is written there, and then press Enter .
How can I find out which process and user is modifying a file?

August 27th, 2013
When troubleshooting a problem, you may discover that a file is being modified that shouldn’t, and you figure out would be nice if there were some way of finding out which process is modifying the file (so you can get it to stop). Enter the security auditing system. Every securable object has an associated system access control list (SACL) which controls what audit events are raised when a request is made to access the object. You can say, for example, “Log an event in the security event log if somebody tries to open this file for writing but is denied access,” or “Log an event in the security event log if somebody successfully creates a new file in this directory.” Here’s how it works. Let’s say that you want to access successful requests from any user to write to a particular file. View the Properties of the file, go to the Security tab, and click Advanced, then go to the Auditing tab and elevate to administrator if necessary. Next, click Add. What happens next depends on what version of Windows you’re using, since the interface varies slightly (but the basic idea remains the same). When asked for the security principal, set the Location to the local computer and use the object name Everyone. Older vesions of Windows will give you a grid of options. Look for the row corresponding to the operation you want to audit and check the box under Successful if you want to audit successful accesses or the box under Failed to audit failed accesses. (Or check both to audit both successful and failed accesses.) Repeat for each access you want to audit. In our case, we would check the Create files / write data and Create folders / append data boxes under the Successful column. Newer versions of Windows break the grid up into two questions. The first is whether you want to audit Success, Fail, or All access. In our case, we want to audit Success. The next question is what type of access you want to audit, and in our case we would check Write. (Or for finer control, click Show advanced permissions and check Create files / write data and Create folders / append data.) OK your way out of all the dialog boxes to save the changes. All right, let’s take this thing out for a spin. Open the file in Notepad, make some change, and then Save them. Now open the Event Viewer and go to the Security event log. And… no log entry. That’s because I forgot a step: You have to enable object access auditing. Open the Control Panel and look in the Administrative Tools folder. From there, you can run the Local Security Policy snap-in. If you are a command line nerd, you can run secpol.msc. Under Local Policies, Audit Policy set the Audit object access policy to enable global auditing of successful or failed accesses, depending on what you need. Okay, let’s try it again. Modify the file and save it. Now go back to the security event viewer and you’ll see audit success events in your log. Again, depending on what version of Windows you’re using, the successful audit event will appear differently. For example, older versions of Windows might show
| |||||||||||||||||
| Object Access Attempt: | |||||||||||||||||
|
whereas newer versions might show
| ||||||||||||
| An attempt was made to access an object. | ||||||||||||
| Subject: | ||||||||||||
| Security ID: | computer\user | |||||||||||
| Account Name: | user | |||||||||||
| Account Domain: | computer | |||||||||||
| Logon ID: | 0x27ADB | |||||||||||
| Object: | ||||||||||||
| Object Server: | Security | |||||||||||
| Object Type Name: | File | |||||||||||
| Object Name: | C:\test.txt | |||||||||||
| Handle ID: | 0x15c | |||||||||||
| Resource Attributes: | S:AI | |||||||||||
| Process Information: | ||||||||||||
| Process ID: | 0xdb0 | |||||||||||
| Process Name: | C:\Windows\System32\notepad.exe | |||||||||||
| Access Request Information: | ||||||||||||
| Accesses: | WriteData (or AddFile) AppendData (or AddSubdirectory or CreatePipeInstance) | |||||||||||
| Access Mask: | 0x6 | |||||||||||
Either way, you can see which process obtained write access to the file, running as what user, at what time. Newer versions of Windows include a bit more information in the event log entry to make it easier to find the access request you’re looking for as well as chase the access further. (For example, from the Logon ID, you can figure out which logon session modified the file.) This feature has been around since the beginning of Windows NT, but it seems that very few people know about it. Whenver I point it out to people, they say, “Hey, that’s cool. How long has that feature been there?”
How To Know Which Process is Using a File or Folder in Windows
Ever wondered which program has a particular file or directory open? Quite often, when trying to delete a folder, Windows reports this:
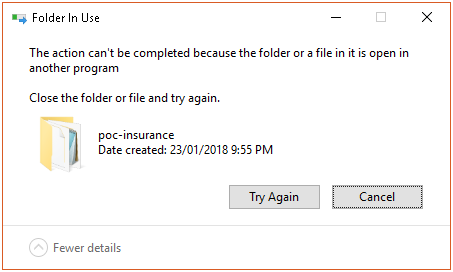
This error also happens with a file, when we tried to move a file, or delete those file. How we can find out which program or application is currently using it and preventing us to delete/move it? To get the process holding those folder or file, we can use these two utilities:
Resource Monitor
For Windows 7 and above, you can use the built-in Resource Monitor.
Open Resource Monitor, which can be found
- By searching for resmon.exe in the start menu, or
- As a button on the Performance tab in your Task Manager

Resource Monitor from Task Manager’s Performance Tab
From CPU tab, use the search field in the Associated Handles section
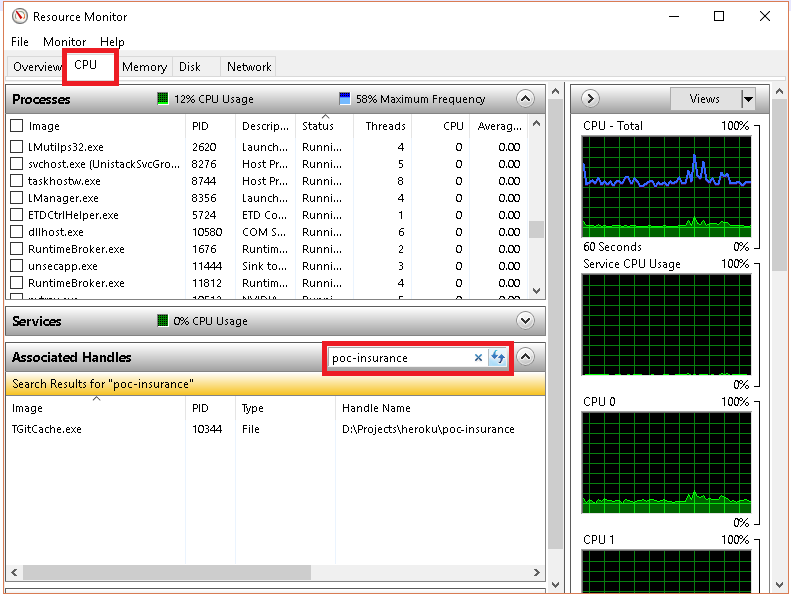
When you’ve found the handle, you can identify the process by looking at the Image and/or PID column. You can then close the application if you are able to do that, or just right-click the row and you’ll get the option of killing the process (End Process) right there.
Process Explorer
Process Explorer shows you information about which handles and DLLs processes have opened or loaded.
- Open Process Explorer (running as «administrator») by running procexp.exe or procexp64.exe.
- Enter the keyboard shortcut Ctrl+F. Alternatively, click the “Find” menu and select “Find a Handle or DLL”.
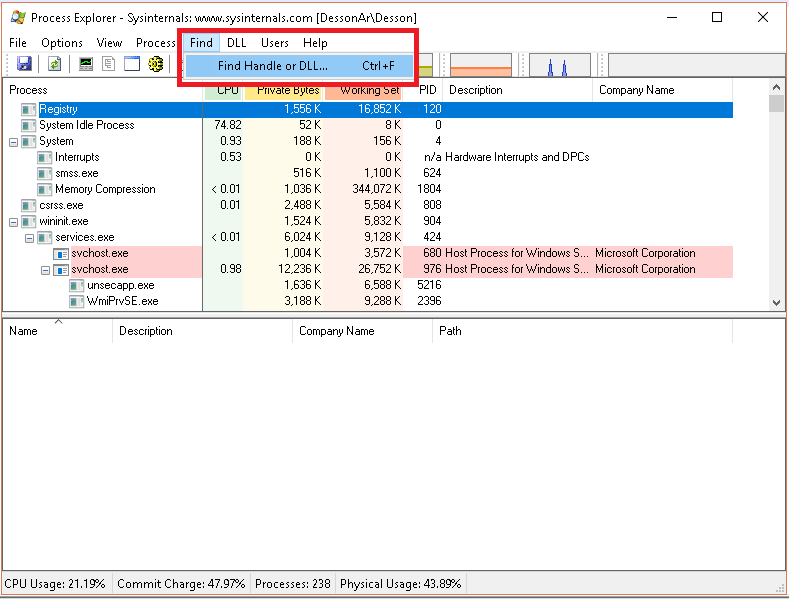
Process Explorer — Find Handle or DLL
- Type in the name of the locked file or other file of interest in the Search dialog box, then click «Search». Partial names are usually sufficient.
- A list will be generated. There may be a number of entries. Click one of the entry, it’ll «Refreshing handles».
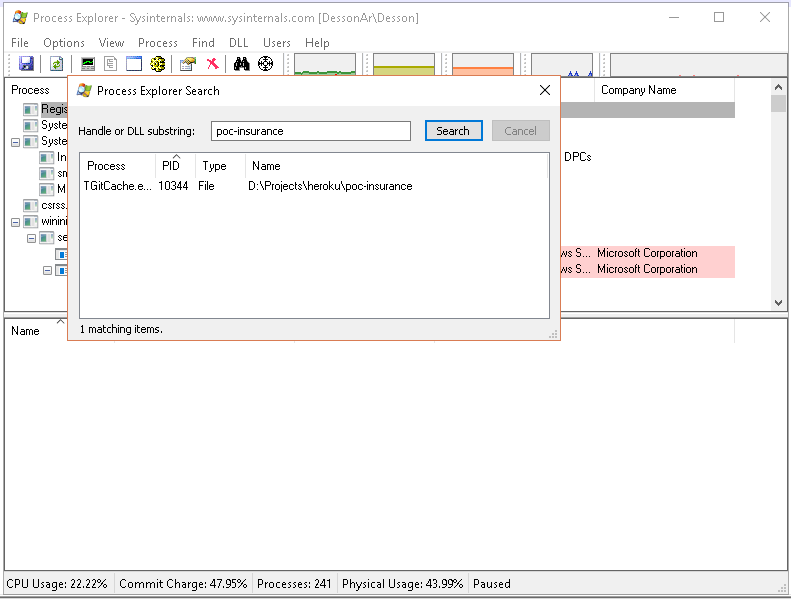
Process Explorer — Search
Same as Resource Monitor, an individual handle in the list can be killed by selecting it and pressing the delete key (or Close Handle). However, please be careful when deleting handles, as system instabilities may occur. Rebooting your system maybe will free the locked file/folder.
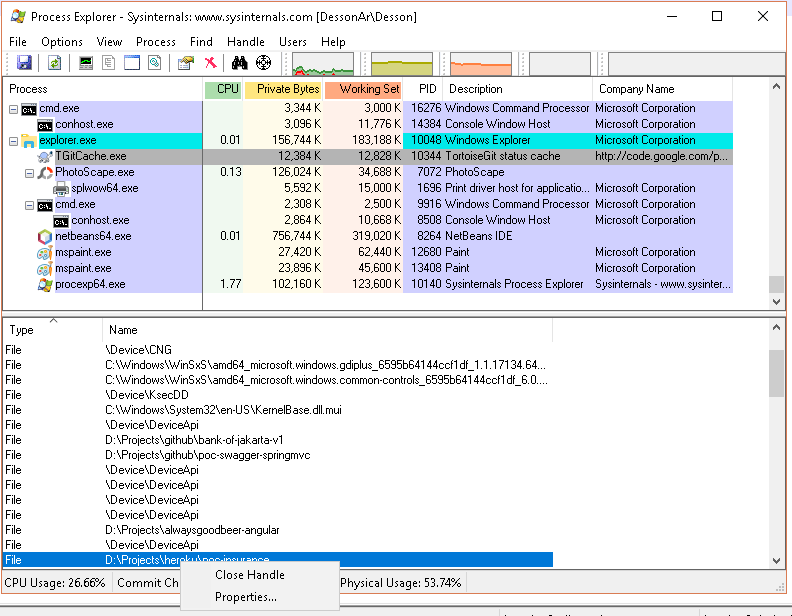
Process Explorer — Close Handle
Handle is a command line version of Process Explorer.
My Take
I prefer to use Resource Monitor compare to Process Explorer since Process Explorer is slower (especially during «Refreshing handles» process). If I can’t find the handle in Resource Monitor, then I use Process Explorer.
Liked this Tutorial? Share it on Social media!
Programmatically determine user who last modified file on Windows?
I’ve been tasked with writing a simple command line utility in C# that will monitor a directory on a server that several users will be accessing to copy/cut/paste/view data. I used FileSystemWatcher to do this but it’s lacking a couple features.
Is it possible to determine the user or at least the computer name from where the file is being accessed/modified?
(Note: This doesn’t have to be with FileSystemWatcher, I’m looking for ANY way to do this.)
2 Answers 2
I don’t think you’ll be able to monitor this from C# directly. Not without the help of the host operating system anyway. Windows and NTFS allow you to audit a particular directory and log the accesses in the Security event log for the host machine (so the server hosting the share would have to audit, not the client).
Auditing User Access of Files, Folders, and Printers
The audit log appears in the Security log in Event Viewer. To enable this feature:
- Click Start, click Control Panel, click Performance and Maintenance, and then click Administrative Tools.
- Double-click Local Security Policy.
- In the left pane, double-click Local Policies to expand it.
- In the left pane, click Audit Policy to display the individual policy settings in the right pane.
- Double-click Audit object access.
- To audit successful access of specified files, folders and printers, select the Success check box.
- To audit unsuccessful access to these objects, select the Failure check box.
- To enable auditing of both, select both check boxes.
- Click OK.
Specifying Files, Folders, and Printers to Audit
After you enable auditing, you can specify the files, folders, and printers that you want audited. To do so:
- In Windows Explorer, locate the file or folder you want to audit. To audit a printer, locate it by clicking Start, and then clicking Printers and Faxes.
- Right-click the file, folder, or printer that you want to audit, and then click Properties.
- Click the Security tab, and then click Advanced.
- Click the Auditing tab, and then click Add.
- In the Enter the object name to select box, type the name of the user or group whose access you want to audit. You can browse the computer for names by clicking Advanced, and then clicking Find Now in the Select User or Group dialog box.
- Click OK.
- Select the Successful or Failed check boxes for the actions you want to audit, and then click OK.
- Click OK, and then click OK.
The process is similar for the server operating systems and Windows Vista/Windows 7. If you go this route, you can have the C# program read the event log (See EventLog class) to look for the data you want.
Note: Starting with vista you must be and (UAC elevated if needed) administrator to read them from code.


