- Fix: Computer Randomly Restarts Windows 7, 8 and 10
- Method 1: Turn off Automatic Restart Feature
- Method 2: Check RAM for issues
- MemTest86
- Manual Checking
- Method 3: Check your PC for overheating
- CPUID
- BIOS
- Resolving Overheating Issues
- Method 4: Check and replace the Power Supply
- Method 5: BIOS Update
- Method 6: Reinstalling Drivers
- Method 7: Changing Power Options
- Method 8: Manually Reinstalling VCRedist
- How to Turn Off Automatic Restart on Windows 10
- Solution 1: Tweaking the Group Policy Settings or Registry
- Solution 2: Another Registry and Group Policy Fix
- Solution 3: Disabling a Task in Task Scheduler
Fix: Computer Randomly Restarts Windows 7, 8 and 10
If you are a regular user of Windows then you might experience a scenario where your system will restart automatically. Normally, this would be useful because the Windows is designed to restart in case of an error especially a BSOD. There are features and options that let you turn this on and off. But, this becomes a problem when your computer restarts automatically without any error. There are a lot of cases where users have complained about their PC restarting without any warning or error. This can be problematic because it can happen at any time e.g. during your gameplay or work etc.
There are a few things that can cause this issue. It can be the automatically restarting feature that might be misbehaving or it might be restarting your system without giving you enough time to look at the error message. It can also be caused by overheating or a faulty power supply. A faulty RAM is can also be the culprit behind this issue. In short, mostly it’s a hardware problem related to your RAM or PSU or GPU (especially if it is an overheating issue). The rare cause of this includes driver problems as well.
There are a few things that you can check which are given below in the methods. So, go through each method until the problem is solved.
Method 1: Turn off Automatic Restart Feature
The first thing that you should do is to turn off the automatic restart feature. This should be done to narrow down the causes of the error. Disabling this feature will help us check whether the restart was because of an error or not. This is mainly because most of the time the automatic restart feature will restart your PC without even showing the error message. So, if the problem is caused by a specific error then it should be shown on the screen after turning this feature off.
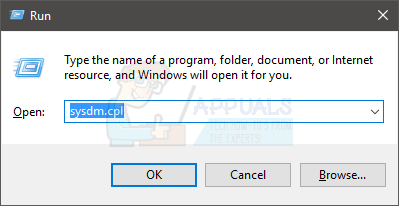
- Hold Windows key and press R
- Type sysdm.cpl and press Enter

- Select Advanced tab
- Click Settings from the Startup and Recovery section
- Uncheck the option Automatically restart option in System Failure section
- Click ok


Now, use your system as you would on a regular basis and check whether the restart occurs or not. If the restart happens and you see an error message then look for the solutions of that error. Otherwise, continue to the next method.
Method 2: Check RAM for issues
The first thing you should do is check the RAM. A faulty RAM can also cause the issue which is easily traceable. You can check the RAM with the MemTest86 or you can do it manually by putting one RAM stick at a time to check which one causes the restart. You can also try to perform a benchmark test to see if the RAM is lagging behind.
Checking the RAM with the MemTest86 is a time-consuming task. So, we will advise you to go for manual checking.
MemTest86
MemTest86 is a program that will check your RAM for any issues. This program is quite reliable but takes a lot of time.
- Go here and download the program
- You can go here for detailed instructions on how to use MemTest86
- Once you setup the MemTest86 and restart your computer, the MemTest86 will automatically run. You will be able to see everything on a blue screen
- Make sure that you run 7-8 tests for accurate results and check all the slots

If you see a red result then that means the RAM is faulty. Take it out and then check your PC for any restarting issue.
Manual Checking
The manual way is the easy way but requires you to open the casing of your system. Follow the instructions below
- Turn off your computer
- Unplug your system
- Open the side cover of your computer’s casing or the back cover of your laptop. You can do that either by unlatching or unscrewing.
- You should see narrow but long sticks on the board. There might be one or multiple but they will be located together
- You can take them out by unlatching them
- If you have multiple RAM sticks then take out all of them. Now, put the RAM back in the board one stick at a time to check which one causes the restart. The one that causes the issue is the faulty one.
- If you have just a single stick then you should replace it with another one (temporarily). You can take one from another computer or from a shop but don’t forget to check their ratings and type. The replacement RAM needs to be compatible with your system.
Confirm the issue by following the steps given above. If you see no progress by changing the RAM sticks then move to the next method. On the other hand, if there is no restart issue after taking out the faulty RAM then you are good to go.
Note: Not only RAM, but the PSU can also cause similar issues with your computer therefore, you might also need to test it out.
Method 3: Check your PC for overheating
You should also check your system for overheating issues. Your system will restart automatically if it overheats while running a certain program. So, if you notice your system getting restarted on a specific program or generally when you run a resource-intensive program then overheating is the most likely cause.
You can check the overheating issue in two ways: You can use third-party software to measure the temperature or you can use the built-in hardware monitoring sensors of your system.
CPUID
CPUID is a software that lets you measure your computer temperatures. You can use this to measure the temperature while playing a game and check whether the temperatures are in range or not.
- Go here and download the HWMonitorPro.
- Once downloaded, run the downloaded file and install it.
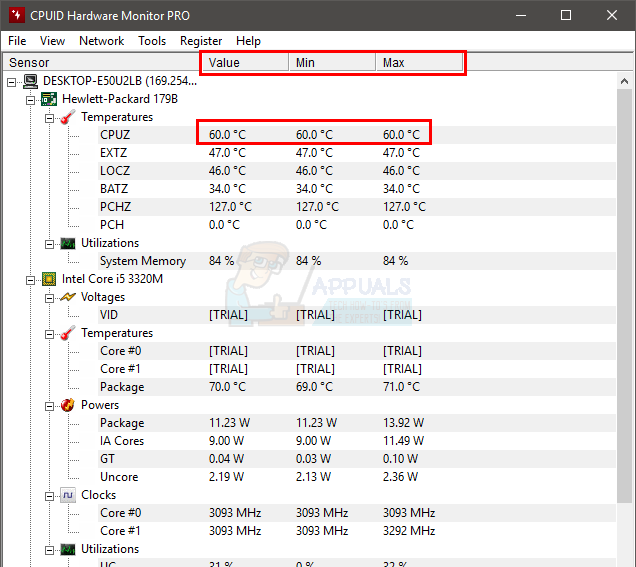
You can run the program and leave it in the background. Now, play a game or run any other resource-intensive program. Check the temperature values and voltages after a few minutes.
BIOS
As mentioned earlier, you can also use your BIOS to check the readings and voltages of your system. The majority of the systems have built-in sensors. Follow the steps given below to check the sensors of your system
- Reboot
- Press F2 when your manufacturer’s logo appears. This key varies depending on your manufacturer but you can try F10 and Del as well. Don’t worry about it, the key will be mentioned on one of the corners of the screen when the manufacturer’s logo appears. So, keep an eye on it and press the mentioned key.
- Now you should be in your BIOS if you aren’t then you should be able to see a menu with multiple options. One of these options should be BIOS settings or BIOS menu (or a variation of it). You can use your arrow keys and to navigate through the list and select the BIOS option. Press Enter to go into an option.
- Now, use your arrow keys to select H/W monitor or Status (or a variation of this depending on your manufacturer) and press Enter.
- You should be able to see the temperature and voltage readings in this section.
Check whether or not the readings are within the limits. The limits will be given on the CPUID software but if you aren’t sure then you can Google it for your specific device. If the readings aren’t in the range then that means it’s an overheating issue.
You can confirm the overheating issue by putting hands on GPU or CPU once the system automatically restarts. If the CPU or GPU is very hot then that confirms the issue.
Resolving Overheating Issues
There are a couple of ways of solving the overheating issue.
- Cleaning your system and making sure that you have a proper cooling system is a good way to resolve the overheating issue. Change the thermal paste and clean the heat sinks especially if you haven’t done these for a long time.
- If the restart happens especially when you are playing a game then the overheating might be because of the GPU. You can take out or unplug the GPU and use the integrated graphics of your system. If there is no restart without the GPU then get your Graphics card checked. Also, make sure it has proper cooling and update its drivers.
Method 4: Check and replace the Power Supply
Lastly, you need to check the power supply unit for any issues. Your power supply is responsible for providing the power to all the components. Follow the steps given below to check the power supply for dust/dirt.
- Turn off your computer
- Unplug your system
- Open the side cover of your computer’s casing or the back cover of your laptop. You can do that either by unlatching or unscrewing.
- You will be able to see a small box on one of the corners with a fan and a sticker with ratings. This will be your power supply.
- Take out the power supply by disconnecting its wires that are connected to the motherboard. Once disconnected, you can unscrew or unlatch the power supply from the system.
- Now, check the power supply for any dust of blocked air paths because these can cause overheating in the power supply. Clean the power supply, put it back and then check if the overheating issue is resolved.
You can also replace the power supply with another one (that is in working condition) and check if the restarting issue is solved or not. It will confirm the issue as well. If replacing the power supply solves the problem then you should get a new power supply.
Method 5: BIOS Update
Although unlikely but not entirely impossible, the problem might be caused by an outdated BIOS as well. If you have your computer for a very long time and you haven’t updated your BIOS then checking for an update is worth a shot.
You can go to your manufacturer’s website and check for any updated BIOS version.
Note: Updating BIOS is a highly advanced procedure and it can have irreversible effects. If you aren’t sure or you aren’t comfortable doing it on your own then take your computer to a specialist.
Method 6: Reinstalling Drivers
Sometimes, the issue might be caused by incompatible or outdated drivers especially if the issue started happening after an update or upgrade. Your graphics card driver is the most likely cause of random restarts. So, uninstall the graphics card driver and let the Windows download the most compatible drivers for it.
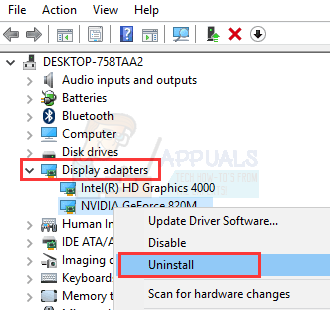
- Hold Windows key and press R
- Type devmgmt.msc and press Enter
- Locate and double click Display adapters
- Right-click your graphics card and select Uninstall

Reboot your system once the uninstall is finished. Windows will automatically install the latest and most compatible driver for your graphics card upon the next sign in. Check if you are having any issues after the restart.
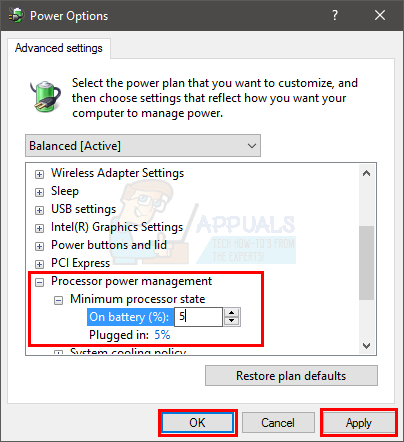
Method 7: Changing Power Options
This solution seems to resolve the random restarting issue. Basically, you will lower the minimum processor state to almost 5% which will prevent your system to randomly start.
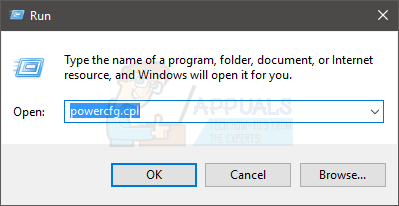
- Hold Windows key and press R
- Type powercfg.cpl and press Enter
- Select change plan settings from your selected (active) plan
- Select Change advanced power settings
- Double click Processor power management
- Double click Minimum processor state
- Select 5% of the range menu. Do it for both plugged in and battery as well.
- Select Apply then Ok
Now, use your system or run a program to check if the issue is still there or not.
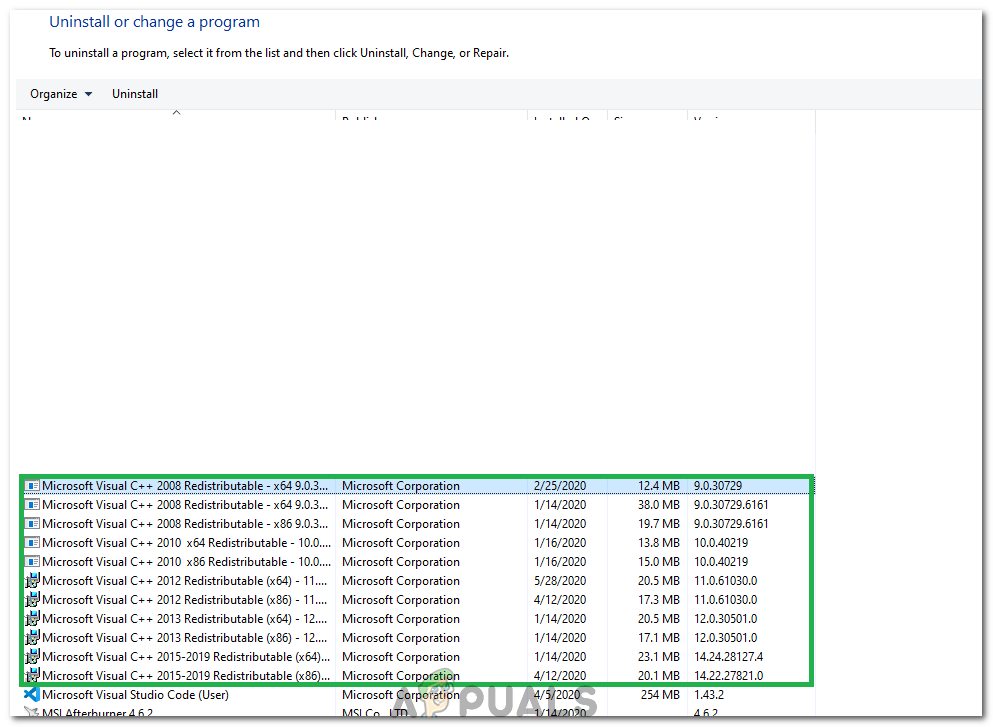
Method 8: Manually Reinstalling VCRedist
According to some users, a simple reinstall of the VC Redist software fixed their problem at least temporarily. Therefore, you can try your luck at reinstalling VC Redist and check if that fixes this issue for you. In order to do so:
- Press “Windows’ + “R” to open the Run prompt.
- Type in “appwiz.cpl” and press “Enter”.
- Right-click on each instance of “Microsoft Visual C++” in here and select “Uninstall”.Uninstalling VC Redist
- Follow through with the instructions and then verify that all instances have been removed.
- Download the VC Redist software from here and run its executable.
- Install the software by following the on-screen instructions and check to see if the issue persists.
 Uninstalling VC Redist
How to Turn Off Automatic Restart on Windows 10
You may have already noticed that Windows 10 sometimes decides to simply restart itself in the worst possible time. Users sometimes leave their computers turned on to download something or to buffer a video but Windows forcefully restarts itself if a new update has been downloaded.
The option to turn off automatic restarts is present by setting the active hours on your PC but users have reported that Windows sometimes overrides these settings and restarts no matter what. There are several solutions to this problem and they will completely prevent this functionality from occurring on your PC ever again.
Losing data to this feature has angered plenty of users and that is the reason why they are constantly urging Microsoft to stop enforcing updates and restarts on its users. Follow the solutions presented below in order to prevent Windows 10 from restarting automatically.
Solution 1: Tweaking the Group Policy Settings or Registry
The first solution on display is quite a powerful one and it lets you access certain settings which are not available through the regular method in Settings or in Control Panel. This way you can choose several extra settings on how the updates are delivered to your computer and hopefully prevent Windows 10 from restarting without notifying you.
- Hold the Windows key and press the R button from your keyboard.
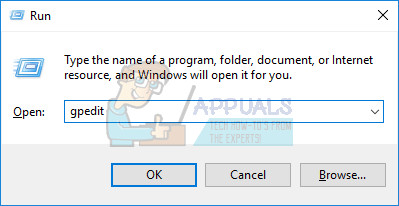
- Enter “gpedit.msc” in the Run dialog box, and press the OK button in order to open the Group Policy Editor.
- On the left section of Local Group Policy Editor, under Computer Configuration, double click on Administrative Templates, and navigate to the Windows Components >> Windows Update.
- Select the Windows Update folder, and navigate to its right side section. Double-click on the Configure Automatic Updates option and enable this policy by switching the radio button at the top of the windows to Enabled.

- Check under the Configure automatic updating and choose the option which works the best for you. The optimal option is the Auto download and notify to install which will download the updates automatically but wait for your approval to install.
- In order to check if the setting has been applied, open up the Settings app by clicking on the Start menu button and tapping the gear icon. Navigate to Update & Security >> Windows Update >> Advanced Options. You should see the option you set in grey, unable to be changed.
Alternative: If you are somehow unable to access the Local Group Policy Settings on your computer, the second method is to simply use the Registry Editor for the same process. Note that you should be quite careful when editing the registry as a simple unwanted change can cause system instability.
Follow the instructions on this backup registry article in order to safely backup your registry!
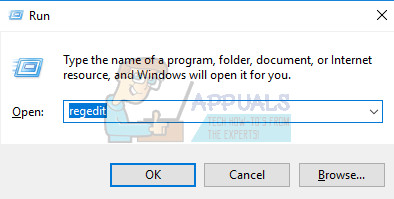
- Open the Registry Editor by typing this into the Start menu or in the search bar located at the left part of the taskbar. You can also open the Run dialog box and type in “regedit”.
- Navigate to the following key in the registry editor:
Note: If some of these keys do not exist, you will need to create them manually by clicking on the destination key, right-clicking on the empty space in the right section of the screen and choosing the New >> Key option. Make sure you name it correctly.
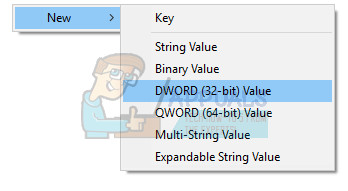
- Right-click on the right section of the Registry Editor window and click on New >> DWORD (32-bit) Value.
- Set its name to AUOptions and set its value to either 2 or 3 according to the option you want.
2 = Notify before download
3 = Automatically download and notify of installation
- Restart your PC in order to save the changes. In order to check if the setting has been applied, open up the Settings app by clicking on the Start menu button and tapping the gear icon. Navigate to Update & Security >> Windows Update >> Advanced Options. You should see the option you set in grey, unable to be changed.

Solution 2: Another Registry and Group Policy Fix
If the solution above did not work for you, you can always try this one out as plenty of users have suggested that this did the trick on their PC instantly. There are also two ways to approach this problem: via registry or via Group Policy settings.
- Hold the Windows key and press the R button from your keyboard.
- Enter “gpedit.msc” in the Run dialog box, and press the OK button in order to open the Group Policy Editor.
- On the left section of Local Group Policy Editor, under Computer Configuration, double click on Administrative Templates, and navigate to the Windows Components >> Windows Update.
- Double-click on the No auto-restart with logged on users for scheduled automatic updates installations and enable this policy by switching the radio button at the top of the windows to Enabled.
Via Registry:
- Open the Registry Editor by typing this into the Start menu or in the search bar located at the left part of the taskbar. You can also open the Run dialog box and type in “regedit”.
- Navigate to the following key in the registry editor:
Note: If some of these keys do not exist, you will need to create them manually.
- Right-click on the right section of the Registry Editor window and click on New >> DWORD (32-bit) Value.
- Set its name to NoAutoRebootWithLoggedOnUsers and set its value to 1.
- Restart your PC in order to save the changes.
Solution 3: Disabling a Task in Task Scheduler
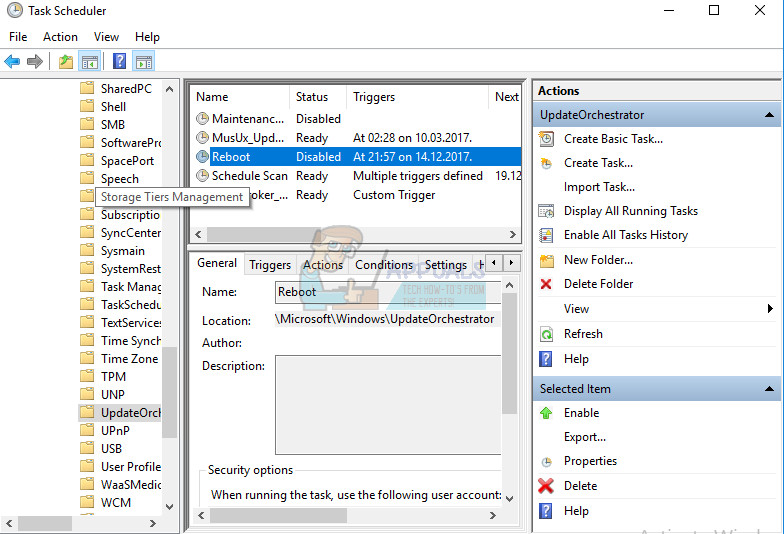
Windows 10’s UpdateOrchestrator scheduled task folder contains a task called “reboot”. This task will wake your computer up to install updates regardless of whether or not any are available. Simply removing its permission to wake the computer is not sufficient; Windows will just edit it to give itself permission again after you leave the Task Scheduler.
- From the Control Panel, enter Administrative Tools and open your Task Scheduler.
- The task is located under Task Scheduler Library >> Microsoft >> Windows >> UpdateOrchestrator. You need to understand that changing the options in Task Scheduler won’t do any good as Windows will immediately revert them after you exit.
- From here, you will need to change the permissions for the task so that Windows can’t use it at all. The task is located in the following location:
- It’s called “Reboot and it does not have an extension.
You will need to make yourself the owner of the file by following the instructions below. This is somewhat difficult to follow but it’s necessary in order to disable the task from occurring.
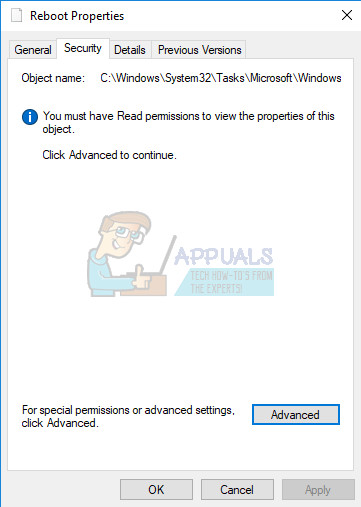
- Right click on the Reboot file and select Properties from context menu.
- Now select the Security tab to access the NTFS permissions and click on the Advanced button.
- Once in the Advanced security window, click on “Change” located at the front of Owner filed.
- Now click on the Advanced button on the next window that comes forth.
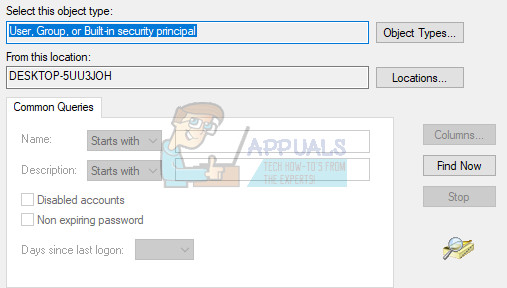
- Now you will be on the “select user or group” page. Click on Advanced so we can select which accounts are available.
- Click on “Find Now” to search for an account to which you can grant the ownership to.
- Once you have selected the user to whom you wish to transfer the ownership to, press Ok and save changes.
- Now we need to grant your account full access. Right click on the file/folder and click on Properties from the list of options.
- Navigate to the Security tab so we can access the NTFS permissions.
- Click on the Advanced
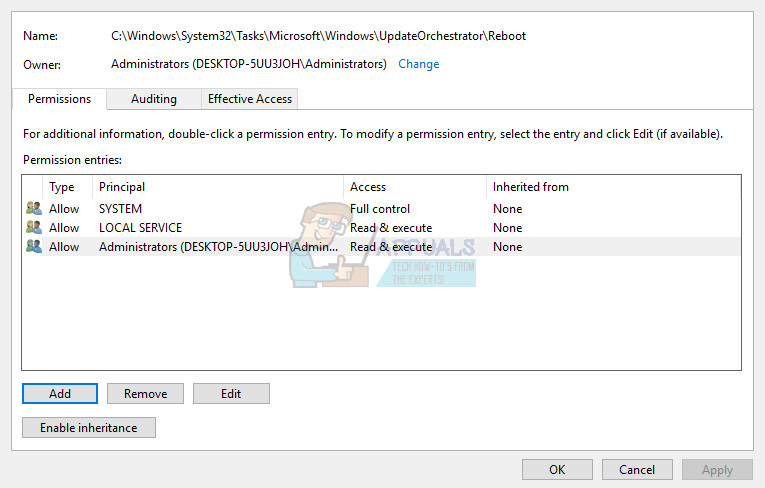
- Now you will see all the permissions listed regarding each account in front of you. Under the Permission tab, click on Add.
- Now you should click on Select a Principal so we can add your account.
- Again you will be seeing the “Select User or Group” window in front of you. Click on Advanced so we can browse through all the accounts.
- Click on the Find Now button to list all the account to whom permission can be granted.
- Locate your account from the list and click on Ok and save changes. Make sure you click on Disable inheritance in the Advanced Security Settings window.
Make it so that no account has write access, not even your own. Please also ensure you disable any inherited permissions for the file from the “Advanced” button on this screen, to override any existing permissions on the root folder.
- You can do this by accessing the Reboot’s properties and checking the permissions for each user. Click on the SYSTEM option at the top and deny all permissions except Read & execute and Read.
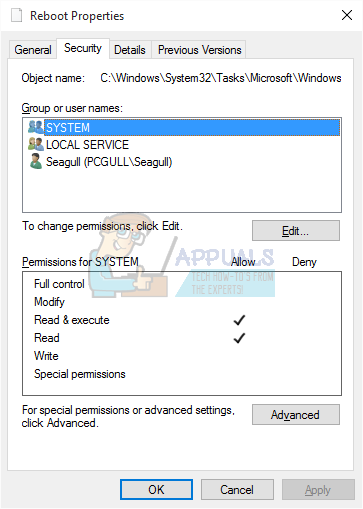
- Repeat the same process for all users.
- Once this has been set, you won’t need to worry about that scheduled task any more.


