- How to move an off-screen window into view
- Move a Window with the Keyboard in Windows 7/8/10
- Method 1 – Incremental Move
- Method 2 – Windows Snap
- Method 3 – Multi-Monitor Setups
- How to Move a Window That Is Off-Screen
- Get lost windows back where they belong on PC or Mac
- Why Is the Window Off-Screen?
- How to Move a Window That’s Off-Screen in Windows 10
- Find Windows Using Arrow and Shift Keys
- Find Windows Using Arrow and Windows Keys
- Find Windows Using Arrow Keys and Mouse
- Change Screen Resolution to Find a Lost Window
- Unhide Windows With the Desktop Toggle
- Use Cascade to Arrange Windows
- How to Move a Window That Is Off-Screen in macOS
- Change the Resolution
- Force a Relaunch
- Use Window Zoom to Make a Window Appear
- Center the Window to Make It Visible
How to move an off-screen window into view
Technical Level : Basic
Sometimes a window may be stuck out of view. Because you can’t see it, you can’t drag it back into view. Here’s how to fix this right up.
What you might see
When this problem occurs, you might notice it as an app that doesn’t show up when you launch it. Maybe you click the Taskbar button and it looks like it’s open, but the window isn’t showing up anywhere. When you point to the Taskbar button, you might even see a preview picture of the window, but the real big one is nowhere to be seen.
Option 1: Use the keyboard method to bring the window back into view.
- Point to the running program icon on the taskbar (but do not click it)
- When the preview popup appears, move your mouse pointer and right-click on the popup preview, choose «move» like this. After you click «move», do not click again anywhere until you do step 3 and 4 below.
Option 2: Use the Windows 7 window move shortcut (Windows 7 and higher only)
- Make sure that the off-screen program is in focus (the active program highlighted on the taskbar) so that it will receive commands.
- hold the Windows
 key and press the left or right arrows on your keyboard. This shortcut moves the selected window to the left or right. Keep holding and tapping the same arrow until it shows up in view.
Prevent the problem in the future
Many times this happens because an extra monitor enabled in the system, but you don’t have an extra screen actually plugged in or being used. So the window is on this other monitor. To prevent this issue from happening again, hold  and press P until the first option is highlighted. This will set your computer to only use the one primary monitor and no other extra screens.
Move a Window with the Keyboard in Windows 7/8/10
Comes in handy once in a blue moon
So for those of you who do not like to use a mouse, it would be pretty cool if you could move a window using just the keyboard in Windows 7 right? Well, there are a couple of ways to do this and even though you may not need to do it very often, it does come in handy on the rare occasion!
In this article, I’ll tell you how to move a window in small increments to the exact position you want, how to snap a window to the left or right and how to move a window between monitors on a multi-monitor setup, all by just using the keyboard!
Method 1 – Incremental Move
For exact positioning, you first need to click on the window. Now this is obviously going to only work for windows that are not fully maximized. If it’s fully maximized, there is really nowhere to move the window.
Step 1: Either click on the window or if you want to use the keyboard, press ALT+TAB and make the window you want to move active.
Step 2: Now go ahead and press ALT+SPACEBAR and you’ll see a small menu appear in the window.
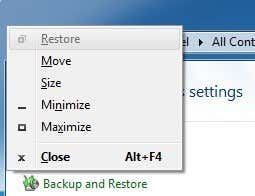
Step 3: Now press M, which will basically choose the Move option in the menu.
Step 4: Now use the arrow keys on your keyboard to move the window to the new position that you desire.
Step 5: Press the Enter key to get out of the move mode. Also, if you want to have the window go back to the original position before you started the move, press the Esc key instead.
Method 2 – Windows Snap
Windows has a nifty feature that lets you snap windows to the left-hand or right-hand side of the screen. If you drag a window to the right or left, it will automatically resize and snap to the side.

To do this using the keyboard, press the Windows Key + the right or left arrow. Make sure to hold down the Windows key while pressing the left and right arrow keys. It’s actually pretty neat and much faster than dragging the window around the screen.
Method 3 – Multi-Monitor Setups
Lastly, for moving between multiple monitors, all you have to do is add SHIFT to the above key combo, so it would simply be Windows Key + Shift + right or left arrow.
For the power users who really want to control their windows, moving may not be enough. So here’s a few other shortcuts that could come in handy if you are left with nothing but a keyboard and Windows:
End – Will display the bottom of the active window (in case you need to scroll using the keyboard)
Home – Will display the top of the active window
F11 – Will either maximize or minimize the active window
Ctrl + Tab – If you have a window with tabs, then this will move you forward through the tabs
Ctrl + Shift + Tab – Will move you back through the tabs
Windows Key + Shift + Up Arrow – This will stretch a window to the top and bottom of the screen.
Founder of Help Desk Geek and managing editor. He began blogging in 2007 and quit his job in 2010 to blog full-time. He has over 15 years of industry experience in IT and holds several technical certifications. Read Aseem’s Full Bio
How to Move a Window That Is Off-Screen
Get lost windows back where they belong on PC or Mac
:max_bytes(150000):strip_icc()/KevinParrish-b4d02569db8648df9104f775444050f1.jpg)
You launch an app or program, but it’s running off-screen, and you’re not sure how to retrieve it. However, you can move a window that’s off-screen in Windows 10 and macOS.
The instructions in this guide cover both Windows 10 and macOS computers.
Why Is the Window Off-Screen?
Typically, lost windows stem from removing a secondary display. For example, if you created a document on your main screen while searching the web on your second, the web browser remains positioned in that extended space even after you disconnect the secondary display.
How to Move a Window That’s Off-Screen in Windows 10
There are several ways to move a window that’s off-screen in Windows 10. Some involve using different keys on the keyboard, while others involved adjusting settings within Windows 10.
Find Windows Using Arrow and Shift Keys
This method uses the left and right arrow keys on your keyboard to move off-screen windows.
Launch the program or app (if it’s not opened already).
Press the Shift key and right-click the active program or app icon located on the taskbar.
Select Move from the pop-up menu.
:max_bytes(150000):strip_icc()/001-how-to-move-a-window-that-is-off-screen-4772840-76eec36848364205be65a45d62736dd5.jpg)
Press the left arrow or right arrow key until the program or app appears on the screen.
Find Windows Using Arrow and Windows Keys
A similar method swaps out the Shift key for the Windows key. It also relies on the snapping feature that snaps windows to the sides of your screen.
This second method moves the missing window to three specific locations: Snapped to the right, to the center, and snapped to the left.
Launch the program or app (if it’s not opened already).
Select the active app or program icon located on the taskbar to make it the current selection.
Press and hold the Windows key while pressing either the left arrow or right arrow key.
Find Windows Using Arrow Keys and Mouse
This version doesn’t use the Shift or Windows keys. Instead, the mouse cursor helps bring your lost windows back to the home screen.
Launch the program or app (if it’s not opened already).
Hover your mouse cursor over the active program or app located on the taskbar until a thumbnail appears.
Right-click on the thumbnail and select Move on the menu.
:max_bytes(150000):strip_icc()/002-how-to-move-a-window-that-is-off-screen-4772840-c0a0fe4c792a4d6480c54ef04c94572b.jpg)
Move the mouse cursor—now switched to a four-arrow «move» symbol – to the middle of your screen.
Use the left arrow or right arrow key to move the missing window into the viewable area. You can also move your mouse while the missing window «sticks» to your pointer.
Press the Enter key.
Change Screen Resolution to Find a Lost Window
Changing your screen resolution can pull lost windows into the main screen. These windows remain stationary on your desktop despite their hidden presence. You basically “zoom the camera” out until the missing windows appear in the frame.
Right-click the desktop.
Select Display settings on the menu.
:max_bytes(150000):strip_icc()/003-how-to-move-a-window-that-is-off-screen-4772840-7584149d4a7f43eeb9c57452eabbdc69.jpg)
Select Display in the side panel and choose one of the resolutions in the Advanced scaling settings section to temporarily change the resolution until the program or app appears on the screen.
:max_bytes(150000):strip_icc()/004-how-to-move-a-window-that-is-off-screen-4772840-f94367dbda4347b987dec7955318b0e5.jpg)
Using your mouse, move the program or app to the center of your screen.
Change the screen resolution back to its original setting.
Unhide Windows With the Desktop Toggle
This doesn’t require a series of steps. Simply press the Windows key+D. All programs and apps disappear the first time you type this combo. Do it again, and everything—including your missing windows—should reappear.
Use Cascade to Arrange Windows
This feature arranges all windows in a cascade, stacking the title bars like an old-school card catalog.
Right-click an empty space on the taskbar.
Select Cascade windows.
:max_bytes(150000):strip_icc()/005-how-to-move-a-window-that-is-off-screen-4772840-706ec557bab8482b9f29cffecca2d34b.jpg)
The open windows are rearranged into a cascade, including your missing windows.
How to Move a Window That Is Off-Screen in macOS
Like Windows, there are several ways to move a window in macOS to find the one you’re looking for. If you opened something and it’s showing off-screen, try these tips to make it reappear.
Change the Resolution
Your lost window doesn’t change its position. By altering the resolution, you’re «zoom the camera» out until the missing window appears in the frame.
Click the Apple icon located in the top left corner and select System Preferences.
:max_bytes(150000):strip_icc()/001-use-your-ipad-as-second-monitor-1994716-8711d72a1a40414c8610548b23e21a3a.jpg)
Click Displays.
:max_bytes(150000):strip_icc()/007-how-to-move-a-window-that-is-off-screen-4772840-86be49b65e3c4f69a75b142d2f04f454.jpg)
Click the radio button next to Scaled in the Display tab and choose a different resolution.
:max_bytes(150000):strip_icc()/008-how-to-move-a-window-that-is-off-screen-4772840-0746331046a1499097c77279ae796dd6.jpg)
Click OK to confirm.
:max_bytes(150000):strip_icc()/009-how-to-move-a-window-that-is-off-screen-4772840-d128042ba04c492d96820ea9551015f9.jpg)
Force a Relaunch
Forcing an app or program to relaunch on a Mac could bring the window back into view so you can access it again.
Click the Apple icon located in the top left corner.
Select Force Quit.
Choose the off-screen application from the list and click Relaunch.
:max_bytes(150000):strip_icc()/010-how-to-move-a-window-that-is-off-screen-4772840-6fa838500b174dba856d080a8c54a0b7.jpg)
Use Window Zoom to Make a Window Appear
Unlike changing the resolution, this version zooms the app or program until it appears on your screen. Once it emerges, drag it fully onto your display.
Click the active program or app shown on the Dock.
Click Window in the Apple menu bar and select Zoom in the drop-down menu.
:max_bytes(150000):strip_icc()/011-how-to-move-a-window-that-is-off-screen-477284-6a6588ff3af546b6bfb2f9d34d8f052c.jpg)
Center the Window to Make It Visible
This is a simple, neat trick using your Mac’s Option key.
If the off-screen app or program isn’t actively selected, click its icon on the Dock.
Hold down the Option key and click the active app or program icon again. This hides the app or program.
Release the Option key and click the active app or program icon for a third time. The window reappears centered on your screen.


