- Windows 8.1 on your big screen with Miracast
- FIX: Windows 10 games won’t go fullscreen
- What to do if Windows 10 is not playing games fullscreen?
- 1. Run your game in windowed mode
- 2. Set display scaling to 100%
- 3. Change your main screen
- 4. Disable Teamviewer
- 5. Change Nvidia Control Panel settings
- 6. Use the Compatibility mode
- 7. Set the Fit setting to Fullscreen.
- 8. Restore your Taskbar to the default position
- 9. Change your resolution in the Catalyst Control Center
Windows 8.1 on your big screen with Miracast
With Windows 8.1, we are introducing wireless display developed on the Wi-Fi Alliance (WFA) Miracast wireless display specification, so you can now wirelessly project to a big screen without fussing with proprietary technologies, network access, and different display cables and adapters. Wireless display is available in new Windows 8.1 PCs – laptops, tablets, and all-in-ones — allowing you to display your full Windows 8.1 experience (up to 1080p) to large wireless display-enabled screens at home and work.
What can you do with it
Although it can be handy to turn your device into what is essentially a touch-screen remote control for watching online videos, we knew the potential was there to do a lot more when you wirelessly project your Windows device to the big screen.
In Windows 8.1, wireless display is a great way to share anything you do on Windows with friends and family in the living room, with colleagues in the conference room, and with students in the classroom. It lets you share experiences like shopping on Amazon or eBay, checking out 360-degree panoramas of vacation destinations in Bing Travel , solving puzzles in Disney Fairies with the kids, enjoying photos from a class field trip on SkyDrive, or exploring the solar system with your classroom with the World Wide Telescope. Of course, you can also use it for watching movies and videos through your favorite services like Netflix, Xbox Video and YouTube.
Wireless display puts Windows 8.1 on your big screen.
With wireless display in Windows 8.1, you can duplicate your main display or extend your display, giving you two independent screens (multi-monitor). Duplicating the display takes what you have on the local screen of your device and shows it on the big screen. Extending your display allows you, for instance, to use Microsoft PowerPoint to show a presentation in Presenter View, where the local screen shows you your speaker notes, next slide, and slide controls, while the wireless display shows the audience your full-screen presentation. Great for when you want to come from behind the podium, while keeping your notes and controls in the palm of your hand.

What you need
When you use wireless display, you have a source and a receiver: your Windows 8.1 device is the source, while your TV or projector is the receiver. If your display already has Miracast support, you are ready to go. If not, Miracast adapters provide an economical way to add wireless display to your existing TV or projector.
Wireless display works on new Windows 8.1 wireless PCs. This includes Surface 2 and Surface Pro 2, Nokia Lumia 2520, and Intel Atom Generation 3 (“Bay Trail”) and Intel Core Generation 4 (“Haswell”) systems. Some PC manufacturers have also added wireless display to some of their systems that originally shipped with Windows 8. This includes the Surface Pro and many systems based on Intel Core Generation 3 (“Ivy Bridge”) and Intel Wi-Fi. Be sure to check for updates from Windows Update and from your PC manufacturer, including driver updates listed as Optional, when determining whether your PC manufacturer has made wireless display available on your upgraded Windows 8 device.
As I mentioned earlier, we built wireless display on the Miracast industry-standard specification, which the industry based on widely adopted standards such as 802.11n, Wi-Fi Direct, and H.264/MPEG-4 AVC. We believe working with the industry and using industry standards allows broader adoption and interoperability by source devices (e.g., laptops, tablets and phones) and receivers (TVs, projectors, streaming players), and over time allows the standard to advance beyond any one company’s interests.
How to use it
We worked with several Miracast receivers during Windows 8.1 development. Notable among these are the ActionTec ScreenBeam Pro and the Netgear Push2TV (PTV3000). These and other Miracast receivers work great in bringing Windows 8.1 to the big screen. Additionally, ActionTec simplified firmware updating and configuration for their receiver by creating a Screenbeam Windows Store app using our new Wi-Fi Direct APIs (Windows.Devices.WiFiDirect). Whichever Miracast receiver you choose, be sure to update to the latest firmware for best results.

Note: ActionTec is providing readers of the Windows blog a 15% discount on the ActionTec Screenbeam Pro through their online store now through the end of this year (12/31). Please use the Screenbeam Pro links in this blog post to receive the discount.
To get started with wireless display, first ensure that your Windows 8.1 device is ready by checking Windows Update and your PC manufacturer for any driver updates, including drivers presented as optional. After your machine is ready, you need to add your wireless display receiver for the first time. To add it, open the Devices charm by swiping in from the right and then tapping Devices (or if you’re using a mouse, point to the lower-right corner of the screen, move the mouse pointer up, and then click Devices.). Select Project and then Add a wireless device to have Windows scan for available Miracast receivers.

Note: Wireless display is available on most new Windows 8.1 PCs, but some PC manufacturers might choose not to include it on some new and upgraded PCs. Specifically, your PC needs WDDM 1.3 display and NDIS 6.4 Wi-Fi drivers, enabled by the IHV and OEM for Miracast. If you don’t see “Add a wireless display” when you tap the Devices charm and tap Project, try going to Windows Update and downloading all available updates (including optional drivers). If you still don’t see it, check for additional updates on your PC manufacturer’s support site, or contact them to ask how you can get this feature on your PC.
Selecting your receiver begins the secure pairing of your Windows 8.1 device to the Miracast receiver. After pairing is finished, you’ll be able to project your full Windows 8.1 experience wirelessly onto your big screen. To extend projection, open Devices and tap Project again (or press Windows key + P), and then tap Extend.

To end projection, open Devices and tap Project again (or press Windows key + P), and then tap or click Disconnect.
The next time you use your wireless display it will be even simpler, as Windows remembers the displays you’ve used, and automatically shows them whenever they’re available. Simply open Devices, tap or click Project, and then tap or click the display you want.

The Project to a wireless display with Miracast article provides info about source and receiver setup, how to project to the receiver, and troubleshooting problems.
What do app developers need to do?
App developers do not need to change their apps to take advantage of wireless display. By default, all apps will just work with wireless display. We do however provide the ProjectionManager APIs, for developers who want to provide an enhanced experience with wireless display.
ProjectionManager APIs allow an app to detect a secondary monitor, and when the monitor is present, control what the app displays on the primary and secondary monitors. An example is a video or photo app, where the local screen shows the box shots, thumbnails, or playlist, while the wireless display shows the full-screen video or slide show. A game developer could provide controls for the game on the local device (e.g., cards in hand, steering wheel and cockpit controls) while the wireless display shows the action of the game on the big screen.
The ProjectionManager APIs are not specific to wireless display and work equally well for wired monitors. In either case, wireless or wired, what gets displayed on either screen is up to the app developer.
How it works
For those interested in the nitty gritty of how wireless display works, here’s a quick rundown. It begins with the discovery of available Miracast receivers, and then proceeds to establishing a point-to-point connection between the source and receiver over Wi-Fi Direct. Security is negotiated using Wi-Fi Protected Setup (WPS), with communication secured using WPA2-AES directly between the Windows device and Miracast receiver. Once communication is established (2.4GHz by default or 5GHz if pre-connected to 5GHz AP), the source and receiver negotiate capabilities – e.g., the resolution and refresh rate (e.g., 30Hz), content protection scheme, audio channels, etc. Once capabilities are agreed, Windows begins projecting its display and audio onto the remote device by encoding the local display and sound, and sending to the receiver, where the receiver decodes and displays. Anything your Windows PC has access to, you can wirelessly display on your big screen. This is, of course, just a high-level explanation of the steps involved, with the Wi-Fi Alliance Miracast site having more details including the full specification.
There are other wireless display (“screen casting”) alternatives, each having their own advantages and drawbacks when compared to Miracast. Not all alternatives support full HD (1080p) and instead top-out at lower resolutions below what your TV/projector may natively support. Some of the alternatives work well in home environments, but have difficulty in corporate and hotspot environments where the receiver has to authenticate onto the network using enterprise-grade security such as WPA2-Enterprise or hotspot style authentication using a captive portal. Miracast is different, in that it is peer-to-peer, going directly between Windows and the receiver, and not over the Wi-Fi infrastructure network. This means that you can allow a guest (corporate or home) to project in your conference or living room without you having to grant them network access (which could potentially give them access to other devices and content beyond what you might have intended). With wireless display, you’re only granting them access to the display… not to your network.
Since the content comes from (or via) the Windows device, only the Windows device needs Internet access, which can come via its Wi-Fi, mobile broadband, or wired connection. Additionally, since we enabled wireless display in the OS and not tied to any particular application, any content in any app can take full advantage of the processing power of the PC, which enables a good wireless display experience across the range of Windows 8.1 devices and form-factors.
We are excited to have worked with our partners and the industry in bringing you a great, no compromise, and standards-based, approach to wireless display. We look forward to hearing about your experiences as you project your full Windows experience onto the big screen! Please let us know your thoughts by leaving us a comment.
Billy Anders
Group Program Manager, Wireless & Mobility
FIX: Windows 10 games won’t go fullscreen

- Even if it’s mostly a stable OS, the truth is that games won’t always go fullscreen in Windows 10.
- We’ve looked at multiple user reports, so rest assured that a great strategy to fix this distracting issue involves changing the display scaling settings.
- You may also try a new remote control application that never interferes with fullscreen games.
- Running them in Compatibility mode may also do the trick, so refer to the below steps right away.
- Banking-level encryption and total privacy
- Multi-platform support for all major operating systems
- Quick and Intuitive file transfer
- Low bandwidth consumption and fast ping response
- High frame rates to ease troubleshooting
- Get Anydesk
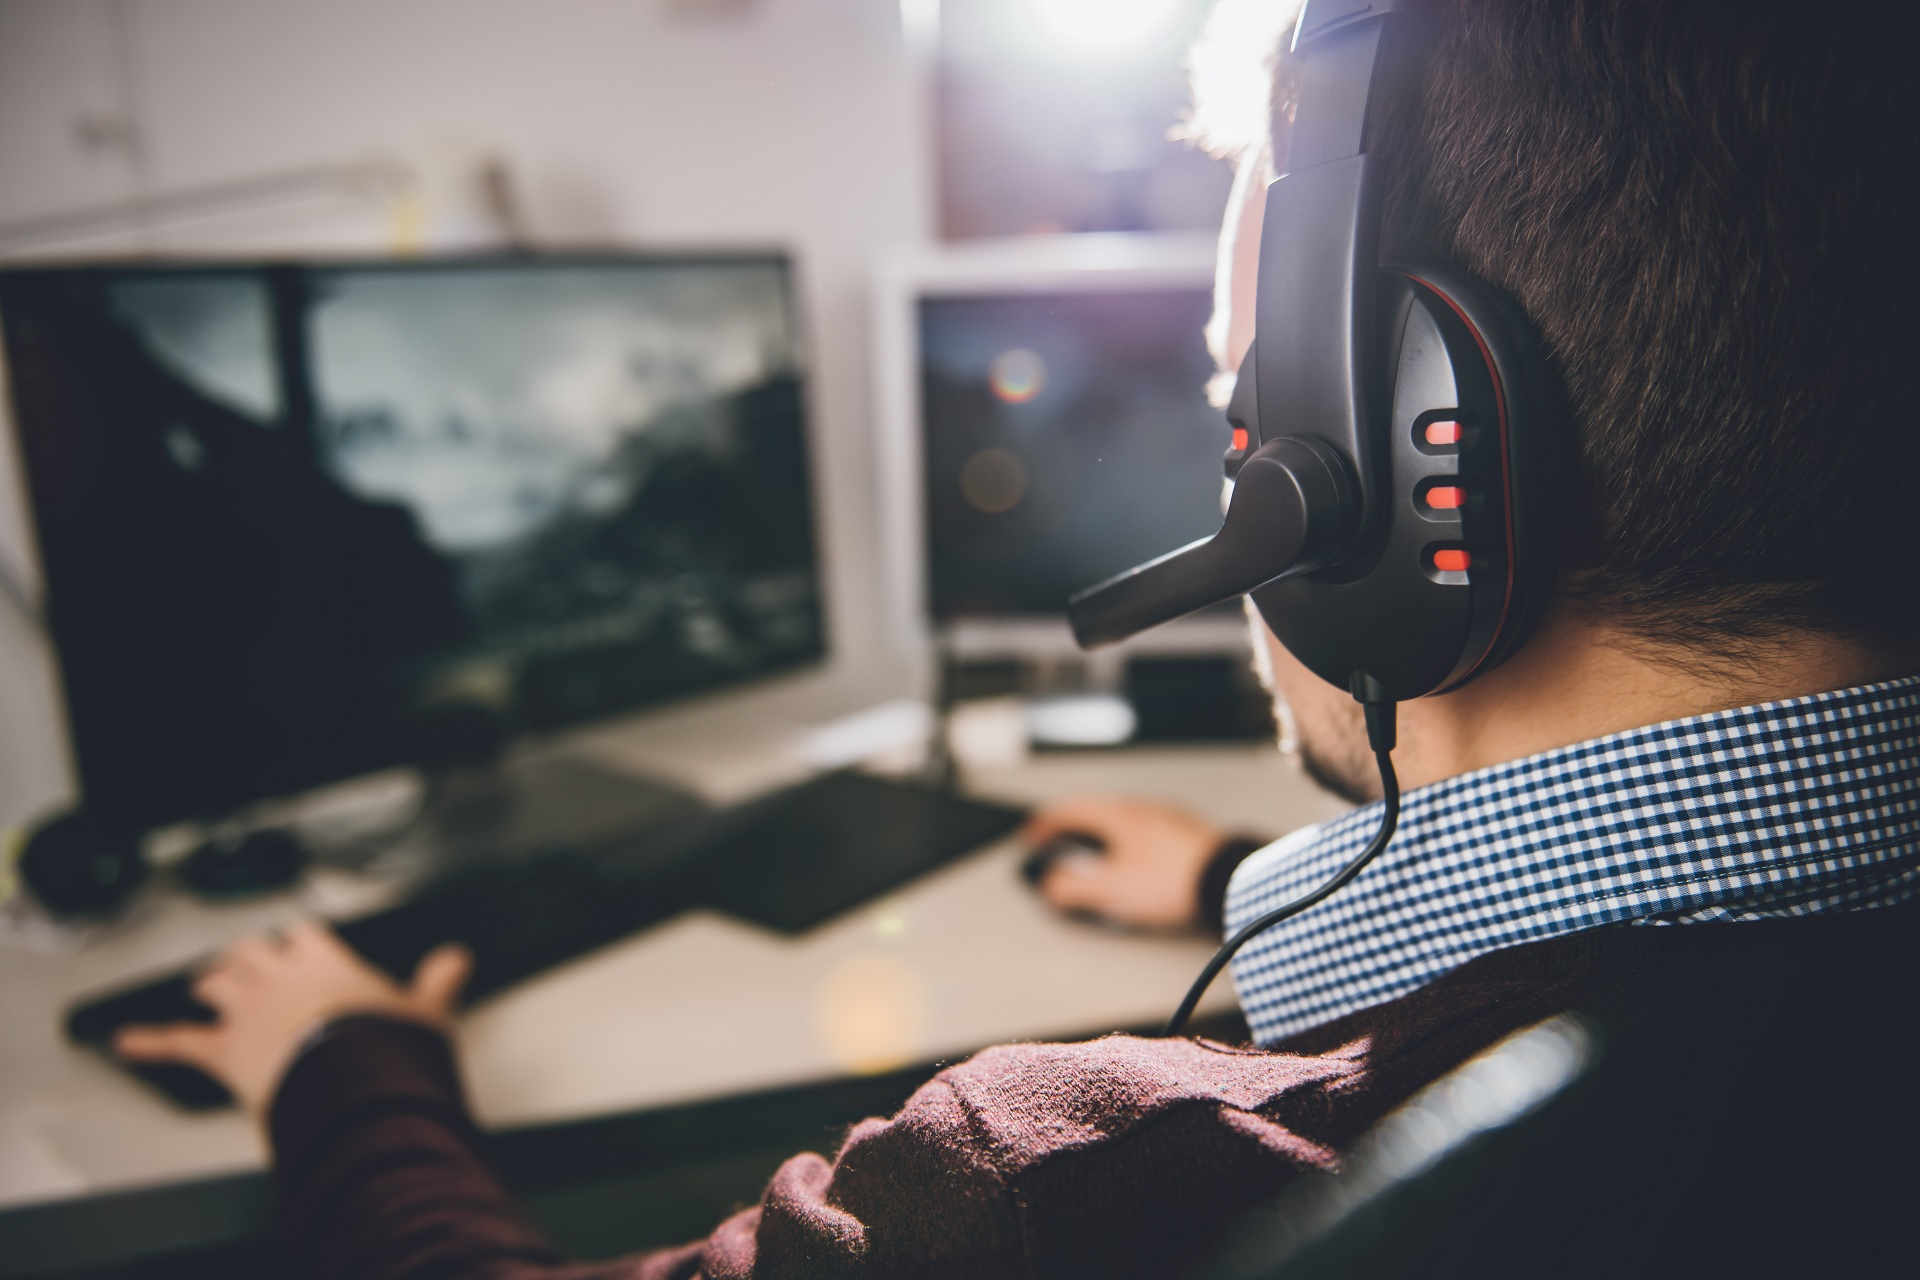
We all love to relax with a favorite game on our computers, but it seems that some players are having problems with fullscreen games in Windows 10.
This sounds like an unusual problem, and today we’ll try to fix that. Some users report that they are unable to run games in fullscreen mode.
According to them, the game just switches to desktop and stays that way while game sounds play in the background.
This makes most games unplayable since Windows 10 games run in fullscreen mode by default, but there are a few solutions that you can try.
What to do if Windows 10 is not playing games fullscreen?
1. Run your game in windowed mode
If your game comes with a configuration file, or if you can set its configuration before starting it, just make sure that you set it to run in windowed mode.
This isn’t the best solution, but it’s a workaround that will allow you to play your favorite game in just a few seconds.
For the best experience, be sure to select borderless windowed mode and the same resolution that you use on your desktop.
2. Set display scaling to 100%
- Open the Settings app and go to System > Display.

- Find the Change the size of text, apps, and other items and set it to 100%.
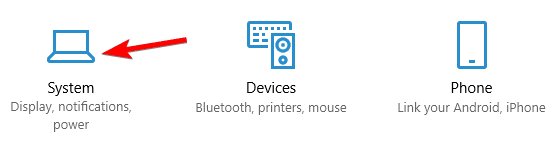
It has been reported that many games won’t run properly unless the display scaling is set to 100%, so use the above steps to set display scaling to 100% in Windows 10.
You might have to sign out of your account and sign back in order to apply the changes, so be sure to do that. Up next, check if your games are working again.
Even more, there’s a game booster that will get rid of low FPS, freezes, lags, and other issues while playing. If you like the idea of a better gaming experience, don’t hesitate to give it a try as well.
3. Change your main screen
You can experience problems with fullscreen and games if you’re using dual monitor setup. However, you can fix this problem simply by changing your display settings.
In order to do so, right-click on your Desktop and choose Display settings from the menu. When the Display settings window opens, you should see two monitors labeled with numbers.
In the Display settings window, click Identify. A number should appear on your screen. Now in Display settings set the monitor with the same number you got as the main monitor.
Save the changes and try running games in fullscreen. This is a simple trick confirmed by users, so give it a try too.
4. Disable Teamviewer
Many users reported various fullscreen issues with their favorite games, and according to them, the common cause is Teamviewer.
If you’re not familiar with Teamviewer, it’s a remote assistance application that allows you to control any other PC remotely.
This is a rather popular application and many users have it installed. Even though Teamviewer is a great application, sometimes issues do occur.
They all know how to fullscreen a game, that’s for sure. However, this isn’t possible all the time. They were able to solve the problem simply by disabling Teamviewer.
If doing so doesn’t help, you might want to try uninstalling the application and check if that solves the problem instead.
If you need another remote control application that won’t interfere with fullscreen games, try out one with bank-level encryption and an impressive speed. Our recommendation is ideal in that regard.
⇒ Get AnyDesk
5. Change Nvidia Control Panel settings
- Open Nvidia Control Panel.
- Go to Manage 3D settings > Global settings.
- Change Preferred graphics processor from Auto-select to High-Performance Nvidia processor.
- Click on Apply to save the changes and try running games in fullscreen mode.
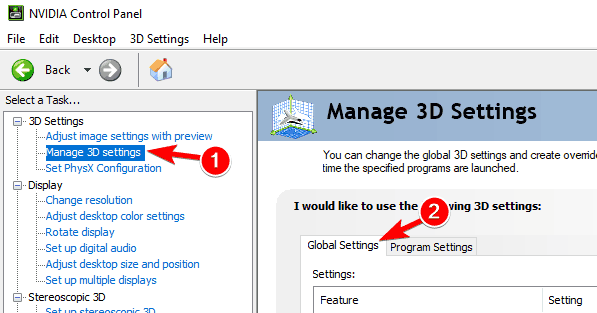
If you own both integrated and dedicated graphic you might need to change few Nvidia Control Panel settings to fix this issue.
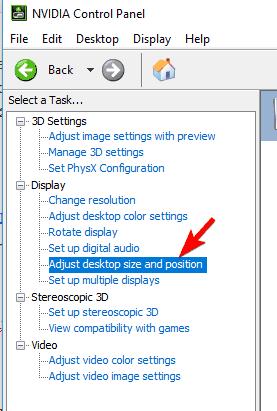
Certain users reported that they fixed the problem simply by adjusting their desktop size and position in Nvidia Control Panel. To do that, follow these steps:
- Open Nvidia Control Panel.
- Go to Display > Adjust desktop size and position.
- Locate the scaling option and set it to No scaling and click on Apply to save changes.
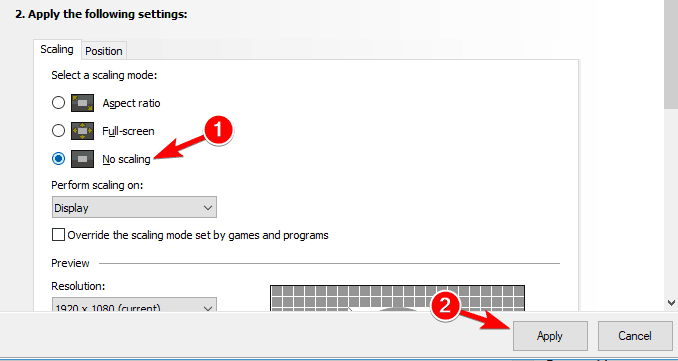
After making these changes, you should be able to run games in fullscreen without any problems. If you use AMD graphics, you should be able to find similar options in Catalyst Control Center.
Can’t open Nvidia Control Panel on Windows 10? In such a case, rest assured that this detailed guide will help you fix the issue in no time.
6. Use the Compatibility mode
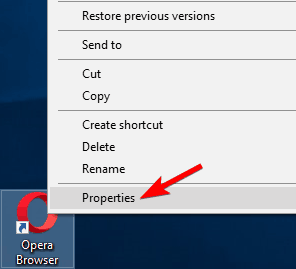
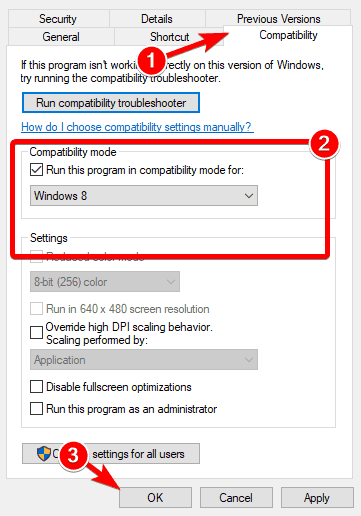
- Locate the problematic application, right-click it, and choose Properties from the menu.
- Navigate to the Compatibility tab and check Run this program in compatibility mode for an option. Now select the desired version of Windows, then click on Apply and OK to save changes.
If you’re having problems with fullscreen games on your PC, you might want to try running them in Compatibility mode.
This mode is specially designed for older applications that aren’t fully compatible with Windows 10. To run a certain application in Compatibility mode, you need to complete the above procedure.
After enabling Compatibility mode, try to run your game again. Note that you might have to try several different compatibility modes before you find the one that works for the selected game.
Compatibility mode is a useful feature that allows you to run old software on your PC, so feel free to try it out.
7. Set the Fit setting to Fullscreen.
If you’re having problems with fullscreen in your favorite games, you might be able to fix this issue simply by setting the font size to 100%.
We already showed you how to do that in Solution 2, so be sure to check it out for detailed instructions.
After doing that, you need to open Intel HD Control Panel application and make a few changes. When Intel HD Control Panel opens, navigate to the Display section and set the Fit setting to Fullscreen.
Now check the Override application settings checkbox and save changes. After doing that, you should be able to run older games without any problems on your PC.
Keep in mind that this solution works only if you’re using Intel HD integrated graphics.
If you’re using AMD or Nvidia graphics, be sure to check their Control Panel software to change the aforementioned settings.
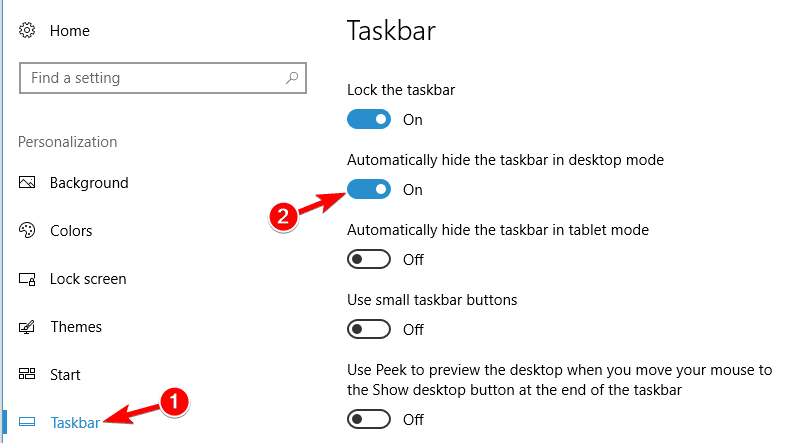
8. Restore your Taskbar to the default position
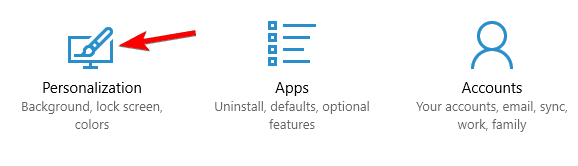
- Press Windows Key + Ikeyboard shortcut to open the Settings app.
- Now navigate to the Personalization section.
- From the menu on the left select Taskbar. Now in the right pane, enable Automatically hide the taskbar in desktop mode option.
According to users, problems with fullscreen games can occur if your Taskbar isn’t in the default position.
Some users like to move their Taskbar to the side or to the top of their screen, but that can sometimes cause this problem to occur.
However, you can easily fix this issue simply by moving your Taskbar to its default position on the bottom.
Once you move your Taskbar to the bottom of the screen, the issue should be resolved and you’ll be able to play your favorite games in fullscreen once again.
If you don’t want to move your Taskbar to the default position, you can fix the problem by setting the Taskbar to hide automatically.
After you enable this option, you should be able to run games in fullscreen mode without any problems.
If Taskbar is not working, do not hesitate to take a look at our quick guide to find out how to solve the issue with ease.
9. Change your resolution in the Catalyst Control Center
- Open Catalyst Control Center and navigate to Graphics/Desktop & Display section.
- Click the triangle button in the big Screen model section and then click on Properties.
- Now set your resolution to the lower one and save changes.
- Navigate to Graphics/Desktop & Display and click on the bottom left small laptop triangle icon.
- You should see several options available. Click on Fullscreen and save changes.
According to users, you might be able to fix this problem simply by changing your resolution in the Catalyst Control Center.
After doing that, you just need to change the resolution on your PC and set it to the desired value. Now your problem should be resolved and you’ll be able to enjoy games in fullscreen mode once again.
If the issue persists, do not hesitate to repeat the entire procedure after minimizing the game.
As you can see, solving full-screen issues on Windows 10 is relatively simple, and we hope that you managed to solve this problem using one of our solutions.
You may often experience issues while trying to run certain games in fullscreen mode. Do keep in mind that the above solutions cover all these problems:
- PC game won’t go fullscreen – Many users reported that Windows 10 isn’t running games in fullscreen. This is usually caused by your game or graphics card settings.
- Fullscreen games keep minimizing – If your fullscreen games keep minimizing, the problem might be a third-party application. Don’t hesitate to take a look at this dedicated guide right away.
- Windows 10 fullscreen games black screen, flickering, crash – Many users reported flickering, crashes, and black screen on Windows 10. These often occur if you have a dual monitor setup.
- Taskbar showing in fullscreen game – Another relatively common issue on Windows 10 is the taskbar overlaying on top of games. If the taskbar won’t hide in fullscreen games, just force-hide it.
- Windows 10 game resolution problem – Sometimes, you just need to adjust your screen resolution to 1024 x 768, then try playing your game again.
- Windows 10 not using full screen – That’s a relatively common problem, and it’s most likely caused by your settings. However, you should be able to fix it by using our solutions.
- Windows 10 full screen not working – This is just a variation of this issue, but you should be able to solve it easily with one of the above procedures.
Let us know if you managed to fix all your fullscreen game issues in Windows 10. Make sure to use the comments area in that regard.


