- Grids or No Grids on Windows: What’s Right for Your Home?
- History of Grids
- New Form of Grids
- Grids or No Grids on Windows: Architectural Design
- Keeping the View in Mind
- Curb Appeal is Everything
- Contents
- Grids
- Overview
- Common Guidelines
- Simple and Complex Grids
- Simple Grid
- Complex Grid
- Stacked and Unstacked Grids
- Stacked Grid
- Unstacked Grid
- Grid Constructs
- Tappable Grid Rows and Hotspots
- Grid Toolbar Buttons and Attributes
- Grid Toolbar
- Grid Title
- Row Count
- Grid Tabs
- Tab Overflow
- View Collection
- Add/Edit
- Delete
- Filters
- Application Buttons
- Grid Column Headers
- Number of Rows to Display
- Bulk Actions
- Toolbar Button Order
- Empty Grid Pattern
- Responsive Design
- List View Grids
- Stacked to Unstacked Grids
- Examples
Grids or No Grids on Windows: What’s Right for Your Home?
Grids or no grids on windows is the big question for thousands of homeowners looking to replace their windows this year. This comprehensive guide is just what you need to make the best decision for your home!

History of Grids
Although now they mostly exist as an aesthetic feature, grids used to serve an important function in windows.
In the early 1600s, London had a shortage on glass. They sent some of the early settlers create a glass factory in Jamestown due to the sandy beaches, which are great for producing glass.
As you can imagine, it’s not easy to ship large glass panes without breakage. So, they shipped them in small sections.
To create full-sized windows for themselves, early residents of the colonies connected the smaller panes with grids.
 New Form of Grids
 New Form of Grids
Grids molded after that tradition are located on the outside of the window.
This can make the window difficult to clean, because you need to clean each pane individually.
Most windows now have multiple layered panes of glass for energy efficiency. So, grids can be placed in between these panes and be on the inside of the window.
That way, cleaning is easy for a streak-free window.

Grids or No Grids on Windows: Architectural Design
One of the biggest factors for consideration in the “grids or no grids on windows” questions is the style of your home.
The best guideline here is to think of your home as falling into one of two categories: traditional or contemporary.
Colonial-style homes have had grids since the early days of our country, so grids look best in these homes.
If you have one of the traditional New England architectural styles, your windows will look the best with grids.
Windows without grids look the most modern. For a contemporary-style home, they’re the more fitting option.
Keeping the View in Mind
Other than being hard to clean if they’re on the outside of the window, the other major complaint with grids is that they can obstruct a view.
If you have a picture window looking out onto a gorgeous view in your back yard, you might want to leave off the grids.
On the other hand, grids can add a little distraction from a view that’s boring. If your view of the street outside bores you, distract the eye with a grid pattern.
Curb Appeal is Everything
When it comes to grids or no grids on windows in the modern era, it’s all a matter of curb appeal.
Since grids don’t serve much of a function other than aesthetic value, think about your architectural styles and view when making your decision.
If you need help choosing windows with grids for your home, Advanced Window Systems, LLC (AWS) can help. Contact us today at 1-800-CALL-AWS to schedule a free in-home estimate.
Grids, also known as mullions or grilles, are strips of a material like wood, metal, or vinyl that run in a grid formation on a window.
Some homeowners love them because they create a classic, traditional look, especially for the New England area. But others think they’re dated and block a view.
Are grids or no grids better for your new replacement windows?
Let’s go over what you need to know to make your choice.
Contents


Grids
Overview
Grids display data in a tabular format of rows and columns. Grids may be simple or complex. In its simple form, a grid may be a single column with a few rows. At its most complex form, it may have multiple columns divided into multiple tabs that contain many selectable items in each grid row, in addition to multiple grid actions available to the user.
The designer may choose from several constructs and design patterns for grids, depending upon the type and amount of data to be displayed as well as the form factor. The guidelines for selecting a grid construct and design pattern are discussed in the following sections.
Generally, the intent of a grid design is to present a simple, easy to understand page that does not overwhelm the user with data. The overall look and feel of the page should be minimum clutter that allows the page to be read easily.
Common Guidelines
When determining how grid data should appear on a page, consider these points:
- How much data needs to be shown?
- What type of data will be included?
- How will the grid reflect the use of responsive design?
The answers to these questions will determine the type of grid and the grid header attributes that will be used in the grid. The two main types of grids are simple and complex. Depending on the amount of data that must appear, grid data can be displayed in two ways: stacked and unstacked. A number of constructs can be used to display data in a grid. Many List View constructs have been designed specifically for small form factor devices. The following sections define simple and complex grids, stacked and unstacked grids, and describe the grid constructs that are available. These sections also discuss when and how to use the grid constructs and design patterns.
Simple and Complex Grids
The two main types of grids are simple and complex.
Simple Grid
A simple grid is a grid that does not contain a lot of data. It has few rows and few columns. It has few action buttons within the grid and few action buttons below the grid that take action on the grid as a whole. It would not have stacked fields in columns or grid tabs. This example shows a simple grid:
 Figure 1: Example of a simple grid with few columns and few rows
Simple grids are preferred over complex grids because they are easy to read and understand. When functional requirements dictate the need to display larger amounts of data, however, use a complex grid. Evaluate the information and include only the necessary columns in any grid; only include data columns that are needed for performing the task.
Complex Grid
A complex grid has a large quantity of data displayed in many rows and columns. It may contain many action buttons within the grid, in the grid toolbar, above the grid, or below the grid. When a page contains many grids stacked one on top of the other, this may be considered complex even if the individual grids are not complex.
The following example shows a more complex grid with stacked columns and an action button above the grid:
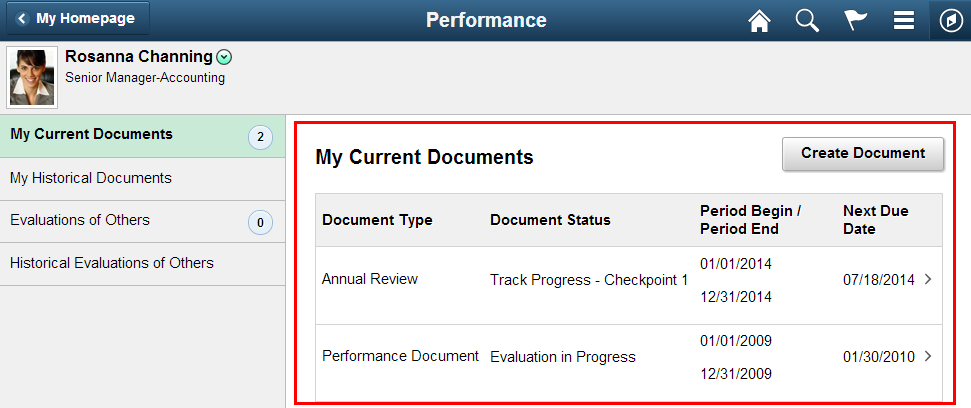 Figure 2: Example of a complex grid with an action button
The following example grid has stacked columns with many rows and columns. It is considered a complex grid:
 Figure 3: Example of a complex grid with many rows and columns
The following example shows a complex grid with many columns. It is an unstacked grid with grid sort turned on, and it has an application-defined grid toolbar button, Add Service Request, above the grid on the right:
 Figure 4: Example of a complex grid with many columns
Stacked and Unstacked Grids
Stacked Grid
A stacked grid combines two or more columns of data into a single column. A stacked grid allows more data to be displayed using less horizontal space. The following example shows an example of a stacked grid. The first column in the grid is Name/Title; this column is the combination of two grid columns, Name and Title. In the unstacked format, Name and Title would each have their own column. In a stacked format, Name and Title occupy the same column with the Name data appearing above the Title data in each row.
 Figure 5: Example of a stacked grid
Use stacked grids when more columns of data need to be displayed than will fit on the page without introducing horizontal scrolling. Avoid horizontal scrolling of grids.
Unstacked Grid
An unstacked grid does not combine two or more columns of data into a single column. It takes the form of a traditional table in which only one piece of data is contained in each cell. The following example shows an unstacked grid with three columns: Contact Name, Relationship, and Preferred. At the intersection of each column and row is one data item, for example, Contact Name is Jason Channing.
 Figure 6: Example of an unstacked grid
Use unstacked grids when only a small amount of columnar data needs to be displayed. Avoid horizontal scrolling of grids; use an unstacked grid when the data will fit on the page without the need for a horizontal scrollbar.
Grid Constructs
A number of different grid constructs can be used to display a grid in a fluid page. The following table lists the constructs available, shows an example, and describes when it should be used.
| Construct Name | Example | Description/Use |
|---|---|---|
| Detailed Multi-Line List |  | Use when several columns of data per grid row need to appear in a small space. Data is organized as primary, secondary, and tertiary. Primary data is larger font and bold. Secondary data is a medium-sized nonbold font. Tertiary data is a small nonbold font. |
| Detailed List with Icons |  | Contains the same primary, secondary, and tertiary data described in Detailed Multi-line List. It also contains an icon below this data. |
| Detailed List with Multiple Hotspots | 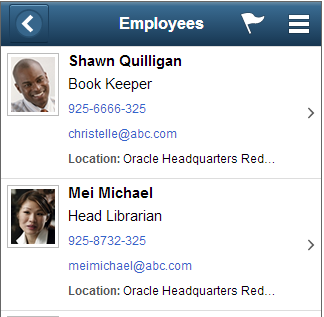 | Contains more than one tappable area on each grid row. The chevron indicates that the row is tappable; however, each row has one or more hotspots. |
| Images with Drill-down |  | Contains an image in each grid row. Use when an image must appear in a multi line list. |
| Empty Grid |  | Use when the grid has no data and no Add button. |
| Empty Grid — Add | 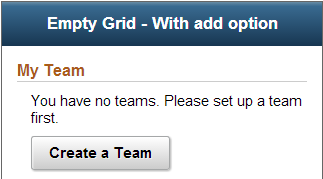 | Use when the grid has no data and an add row button is needed. |
| Row Count | 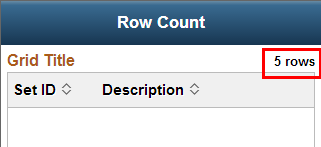 | Use when no grid toolbar buttons are available for display and a row count appears. The grid toolbar moves the row count down to be in line with the grid title. Without the grid toolbar, the row count would be on a row by itself. This style reclaims space and places the count in the same row as the grid title. |
| Stacked Grid | 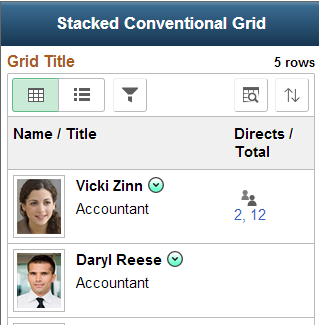 | Use when a grid contains more columns than can be displayed in the horizontal space available. The stacked grid takes data from multiple columns and combines it in a single column to save space. |
| Summary/Detail |   | Collapses or expands the data in each grid row by toggling between Summary and Detail. Use when secondary data is available in each grid row that can be viewed on demand by users when selecting the Detail view. The data in the detail view is display-only. Update the grid row by tapping the grid row to open a modal window. |
| Listview with Right-aligned Labels, Truncate and Wrap | 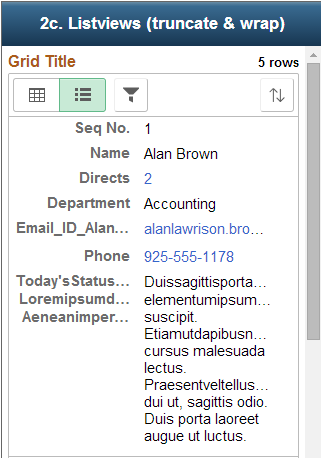 | Contains one line per column for each grid row. The labels are right aligned and the data is left aligned. Long words are truncated and long labels with many words wrap to the next line on a space between words. |
| Listview with Check Box and Tappability | 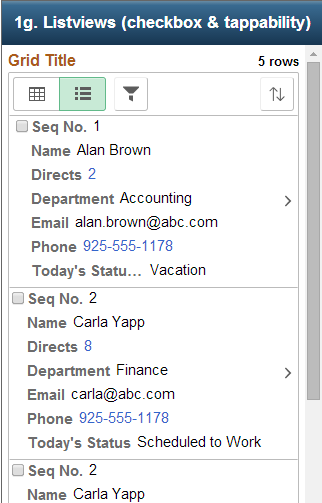 | Contains a left-aligned check box on each grid row and a chevron to indicate tappability. Use when a check box is needed and the row is tappable. |
| Tabbed Grid | 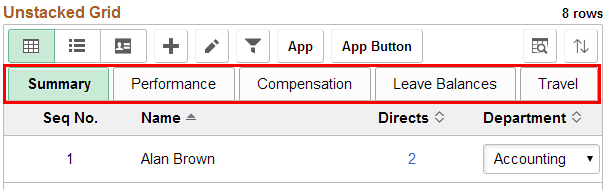 | Use when there are more columns than can be displayed in a stacked grid. The columns in a grid row are divided into separate tabs. |
Tappable Grid Rows and Hotspots
The chevron icon indicates a tappable row. Always use a chevron to indicate that a grid row is tappable except in the following instances:
Grid rows appear in a list view and are used for navigation. For example:
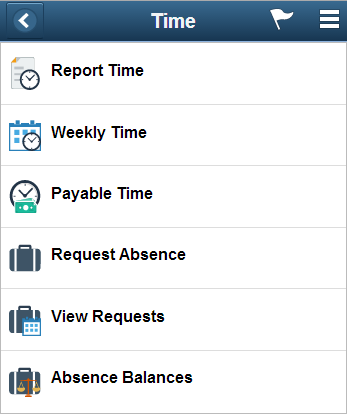 Figure 7: Example of grid rows in a list view
Grid rows appear in a list view and contain a count indicator. For example:
 Figure 8: Example of grid rows with a count indicator
For tappable grid rows, this is an example of the chevron tappable row indicator:
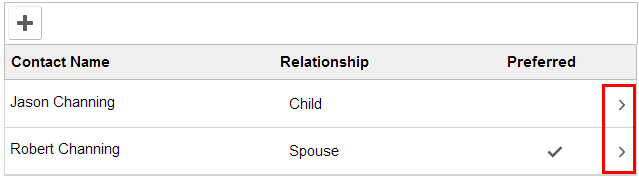 Figure 9: Example of the chevron tappable row indicator
This example shows a Summary/Detail list view with a tappable row indicator:
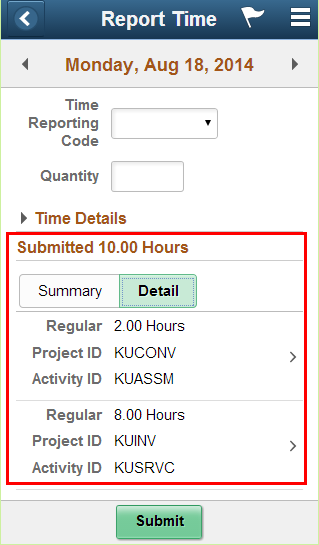 Figure 10: Example Summary/Detail list view with tappable row indicator
Grid Toolbar Buttons and Attributes
There are a large number of toolbar buttons and attributes available on a grid and each button or attribute can be included or excluded from the grid design as needed. The following example shows all of the grid toolbar buttons, the grid title, the row count, and grid tabs:
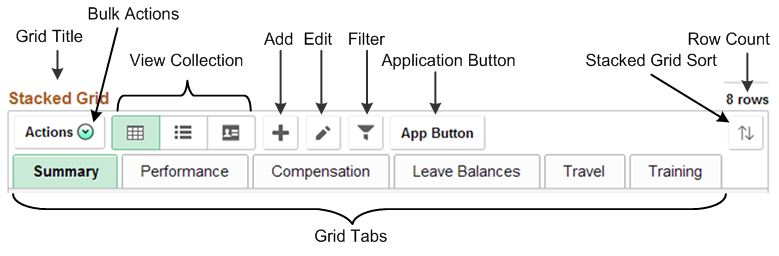 Figure 11: Example of Grid toolbar buttons and attributes
The following table lists the toolbar elements, and describes each one:
| Toolbar Element | Description |
|---|---|
| Grid Title | The grid title appears above the grid and the grid toolbar.  |
| Row Count | The row count is displayed by Tools and appears on the right above the grid toolbar. 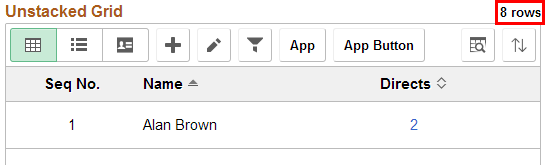 See the Row Count topic in this section for an alternate style when there are no toolbar buttons. The row count is moved down and placed directly above the grid, reclaiming the space reserved for the Grid toolbar: |
| Tabs | The tabs in a tabbed grid appear directly above the grid header and below the grid toolbar. |
| Tab Overflow | A scrollbar will appear when there are more tabs to display than can fit in the horizontal space. |
| View Collection | View Collection is a series of three buttons that switch between grid view, list view, and card view:  |
| Add | The Add new row icon is the plus image:  |
| Edit | The Edit row icon is the pencil:  |
| Filter | The grid filter icon is the filter:  |
| App Button | Application Development can place application-specific buttons on the grid Toolbar:  |
| Find in Grid | Find in Grid functionality was deferred to Tools Release 8.56. |
| Sort | The grid Sort button is provided by PeopleTools and appears on the right side of the grid toolbar. This button applies only to stacked grids and is used to select the column that will be sorted. The sort is the up and down arrow image:  |
| Grid Toolbar | The grid toolbar is hidden when none of the grid toolbar buttons or attributes is enabled. Example when toolbar buttons are enabled: 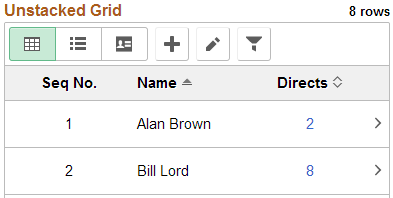 Example when toolbar buttons are disabled; the toolbar is hidden and the row count appears directly above the grid:
|

Grid Toolbar
The attributes listed in the section above are placed in the grid toolbar as needed. The grid toolbar and grid toolbar border attributes can be enabled or disabled. The toolbar is disabled when there are no toolbar buttons to display. In the following example, there are no grid toolbar buttons to display and the toolbar is hidden. An application button placed above or below the grid and not directly in the toolbar is not considered when hiding the grid toolbar:
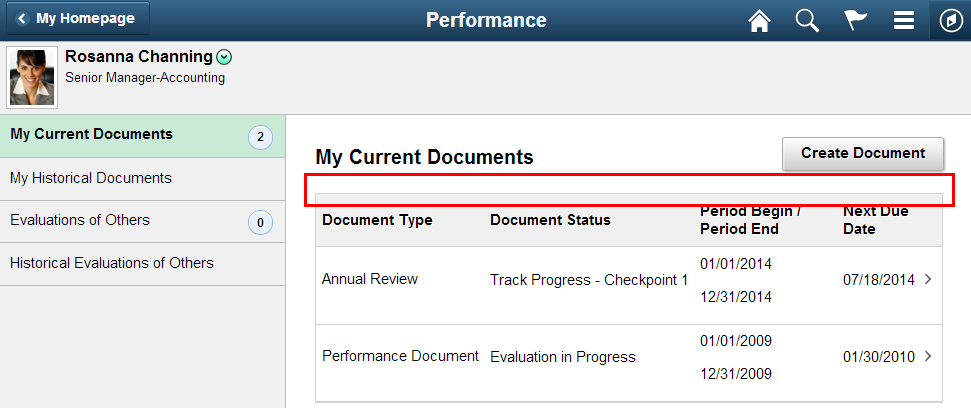 Figure 12: Example of hidden grid toolbar
The toolbar borders are disabled when:
- Only one or two buttons appear and there are few rows and columns.
- Toolbar borders would add clutter, for example, on a small form factor device.
In the following example, the grid toolbar is hidden and the grid borders are turned off:
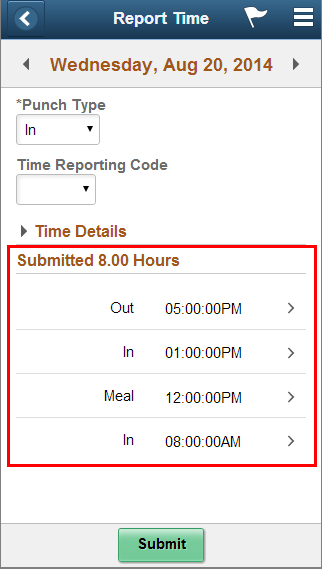 Figure 13: Example of hidden grid toolbar in small form factor
PeopleTools provides one button, Grid Sort. Application Development must provide the remaining buttons. The Grid Sort Tools button, if enabled, automatically appears on the far right in the grid toolbar. PeopleTools also provides the row count, which appears on the right and above the toolbar:
 Figure 14: Location of buttons in toolbar
Avoid placing a large number of buttons in the grid header on the small form factor because the buttons will wrap to the next line, as shown in this example:
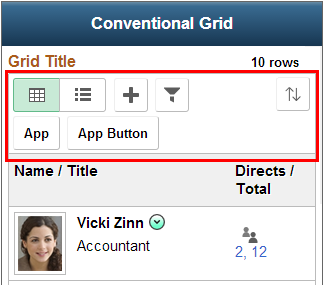 Figure 15: Example of wrapped toolbar buttons
Grid Title
Use a grid title if:
- The page has more than one grid.
- Additional clarity is required.
- If you are not displaying a grid title, set one in accessible mode.
A grid is not required to have a title. When there is one grid in the right panel of a two-panel layout, the grid title may be suppressed to avoid repeating the title that already appears as a panel selection in the left panel and a panel title in the right panel. For example:
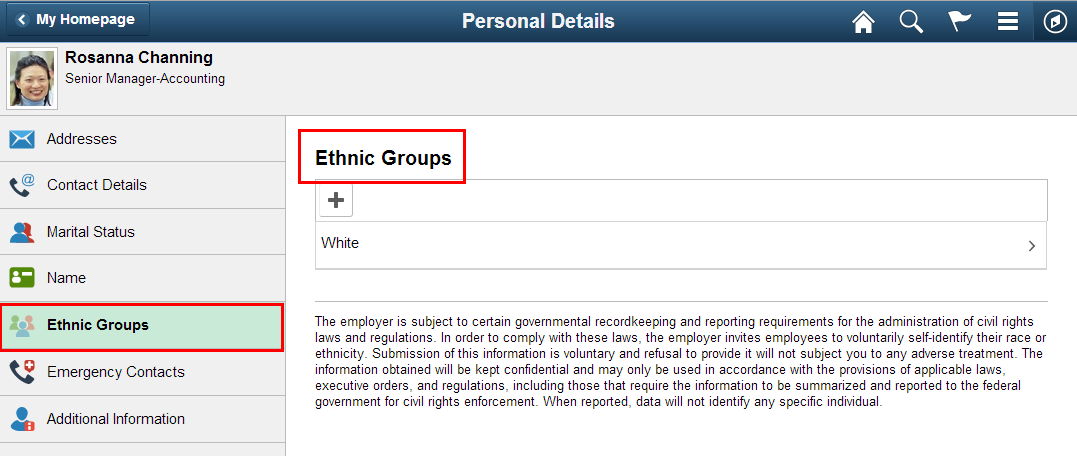 Figure 16: Example of panel selection in left panel and only panel title in the right panel (no grid title)
In the following example of multiple grids in the right panel, the grid titles appear for all three grids because each grid title is unique on the page and does not match the page title. Contact Details is the title of the right panel, and the three grid titles are Phone, Email, and Instant Message:
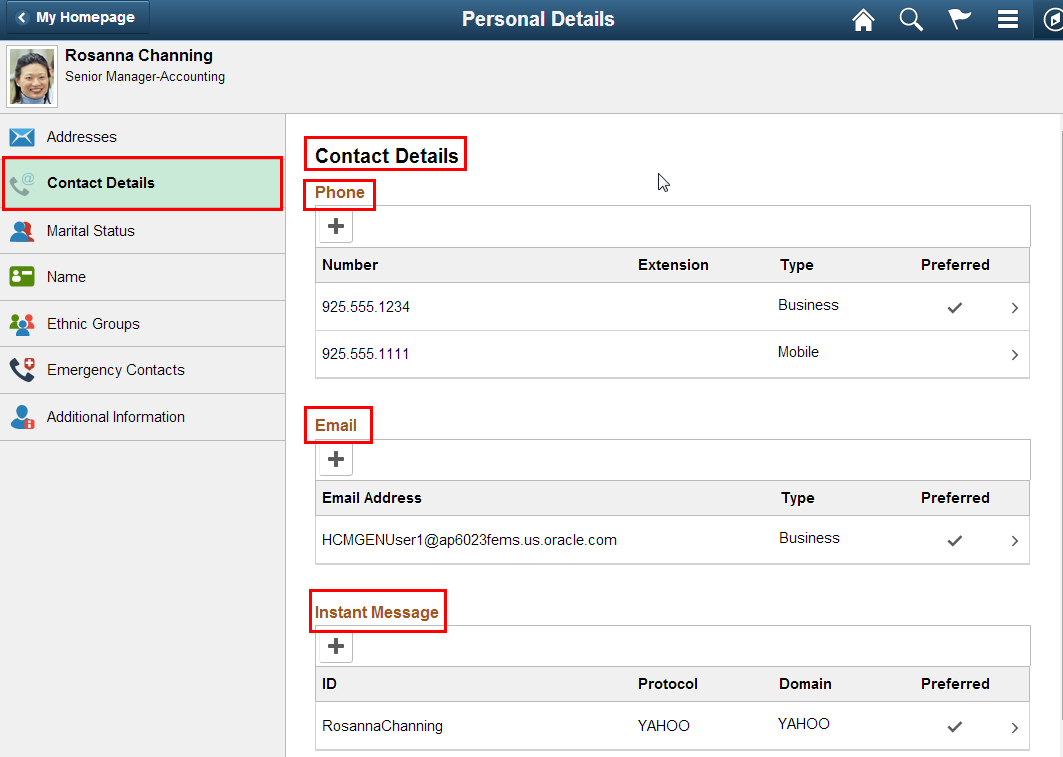 Figure 17: Example of panel title and grid titles in right panel
Row Count
When the row count appears, two styles are available, depending on whether toolbar buttons are enabled or not.
This example shows Row Count displayed with toolbar buttons enabled:
Figure 18: Example of Row Count and enabled toolbar buttons
This example shows Row Count displayed with toolbar buttons disabled:
Figure 19: Example of Row Count and disabled toolbar buttons
Displaying the Row Count is optional. The row count can be suppressed when only a small number of rows will be displayed or if the row count is not functionally relevant.
Grid Tabs
Use Grid tabs when the data to be displayed contains a large number of columns and those columns can be logically grouped into tabs.
Tab Overflow
When a grid contains more tabs than can be displayed in the horizontal space available, tab overflow will occur.
View Collection
View Collection is three buttons that enable users to toggle among a detailed grid view, a list view, and a card view of a grid. Any two of the three buttons or all three buttons may be used, depending on functional requirements. The collection does not have to provide all three buttons. Use View Collection to change the view of tabular information to a table, a single column, or a group of cards.
Figure 20: View Collection buttons: grid view, list view, card view from left to right
| View Collection Type | Description |
|---|---|
| Grid View | Displays information in multiple columns and multiple rows. This is the traditional table format for a grid and can be used when sufficient horizontal space is available. Avoid horizontal scrolling. |
| List View | Displays information in a single column with multiple rows. There is more vertical scrolling with a List View; it can be used when horizontal space is limited. |
| Card View | Displays information using a business card metaphor. It is used when data is display-only and the grouping of the data into a card type image is more easily reviewed by the user. |
The following example shows a View Collection with a Card View button and a Grid View button. The selected button in the View Collection appears shaded green:
 Figure 21: Grid view example
The next two examples show the Card View, the Card View flipped.
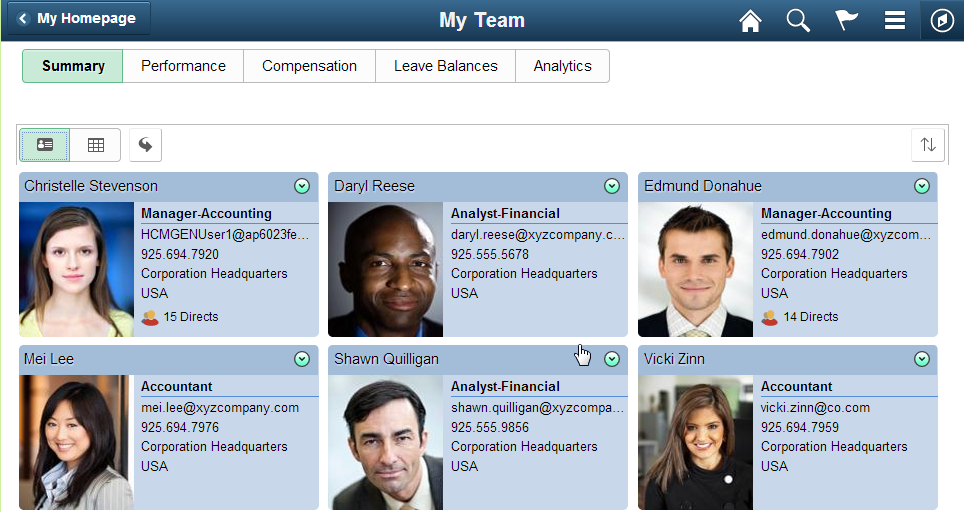 Figure 22: Card view example
The button that flips the card is an application-specific button:
 Figure 23: Flipped card view example
The following two examples illustrate selecting a grid view versus selecting a list view. In a grid view, data columns display horizontally:
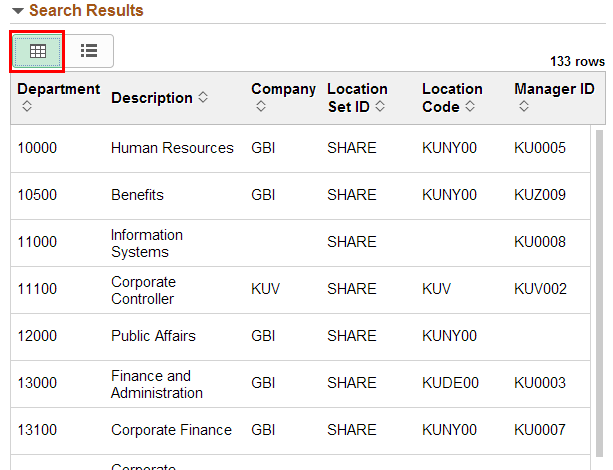 Figure 24: Grid view example displaying data columns horizontally
Data columns are stacked in a list view:
 Figure 25: List view example showing stacked data columns
Add/Edit
The three design patterns for adding and editing grid data are:
- In-line editing
- Editing in a modal, single tappable row
- Editing in a modal, multiple hotspot row
The following sections describe these design patterns.
In-line Editing
We recommend that you not use inline editing for the small form factor. In a small form factor device, the grid should be read-only and a modal window should be used for editing, adding, and deleting because of the space constraints. On a tablet, medium form factor, use inline editing when the user is expected to make many modifications to a number of rows in one session. Use a modal window when updates are infrequent and single row updates are expected. Be aware of providing a consistent experience when choosing inline versus modal editing. The grid Add button will insert a new row directly into the grid. The fields in the grid are directly editable on the page. When a new row is inserted directly into the grid, the row may be added to the top or the bottom of the grid, depending on the application functionality. When lazy scrolling is used, we recommend that the new row be added to the top of the grid. When the new row is added to the top, scrolling is not required to view the new row.
Fields are open for editing. Rows are added directly into the grid by selecting the Add button in the grid toolbar.
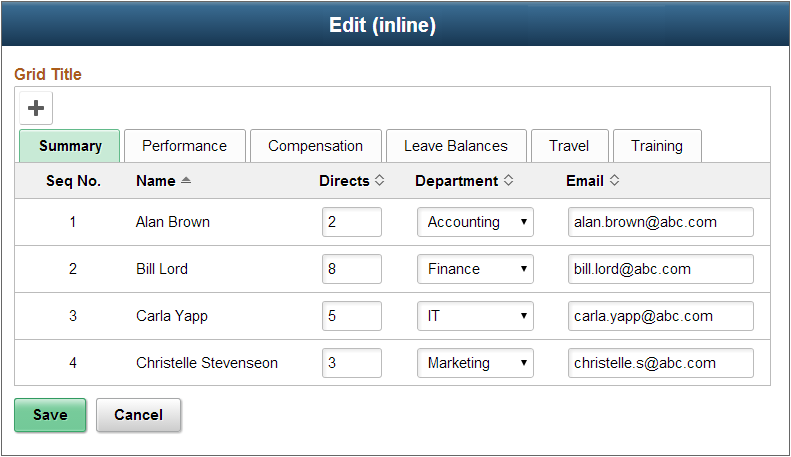 Figure 26: Edit (inline) page
Use the inline edit design pattern when there is enough space to display the grid in portrait mode and to avoid horizontal scrolling.
The inline Add/Delete row buttons are available for backward compatibility and should not be used in fluid design:
 Figure 27: Inline Add/Delete row buttons
This design pattern is not available in Tools Release 8.54.
In this design pattern, the grid rows are display-only and become editable when the Edit icon is tapped:
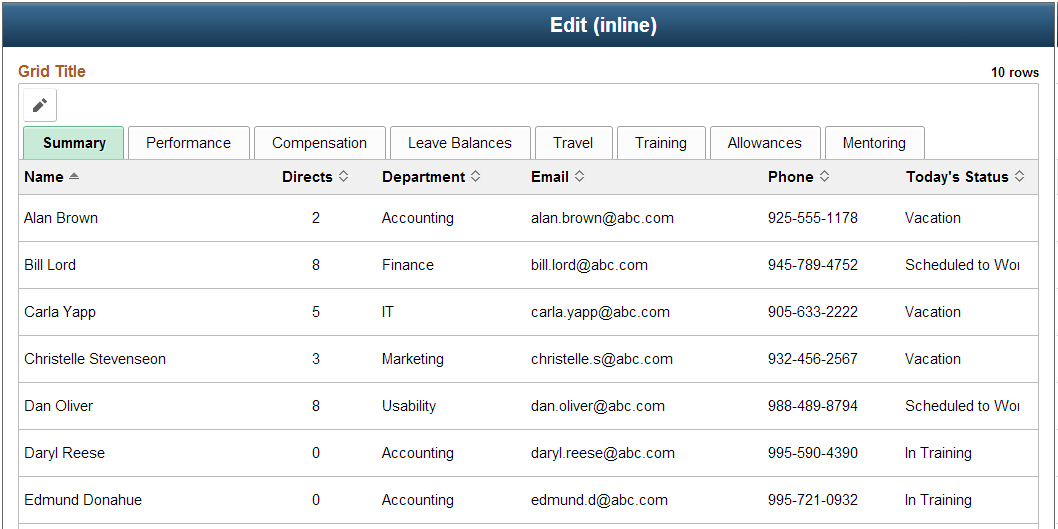 Figure 28: Grid rows are display-only until user taps the Edit icon
 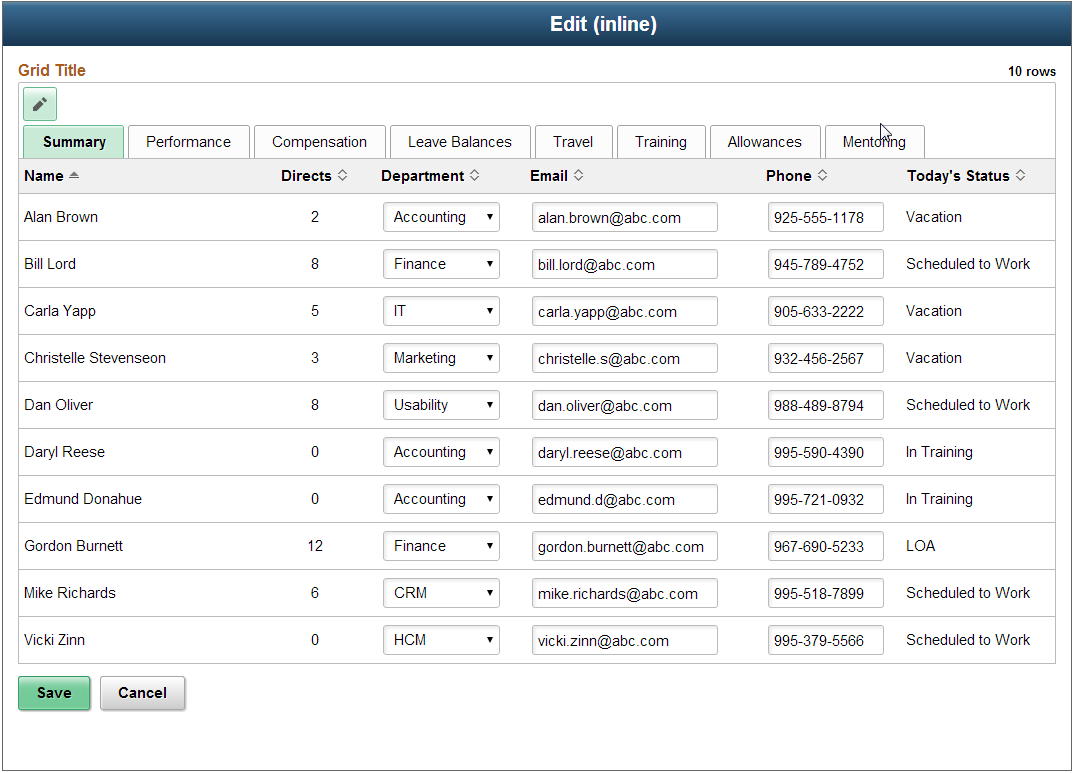 Figure 29: After user taps the Edit icon, fields are open for editing
Editing in a Modal, Single Tappable Row
The grid Add button launches a modal window where a new row of data can be added and saved. To modify an existing row, the row is tapped to open a modal window where the grid row updates can be made and saved. The modal window contains a Cancel button so the user can exit the window without saving either a new row or modified existing row.
The following example shows the modal window that appears when the Add button on the grid is selected:
 Figure 30: Modal window appears when user taps Add button
The next example shows the modal window displayed when an existing row is tapped for editing. The Cancel and Save buttons are available when a row is added or when a row is updated.
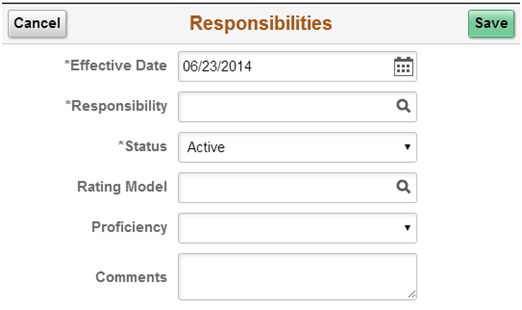 Figure 31: Modal window also appears when user taps an existing row
Size the modal window such that all content will be visible. Users must be able to see the Save and Cancel buttons.
Editing a Row with Multiple Hotspots
When a row contains multiple hotspots, the entire row is tappable and a chevron is placed on the row. Additionally, each row has one or more tappable areas that perform different actions than when the whole row is tapped. In the following example, the Name Tile contains a Related Actions hotspot that opens the Related Actions menu. The Directs/Total column contains a hotspot that shows the Direct reports. The Email/Phone column contains a hotspot that opens the email client. The row has a chevron indicator that allows the row to be tapped anywhere other than the two hotspots for a modal window to open:
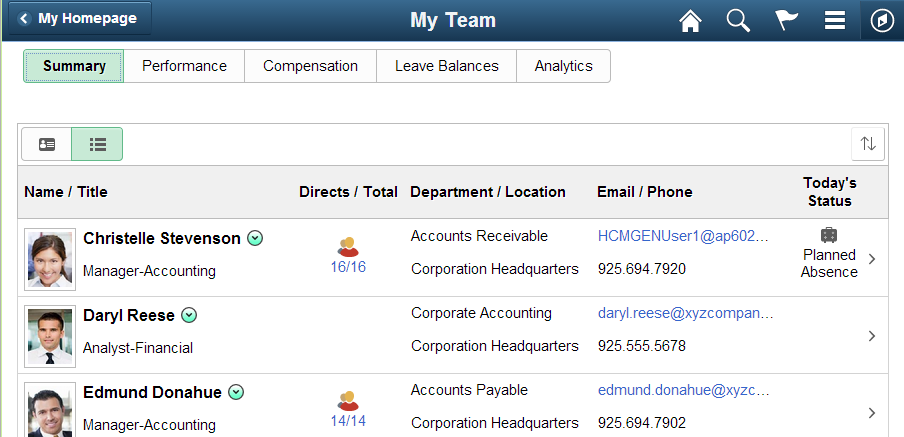 Figure 32: In a row with multiple hotspots, the entire row is tappable
Delete
Delete from a Modal Window
When deleting from a modal window, grid rows are deleted one at a time. A specific grid row is deleted by tapping the row to open a modal window and then tapping a Delete button. After tapping the Delete button, the modal window is dismissed and the deleted row no longer appears in the grid.
The following example shows the full screen modal window that opens when the grid row is tapped. The modal window contains a Cancel button in the upper left, the primary save action (Submit) in the upper right, and a separator line at the bottom with a Delete button below it:
 Figure 33: Clicking a row opens the modal window, which has a Delete button
The following example shows a grid in a tablet. Users can delete grid rows one at a time using the modal window, which opens when the user selects the grid row. A Delete button appears at the bottom of the modal window:
 Figure 34: Selecting a grid row opens the modal window, which has a Delete button
Use this design pattern when deleting and modifying rows one at a time will not be tedious for the user. The advantage of this design pattern is that all of the data for a row can be accessed from a single tap, and the data for that row can be updated or deleted from the modal window. Additional grid toolbar buttons are not necessary, and data from the grid is modified or deleted one row at a time rather than opening the entire grid for editing.
Delete from Edit Button in Grid Header
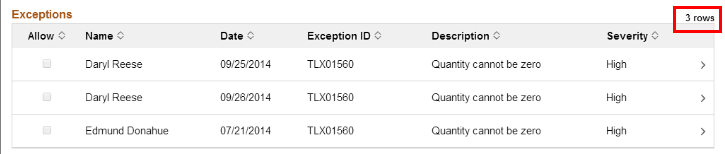
Deleting from a button in the grid header will open a column of check boxes that allows the user to select multiple rows to be deleted at one time. This design pattern hides the check boxes until needed. Tap the Edit button in the grid toolbar.
 Figure 35: Example of using the Edit button to display the check boxes needed for deleting rows
Use the following design pattern when the check boxes are always displayed and when multiple rows are deleted frequently. The Delete button is always displayed in the grid toolbar. In this design pattern, the check boxes should be on the far left of the grid, and the Delete button should be the leftmost button in the grid toolbar.
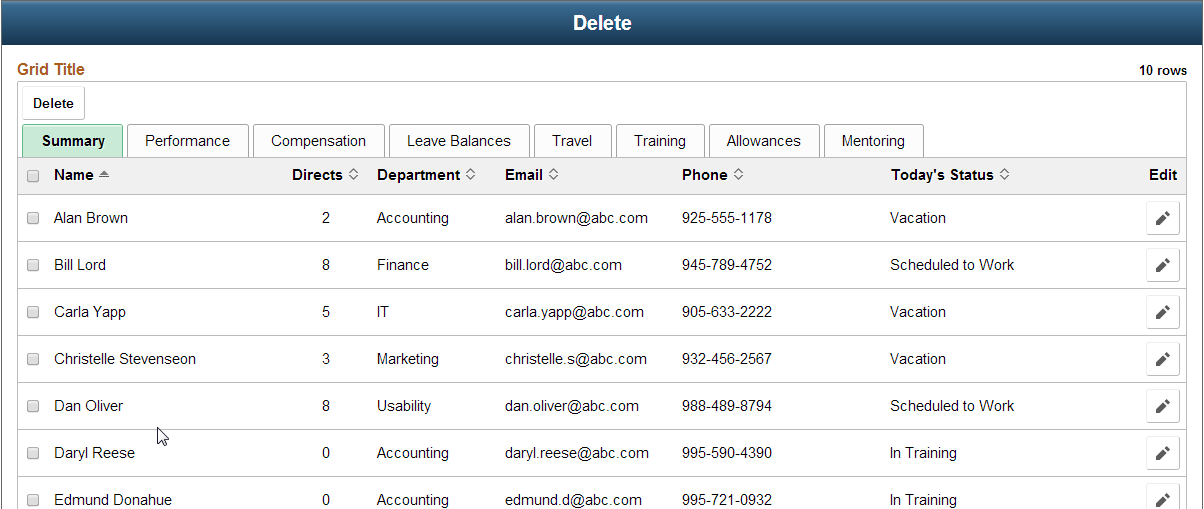 Figure 36: Example of check boxes always displayed for deleting rows
Filters
Grid contents can be filtered by the user when the Filter toolbar button is enabled. The Filter button opens a modal window where the user can select field values to filter on:
 Figure 37: Example of clicking Filter button to open modal window for filtering
The Filter modal window contains a Cancel button and a Done button. If the user makes modifications to the filter fields, they can use the Cancel button to abandon those changes and return. When the user selects the Done button, the filters are applied to the grid.
It is optional to use a Reset or Clear button in the Filter modal window. Use a Reset button when default values for the filters are automatically populated when the modal window is first opened.
- The Reset button will repopulate the fields with the default values.
- Use the Clear button when there are no default filter values and the user wants to set the values for the filters back to all values.
When the grid contents have been filtered, the filter icon becomes green:
 Figure 38: Example of filtered content (button turns green)
When the user selects Reset or Clear and then Done, the filter icon should no longer be green.
Any filter that has been applied to a grid will cause the filter icon to be green for the life of the component. When the user re-enters the component, all grid filtering will be cleared and the icon will be white.
Application Buttons
Application buttons may appear in the grid toolbar, above or below the grid:
 Figure 39: Example of available Application buttons
Consider the following guidelines when selecting where to place an Application button:
- Place the Application button in the grid toolbar when:
- The application logic applies to the grid as a whole.
- The view selector buttons are always in the grid toolbar.
- The Add button is always in the grid toolbar.
- The pencil Update button (available post-8.54) is always in the grid toolbar.
- The filter button is always in the grid toolbar.
- The Delete button is always in the grid toolbar.
- The Edit button is always in the grid toolbar.
- Place the Application button above the grid when:
- Users must be able to see the button without scrolling.
- The button would get lost if placed in the grid toolbar.
- The button has a long label.
- Place the Application button below the grid when:
- Users are selecting check boxes as they work their way down a grid.
- The button would get lost if placed in the grid toolbar.
- The button performs an action that changes the data in the grid, for example, updating a Status.
- The button has a long label.
PeopleTools provides a Sort button for stacked grids. Stacked grids contain multiple data elements in a single column, and sorting requires users to select one data element in a column when there are multiples. When the Sort button is enabled, it appears on the far right of the grid toolbar:
 Figure 40: Example of Sort button for stacked grids
When the Sort button is selected, a window appears where the user can select a specific data element to sort on. The labels in the Grid Sort window are taken from the label on the grid column:
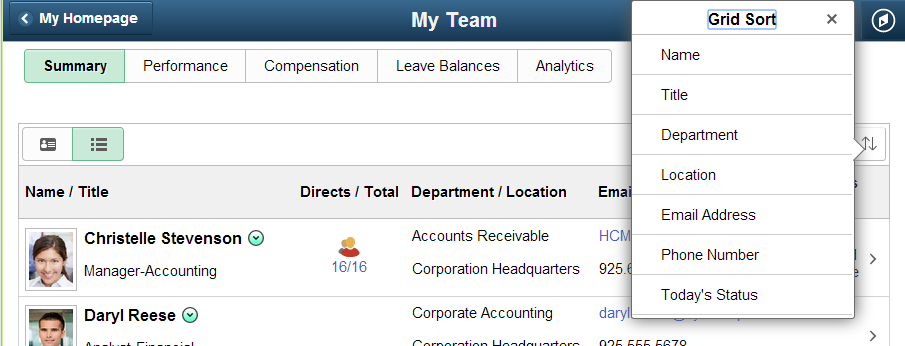 Figure 41: Example of labels in the Grid Sort window, which match the grid columns
When Sort is enabled, we recommended that all sortable data has a grid column header label that matches the label in the Grid Sort window.
The Sort button should be enabled in the grid toolbar when sorting is desired in a stacked grid. PeopleTools will automatically exclude Sort fields that should not be sorted on, such as images.
Grid Column Headers
Typically, grid column headers should be used. If a grid has only one or a few columns and the column header would add clutter rather than clarity, then the column header can be suppressed. When the grid column header is suppressed, it should be enabled in accessible mode. Use sorting on grid column headers when it makes sense to.
By default, column headers are left-aligned, text in a column is left-aligned, numbers are right-aligned, and dates are left-aligned.
Number of Rows to Display
Avoid vertical scrolling in grids on touch devices. A vertical scrollbar adds clutter to a self-service page and should be avoided. For simple grids, display all rows to the user and allow the page to scroll.
In some circumstances a vertical scroll bar may be needed; use one when:
- The grid contains a large amount of data with many rows, and scrolling the page is not feasible.
- The grid contains a multi-select check box and action buttons appear below the grid.
- The grid data must be viewed side by side with other data on the page, and this cannot be accomplished if the page scrolls.
- Lazy loading is needed because of the large amount of data.
Never create a situation in which the user must alternately scroll the page and then the grid to view more data.
Bulk Actions
Bulk actions enable users to select multiple grid rows to take action on. The two types of bulk actions are:
- Bulk related actions enable users to select multiple grid rows to perform a transaction-level change, for example, a reporting change.
- Bulk actions enable users to select multiple grid rows for row-level processing changes, such as making a status change to candidates in Recruiting.
Both types of bulk actions use the same button, as shown here:
When a grid contains both bulk actions and bulk related actions, all of the actions should be placed in a single list accessed from the Actions button.
Users choose rows to act upon by selecting the check box next to the desired rows and then selecting the Actions button. The system displays a window showing the available actions:
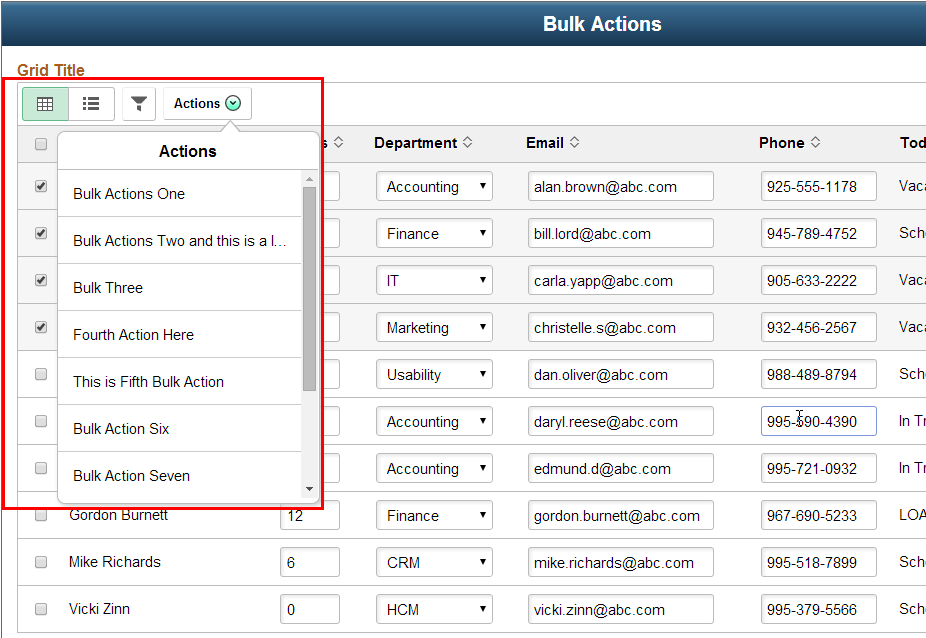 Figure 42: Example of available bulk actions using the Actions button
Toolbar Button Order
Place toolbar buttons in the following order when two or more buttons are used in the grid toolbar:
- Bulk Actions
- View Collection
- Add
- Edit
- Filter
- Application Button
PeopleTools will automatically place the Sort button on the far right side of the toolbar:
 Figure 43: Example of correct toolbar button placement
Empty Grid Pattern
Use the empty grid pattern when the grid has no data to display. Empty Grid has two design patterns: empty grid for a grid with no Add row functionality and empty grid for a grid with the ability to add a row to the grid.
The following example shows the empty grid for a grid that has an Add button for inserting a new grid row. The Empty Grid pattern contains three elements:
- Grid title
- Empty Grid text
- Add button
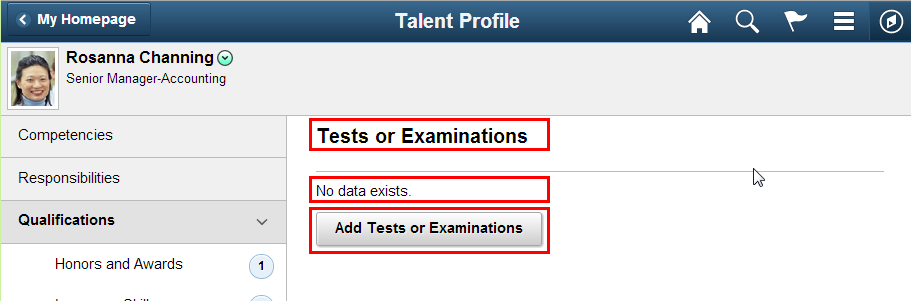 Figure 44: Example of Empty Grid pattern
When a grid contains a Filters toolbar button and the empty grid pattern is used, the Filters button appears below the grid:
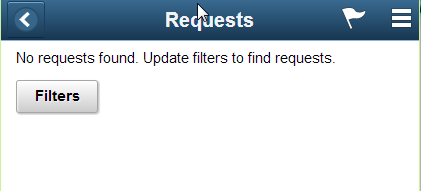 Figure 45: Example of Filters button below an empty grid pattern
This example shows a two-panel layout with data in the grids in the left and right panels:
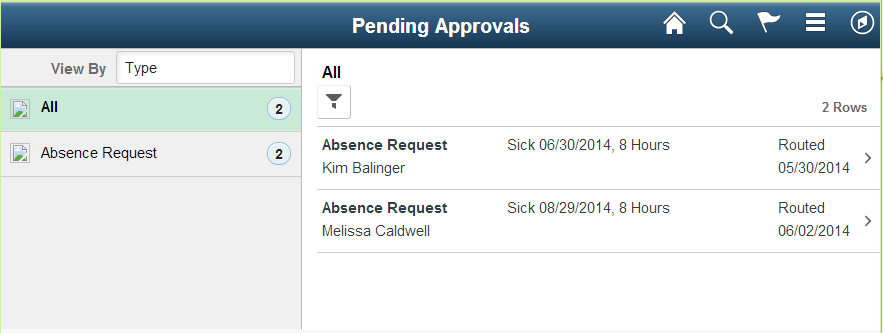 Figure 46: Example of two-panel layout with data in the grids in both panels
In a two-panel layout with an empty grid in the left panel and an empty grid in the right panel, you convert the two-panel layout to a single-panel layout and display the empty grid text. This example shows the result of converting the two-panel layout to a single panel when the grids are empty and displaying the empty grid text:
 Figure 47: Example of single-panel layout displaying the empty grid text
Responsive Design
Designers can use the following techniques to display grids across form factors. Each technique is discussed in the sections that follow.
- List View grids
- Stacked to Unstacked grids
List View Grids
List View grids showing Summary and Detail can be used to display a large number of columns in a small form factor device:
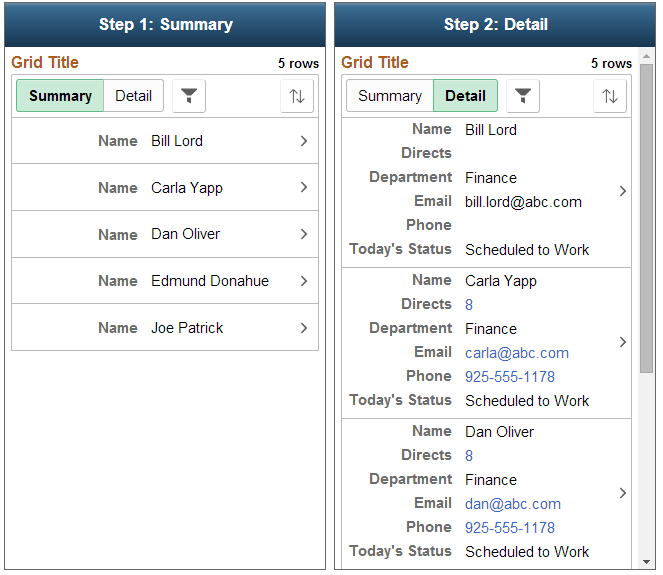 Figure 48: List View grids display a large number of columns in a small form factor
For larger form factor devices, adaptive design can be used to switch from displaying the List View in the small form factor to a Grid View in larger form factors:
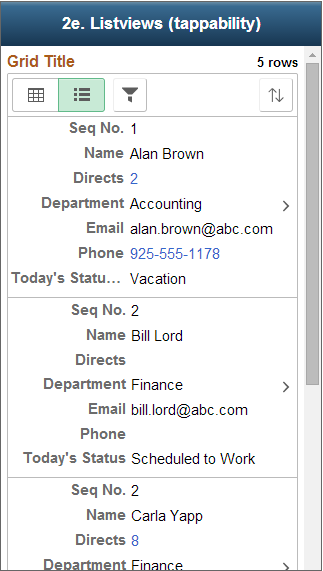 Figure 49: Example of List View in small form factor converts to Grid View in medium and large form factors (1 of 2)
 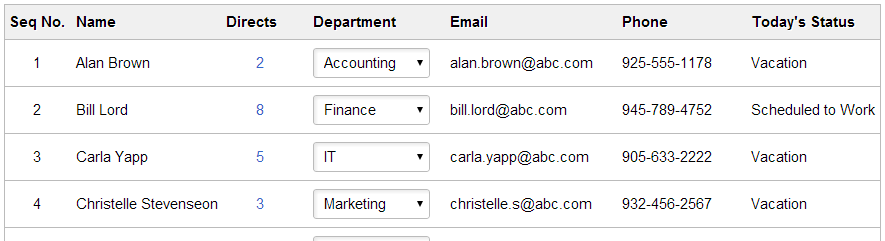 Figure 49: Example of conversion to Grid View in medium and large form factors (2 of 2)
Stacked to Unstacked Grids
Grids should be stacked for the small form factor and unstacked for larger form factors:
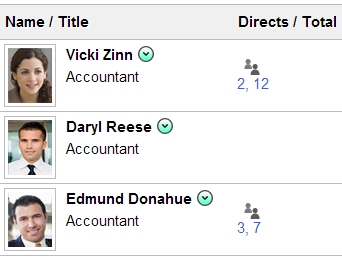 Figure 50: Example of stacked grid in small form factor
  Figure 51: Example of unstacked grid in medium and large form factors
Examples
Here are additional examples of grids.
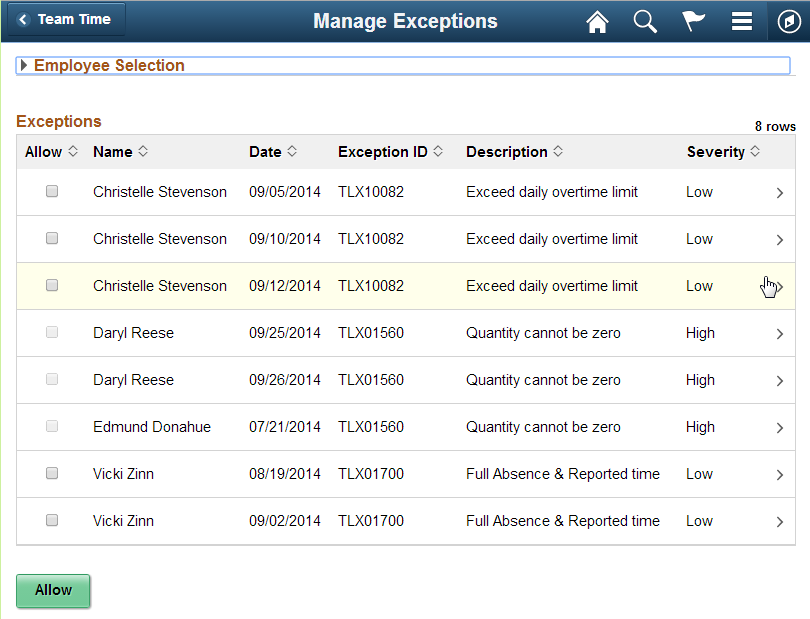 Figure 52: Example of complex unstacked grid with many rows and columns, column sorting, hidden toolbar, and row count
 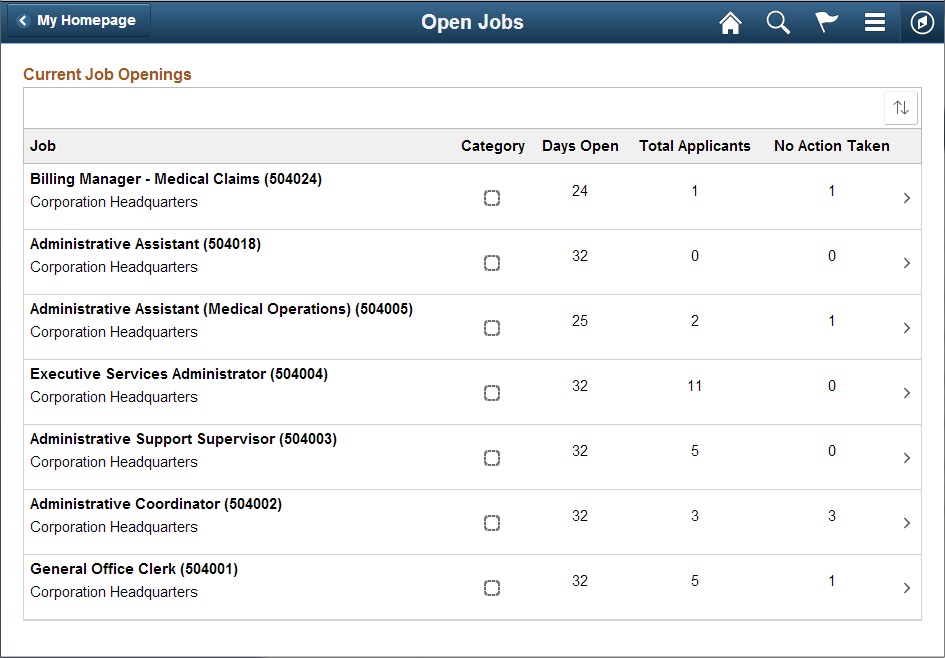 Figure 53: Example of complex stacked grid with many columns and Sort button
 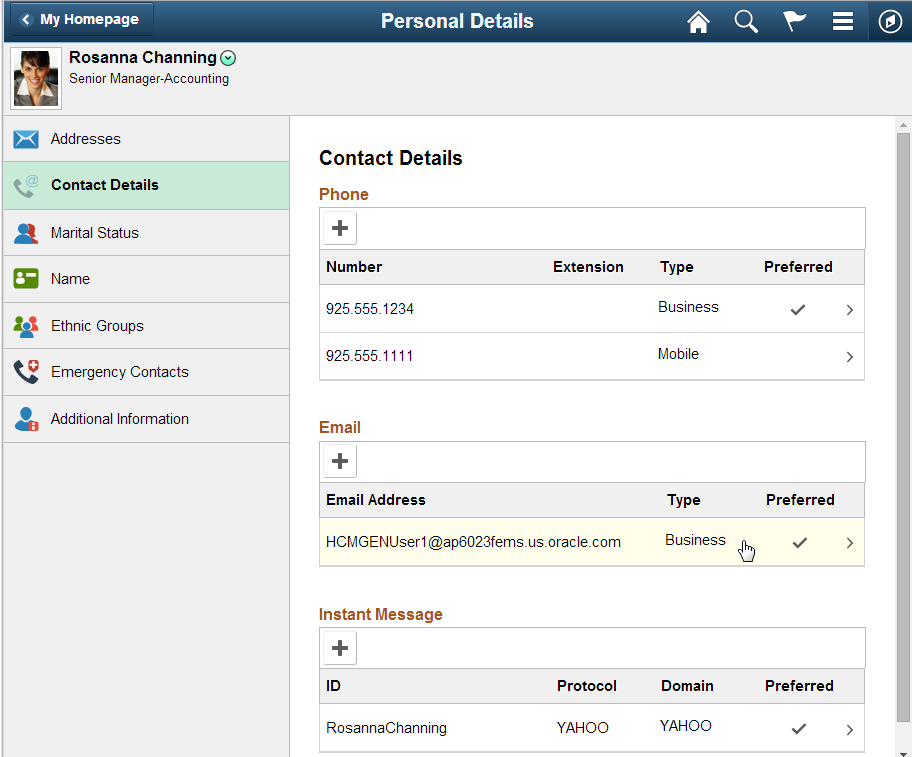 Figure 54: Example of two-panel layout containing three grids in the right panel and Add buttons that open modal windows, enabling the user to add a row to the grid
 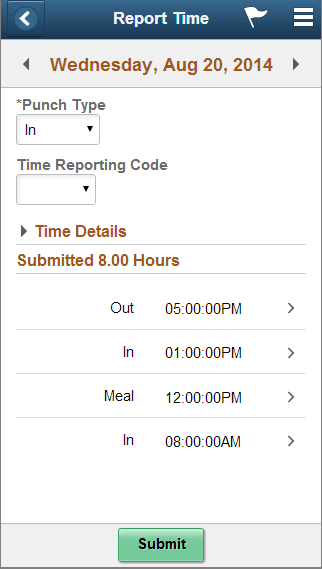 Figure 55: Example of simple grid in a small form factor containing two columns and a few rows, grid borders are turned off, and the column header labels are suppressed when not in accessible mode


