- Shipping a Linux Kernel with Windows
- Tuned for WSL
- Code goes upstream
- Security
- Open Source
- Thanks!
- Контейнеры Linux в Windows 10 Linux containers on Windows 10
- Контейнеры Linux на виртуальной машине Moby Linux containers in a Moby VM
- Release Notes for Windows Subsystem for Linux kernel
- 5.10.16.3
- 5.4.51-microsoft-standard
- 4.19.128-microsoft-standard
- 4.19.121-microsoft-standard
- 4.19.104-microsoft-standard
- 4.19.84-microsoft-standard
- Windows Subsystem for Linux Installation Guide for Windows 10
- Simplified Installation for Windows Insiders
- Manual Installation Steps
- Step 1 — Enable the Windows Subsystem for Linux
- Step 2 — Check requirements for running WSL 2
- Step 3 — Enable Virtual Machine feature
- Step 4 — Download the Linux kernel update package
- Step 5 — Set WSL 2 as your default version
- Step 6 — Install your Linux distribution of choice
- Install Windows Terminal (optional)
- Set your distribution version to WSL 1 or WSL 2
- Troubleshooting installation
Shipping a Linux Kernel with Windows

Beginning with Windows Insiders builds this Summer, we will include an in-house custom-built Linux kernel to underpin the newest version of the Windows Subsystem for Linux (WSL). This marks the first time that the Linux kernel will be included as a component in Windows. This is an exciting day for all of us on the Linux team at Microsoft and we are thrilled to be able to tell you a little bit about it.
Tuned for WSL
The term “Linux” is often used to refer both to the Linux kernel as well as the GNU userspace. As with WSL1, WSL2 will not provide any userspace binaries. Instead, the Microsoft kernel will interface with a userspace selected by the user. This will generally come through installation via the Windows store but can also be “sideloaded” through the creation of a custom distribution package. The only exception to this rule is a small init script that is injected to bootstrap the startup process, forming the connections between Windows and Linux that make WSL so magical.
The kernel itself will initially be based on version 4.19, the latest long-term stable release of Linux. The kernel will be rebased at the designation of new long-term stable releases to ensure that the WSL kernel always has the latest Linux goodness.
In addition to the LTS source from Kernel.org, a number of local patches are being applied. These patches tune the resulting binary for use in WSL2 by improving launch times, reducing the memory footprint and curating a minimal set of supported devices. The result is a small, lightweight kernel that is purpose built for WSL2 to be a drop-in replacement for the emulation architecture featured in the design of WSL1.
Code goes upstream
Microsoft employs a growing number of Linux contributors who have brought industry leading Linux knowhow into the company. For years now, these Linux developers have enabled Microsoft to support new platform features in the wide number of distributions provided in the Azure Marketplace.
An important philosophy of Linux at Microsoft is that all changes go upstream. Maintaining downstream patches adds complexity and is not standard practice in the open source community. In leveraging Linux, we are making a commitment to be good citizens and contribute back the changes that we make.
However, during development it is necessary to work with local patches that enable new features or address issues in upstream. In these cases, we either create, or find patches that fulfill our product requirements and then work with the community to get that code integrated as soon as possible. To protect the stability of the LTS branches, some patches – such as for new features – might only be included in future versions of the kernel, and not be back-ported to the current LTS version.
When the WSL kernel source becomes available it will consist of links to a set of patches in addition to the long-term stable source. Over time, we hope this list will shrink as patches make it upstream and grow as we add new local patches to support new WSL features.
Security
The WSL kernel will be built using Microsoft’s world-class CI/CD systems and serviced through Windows Update in an operation transparent to the user. The kernel will stay up to date with the newest features and fixes in the latest stable branch of Linux. To ensure the provenance of our sources we mirror repositories locally. We continually monitor Linux security mailing lists and partner with several CVE database companies to help ensure that our kernel has the most recent fixes and mitigations.
One of the great things about Linux is its stable and backwards compatible system call interface. This will enable us to ship the latest stable branch of the Linux kernel to all versions of WSL2. We will rebase the kernel when a new LTS is established and when we have sufficiently validated it.
Open Source
The kernel provided for WSL2 will be fully open source! When WSL2 is released in Windows Insider builds, instructions for creating your own WSL kernel will be made available on Github. We will work with developers interested in contributing to help get changes upstream. Check back in a few weeks for more information.
Thanks!
This is the culmination of years of effort from the Linux Systems Group as well as multiple other teams across Microsoft. We are excited to be able to share the result and look forward to the new and interesting ways in which you will use WSL. If you are interested in positions at Microsoft working with Linux check out this job listing.
Контейнеры Linux в Windows 10 Linux containers on Windows 10
Контейнеры Linux составляют огромную долю общей экосистемы контейнеров и имеют важное значение для разработки и рабочих сред. Linux containers make up a huge percent of the overall container ecosystem and are fundamental to both developer experiences and production environments. Так как контейнеры и узел контейнеров используют одно ядро, запуск контейнеров Linux непосредственно в Windows — не лучший вариант. Since containers share a kernel with the container host, however, running Linux containers directly on Windows isn’t an option. Как раз в таких случаях и применяется виртуализация. This is where virtualization comes into the picture.
Контейнеры Linux на виртуальной машине Moby Linux containers in a Moby VM
Чтобы запустить контейнеры Linux на виртуальной машине Linux, выполните инструкции из статьи о начале работы с Docker. To run Linux containers in a Linux VM, follow the instructions in Docker’s get-started guide.
Docker поддерживает запуск контейнеров Linux на компьютерах с Windows с момента своего первого запуска в 2016 г. (до того, как стали доступны изоляция Hyper-V или контейнеры Linux в Windows). Для этого используется виртуальная машина на базе LinuxKit, работающая в Hyper-V. Docker has been able to run Linux containers on Windows desktop since it was first released in 2016 (before Hyper-V isolation or Linux containers on Windows were available) using a LinuxKit based virtual machine running on Hyper-V.
В такой модели клиент Docker запускается на компьютере с Windows, но отправляет вызовы в управляющую программу Docker на виртуальной машине Linux. In this model, Docker Client runs on Windows desktop but calls into Docker Daemon on the Linux VM.
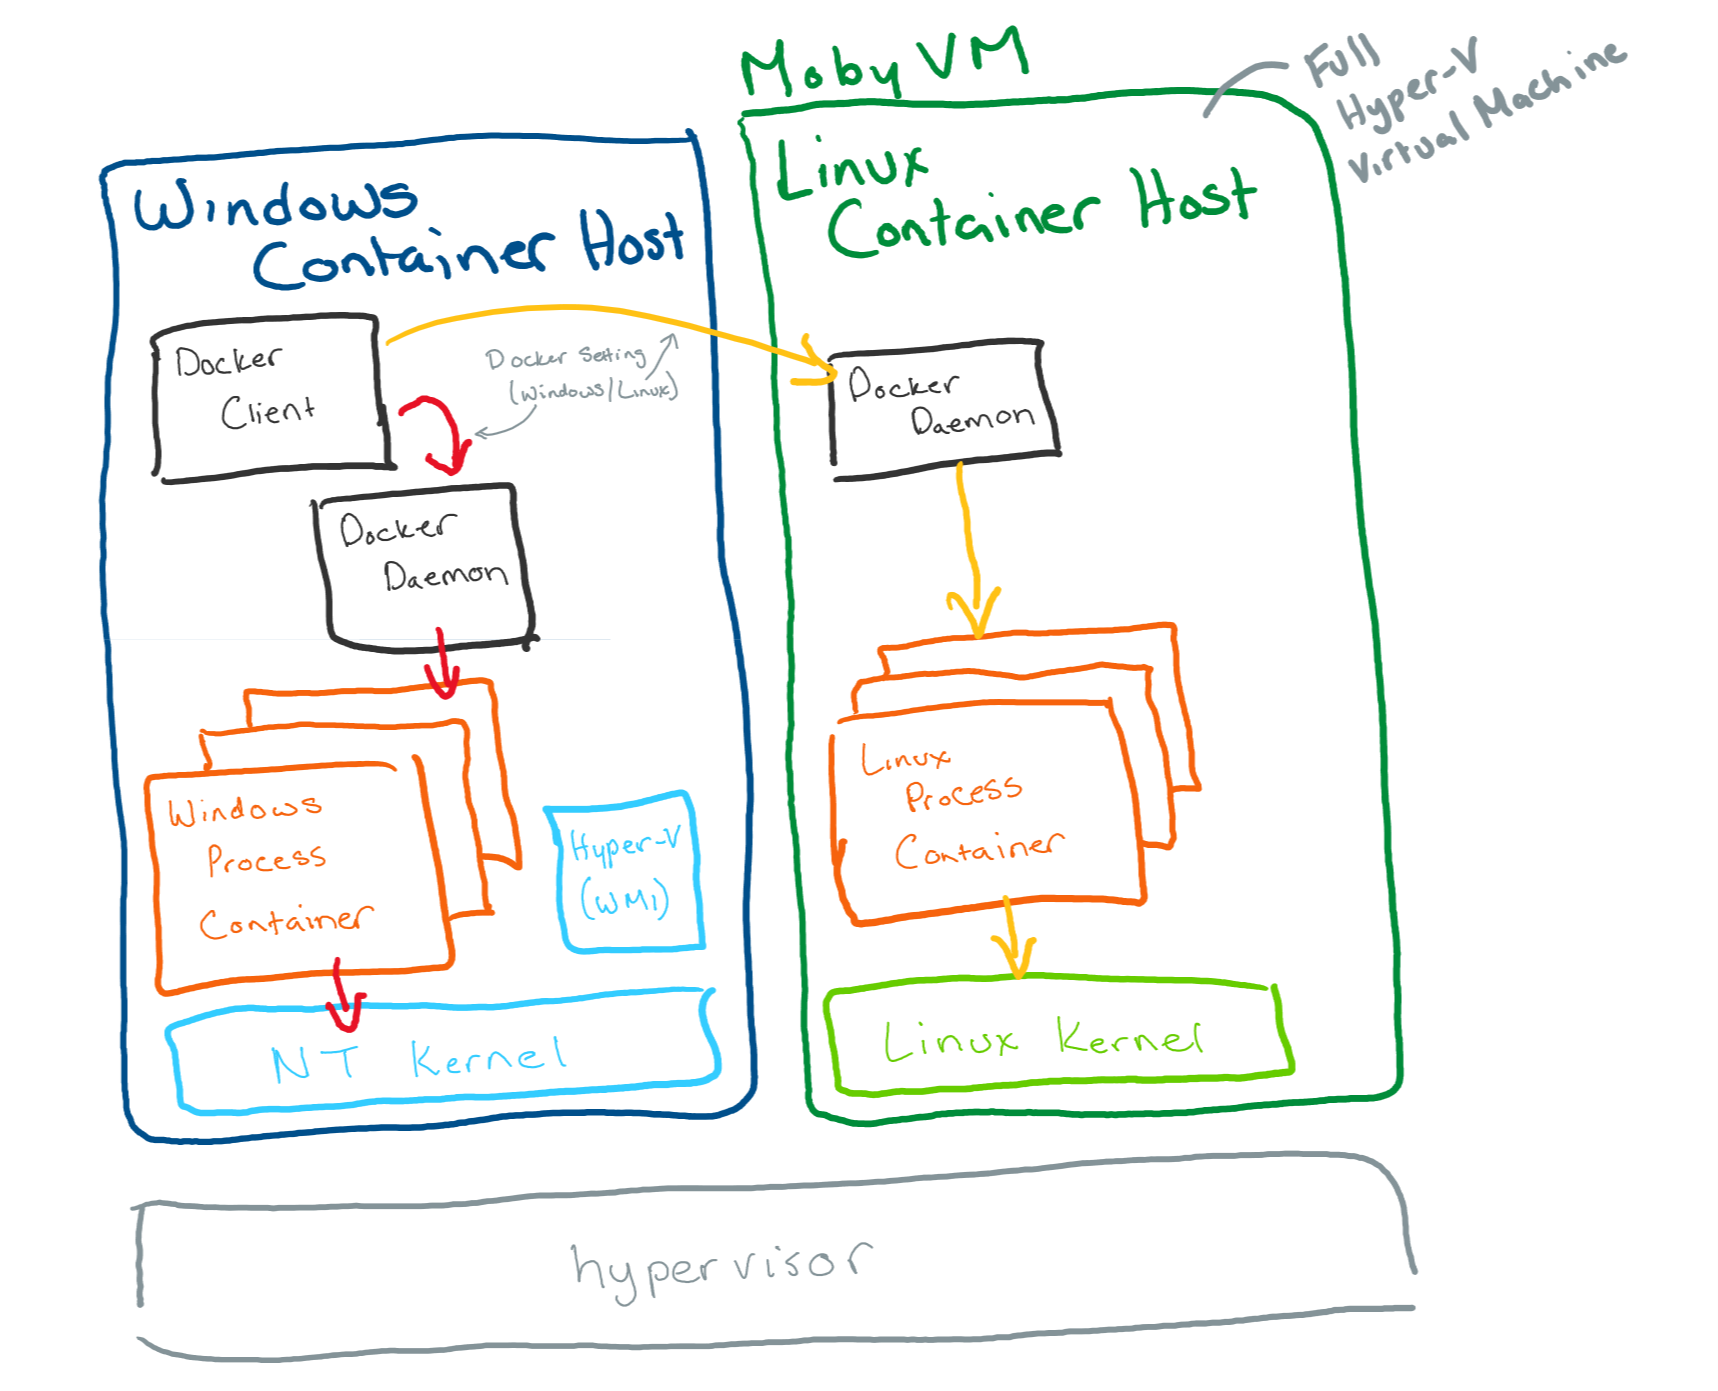
В этой модели все контейнеры Linux совместно используют один узел контейнера, а также: In this model, all Linux containers share a single Linux-based container host and all Linux containers:
- используют одно ядро совместно с виртуальной машиной Moby, но не с узлом Windows; Share a kernel with each other and the Moby VM, but not with the Windows host.
- имеют согласованные свойства сети и хранилища между контейнерами Linux, работающими в Linux (так как они работают на виртуальной машине Linux). Have consistent storage and networking properties with Linux containers running on Linux (since they are running on a Linux VM).
Это также означает, что в узле контейнера Linux (виртуальной машине Moby) должна быть запущена управляющая программа Docker и все ее зависимости. It also means the Linux container host (Moby VM) needs to be running Docker Daemon and all of Docker Daemon’s dependencies.
Чтобы узнать, используется ли виртуальная машина Moby, проверьте в диспетчере Hyper-V ее наличие с помощью пользовательского интерфейса или выполните команду Get-VM в окне PowerShell с повышенными привилегиями. To see if you’re running with Moby VM, check Hyper-V Manager for Moby VM using either the Hyper-V Manager UI or by running Get-VM in an elevated PowerShell window.
Release Notes for Windows Subsystem for Linux kernel
We’ve added support for WSL 2 distributions, which use a full Linux kernel. This Linux kernel is open source, with its source code available at the WSL2-Linux-Kernel repository. This Linux kernel is delivered to your machine via Microsoft Update, and follows a separate release schedule to the Windows Subsystem for Linux which is delivered as part of the Windows image.
5.10.16.3
Release Date: Prerelease 2021/04/16
- Fixes GH 5324
- Adds support for LUKS encyrpted disks using wsl —mount
Release Date: Prerelease 2021/02/22
Release Date: 2021/01/21
5.4.51-microsoft-standard
Release Date: Prerelease — 2020/10/22
4.19.128-microsoft-standard
Release Date: 2020/09/15
- This is a stable release of 4.19.128
- Fix dxgkrnl driver IOCTL memory corruption
4.19.121-microsoft-standard
Release Date: Prerelease
- Drivers: hv: vmbus: hook up dxgkrnl
- Added support for GPU Compute
4.19.104-microsoft-standard
Release Date: 2020/06/09
- Update WSL config for 4.19.104
4.19.84-microsoft-standard
Release Date: 2019/12/11
- This is the 4.19.84 stable release
—>
Windows Subsystem for Linux Installation Guide for Windows 10
There are two options available for installing Windows Subsystem for Linux (WSL):
Simplified install (preview release): wsl —install
The wsl —install simplified install command requires that you join the Windows Insiders Program and install a preview build of Windows 10 (OS build 20262 or higher), but eliminates the need to follow the manual install steps. All you need to do is open a command window with administrator privileges and run wsl —install , after a restart you will be ready to use WSL.
Manual install: Follow the six steps listed below.
The manual install steps for WSL are listed below and can be used to install Linux on any version of Windows 10.
If you run into an issue during the install process, check the Troubleshooting installation section at the bottom of this page.
Simplified Installation for Windows Insiders
The installation process for Windows Subsystem for Linux has been significantly improved in the latest Windows Insiders preview builds of Windows 10, replacing the manual steps below with a single command.
In order to use the wsl —install simplified install command, you must:
- Join the Windows Insiders Program
- Install a preview build of Windows 10 (OS build 20262 or higher).
- Open a command line windows with Administrator privileges
Once those requirements are met, to install WSL:
- Enter this command in the command line you’ve opened in Admin mode: wsl.exe —install
- Restart your machine
The first time you launch a newly installed Linux distribution, a console window will open and you’ll be asked to wait for files to de-compress and be stored on your PC. All future launches should take less than a second.
CONGRATULATIONS! You’ve successfully installed and set up a Linux distribution that is completely integrated with your Windows operating system!
The —install command performs the following actions:
- Enables the optional WSL and Virtual Machine Platform components
- Downloads and installs the latest Linux kernel
- Sets WSL 2 as the default
- Downloads and installs a Linux distribution (reboot may be required)
By default, the installed Linux distribution will be Ubuntu. This can be changed using wsl —install -d . (Replacing with the name of your desired distribution.) Additional Linux distributions may be added to your machine after the initial install using the wsl —install -d command.
To see a list of available Linux distributions, enter wsl —list —online .
Manual Installation Steps
If you are not on a Windows Insiders build, the features required for WSL will need to be enabled manually following the steps below.
Step 1 — Enable the Windows Subsystem for Linux
You must first enable the «Windows Subsystem for Linux» optional feature before installing any Linux distributions on Windows.
Open PowerShell as Administrator and run:
We recommend now moving on to step #2, updating to WSL 2, but if you wish to only install WSL 1, you can now restart your machine and move on to Step 6 — Install your Linux distribution of choice. To update to WSL 2, wait to restart your machine and move on to the next step.
Step 2 — Check requirements for running WSL 2
To update to WSL 2, you must be running Windows 10.
- For x64 systems: Version 1903 or higher, with Build 18362 or higher.
- For ARM64 systems: Version 2004 or higher, with Build 19041 or higher.
- Builds lower than 18362 do not support WSL 2. Use the Windows Update Assistant to update your version of Windows.
To check your version and build number, select Windows logo key + R, type winver, select OK. Update to the latest Windows version in the Settings menu.
If you are running Windows 10 version 1903 or 1909, open «Settings» from your Windows menu, navigate to «Update & Security» and select «Check for Updates». Your Build number must be 18362.1049+ or 18363.1049+, with the minor build # over .1049. Read more: WSL 2 Support is coming to Windows 10 Versions 1903 and 1909. See the troubleshooting instructions.
Step 3 — Enable Virtual Machine feature
Before installing WSL 2, you must enable the Virtual Machine Platform optional feature. Your machine will require virtualization capabilities to use this feature.
Open PowerShell as Administrator and run:
Restart your machine to complete the WSL install and update to WSL 2.
Step 4 — Download the Linux kernel update package
Download the latest package:
If you’re using an ARM64 machine, please download the ARM64 package instead. If you’re not sure what kind of machine you have, open Command Prompt or PowerShell and enter: systeminfo | find «System Type» . Caveat: On non-English Windows versions, you might have to modify the search text, for example, in German it would be systeminfo | find «Systemtyp» .
Run the update package downloaded in the previous step. (Double-click to run — you will be prompted for elevated permissions, select вЂyes’ to approve this installation.)
Once the installation is complete, move on to the next step — setting WSL 2 as your default version when installing new Linux distributions. (Skip this step if you want your new Linux installs to be set to WSL 1).
Step 5 — Set WSL 2 as your default version
Open PowerShell and run this command to set WSL 2 as the default version when installing a new Linux distribution:
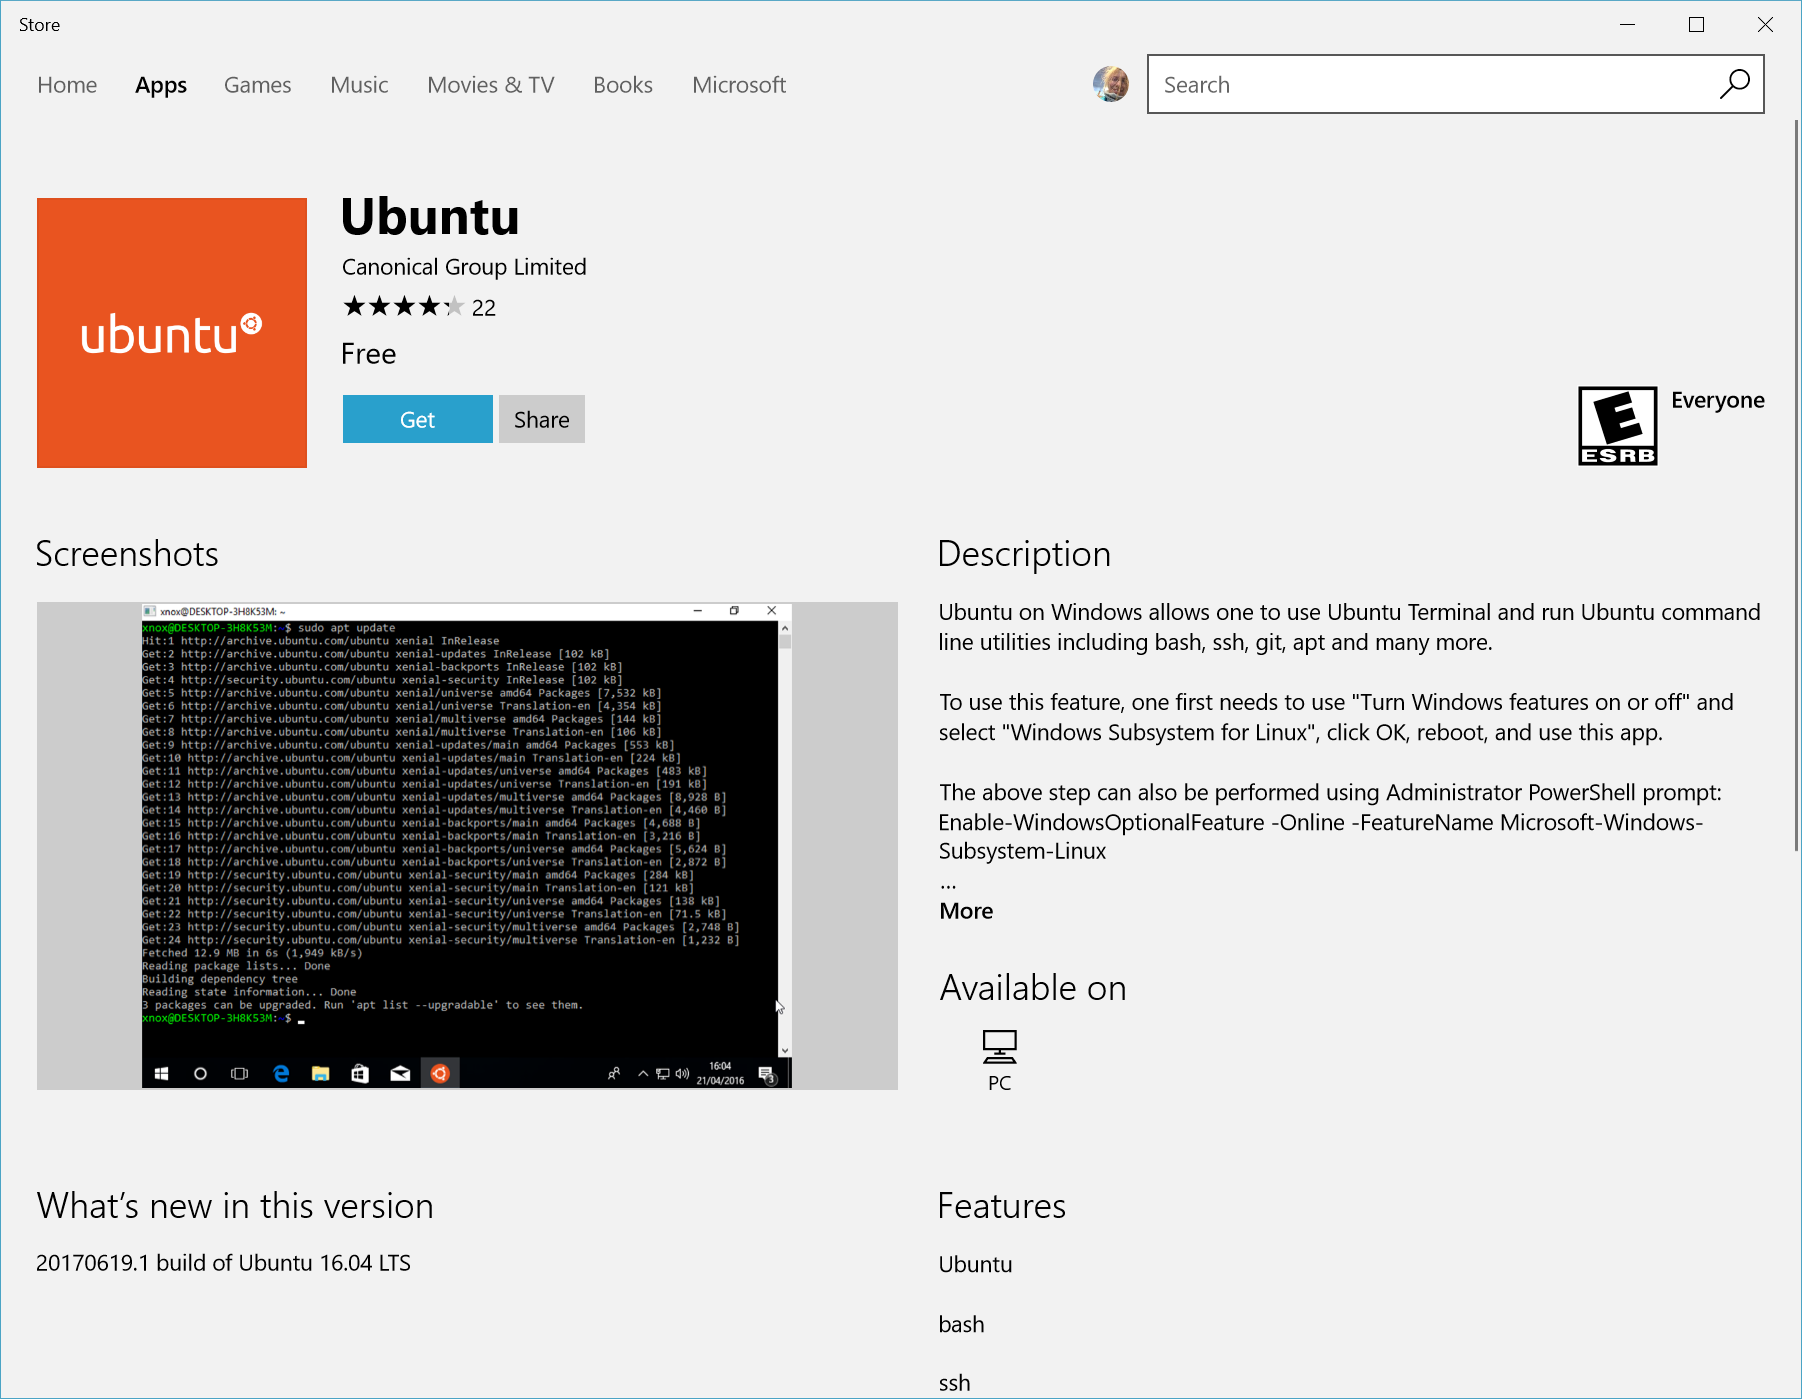
Step 6 — Install your Linux distribution of choice
Open the Microsoft Store and select your favorite Linux distribution.

The following links will open the Microsoft store page for each distribution:
From the distribution’s page, select «Get».
The first time you launch a newly installed Linux distribution, a console window will open and you’ll be asked to wait for a minute or two for files to de-compress and be stored on your PC. All future launches should take less than a second.

CONGRATULATIONS! You’ve successfully installed and set up a Linux distribution that is completely integrated with your Windows operating system!
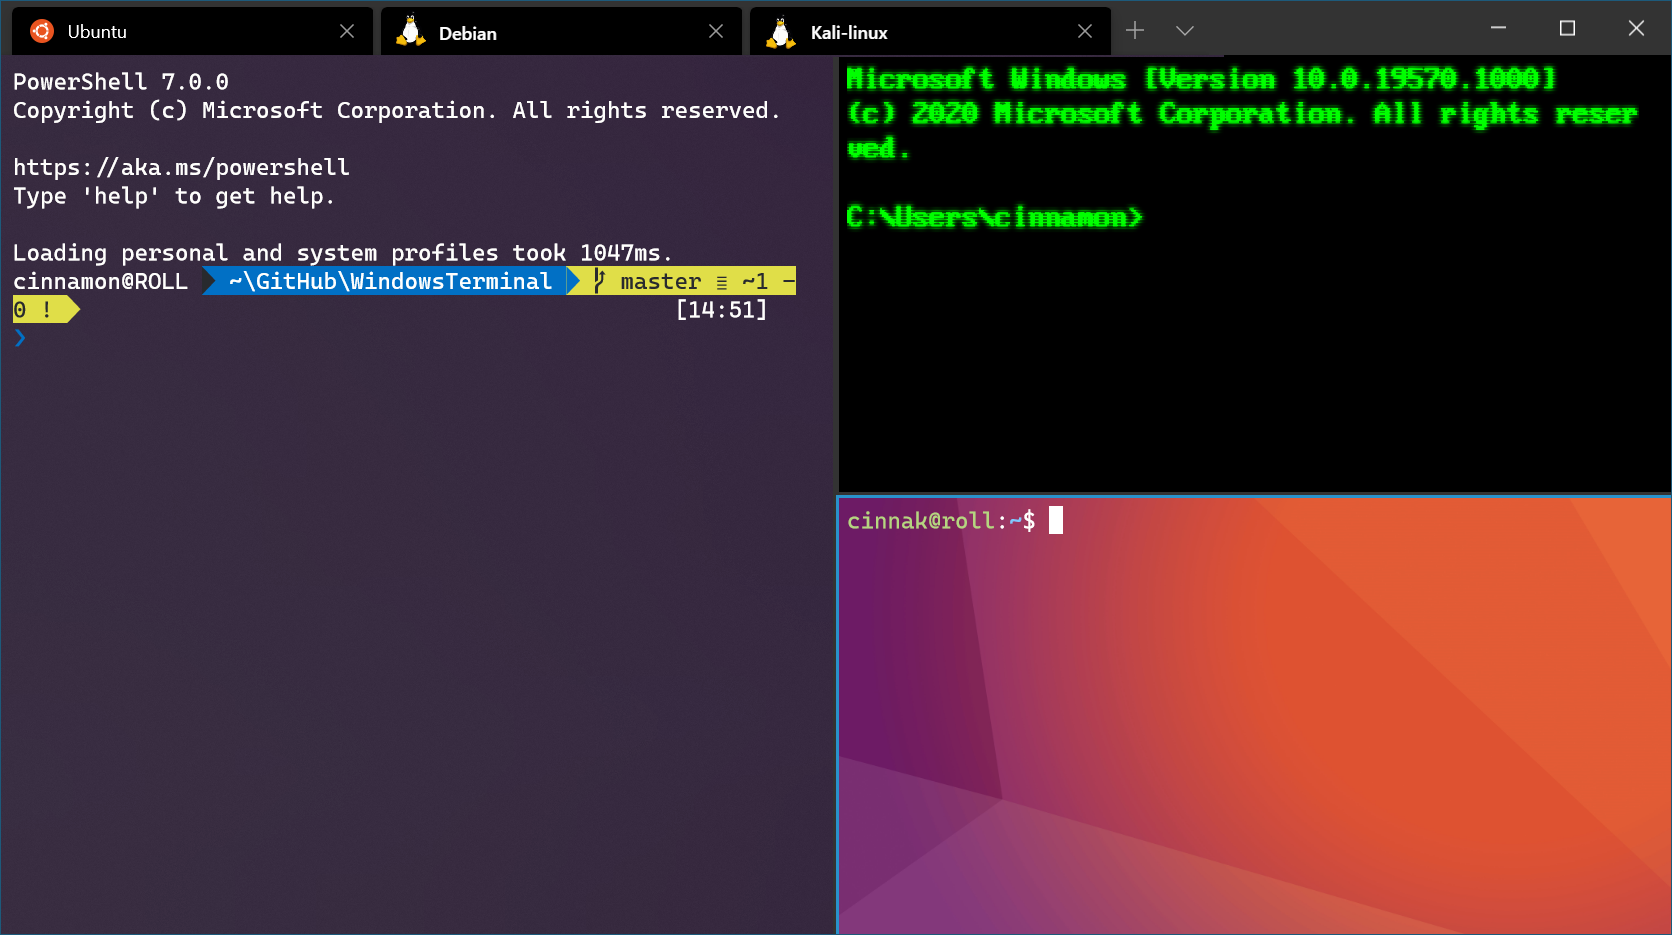
Install Windows Terminal (optional)
Windows Terminal enables multiple tabs (quickly switch between multiple Linux command lines, Windows Command Prompt, PowerShell, Azure CLI, etc), create custom key bindings (shortcut keys for opening or closing tabs, copy+paste, etc.), use the search feature, and custom themes (color schemes, font styles and sizes, background image/blur/transparency). Learn more.
Set your distribution version to WSL 1 or WSL 2
You can check the WSL version assigned to each of the Linux distributions you have installed by opening the PowerShell command line and entering the command (only available in Windows Build 18362 or higher): wsl -l -v
To set a distribution to be backed by either version of WSL please run:
Make sure to replace with the actual name of your distribution and with the number ‘1’ or ‘2’. You can change back to WSL 1 at anytime by running the same command as above but replacing the ‘2’ with a ‘1’.
The update from WSL 1 to WSL 2 may take several minutes to complete depending on the size of your targeted distribution. If you are running an older (legacy) installation of WSL 1 from Windows 10 Anniversary Update or Creators Update, you may encounter an update error. Follow these instructions to uninstall and remove any legacy distributions.
If wsl —set-default-version results as an invalid command, enter wsl —help . If the —set-default-version is not listed, it means that your OS doesn’t support it and you need to update to version 1903, Build 18362 or higher. If you are on Build 19041 for ARM64, this command may fail when using PowerShell in which case you can use a Command Prompt instead to issue the wsl.exe command.
If you see this message after running the command: WSL 2 requires an update to its kernel component. For information please visit https://aka.ms/wsl2kernel . You still need to install the MSI Linux kernel update package.
Additionally, if you want to make WSL 2 your default architecture you can do so with this command:
This will set the version of any new distribution installed to WSL 2.
Troubleshooting installation
Below are related errors and suggested fixes. Refer to the WSL troubleshooting page for other common errors and their solutions.
Installation failed with error 0x80070003
- The Windows Subsystem for Linux only runs on your system drive (usually this is your C: drive). Make sure that distributions are stored on your system drive:
- Open Settings -> **System —>Storage ->More Storage Settings: Change where new content is saved


WslRegisterDistribution failed with error 0x8007019e
- The Windows Subsystem for Linux optional component is not enabled:
- Open Control Panel ->Programs and Features ->Turn Windows Feature on or off -> Check Windows Subsystem for Linux or using the PowerShell cmdlet mentioned at the beginning of this article.
Installation failed with error 0x80070003 or error 0x80370102
- Please make sure that virtualization is enabled inside of your computer’s BIOS. The instructions on how to do this will vary from computer to computer, and will most likely be under CPU related options.
- WSL2 requires that your CPU supports the Second Level Address Translation (SLAT) feature, which was introduced in Intel Nehalem processors (Intel Core 1st Generation) and AMD Opteron. Older CPUs (such as the Intel Core 2 Duo) will not be able to run WSL2, even if the Virtual Machine Platform is successfully installed.
Error when trying to upgrade: Invalid command line option: wsl —set-version Ubuntu 2
- Enure that you have the Windows Subsystem for Linux enabled, and that you’re using Windows Build version 18362 or higher. To enable WSL run this command in a PowerShell prompt with admin privileges: Enable-WindowsOptionalFeature -Online -FeatureName Microsoft-Windows-Subsystem-Linux .
The requested operation could not be completed due to a virtual disk system limitation. Virtual hard disk files must be uncompressed and unencrypted and must not be sparse.
- Deselect “Compress contents” (as well as “Encrypt contents” if that’s checked) by opening the profile folder for your Linux distribution. It should be located in a folder on your Windows file system, something like: USERPROFILE%\AppData\Local\Packages\CanonicalGroupLimited.
- In this Linux distro profile, there should be a LocalState folder. Right-click this folder to display a menu of options. Select Properties > Advanced and then ensure that the “Compress contents to save disk space” and “Encrypt contents to secure data” checkboxes are unselected (not checked). If you are asked whether to apply this to just to the current folder or to all subfolders and files, select “just this folder” because you are only clearing the compress flag. After this, the wsl —set-version command should work.
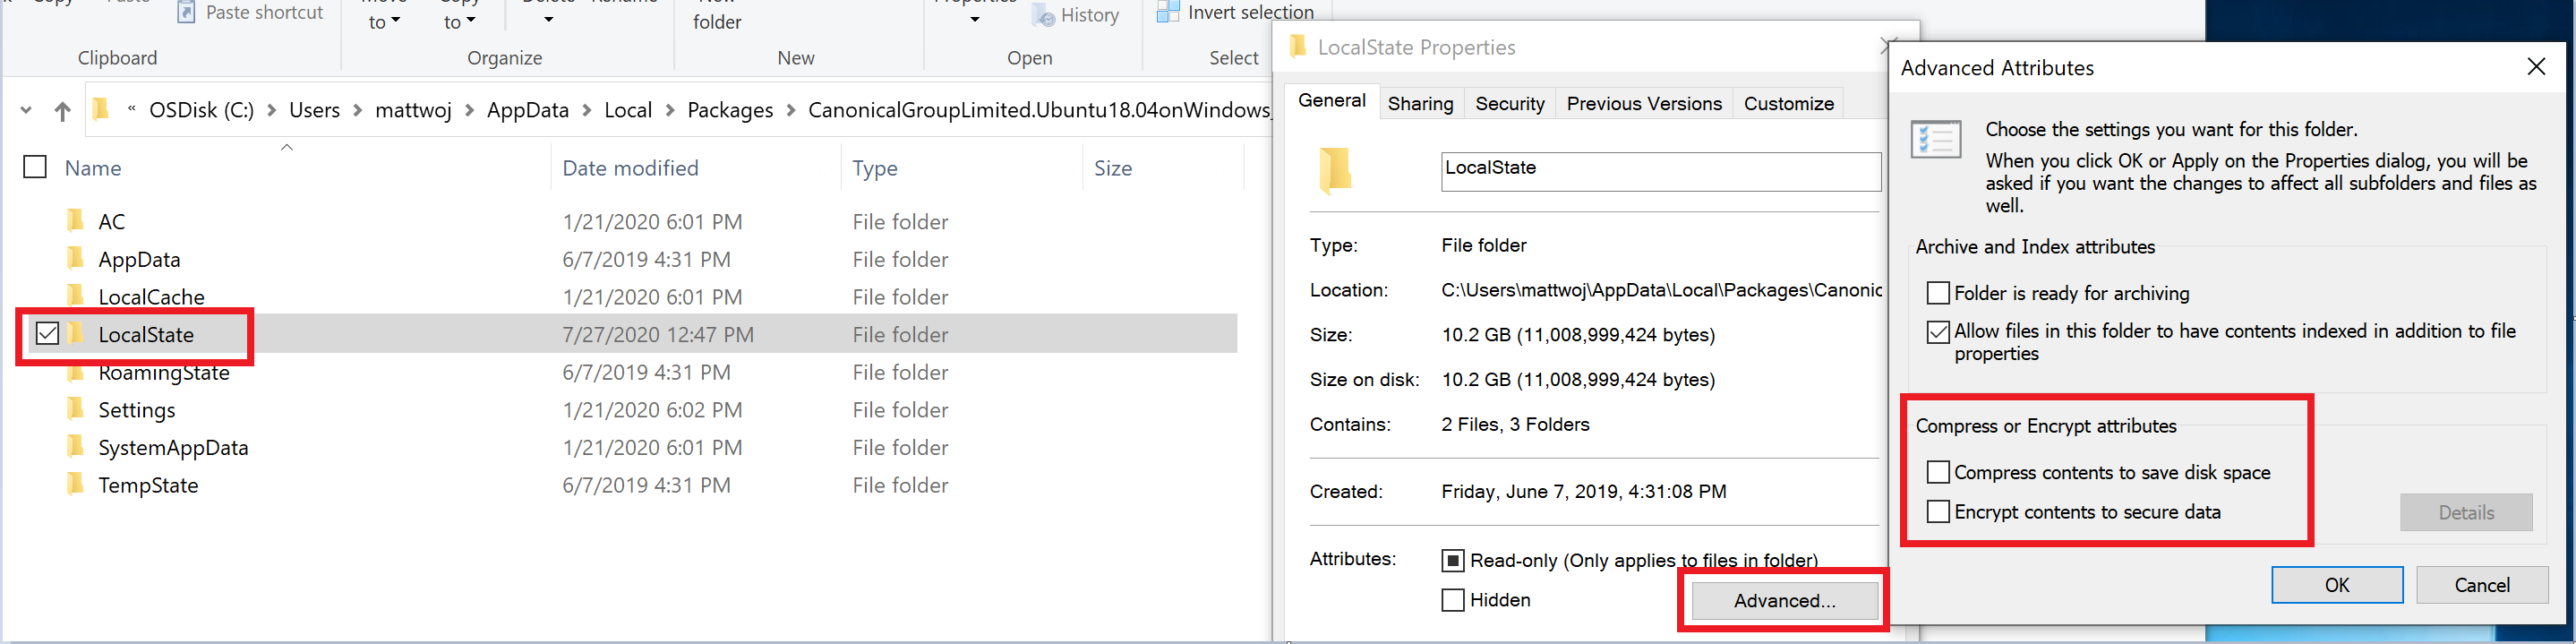
In my case, the LocalState folder for my Ubuntu 18.04 distribution was located at C:\Users \AppData\Local\Packages\CanonicalGroupLimited.Ubuntu18.04onWindows_79rhkp1fndgsc
Check WSL Docs GitHub thread #4103 where this issue is being tracked for updated information.
The term ‘wsl’ is not recognized as the name of a cmdlet, function, script file, or operable program.
- Ensure that the Windows Subsystem for Linux Optional Component is installed. Additionally, if you are using an ARM64 device and running this command from PowerShell, you will receive this error. Instead run wsl.exe from PowerShell Core, or Command Prompt.
Error: This update only applies to machines with the Windows Subsystem for Linux.
- To install the Linux kernel update MSI package, WSL is required and should be enabled first. If it fails, it you will see the message: This update only applies to machines with the Windows Subsystem for Linux .
- There are three possible reason you see this message:
- If the Linux kernel package is missing in the %SystemRoot%\system32\lxss\tools folder, you will encounter this error. Resolve it by installing the Linux kernel update MSI package in step #4 of these installation instructions. You may need to uninstall the MSI from ‘Add or Remove Programs’, and install it again.
You are still in old version of Windows which doesn’t support WSL 2. See step #2 for version requirements and links to update.
WSL is not enabled. You will need to return to step #1 and ensure that the optional WSL feature is enabled on your machine.
After you enabled WSL, a reboot is required for it to take effect, reboot your machine and try again.
Error: WSL 2 requires an update to its kernel component. For information please visit https://aka.ms/wsl2kernel .
—>


