- Window won’t boot at all
- Replies (3)
- Computer wont Boot at all
- Replies (4)
- Windows 7 won’t boot (even in safe mode) and can’t reinstall
- Replies (4)
- Windows 7/8/10 Won’t Boot from USB Flash Drive! How to Fix?
- Part 1: Check If Your PC Supports USB Booting
- Part 2: Re-Make A New Bootable USB with WizBurn
- Part 3: Set up Your PC for USB Boot
- Part 4: Check If Your USB Drive Is Actually Bootable
- Conclusion
Window won’t boot at all
Replies (3)
Hi and thanks for reaching out. My name is Anthony.
I’m Independent Advisor and I’m happy to assist you.
I understand how difficult it is, when the device or app won’t work in the way it should.
Please check the different solutions indicated in the link below that can address this certain issue.
Hope it will help.
Please let me know if you need any further assistance.
Thank you and Keep Safe.
Was this reply helpful?
Sorry this didn’t help.
Great! Thanks for your feedback.
How satisfied are you with this reply?
Thanks for your feedback, it helps us improve the site.
How satisfied are you with this reply?
Thanks for your feedback.
Was this reply helpful?
Sorry this didn’t help.
Great! Thanks for your feedback.
How satisfied are you with this reply?
Thanks for your feedback, it helps us improve the site.
How satisfied are you with this reply?
Thanks for your feedback.
I do apologize for this inconvenience.
You may try any of the solutions indicated on the link below.
Note: This is a non-Microsoft website. The page appears to be providing accurate, safe information. Watch out for ads on the sites that may advertise products frequently classified as a PUP (Potentially Unwanted Products). Thoroughly research any product advertised on the sites before you decide to download and install it.
Hope it will help.
Please let me know if you need any further assistance.
Thank you and Keep Safe.
Was this reply helpful?
Sorry this didn’t help.
Great! Thanks for your feedback.
How satisfied are you with this reply?
Thanks for your feedback, it helps us improve the site.
Computer wont Boot at all
When I startup my system it goes nowhere beyond the initial screen. it shows:
Bios Revision 1.0.12
Can I start in safe mode to recover?
Replies (4)
![]()
Tap F8 to try and start in Safe Mode.
Restore Point:
Try tapping F8 at startup, and from the list of startup selections, select Safe Mode by using UP Arrow Key to go there > then hit Enter.
Try a System Restore once there, to pick a Restore Point before your problem..
Click Start > Programs > Accessories > System Tools > System Restore > pick a different time > Next > etc
If Restore does not work and you do not have a Microsoft Vista DVD, make a Bootable Repair Disk to do a Startup Repair:
Download the ISO file at the supplied link, and make a Bootable Startup Repair Disk from it.
Go into your Bios/Setup, or Boot Menu, at startup, and change the Boot Order to make the DVD/CD drive 1st in the Boot Order, then reboot with the disk in the Drive.
At startup/power on you should see at the bottom of the screen either F2 or DELETE, to go into Bios/Setup, or F12 for the Boot Menu.
When you have changed that, insert that Bootable Disk you have made in the Drive, and reboot.
Above link shows what the process looks like, and a how-to, as it loads to the Repair Options.
Neosmart contains the contents of the Windows Vista DVD’s «recovery center,» as we’ve come to refer to it. It cannot be used to install or reinstall Windows Vista, and just serves as a Windows PE interface to recovering your PC. Technically, one could re-create this installation media with freely-downloadable media from Microsoft (namely the Microsoft WAIK kit, a multi-gigabyte download); but it’s damn-decent of Microsoft to make this available to Windows’ users who might not be capable of creating such a thing on their own.
Read all info at the website about creating and using it:
It makes a very good Vista Startup Repair Disk.
You can do a Startup Repair, System Restore, etc from it.
It is NOT a reinstall disk.
And the 32bit is what comes normally on a computer, unless 64bits requested.
Windows 7 won’t boot (even in safe mode) and can’t reinstall
About 2 weeks ago, a day after my Dell 15r laptop running Windows 7 Home Pemium had been working fine, my laptop took 1 hour to boot. After I thought I had fixed the problem, it just wouldn’t boot at all. I was initially able to access the windows repair system when i was prompted but now that doesn’t work. It just hangs indefinitely on the blue screen with the bird and the plant (I’ve left it over-night and it’s still been there in the morning).
When I try to start windows in normal mode it hangs at the ‘Starting Windows’ screen for about 5 minutes, and gives a blue screen saying: «A problem has been detected and windows has been shut down to prevent damage to your computer.
*** STOP: 0x000000ED (0xFFFFFA8004A8F140, 0xFFFFFFFFC0000185, 0x000000000000000, 0x0000000000000000)
When I try to start in safe mode, it hangs on the screen where the drivers are loaded and the last driver to be loaded is «\windows\system32\DRIVERS\CLASSPNP.SYS» and then gives me the same blue screen.
And finally, when i try to reinstall, it just hangs indefinitely on the «setup is starting» screen (I have left this over-night too).
I have tried everything with this computer and nothing seems to work so any held would be much appreciated. Thanks in advance.
Replies (4)
Sounds like you have serious hard drive issues or other hardware affecting the hard drive.
The main method to fix is to boot with a Windows 7 disk and use the Command Prompt to run :
(spaces after k , C: , and /f such as Chkdsk C: /f /r using just one space each time)
If you need a Windows 7 Repair Disk the method to make one is below. (Of course you can use
a Windows 7 Installation Disk as well.)
Check this thread for information on using BlueScreenView, MyEventViewer, and other methods to
troubleshoot BlueScreens — top 3 replies (+1 other).
Bug Check 0xED: UNMOUNTABLE_BOOT_VOLUME
The UNMOUNTABLE_BOOT_VOLUME bug check has a value of 0x000000ED. This indicates that the I/O subsystem attempted to mount the boot volume and it failed.
Important Information If You Have Received a STOP Code
If you have received a blue screen error, or stop code, the computer has shut down abruptly to protect itself from data loss. A hardware device, its driver, or related software might have caused this error. If your copy of Windows came with your computer, call the manufacturer of your computer. If you purchased Windows separately from your computer, Microsoft provides support. To find contact information for Microsoft or your computer manufacturer, Contact Support.
If you have experience with computers and want to try to recover from this error, follow the steps provided in the Microsoft article Resolving STOP (Blue Screen) Errors in Windows.
The following actions might prevent an error like this from happening again:
Download and install updates and device drivers for your computer from Windows Update.
Scan your computer for computer viruses.
Check your hard disk for errors.
You can try some of these in Safe Mode — repeatedly tap F8 as you boot (if you can as you can).
If you do not have a Windows 7 disk you can borrow a friends as they are not copy
protected. Your System maker will also sell the physical DVD cheap since you already
own Windows. Also you can make a repair disk on another computer.
Try Startup Repair — (If at ANY point you gain some but not full access to Windows come
back and try Startup Repair again.)
Try StartUp Repair from Recovery Options or Windows 7 disk.
Also from the COMMAND PROMPT of Recovery Console (if possible) or a Windows 7 disk
Start — type in Search box — COMMAND find at top of list — RIGHT CLICK — RUN AS ADMIN
Then run checkdisk (chkdsk).
Retry Startup Repair after Chkdsk.
If needed after those you can try System Restore from Safe Mode or the Recovery or Windows 7
disk.
If you need to make repair disks — these help repair Windows not re-install.
If CheckDisk fails to complete as above or you need to further test the disk :
(The old 302602 links is not valid now for the diagnostic links.)
Corrected list as of 6-09-2010
IBM Hard Drives: Use Hitachi Utilities*
Toshiba Hard Drives: Use Hitachi or Maxtor Utilities
Maxtor Hard Drives: Diagnostic Utilities Here (now SeaGate)
http://www.seagate.com/www/en-us/support/
Quantum Hard Drives: Use Maxtor Utilities
Conner Hard Drives: Use Seagate Utilities
The trial versions of one of these «might» help.
Windows 7/8/10 Won’t Boot from USB Flash Drive! How to Fix?
Many computers do not have the external CD/DVD drive and thus you need the bootable USB drive to install Windows. Creating a bootable USB is fairly easy and all thanks to some really good freeware programs available for this purpose. But, what if the computer wouldn’t boot from the USB drive? If you have run into such a problem, here are some solutions for you.
Part 1: Check If Your PC Supports USB Booting
Your computer will boot from the USB bootable drive only if it supports this type of boot. Not all the computers support USB boot. While most modern computers today support USB booting, there are some that do not. In order to find whether your computer is USB bootable or not, you will need to check the BIOS setup. The steps may vary across computer models but remain more or less the same for all PCs:
Step 1. Restart the computer or if it is shut down, power it on.
Step 2. When the PC starts to run, on the first screen it will display the key you need to press in order to enter the BIOS setup. Usually, it is the ‘Delete’ or ‘Del’ key
Note: If you have previously set the BIOS password you will need to provide the password to enter BIOS setup. If you forgot BIOS password, you will need to reset it by taking out the CMOS battery from the motherboard. In case you haven’t done this before, it is best to take the help of a technician. If you forgot Windows login password, try to reset your Windows 10 password with PC Unlocker software.
Step 3. You will need to explore a bit and find the ‘Boot Options’ (or something like that). Once you are there you can set the Boot Priority
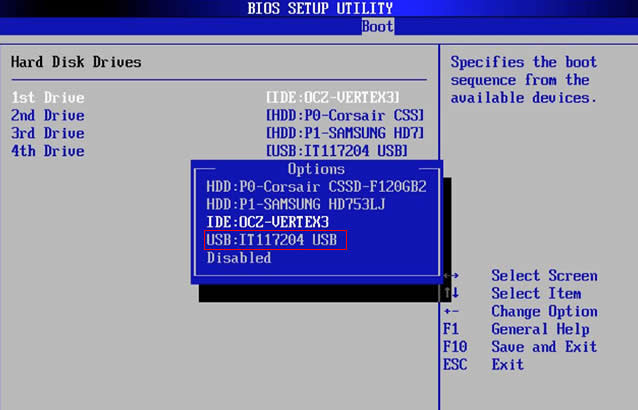
If you do not see the USB boot option, it means that your motherboard does not support it. You will need to boot using some other method.
Part 2: Re-Make A New Bootable USB with WizBurn
In most cases, you need to reexamineВ if the ISO burning software is the right one for you? As we know there are many free ISO burning tools out there, like Rufus, RMPrepUSBВ , Windows USB/DVD Download Tool or ISO to USB, etc. These free burning tools can’t be updated continuously and provide any support service, even some tools don’t support UEFI BIOS! Eventually, the generated USB disk cannot normally boot the computers. But only a small part of computers can boot win8/Win7 except Win10. These computer will generally display «NTLDR is missing», for this problem there is no good solution currently.
If your computer won’t boot from USB, the only solution is try to re-make a new bootable USB disk with professional ISO burning software. We recommend iSeePassword Dr.Boot tool.
Step 1. Click the «Download» button to get the latest version of Dr.Boot software, then install it on another working computer.
Step 2. After installation, launch it and you will see the main interface below. Easy to use and user-friendlyВ interface.
Step 3. Click «Browse» button to import local ISO file and add it to progarm.
Step 4. Now insert an USB drive to the computer and select the drive name from the list undert «Create A Bootable USB».
NOTE: For Win 10 ISO file, if your computer is UEFI, then just select «UEFI boot» from Partition Style.
Step 5. After settings, click «Burn» button to start make a bootable USB disk. It may take around 10 minutes. After making a boot disk, insert it to your computer and boot from USB.
Part 3: Set up Your PC for USB Boot
Even if your computer supports USB booting, remember that USB is not always the first boot priority. It is also possible that your computer has not been set up to boot from the USB at all even though it is supported. So, what you need to do is change the BIOS settings so that your computer accepts USB boot. Follow the simple steps below:
Step 1. Restart your PC or if it is already shut down, turn it back on.
Step 2. When the PC starts to run, on the first screen you will see the key you need to press in order to enter the BIOS setup. More often than not it is the ‘F2’, ‘Del’ or whichever is the appropriate key for your computer. It may vary depending upon your computer model. For example, Dell computer has different ways to enter BIOS setup, see how to get into BIOS on a Dell computer.
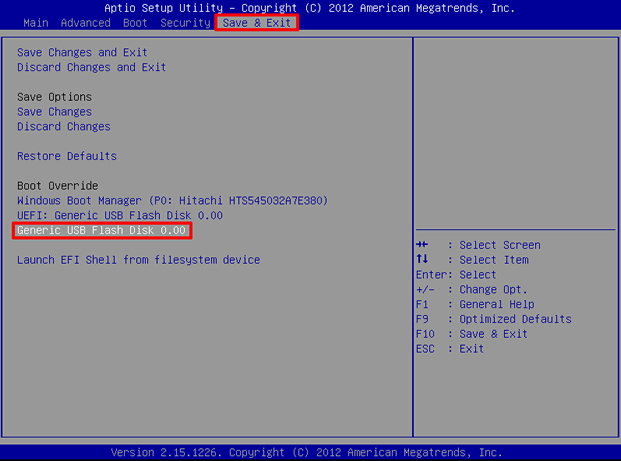
Step 3. Find the ‘Boot Options’ or something similar to it (the steps may vary across computers but it is easy to find).
Step 4. Once you are in the Boot section of the BIOS, you can select the ‘First Boot Device’. Select the appropriate option from the Boot Menu.
This will instruct the computer to prioritize the boot and select USB drive as the first option, and insert the bootable USB drive and restart your computer.
Part 4: Check If Your USB Drive Is Actually Bootable
If the USB bootable drive has not been created the right way or if it is corrupt, you will not be able to install Windows with it. You need to make sure that USB drive has been prepared using the right tools and the right method. You will be able to boot Windows only if the drive is bootable.
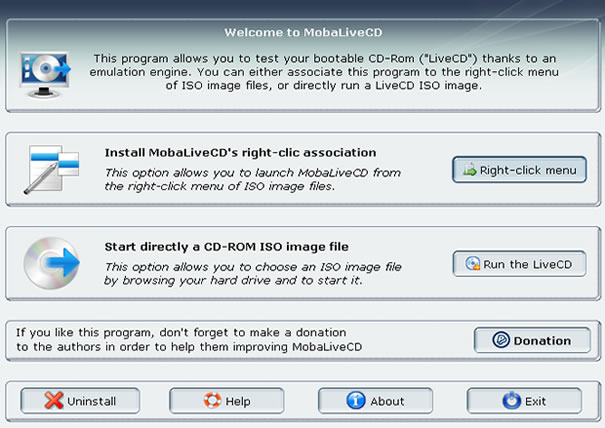
This is why it would be worth your while to check if the drive is actually bootable. For this you will need to install a portable application called MobaLiveCD, which uses QEMU emulator to determine if the drive is bootable. Here are the steps:
Step 1. Download the application from http://www.mobatek.net/ (you don’t need to install it as it is a portable app for Windows)
Step 2. Launch the app and click ‘Run the LiveUSB’ button on the screen.
Step 3. You don’t need to create any virtual disk image. You can test the validity of the drive by clicking NO when the next confirmation dialogue box appears:
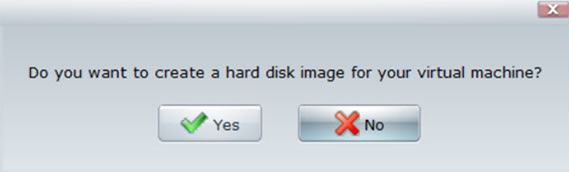
Step 4. The QEMU emulator runs and if the drive is bootable, you will see ‘Press any key to boot from CD or DVD. ‘

Step 5. If the drive isn’t bootable it will ask you to insert a bootable device.
If the USB drive is not bootable, you will need to create the proper bootable drive first. Different versions of Windows use different file systems. If you are trying to use the NTFS formatted bootable drive to install the Windows in the legacy-BIOS or UEFI mode, it will not work. If you are not sure what this is all about, you may contact Microsoft support for more help.
Conclusion
There are a number of factors that may prevent USB bootable from working. You need to make sure that USB drive is actually bootable and has been formatted using the correct file system, make sure that your computer supports USB boot. You will also need enter the BIOS setup to configure your computer to accept USB bootable drive. Hope these methods would be helpful if your laptop can’t boot from USB drive.

Vicky is a professional Windows technology author with many experience, focusing on computer technology. She’s very much enjoy helping people find solutions to their problems. Her knowledge and passion always drive her to discover everything about technology.


