- Как архивировать через Powershell
- ИТ База знаний
- Полезно
- Навигация
- Серверные решения
- Телефония
- Корпоративные сети
- Курс по сетям
- Пошаговый ввод в домен Windows 10
- Основные команды cmd в Windows
- Поднимаем контроллер домена на Windows 2008 R2
- От Windows NT 3.1 до Windows Server 2019 — путь развития системы
- Windows Terminal: Советы и хитрости
- Новый монитор производительности для Windows Server
- 5 вещей, которые должен знать каждый администратор Windows
- Как архивировать и распаковывать файлы с помощью PowerShell
- Как архивировать файлы с помощью PowerShell
- Как распаковать файлы с помощью PowerShell
- Compress-Archive
- Syntax
- Description
- Examples
- Example 1: Compress files to create an archive file
- Example 2: Compress files using a LiteralPath
- Example 3: Compress a directory that includes the root directory
- Example 4: Compress a directory that excludes the root directory
- Example 5: Compress only the files in a root directory
- Example 6: Use the pipeline to archive files
- Example 7: Use the pipeline to archive a directory
- Example 8: How recursion can affect archives
- Example 9: Update an existing archive file
- Parameters
- Inputs
- Outputs
- Notes
Как архивировать через Powershell
Архивирования через Powershell воз можно используя два командлета Compress-Archive и Extract-Archive. Эти команды доступны с версии 5.0. Что бы узнать версию нужно запустить:
Архивирование файла в powershell делается так:
- DestinationPath — путь куда архив будет сохранен
- Path — папка или файл который мы планируем архивировать
Выбирать формат архивирования мы не можем, он всегда ZIP. Мы можем выбрать тип сжатия:
CompressionLevel — уровень компрессии данных. Мы можем сэкономить место путем сжатия или увеличить скорость не прибегая к сжатию вовсе. Тут есть 3 варианта:
- Fastest
- NoCompression
- Optimal (по умолчанию)
Мы можем выполнять архивацию в Powershell используя несколько папок или документов:
Либо можем обновить существующий архив новыми файлами добавив ключ Update:
Архивацию в powershell можно использовать совместно с командой Get-ChildItem и фильтровать глубину и типы файлов для добавления в архив:
- Include — включает любые файлы. В моем случаем возьмутся все файлы, которые заканчиваются на .txt
- Exclude — исключает файлы. В моем случае мне не нужны файлы, которые заканчиваются на .exe
- Recurse — рекурсивный поиск файлов.
Для извлечение данных из архива работает этот командлет:
Для извлечения множества файлов из архивов, которые лежат в текущей папке, можно сделать следующее:
Ключ -Force перезапишет те файлы если названия будут совпадать
ИТ База знаний
Курс по Asterisk
Полезно
— Узнать IP — адрес компьютера в интернете
— Онлайн генератор устойчивых паролей
— Онлайн калькулятор подсетей
— Калькулятор инсталляции IP — АТС Asterisk
— Руководство администратора FreePBX на русском языке
— Руководство администратора Cisco UCM/CME на русском языке
— Руководство администратора по Linux/Unix
Навигация
Серверные решения
Телефония
FreePBX и Asterisk
Настройка программных телефонов
Корпоративные сети
Протоколы и стандарты
Популярное и похожее
Курс по сетям

Пошаговый ввод в домен Windows 10
Основные команды cmd в Windows
Поднимаем контроллер домена на Windows 2008 R2
От Windows NT 3.1 до Windows Server 2019 — путь развития системы
Windows Terminal: Советы и хитрости
Новый монитор производительности для Windows Server
5 вещей, которые должен знать каждый администратор Windows
Еженедельный дайджест
Как архивировать и распаковывать файлы с помощью PowerShell
Формат файла ZIP уменьшает размер файлов, сжимая их в один файл. Этот процесс экономит дисковое пространство, шифрует данные и позволяет легко обмениваться файлами с другими. Вот как можно сжать и разархивировать файлы с помощью PowerShell.
Обучайся в Merion Academy
Пройди курс по сетевым технологиям
Начать

Как архивировать файлы с помощью PowerShell
Начнем с сжатия некоторых файлов в ZIP-архив с помощью командлета Compress-Archive . Он берет путь к любым файлам, которые вы хотите сжать — несколько файлов разделяются запятой — и архивирует их в указанном месте назначения.
Сначала откройте PowerShell, выполнив поиск в меню «Пуск», а затем введите следующую команду, заменив PathToFiles и PathToDestination на путь к файлам, которые вы хотите сжать, а также на имя и папку, в которую вы хотите перейти, соответственно:
Когда вы указываете путь назначения, обязательно укажите имя файла архива, иначе PowerShell сохранит его как .zip .
Примечание. Кавычки вокруг пути необходимы только в том случае, если путь к файлу содержит пробел.
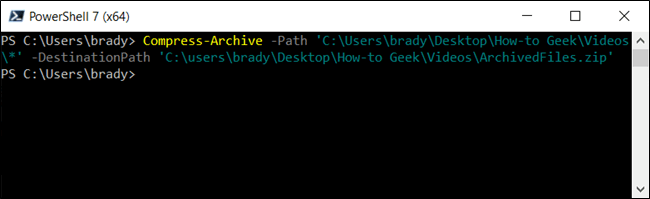
В качестве альтернативы, чтобы сжать все содержимое папки и все ее подпапки, вы можете использовать следующую команду, заменив PathToFolder и PathToDestination на путь к файлам, которые вы хотите сжать, а также на имя и папку, которую вы хотите. чтобы перейти соответственно:
В предыдущем примере мы указали путь к каталогу с несколькими файлами и папками без указания отдельных файлов. PowerShell берет все внутри корневого каталога и сжимает его, а также все подпапки.
Командлет Compress-Archive позволяет использовать подстановочный знак (*) для дальнейшего расширения функциональности. При использовании символа вы можете исключить корневой каталог, сжать только файлы в каталоге или выбрать все файлы определенного типа. Чтобы использовать подстановочный знак с Compress-Archive , вы должны использовать вместо этого параметр -Path , так как -LiteralPath не принимает их.
Выше мы рассмотрели, как включить корневой каталог и все его файлы и подкаталоги при создании архивного файла. Однако, если вы хотите исключить корневую папку из Zip-файла, вы можете использовать подстановочный знак, чтобы исключить ее из архива. Добавляя звездочку (*) в конец пути к файлу, вы указываете PowerShell только захватить то, что находится внутри корневого каталога. Это должно выглядеть примерно так:
Далее, скажем, у вас есть папка с кучей файлов разных типов (.doc, .txt, .jpg и так далее), Но вы хотите сжать только один тип. Вы можете указать PowerShell архивировать их, не затрагивая явно. Обозначение команды будет выглядеть так:
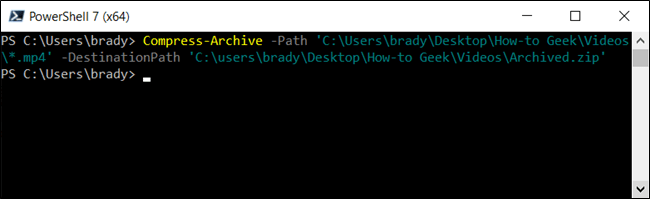
Примечание. Подкаталоги и файлы корневой папки не включаются в архив этим методом.
Наконец, если вам нужен архив, который сжимает файлы только в корневом каталоге и во всех его подкаталогах, вы должны использовать подстановочный знак «звезда-точка-звезда» (*. *) Для их сжатия. Это будет выглядеть примерно так:

Примечание. Подкаталоги и файлы корневой папки не включаются в архив этим методом.
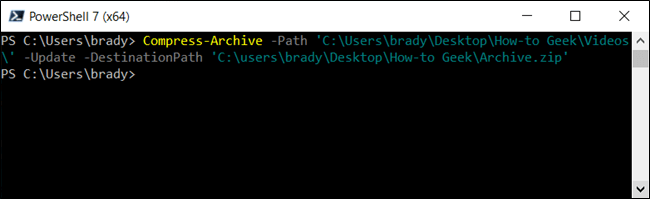
Даже после завершения архивирования вы можете обновить существующий заархивированный файл с помощью параметра -Update . Это позволяет заменять старые версии файлов в архиве новыми версиями с такими же именами и добавлять файлы, созданные в корневом каталоге. Это будет выглядеть примерно так:
Как распаковать файлы с помощью PowerShell
Помимо возможности архивировать файлы и папки, PowerShell имеет возможность разархивировать архивы. Процесс даже проще, чем их сжатие; все, что вам нужно, это исходный файл и место для данных, готовых к распаковке.
Откройте PowerShell и введите следующую команду, заменив PathToZipFile и PathToDestination на путь к файлам, которые вы хотите сжать, а также на имя и папку, в которую вы хотите перейти, соответственно:
Папка назначения, указанная для извлечения файлов, будет заполнена содержимым архива. Если папка не существовала до разархивирования, PowerShell создаст папку и поместит содержимое в нее перед разархивированием.
По умолчанию, если вы пропустите параметр -DestinationPath , PowerShell разархивирует содержимое в текущий корневой каталог и использует имя файла Zip для создания новой папки.
В предыдущем примере, если мы опускаем -DestinationPath , PowerShell создаст папку «Архив» по пути C:\Users\user и извлечет файлы из архива в папку.
Если папка уже существует в месте назначения, PowerShell выдаст ошибку при попытке разархивировать файлы. Однако вы можете заставить PowerShell перезаписывать данные новыми, используя параметр -Force .
Вы должны использовать параметр -Force только в том случае, если старые файлы больше не нужны, поскольку это необратимо заменит файлы на вашем компьютере.
Compress-Archive
Creates a compressed archive, or zipped file, from specified files and directories.
Syntax
Description
The Compress-Archive cmdlet creates a compressed, or zipped, archive file from one or more specified files or directories. An archive packages multiple files, with optional compression, into a single zipped file for easier distribution and storage. An archive file can be compressed by using the compression algorithm specified by the CompressionLevel parameter.
The Compress-Archive cmdlet uses the Microsoft .NET API System.IO.Compression.ZipArchive to compress files. The maximum file size is 2 GB because there’s a limitation of the underlying API.
Some examples use splatting to reduce the line length of the code samples. For more information, see about_Splatting.
Examples
Example 1: Compress files to create an archive file
This example compresses files from different directories and creates an archive file. A wildcard is used to get all files with a particular file extension. There’s no directory structure in the archive file because the Path only specifies file names.
The Path parameter accepts specific file names and file names with wildcards, *.vsd . The Path uses a comma-separated list to get files from different directories. The compression level is Fastest to reduce processing time. The DestinationPath parameter specifies the location for the Draft.zip file. The Draft.zip file contains Draftdoc.docx and all the files with a .vsd extension.
Example 2: Compress files using a LiteralPath
This example compresses specific named files and creates a new archive file. There’s no directory structure in the archive file because the Path only specifies file names.
Absolute path and file names are used because the LiteralPath parameter doesn’t accept wildcards. The Path uses a comma-separated list to get files from different directories. The compression level is Fastest to reduce processing time. The DestinationPath parameter specifies the location for the Draft.zip file. The Draft.zip file only contains Draftdoc.docx and diagram2.vsd .
Example 3: Compress a directory that includes the root directory
This example compresses a directory and creates an archive file that includes the root directory, and all its files and subdirectories. The archive file has a directory structure because the Path specifies a root directory.
Compress-Archive uses the Path parameter to specify the root directory, C:\Reference . The DestinationPath parameter specifies the location for the archive file. The Draft.zip archive includes the Reference root directory, and all its files and subdirectories.
Example 4: Compress a directory that excludes the root directory
This example compresses a directory and creates an archive file that excludes the root directory because the Path uses an asterisk ( * ) wildcard. The archive contains a directory structure that contains the root directory’s files and subdirectories.
Compress-Archive uses the Path parameter to specify the root directory, C:\Reference with an asterisk ( * ) wildcard. The DestinationPath parameter specifies the location for the archive file. The Draft.zip archive contains the root directory’s files and subdirectories. The Reference root directory is excluded from the archive.
Example 5: Compress only the files in a root directory
This example compresses only the files in a root directory and creates an archive file. There’s no directory structure in the archive because only files are compressed.
Compress-Archive uses the Path parameter to specify the root directory, C:\Reference with a star-dot-star ( *.* ) wildcard. The DestinationPath parameter specifies the location for the archive file. The Draft.zip archive only contains the Reference root directory’s files and the root directory is excluded.
Example 6: Use the pipeline to archive files
This example sends files down the pipeline to create an archive. There’s no directory structure in the archive file because the Path only specifies file names.
Get-ChildItem uses the Path parameter to specify two files from different directories. Each file is represented by a FileInfo object and is sent down the pipeline to Compress-Archive . The two specified files are archived in PipelineFiles.zip .
Example 7: Use the pipeline to archive a directory
This example sends a directory down the pipeline to create an archive. Files are sent as FileInfo objects and directories as DirectoryInfo objects. The archive’s directory structure doesn’t include the root directory, but its files and subdirectories are included in the archive.
Get-ChildItem uses the Path parameter to specify the C:\LogFiles root directory. Each FileInfo and DirectoryInfo object is sent down the pipeline.
Compress-Archive adds each object to the PipelineDir.zip archive. The Path parameter isn’t specified because the pipeline objects are received into parameter position 0.
Example 8: How recursion can affect archives
This example shows how recursion can duplicate files in your archive. For example, if you use Get-ChildItem with the Recurse parameter. As recursion processes, each FileInfo and DirectoryInfo object is sent down the pipeline and added to the archive.
The C:\TestLog directory doesn’t contain any files. It does contain a subdirectory named testsub that contains the testlog.txt file.
Get-ChildItem uses the Path parameter to specify the root directory, C:\TestLog . The Recurse parameter processes the files and directories. A DirectoryInfo object is created for testsub and a FileInfo object testlog.txt .
Each object is sent down the pipeline to Compress-Archive . The DestinationPath specifies the location for the archive file. The Path parameter isn’t specified because the pipeline objects are received into parameter position 0.
The following summary describes the PipelineRecurse.zip archive’s contents that contains a duplicate file:
- The DirectoryInfo object creates the testsub directory and contains the testlog.txt file, which reflects the original directory structure.
- The FileInfo object creates a duplicate testlog.txt in the archive’s root. The duplicate file is created because recursion sent a file object to Compress-Archive . This behavior is expected because each object sent down the pipeline is added to the archive.
Example 9: Update an existing archive file
This example updates an existing archive file, Draft.Zip , in the C:\Archives directory. In this example, the existing archive file contains the root directory, and its files and subdirectories.
The command updates Draft.Zip with newer versions of existing files in the C:\Reference directory and its subdirectories. And, new files that were added to C:\Reference or its subdirectories are included in the updated Draft.Zip archive.
Parameters
Specifies how much compression to apply when you’re creating the archive file. Faster compression requires less time to create the file, but can result in larger file sizes.
If this parameter isn’t specified, the command uses the default value, Optimal.
The following are the acceptable values for this parameter:
- Fastest. Use the fastest compression method available to reduce processing time. Faster compression can result in larger file sizes.
- NoCompression. Doesn’t compress the source files.
- Optimal. Processing time is dependent on file size.
| Type: | String |
| Accepted values: | Optimal, NoCompression, Fastest |
| Position: | Named |
| Default value: | Optimal |
| Accept pipeline input: | False |
| Accept wildcard characters: | False |
Prompts you for confirmation before running the cmdlet.
| Type: | SwitchParameter |
| Aliases: | cf |
| Position: | Named |
| Default value: | False |
| Accept pipeline input: | False |
| Accept wildcard characters: | False |
This parameter is required and specifies the path to the archive output file. The DestinationPath should include the name of the zipped file, and either the absolute or relative path to the zipped file.
If the file name in DestinationPath doesn’t have a .zip file name extension, the cmdlet adds the .zip file name extension.
| Type: | String |
| Position: | 1 |
| Default value: | None |
| Accept pipeline input: | False |
| Accept wildcard characters: | False |
Forces the command to run without asking for user confirmation.
| Type: | SwitchParameter |
| Position: | Named |
| Default value: | False |
| Accept pipeline input: | False |
| Accept wildcard characters: | False |
Specifies the path or paths to the files that you want to add to the archive zipped file. Unlike the Path parameter, the value of LiteralPath is used exactly as it’s typed. No characters are interpreted as wildcards. If the path includes escape characters, enclose each escape character in single quotation marks, to instruct PowerShell not to interpret any characters as escape sequences. To specify multiple paths, and include files in multiple locations in your output zipped file, use commas to separate the paths.
| Type: | String [ ] |
| Aliases: | PSPath |
| Position: | Named |
| Default value: | None |
| Accept pipeline input: | True |
| Accept wildcard characters: | False |
Causes the cmdlet to output a file object representing the archive file created.
This parameter was introduced in PowerShell 6.0.
| Type: | SwitchParameter |
| Position: | Named |
| Default value: | False |
| Accept pipeline input: | False |
| Accept wildcard characters: | False |
Specifies the path or paths to the files that you want to add to the archive zipped file. To specify multiple paths, and include files in multiple locations, use commas to separate the paths.
This parameter accepts wildcard characters. Wildcard characters allow you to add all files in a directory to your archive file.
Using wildcards with a root directory affects the archive’s contents:
- To create an archive that includes the root directory, and all its files and subdirectories, specify the root directory in the Path without wildcards. For example: -Path C:\Reference
- To create an archive that excludes the root directory, but zips all its files and subdirectories, use the asterisk ( * ) wildcard. For example: -Path C:\Reference\*
- To create an archive that only zips the files in the root directory, use the star-dot-star ( *.* ) wildcard. Subdirectories of the root aren’t included in the archive. For example: -Path C:\Reference\*.*
| Type: | String [ ] |
| Position: | 0 |
| Default value: | None |
| Accept pipeline input: | True |
| Accept wildcard characters: | True |
Updates the specified archive by replacing older file versions in the archive with newer file versions that have the same names. You can also add this parameter to add files to an existing archive.
| Type: | SwitchParameter |
| Position: | Named |
| Default value: | False |
| Accept pipeline input: | False |
| Accept wildcard characters: | False |
Shows what would happen if the cmdlet runs. The cmdlet isn’t run.
| Type: | SwitchParameter |
| Aliases: | wi |
| Position: | Named |
| Default value: | False |
| Accept pipeline input: | False |
| Accept wildcard characters: | False |
Inputs
You can pipe a string that contains a path to one or more files.
Outputs
The cmdlet only returns a FileInfo object when you use the PassThru parameter.
Notes
Using recursion and sending objects down the pipeline can duplicate files in your archive. For example, if you use Get-ChildItem with the Recurse parameter, each FileInfo and DirectoryInfo object that’s sent down the pipeline is added to the archive.
The ZIP file specification does not specify a standard way of encoding filenames that contain non-ASCII characters. The Compress-Archive cmdlet uses UTF-8 encoding. Other ZIP archive tools may use a different encoding scheme. When extracting files with filenames not stored using UTF-8 encoding, Expand-Archive uses the raw value found in the archive. This can result in a filename that is different than the source filename stored in the archive.


