Burn and rip CDs
When you copy music, pictures, and videos from your PC to a blank CD or DVD, it’s called «burning.» When you copy music, pictures, and videos from a CD or DVD to your PC, it’s called «ripping.» You can use Windows Media Player to do both.
Burn CDs (or data DVDs)
With Windows Media Player, you can burn three kinds of discs: audio CDs, data CDs, and data DVDs. To decide which kind of disc you should use, you’ll need to think about what you want to copy, how much you’re copying, and how you want to play the disc. This table helps you decide what type of disc to use.
Choose this option if you want to make music CDs that you can play in your car, on your stereo, or on your PC.
Use this for music only
Capacity: up to 80 minutes
You can play a data CD on PCs and some CD and DVD players. The device must support the file types that you add to the disc, such as WMA, MP3, JPEG, or Windows Media Video (WMV). Choose this option if you have lots of music and a CD or DVD player that can play the file types you add to the disc or if you want to back up your media.
Use this for music, pictures, and videos
Capacity is about 700 megabytes (MB), or roughly 8 hours of music
You can play a data DVD on PCs and some DVD players. The device must support the file types that you add to the disc, such as WMA, MP3, JPEG, or WMV. Choose this option if you have a lot of files that won’t fit on a single CD because a data DVD has a lot of space.
Use this for music, pictures, and videos
Capacity is about 4.7 gigabytes (GB), or roughly 54 hours of music
You’ll need two things to get started:
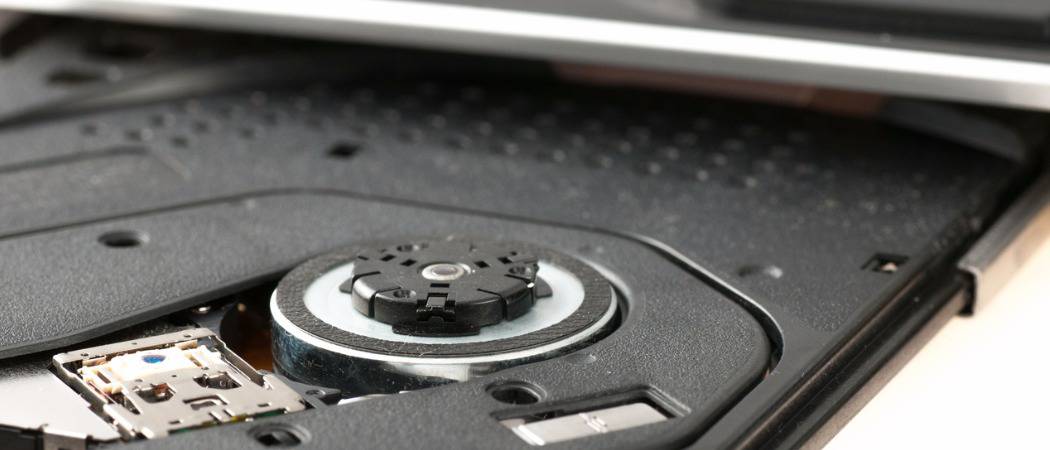
A CD or DVD recorder drive (also known as a CD or DVD burner).
A blank CD or DVD.
You can make a CD that stores about 80 minutes of music and will play in almost any CD player. Or you can make a data CD or DVD that can hold several hours of music (or many photos or short video clips) and will play in PCs. A data CD will work in CD players that support the file types copied to the disc.
Here’s how to burn an audio CD:
Open Windows Media Player.
In the Player Library, select the Burn tab, select the Burn options button  , and then select Audio CD or Data CD or DVD.
Insert a blank disc into your CD or DVD burner.
If your PC has more than one CD or DVD drive, select the drive you want to use.
Search for the items in your Player Library that you want to burn to the disc, and then drag them to the list pane (on the right side of the Player Library) to create a burn list.
When you’re finished with the list, select Start burn.
If you want to change the order of the items in the burn list, drag them up or down in the list.
If you want to remove an item from the burn list, right-click the item, and then select Remove from list. This removes the item from the burn list, but doesn’t delete it from your PC.
If your list has too many items for one disc, you can burn the remaining items to a second disc.
Rip CDs
When you rip music from a CD, you’re copying songs from an audio CD to your PC. During the ripping process, the Player compresses each song and stores it on your drive as a Windows Media Audio (WMA), WAV, or MP3 file.
Ripped files are automatically saved to the Music folder, but you can change the location using the options on the Rip settings tab.
Make sure your PC is connected to the Internet if you want Windows Media Player to automatically get info about the songs, such as the name of the CD, the artist, and titles for the tracks being ripped.
Open Windows Media Player.
Insert an audio CD into the PC’s CD drive.
Select the Rip CD button  .
.
If you want to select a different format or bit rate, select the Rip settings menu, and then choose Format or Audio Quality in the Player Library.
If you don’t want to rip every song, clear the check boxes next to the songs you don’t want.
In the Player Library, search for the album or song you want to edit.
Right-click the album, and then select Find album info.
Do one of the following:
If the correct album or artist info appears in the search results, select the correct entry, and then follow the instructions on the page to automatically update the album art and media info.
If the correct album doesn’t appear in the search results, follow the instructions on the page to search again using different search criteria, or to manually add the media info.
If you get an error message when you try to find album info that says you need to change your privacy settings, select Organize, select Options, select the Privacy tab, and then select the Update music files by retrieving media info from the Internet check box.
If the correct album info appears with a generic music icon displayed as the album art, the album art is unavailable for download.
The changes you make apply to new tracks that you rip. You can’t use the Player to change the format or audio quality of a song you’ve already ripped.
Open Windows Media Player.
Insert a CD into your CD drive.
Maximize the Windows Media Player window so you can see all of the menu options, select Rip settings, and then select the setting you want to change.
How do I burn a DVD using Windows 10
I am using Windows10 and Office 2013. I used to burn holiday dvd’s using Windows 7 but cannot do it in Windows 10. I can edit put on music etc but cannot burn to dvd. I used to open up Movie Maker, save the dvd and burn it from the drop down menu at the top of the screen on the right hand side. There is not a choice to Burn in the drop down menu. I have saved the dvd in «recommended for this project and HD» neither gives you an option to burn. When you have asked it to save as, there is a choice of either MPEG-4/H.264 Video file OR Windows Media Video file. I choose MPEG-4. It it goes through the motions of stage 1 and then stage 2. When it has finished saving, there is a choice in a box in the middle of the screen of either Play, open folder or close. There is no option to burn.
I have looked for solutions but it advises to burn from the drop down menu. I know someone else with Windows 10 and there’s is the same.
Replies (5)
![]()
Thank you for posting the query on Microsoft Community.
I understand that you are trying to Burn a DVD/CD in Windows 10. We will help you.
You can copy and paste the files to DVD once you insert it. Or you can use Media Player which comes pre-installed on Windows 10.
Go to search and type Windows Media Player. Click on it to open. Then follow the other steps in the link below.
Hope this helps in resolving the issue. If the issue persists, do get back to us. We will be happy to assist you.
2 people found this reply helpful
Was this reply helpful?
Sorry this didn’t help.
Great! Thanks for your feedback.
How satisfied are you with this reply?
Thanks for your feedback, it helps us improve the site.
How satisfied are you with this reply?
Thanks for your feedback.
Sorry for the delay but I have been away on holiday for a few days.
I have tried to follow the procedure which I cannot make work so if I can I would like to clarify a few things.
I insert a blank dvd in the device.
I open up a project in Movie Maker. I am using an edited but not saved as you used to in Windows 7. This looks like a film roll and it is coloured orange & blue. The size of this is 146kb and it is 29 mins 26 secs long.
When I click «File» and then «publish» it offers One Drive, Face Book, Youtube, Vimeo Flicker Groups, Add a Plug in, Manage your Services. NO DVD option.
If I save the Movie as I used to do in Windows 7 using «Recommended for this project or HD» it offer a choice of MPEG-4/H2.64 or Windows media file. If I choose MPEG it saves the Movie (I name it slightly differently) when it has finished saving it asks » play, open folder or close. The result is an object in my Video file that looks like a 35mm single negative but with 3.98GB. If I click this it plays in Media Player.
If I choose to right click this and send to dvd drive a balloon in the bottom right of the screen says you have files waiting to be written to disc. If I drag these to the dvd player and then right click again I can burn to disc. I put in a disc name click next it starts to burn. Great you think however when the disc has burned and put it in a dvd player it says «disc error» and it takes ages to eject.
Sorry about this but can you offer any advice?
How to Burn Files to CD or DVD on Windows 10

The death of the optical drive has been greatly exaggerated over the years. A lot of budget PCs still have them. The same goes for mid-range, and even high-end models as well. Just the other day, I was in a bind, a brand new 8 GB thumb drive suddenly stopped working. I had a few large video files that I needed to transfer between computers. With no other medium at my disposal, I came across an unused CD-R included with my Plextor CD-Writer from 2001. I was in a pinch and optical media saved the day.
Note: Experienced Windows users should know how to burn files to a disc. But if you’re new to computing this article is for you. Maybe you haven’t burned files to a CD/DVD before, or haven’t done so for such a long time a refresher is needed. Whatever the case, here’s a look at how to burn data to an optical disc in Windows 10.
Burn and Edit Files on a CD-R using Windows 10
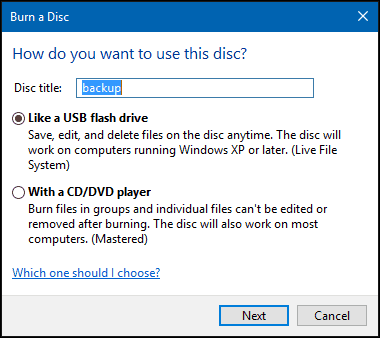
Insert a blank DVD-R or CD-R disc into your optical drive. A burn disc wizard will appear on the screen; give the disc a title, then choose the option Like a USB flash drive. This option is the best choice since it will have better compatibility with older versions of Windows.
Click Next then wait while the disc is prepared for use.

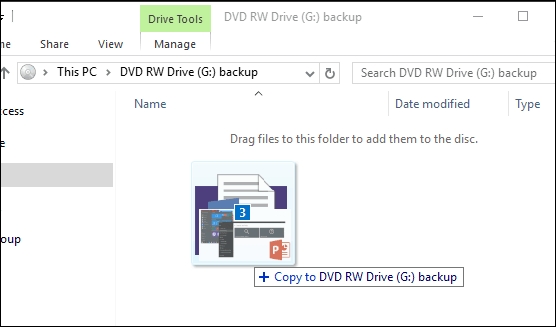
Browse to any files you would like to add to the disc, then click Start > File Explorer > This PC and open the drive containing your DVD-R or CD-R. Then drag and drop any files you want to write to the disc.
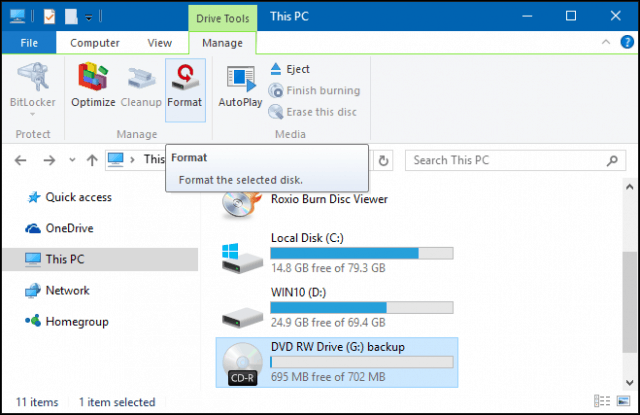
When complete, click the Manage tab and then Eject. Now you can manipulate and edit your files like you would on a standard USB thumb drive. I do admit, it is a bit slow when writing, but it is just as effective and works in a pinch.
Indeed a useful trip down memory lane, which can still be handy if you need it.
Also, if you have a Blu-ray drive on your PC, you might be interested in checking out some of our other articles listed below.
How to Burn ISO Files in Windows 10

- ISO files are an excellent file format for creating bootable media.
- This guide will teach you how you can burn ISO files in Windows 10.
- Do you like our comprehensive tutorials? We have many more on our How-To section.
- For more guides on how to perform tasks via software, visit our Utilities Hub.
- Download Restoro PC Repair Tool that comes with Patented Technologies (patent available here).
- Click Start Scan to find Windows issues that could be causing PC problems.
- Click Repair All to fix issues affecting your computer’s security and performance
- Restoro has been downloaded by 0 readers this month.
ISO files became a very important form of data over the past few years. The fact that Windows 10 Technical Preview installation comes as an ISO image proves this claim even more.
So having an ISO burned on a CD could be useful, and in this article we’ll show you how to do that in Windows 10 Technical Preview. 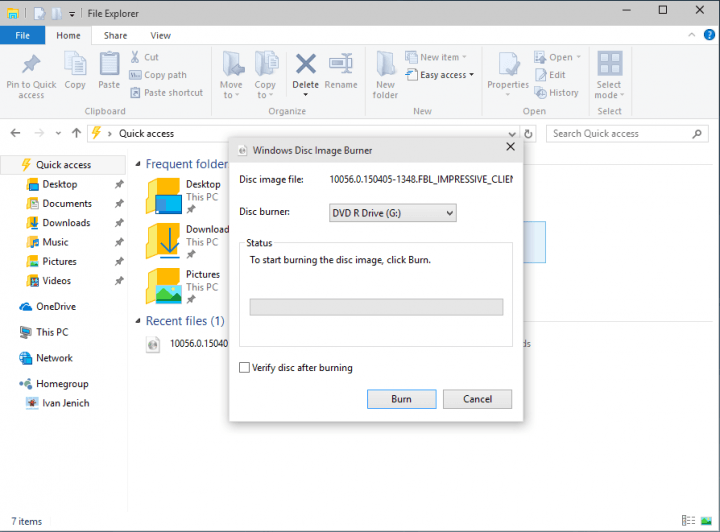
This is how you can burn ISO files in Windows 10
Previous versions of Windows operating system, like Windows XP or Windows 7 had to use a third-party software not just to run or burn ISO files to CDs, but also to burn any other formats format of data to a CD or DVD.
But luckily, Windows 10 has its own burner, called Windows Disc Image Burner, and it could be used for burning regular data to CDs, as well as ISO files.
So if you want to burn an ISO image to a CD, you just have to do a few simple steps, and Windows 10 burner will do all the work for you. Here’s what you need to do to burn an ISO image to a CD:
-
- Click on the ISO image you want to burn on CD
- On the top of the screen of File Explorer, click on Manage, under Disc Image Tools
- Click on Burn
- Select your CD-ROM as Disc burner and click on Burn
- Wait until the process is complete and you’ll have your ISO image burned on a CD
Here’s a tip
Since the installation image of Windows 10 Technical Preview comes as an ISO file, you can use this technique to burn Windows 10 Technical Preview image on a CD, and install it on the boot, just like any other Windows operating system before.
Having your Windows 10 installation image on a CD will definitely keep it safe, and it will save you some hard disk space, as well.
If you are looking for a dedicated software to do this for you, we highly recommend Power ISO. This program comes with the following features: 
- Process ISO / BIN image files, make a bootable CD image file.
- PowerISO supports almost all CD/DVD image file formats
- Mount image file with an internal virtual drive, and then use the file without extracting it
- Compress files and folders to a compressed archive.
- PowerISO will scan and optimize the files during compression, and thus can have better compression ratio and faster compression speed
- Split the archive into multiple volumes
- Protect the archive with a password
- Use the archive directly without decompressing.
- PowerISO virtual drive can mount the archive directly.
Of course, this is not the only ISO burner you can use. We already compiled a list of the best ISO burners that you can use on your Windows 10 computer.


