- FIX: Account has been disabled. Please see your System Administrator
- Create a new account with administrative privileges in Safe Mode
- Perform a System Image Restore
- Use a PCUnlocker Live CD/DVD or USB to reset your password
- Enabling the Disabled Account
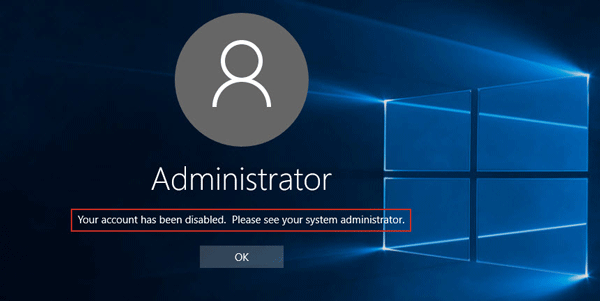
- Your account has been disabled, Please see your system administrator
- Your account has been disabled, Please see your system administrator
- Fix: Your Account Has Been Disabled, Please See Your System Administrator
- Solution 1: Activate built-in administrator by hacking registry
- Solution 2: Create a new administrator account with a third-party tool
- Step 1: Create a bootable USB drive
- Step 2: Boot Windows 10 computer from USB drive
- Step 3: Create a new administrator account
- Step 4: Sign in Windows 10 with the new admin account
- Step 5: Enable the account that has been disabled
FIX: Account has been disabled. Please see your System Administrator
One of the most terrifying problems that any Windows 10 user has ever faced is the “Account has been disabled” problem. The “Account has been disabled” error message (or the “Account has been disabled. Please see your System Administrator” message – to be more specific) basically says that a user account has, for some reason, been disabled.
The “Account has been disabled” problem can appear either after something goes wrong and you are locked out of your user account for some reason or your computer shuts down inappropriately while you are in the process of creating a user account after a fresh Windows 10 installation or upgrade. If this problem appears after your computer shuts down inappropriately while you are in the middle of creating a user account after a fresh Windows 10 installation or upgrade, you will be greeted with a user account named defaultuser0 when you boot the computer up, and any attempts to log in to this user account will be greeted by the “Account has been disabled” problem.
The “Account has been disabled” issue completely locks the user out of their user accounts, and that can be a pretty big problem for the average Windows 10 user as any Windows 10 user would be furious if they are simply locked out of their computer for no apparent reason. Well, the following are the two solutions that you can use to fix the “Account has been disabled” issue by yourself:
Create a new account with administrative privileges in Safe Mode
The folks at Microsoft know just how much of a goof the average Windows 10 user can be, which is why all copies of Windows 10 have a hidden account named Administrator that has administrative privileges. In the event that something happens to your primary Windows 10 account, you can lean on this hidden Administrator account and create a new account with administrative privileges for yourself using this account. The hidden Administrator account is only accessible when a computer is in safe mode.
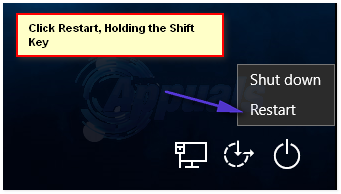
- At the sign-in screen, hold down the Shift key on your keyboard and click on the Power button located at the bottom of the screen. From the menu that pops up, click on Restart, all while holding down the Shift.

- Only let go of the Shift key when the Advanced Recovery Options menu appears.
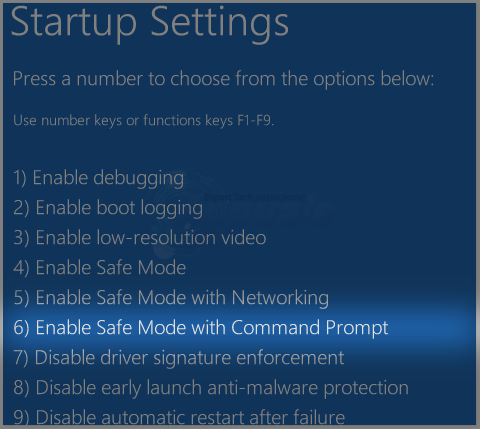
- In the Advanced Recovery Options menu, click on Troubleshoot >Advanced options >Startup settings >Restart. When your computer restarts and you are greeted with a blue screen with a horde of different options, press the numerical key on your keyboard that corresponds with the Enable Safe Mode with Command Prompt
- When your computer boots up, you will be able to see the hidden Administrator Log into it.
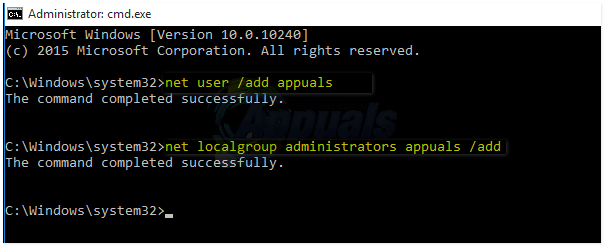
- Open the Start Menu, type cmd into the Search bar and click on the search result titled cmd to open a Command Prompt.
- One by one, type the following commands into the Command Prompt, making sure that you press Enter after typing in each one:
Perform a System Image Restore
The second method that you can use to fix the “Account has been disabled” problem is to perform a System Image Restore. Performing a System Image Restore will restore your computer to a previous point in time, a point at which the “Account has been disabled” problem did not exist. Performing a System Image Restore will not result in a loss of personal files or data but can result in the deletion of apps or updates that were downloaded and installed after the point in time to which you are restoring your computer. And best of all, you can perform a System Image Restore without having to login to your user account.
- At the sign-in screen, hold down the Shift key on your keyboard and click on the Power button located at the bottom of the screen.
- From the menu that pops up, click on Restart, all while holding down the Shift
- Only let go of the Shift key when the Advanced Recovery Options menu appears.
- In the Advanced Recovery Options menu, click on Troubleshooting >System image restore.
- When provided with system restore points to choose from, choose a point at which the “Account has been disabled” issue did not exist and begin the restoration process.
- When (or if) prompted to select an account, click on the account titled Administrator.
- Wait for the System Image Restore to be completed. Once the process has been completed, you will be prompted to restart your computer, and there will be no trace of the “Account has been disabled” problem once your computer boots up.
Use a PCUnlocker Live CD/DVD or USB to reset your password
PCUnlocker Live is a program designed specifically to allow users of any version of the Windows Operating System to gain access to their user accounts in the event that they either forget their password or another problem is restraining them from being able to unlock their accounts.
- Go here and download and install the latest version of PCUnlocker.
- Run PCUnlocker on a different computer.
- Using PCUnlocker, create a bootable CD/DVD or USB flash drive that is capable of either resetting your user account’s password or bypassing it and letting you gain access to it (depending on what course of action you want to take).
- Insert the password reset or bypass CD/DVD or USB into the affected computer and restart
- Configure the affected computer to boot from a CD/DVD or USB by fiddling around with its BIOS settings.
- Allow the affected computer to boot from the CD/DVD or USB, and then follow the onscreen PCUnlocker instructions to reset or bypass the password on your user account. Once you have done so, you will be able to successfully login to your disabled user account once you boot your computer into Windows.
Enabling the Disabled Account
In the User Access Control in Windows, there is an option which allows users to simply re-enable the disabled account. When we do this, the account will be accessible again with all the previous data and configurations stored in it. However, you must be logged in as an administrator to re-enable the account. Here are the steps:
Note: If you do not have an administrator account available, follow the first solution and enable the built-in admin using the command prompt.
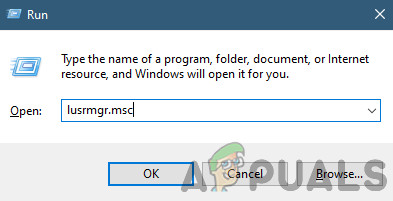
- Press Windows + R and type lusrmgr.msc in the dialogue box and press Enter. lusrmgr.msc
- Once in the Local Users and Groups window, click on Users from the left navigation pane.
- Click on Users once, select the User which is disabled, right-click on it and select
- Now underneath the General tab, uncheck the option of Account is disabled. Enabling the Disabled Account
- Press OK to save changes and exit. Restart your computer and try logging in the account. See if the problem is solved for good.
 lusrmgr.msc
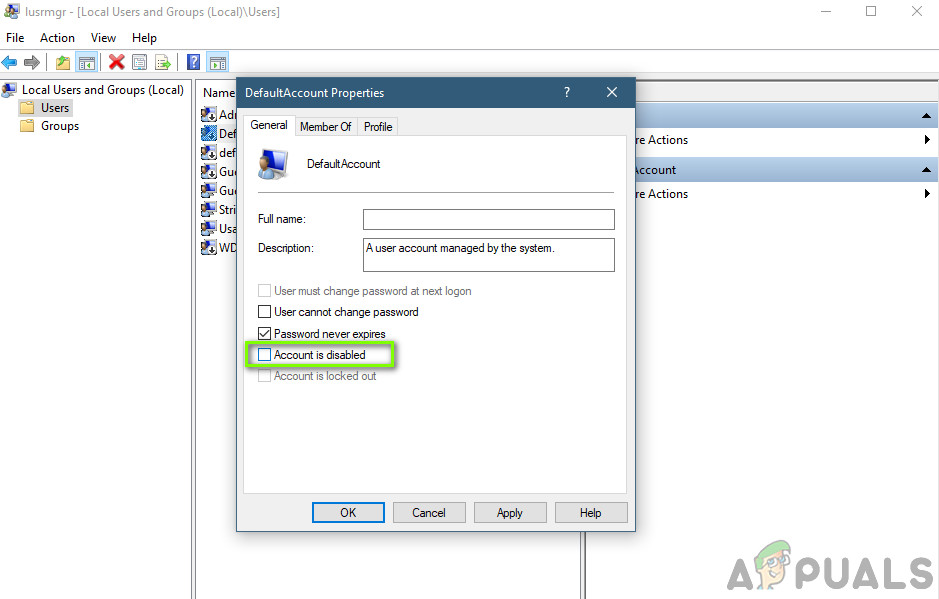 Enabling the Disabled Account
Your account has been disabled, Please see your system administrator
If you are not able to log into your user account and you see a message – Your account has been disabled, Please see your system administrator on Windows 10/8/7, follow this solution. You won’t be able to access your data unless you have the administrator account access.
Malware can change various settings on your computer. If your computer was under malware attack recently, and it changed the Account is disabled option, you can face this issue. The only solution is to log into your computer using a different administrator account and change the setting. If you do not have a second account, you can enable the in-built hidden administrator account. Enabling this hidden administrator account is very easy when you can log into your account. This article shows how to enable the hidden administrator account using Registry so that you can fix the error immediately.
Your account has been disabled, Please see your system administrator
To resolve the Your account has been disabled, Please see your system administrator issue on Windows 10/8/7 you need to follow these following steps:
- Open Advanced Boot options
- Open Command Prompt and Registry Editor
- Enable Hidden administrator account
- Remove Account is disabled filter from your user account.
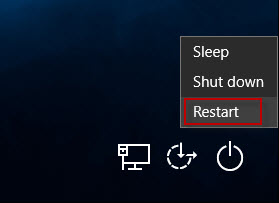
To get started, you need to start your computer and make sure that you are on the error screen. You should find the Power options on your right-hand side. Click this option, press and hold the Shift key, and select Restart. It should open the Advanced Boot Options.
Now, go to Troubleshoot > Command Prompt.
After that, you need to choose your user account. Click on it, and enter the password to open Command Prompt.
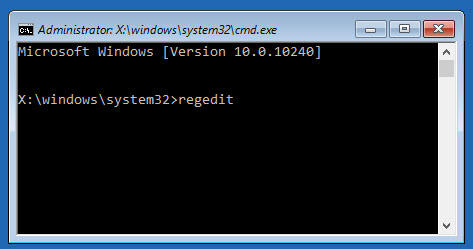
After the Command Prompt, open on your screen, type regedit, and hit the Enter button.
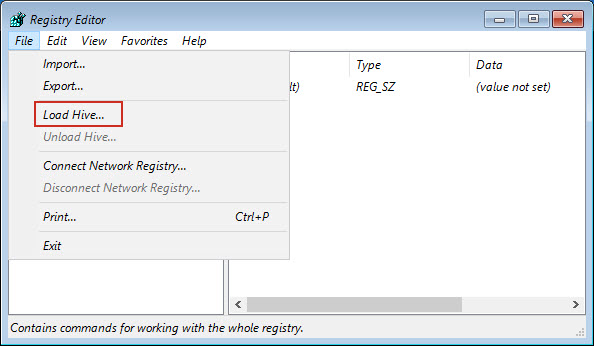
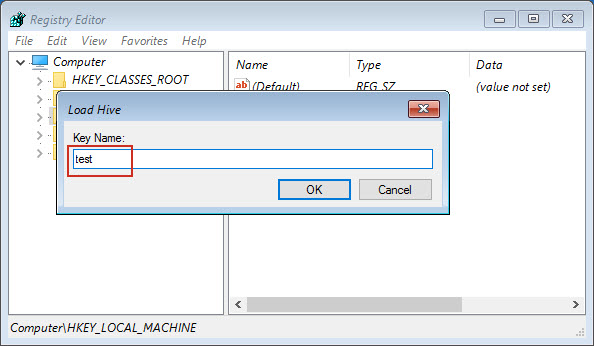
Then, select HKEY_LOCAL_MACHINE in the Registry Editor, and go to File > Load Hive.
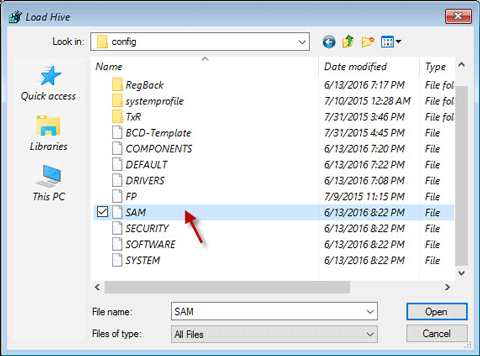
Next, you need to open your Windows installation drive and go to this location:
Here you can find a file called SAM. Select it and click the Open button.
Now, you need to enter a Key Name. You can write anything you want. After doing that, navigate to this path:
Here you should find a key called 000001F4. Select it, and double-click on the F entry that is visible on your right-hand side.
Now, find out the Value data line named 0038. It should show 11 in the first column. You need to replace it with 10.
After that, click the OK button, and close Registry Editor and Command Prompt to restart your PC.
After doing that, you need to restart your computer and sign in to the Administrator account. Then, open the Computer Management window on your computer. You can search for it in the Taskbar search box. In the Computer Management panel, go to Local Users and Groups > Users. Here you can find all the user accounts. You need to right-click on your defected user account and select Properties.
Remove the tick-mark from the checkbox saying Account is disabled.
Now restart your PC, and sign in to the user account as you did earlier.
TIP: This post will help you if you receive a message Your account has been disabled message after exiting Audit mode.
Date: October 10, 2019 Tags: Administrator
Fix: Your Account Has Been Disabled, Please See Your System Administrator
«I can’t sign into Windows 10 and the screen flashes a message: Your account has been disabled. Please see your system administrator. There is no other account displaying on the screen. What can I do?»
This issue can result from various circumstances. Now, this post will show you two solutions to fix the problem.
Solution 1: Activate built-in administrator by hacking registry
Step 1: On Windows 10 sign-in screen, click the Power button, then click the Restart button while pressing and holding the Shift key on your keyboard. This will start Windows 10 to «Choose an option» screen.
Step 2: Click Troubleshoot > Advanced options > Command Prompt. Then Windows 10 will restart and prepare Command Prompt.
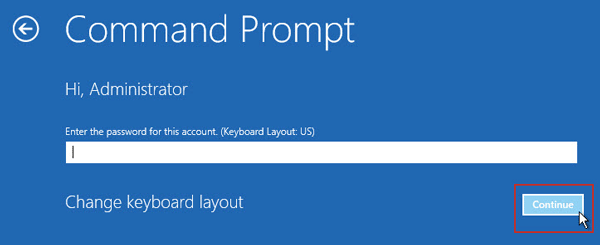
Step 3: After the Command Prompt screen appears, the Administrator built-in Windows 10 is displayed on the screen, even it is in a disabled state. Click on it to continue.
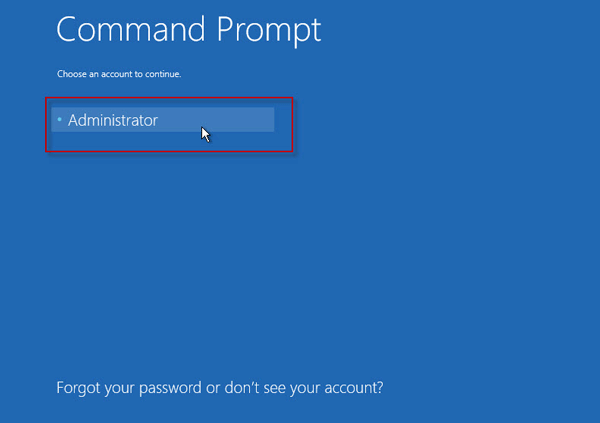
Step 4: Then you are asked to type the password to continue. The password of a built-in administrator account is blank by default, so just leave the password field blank, and click Continue. If you have changed the password, enter it and click Continue. But if you’ve forgotten the password, you won’t be able to continue and have to choose Solution 2 to fix the issue: Your account has been disabled. Please see your system administrator.
Step 5: After the command prompt window opens, type regedit and press Enter key to open Registry Editor.
Step 6: In the Registry Editor, click on HKEY_LOCAL_MACHINE, then click the File tab and select Load Hive.
Step 7: In the Load Hive dialog, select This PC, then open the disk drive where your Windows 10 system is installed, and navigate to Windows\System32\Config. Under the Config folder, double-click the SAM file to create a new key.
Step 8: Type a name for the new key and click OK. In my example, I name it as test.
Step 9: Now, navigate to HKEY_LOCAL_MACHINE\test\SAM\Domains\Account\Users. Under the Users folder, click the key named «000001F4«, and then double-click the entry named «F» on the right pane.
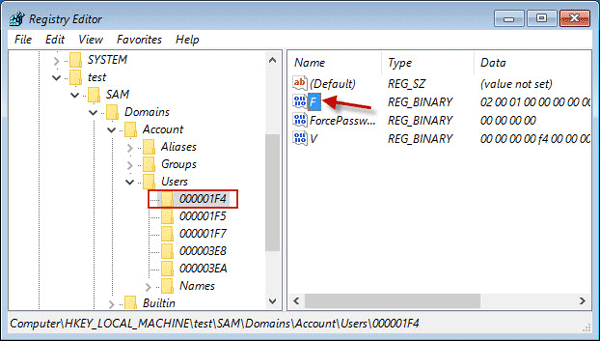
Step 10: Locate the line that starts with «0038«, then double-click the value data “11”, type «10» to replace «11«, and click OK. This will enable the built-in administrator in Windows 10.

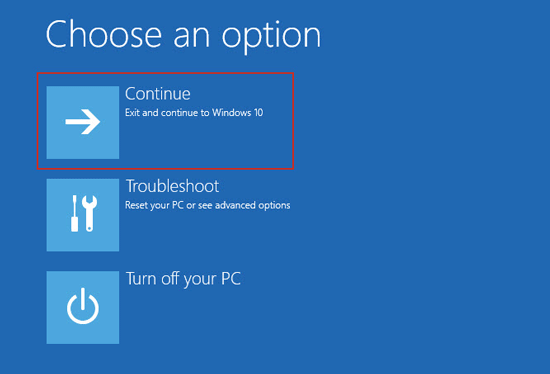
Step 11: Close the Registry Editor and the command prompt dialog so that you can be back on the “Choose an option” screen. Click on Continue. Then Windows 10 will restart and automatically sign into the built-in administrator account.
Step 12: After you access the built-in administrator account, you can enable any other account that has been disabled.
Solution 2: Create a new administrator account with a third-party tool
Now that your account has been disabled and your Windows 10 system is locked out, you can use a third-party tool to create a new account that has administrative rights so that you can sign in Windows 10 with the new admin account and then enable the account that has been disabled. Steps are as follows.
Step 1: Create a bootable USB drive
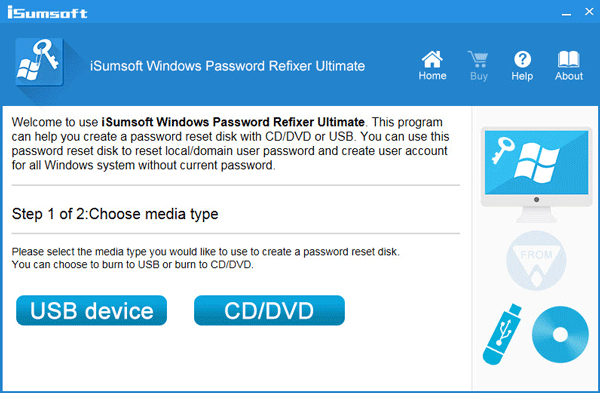
On another working computer, download and install Windows Password Refixer tool. After the installation is complete, launch it and then follow its screen to burn it to a USB flash drive to create a bootable USB drive.
Step 2: Boot Windows 10 computer from USB drive
Connect the bootable USB drive to the Windows 10 computer, and set computer to boot from the USB drive. During the process of booting, you will see Windows PE load, and then «Windows Password Refixer» screen appears.
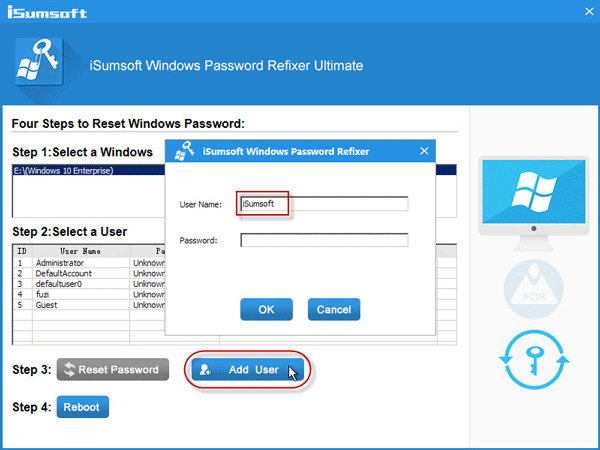
Step 3: Create a new administrator account
On Windows Password Refixer screen, click the Add User button, type a user name, and click OK. This will create a new account that has administrative rights on Windows 10.
Step 4: Sign in Windows 10 with the new admin account
After a new admin account is created, click the Reboot button and disconnect the bootable USB drive when prompted. Then the computer will restart and the new admin account will display on Windows 10 sign-in screen. Sign in Windows 10 with the new admin account.
Step 5: Enable the account that has been disabled
Open Computer Management app. Go to System Tools > Local Users and Groups > Users. Select the Users folder, double-click the account that has been disabled, then uncheck the checkbox next to «Account is disabled» and click OK, so that the account can be enabled.

The above are two solutions to solve the problem, «Your account has been disabled. Please see your system administrator.»


