- Wine preloader mac os
- Как запустить любое Windows-приложение прямо в macOS
- Что такое Wine
- Преимущества и недостатки Wine
- Как отключить SIP
- Как установить Wine
- Как установить приложение или игру через Wine
- macOS
- Installing WineHQ packages
- Installing Winehq packages using homebrew
- Building Wine
- Uninstalling Wine
- Third Party Versions
Wine preloader mac os
How to install/about wine on mac
As this question keeps appearing more recently I’m making this basic guide.
- Install XQuartz 2.7.7 or above
- Gatekeeper must allow block unsigned packages
- Running OS X 10.8 to macOS 10.14* (macOS Catalina & later)
Recommended way to install Winehq packages;
Installing wine using homebrew Once homebrew is installed you the following command to install your selected wine package
The above command will install XQuartz and the most recent wine-staging pkg available on winehq but it will also add wine for use in Terminal meaning you no longer need to launch the installed Wine Staging app each time you want to access wine.
Please Note;
Only a single wine package can be installed using brew
The —no-quarantine command is required as homebrew by default adds the quarantine flag to downloaded casks, this causes Gatekeeper to treat the bundle as damaged.
Winehq is currently not providing recent packages for macOS so I decided to upload my own builds.
This command will add my brew tap and the second command will install my custom cask of Wine Staging
The tap contains the following
- gcenx-wine-stable
- gcenx-wine-devel
- gcenx-wine-staging
- wine-crossover
How to manually install wine on mac using Winehq releases;
Grab a wine package usually using the latest wine-devel is recommended, but most agree it’s best to use the latest wine-staging due to additional patches.
If your intention is to have a more stable environment use wine-stable
The above is the Winehq way to install wine on mac but that makes it cumbersome to use considering you must launch the Wine Stable , Wine Devel or Wine Staging app each time to get access to wine within Terminal
The default WINEPREFIX will be
/.wine so anything you install will be placed into the hidden
/.wine folder. You can override this by using the WINEPREFIX command
The default architecture of a WINEPREFIX will be 64Bit meaning 32Bit and 64Bit applications & games are supported but that’s not always ideal for several reasons. A new WINEPREFIX can be created and also setting WINEARCH
Here is an example of using both commands to create a 32Bit only WINEPREFIX
The above command will create a new WINEPREFIX thats also 32Bit only and launch winecfg
Basic wine tools
- wine (32Bit loader)
- wine64 (64Bit loader)
- msiexec (execute msi files
- notepad
- regedit (Wines Registry editor)
- regsvr32 (Provides DLL registration services)
- wineboot
- winecfg (wine configuration utility)
- wineconsole (windows like shell aka cmd)
- winedbg (wine debug utility)
- winefile (wine file manager)
- winemine (wines version of the game mine)
- winepath
What’s this winetricks everyone keeps saying to use?
Winetricks is an easy way to work around problems in Wine.
While winetricks can be installed directly from GitHub you will be missing packages winetricks requires, instead install again using homebrew
Now you will also have access to winetricks command within Terminal
Why doesn’t Virtual Desktop work?
By default wine on mac uses what’s known as macDriver using winetricks run the following command
This will swap from macDriver to x11 now wine will make use of XQuartz
Why doesn’t my game work on mac but Winehq says it does?
This usually happens when the game uses DirectX10 or above, the version of OpenGL included on macOS hasn’t been updated in years so it’s missing some needed extensions.
Can I use DXVK on mac?
No not currently.
MoltenVK is Vulkan 1.1 compliant, but still missing additional extensions needed by DXVK.
MoltenVK uses Metal meaning only wine64 has Vulkan support (currently wine32on64 doesn’t support MoltenVK).
Please Note;
CrossOver-20 does include DXVK support, this provides DirectX10 and DirectX11 support. CodeWeavers patched MoltenVK to fake unsupported extensions and a custom version of DXVK that’s modified specifically for macOS.
macOS Catalina and later
Currently only CrossOver-19 and later will run
Here are some free alternatives;
- Unofficial Wineskin Use a WS11 Engine
- PortingKit Should automatically select a working Engine
- My brew tap
Gatekeeper will give a warning for each Windows binary that is ran as these won’t be code-signed in a way Apple expects, to avoid this you could disabled Gatekeeper using the following command
Please Note;
macOS Catalina 10.15.0 to 10.15.3, SIP needs to be disabled this will allow wine32on64 to change the state of i386_set_ldt
My current wine-crossover package can be downloaded directly WineCX19.02
Phoenicis has a build of WineCX19.0.0
Also;
wine32on64 currently does not support 16Bit executable so some things just won’t work
Apple Silicon support?
Only CrossOver-20.0.2 includes support for Apple Silicon at this time, this requires macOS Big Sur 11.1 and install Rosetta2.
I will be adding support for Apple Silicon into Wineskin once I’m able to obtain an M1 Mac mini, currently checking where would be the best place to purchase from.
Using wine in a macOS Virtual Machine
From Wine-4.15 to Wine-5.16 macDriver (the default display driver) won’t function within a Virtual Machine, however the X11 display driver works.
You can edit the wine registry manually or use winetricks
Please Note; The macDriver regression was resolved from Wine-5.17
Wine-5.9 to Wine-5.18 file limit regression;
The upstream patch was applied to my recently uploaded Wine-5.17 packages
The most commonly noticed issues was wine-gecko was always crashing.
Источник
Как запустить любое Windows-приложение прямо в macOS
Для операционной системы Windows существует большое количество специализированного и профильного ПО, аналогов которому нет на macOS.
Не все знают, что есть еще один способ запускать Windows-приложения прямо на Mac без дополнительных операционных систем и виртуальных машин. Работает это благодаря технологии Wine, которая не первый год выручает пользователей.
Что такое Wine
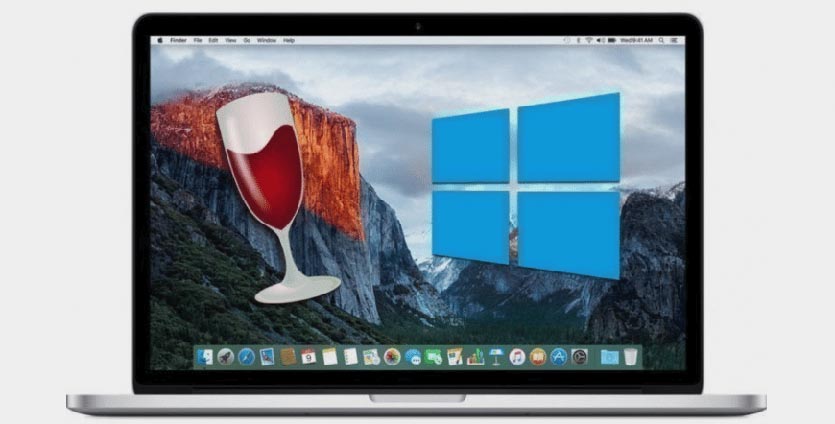
Wine — это свободно распространяемое ПО, которое предназначено для запуска 16-, 32- и 64- битных приложений, которые создавались для Microsoft Windows, в UNIX-подобных операционных системах.
Существуют сборки программы для Linux, macOS и даже Windows (чтобы запускать устаревшие программы и игры для “винды”). Wine основан на альтернативной реализации Windows API и не является эмулятором или виртуальной машиной.
Первые стабильные версии Wine появились в середине 2008 года. С того времени среда активно развивалась, части кода Wine использовались в разных программных продуктах и сборках операционных систем.
На данный момент при помощи Wine можно запустить практически любое приложение или игру из операционной системы Windows на Mac.
Преимущества и недостатки Wine
Прежде чем начать работу со средой Wine, следует изучить ее основные преимущества и недостатки. Возможно, в вашем случае уместнее использовать другой способ запуска Windows-программ.
✅ Windows приложения запаковываются в специальную “обертку” и работают как программы для macOS.
✅ Не требуется место, как для виртуальной машины, Boot Camp или дистрибутива Windows.
✅ Приложение запускается быстро и работает очень отзывчиво. Получится даже поиграть в динамичные игры.
✅ Среда имеет большое количество настроек графики и производительности, что позволяет добиться комфортной работы в большинстве случаев.
❌ Wine практически не взаимодействует с подключенными к компьютеру устройствами. Использовать Windows ПО, например, для работы с подключенным iPhone не получится.
❌ Каждое запакованное приложение будет занимать не менее пары ГБ, ведь будет включать в себя все необходимые API. Если нужно запускать таким способом более 5-6 программ, проще установить виртуальную машину.
❌ Некоторые программы и игры банально не запускаются в Wine, но при этом работают в виртуальной машине или Boot Camp.
Как отключить SIP
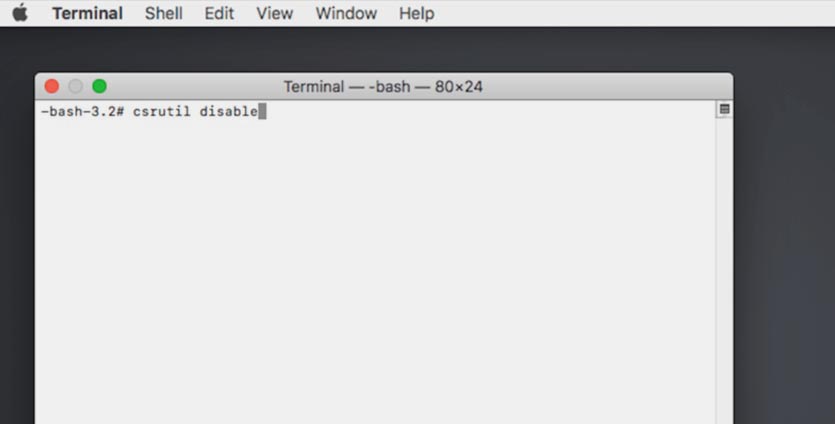
Для начала потребуется временно отключить защиту SIP (System Integrity Protection). Это необходимо для изменения системных файлов во время установки Wine и его компонентов.
1. Перезагрузите Mac.
2. Во время включения компьютера зажмите сочетание клавиш Command + R для загрузки в режиме восстановления.
Для этого нужно использовать оригинальную беспроводную клавиатуру Apple или любую проводную. Беспроводные клавиатуры других производителей могу подключаться к Mac уже после начала запуска ОС и не позволят загрузиться в любом служебном режиме.
3. После загрузки в режиме восстановления в строке меню выбираем Утилиты – Терминал.
4. Водим следующе команду и нажимаем Ввод:
5. Перезагружаем Mac в обычном режиме. Сделать это можно из строки меню или при помощи команды “reboot”.
После завершения установки Wine и загрузки необходимых приложений можно заново включить защиту SIP. Для этого проделываем аналогичные действия, только для включения используем команду “csrutil enable”.
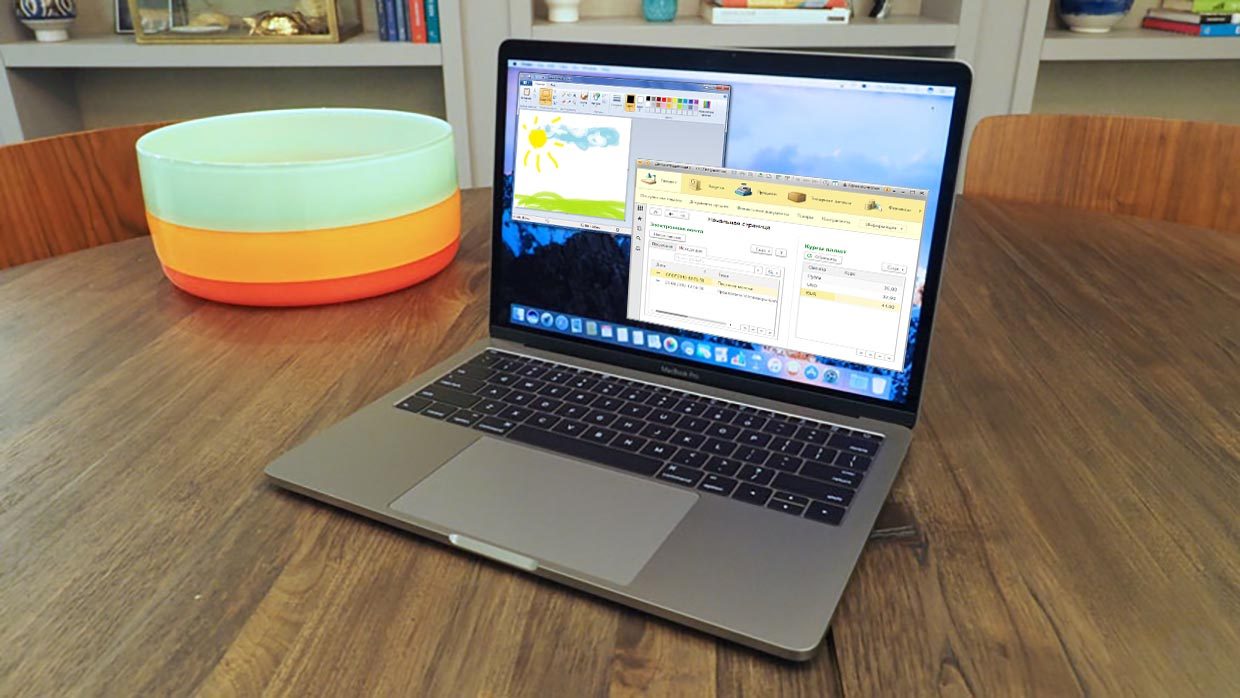
Как установить Wine
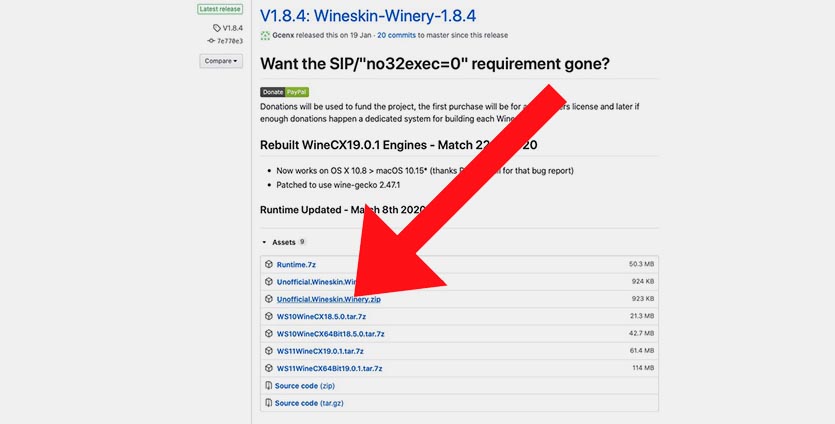
1. Скачайте последнюю неофициальную версию Wine с GitHub. Этот апдейт поддерживает работу с последними релизами macOS, которые еще за бортом официальных версий.
2. Извлеките приложение из архива и запустите его.
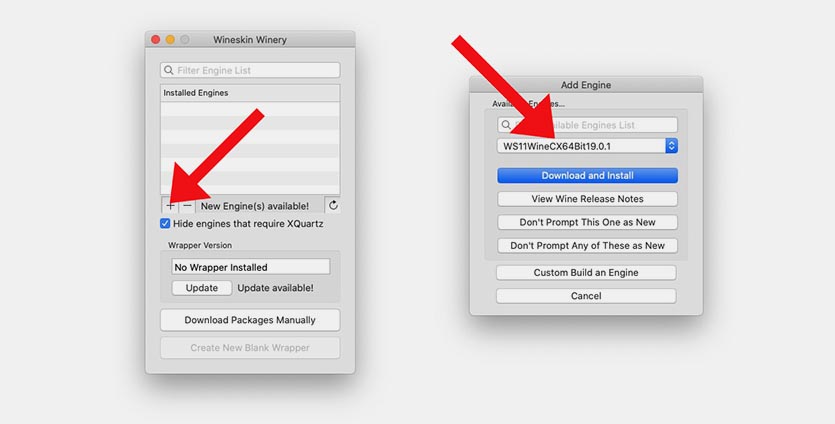
3. Нажмите “+” для добавления нового движка и найдите в списке WS11WineCX64Bit19.01.
Это самая актуальная версия с поддержкой 32-битных приложений.
4. Нажмите Download and Install и дождитесь окончания процесса установки.
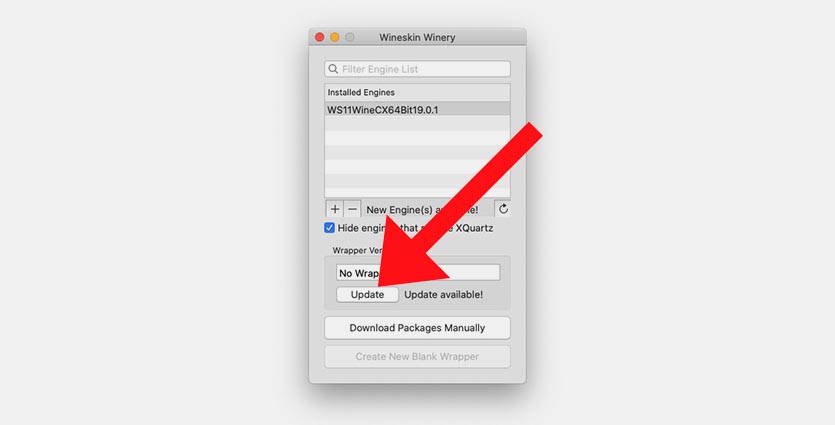
5. Нажмите кнопку Update и дождитесь окончания обновления модуля.
Все. Среда Wine готова для установки приложений. Скачайте подходящие установочные пакеты для операционной системы Windows.
Как установить приложение или игру через Wine
Описанные в предыдущем пункте манипуляции проводятся один раз. После этого для добавления новой программы или игры нужно сделать следующее:
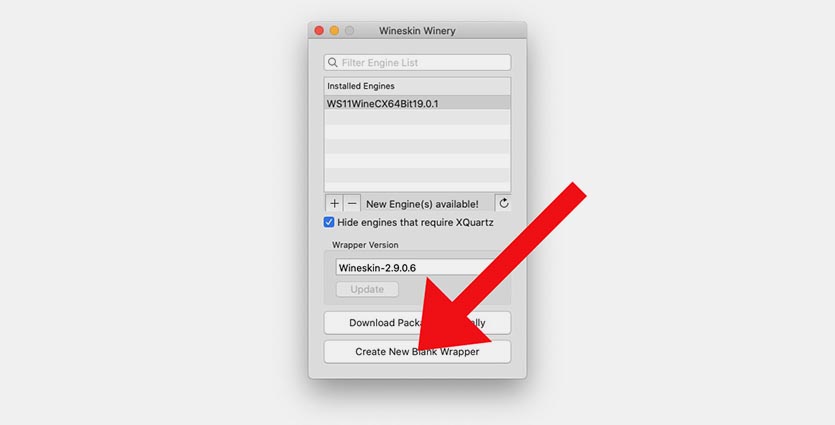
1. Нажмите кнопку Create New Blank Wrapper.
2. Укажите название будущего приложения, нажмите Ok и дождитесь окончания процесса.
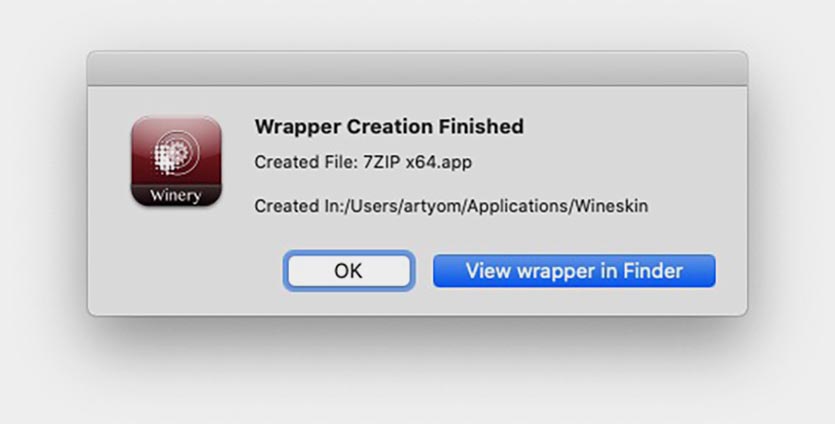
3. В последнем диалоговом окне нажмите View wrapper in Finder.
4. Запустите созданную заготовку будущего приложения.
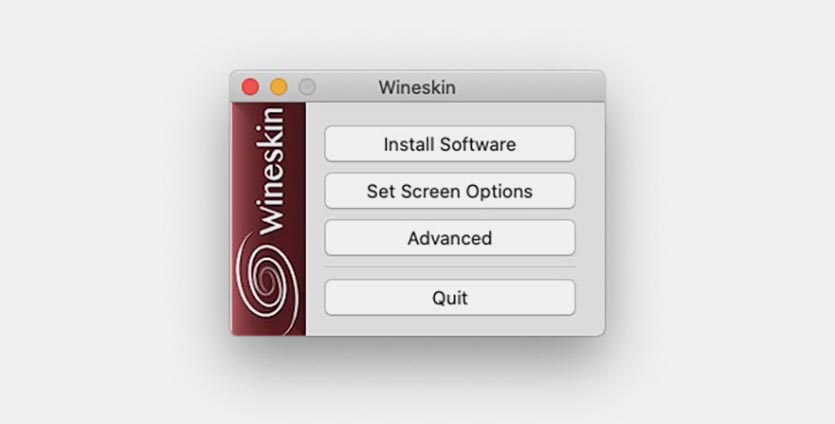
5. Нажмите кнопку Install software.
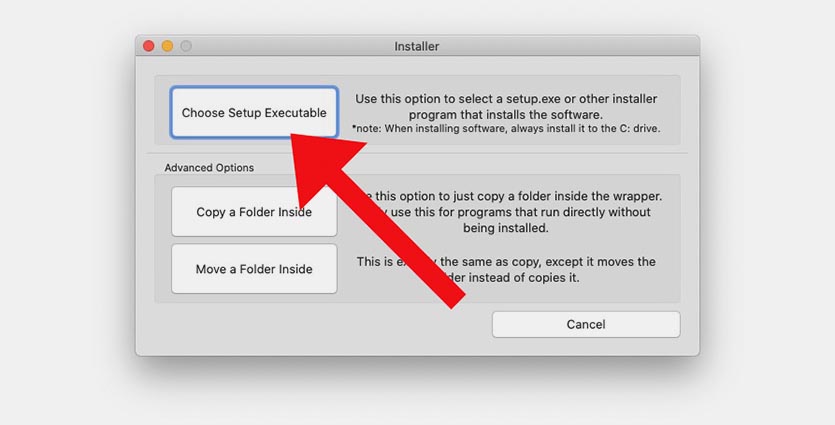
6. Выберите пункт Choose Setup Executable.
7. Укажите установочный покет для ОС Windows и произведите привычную установку программы.
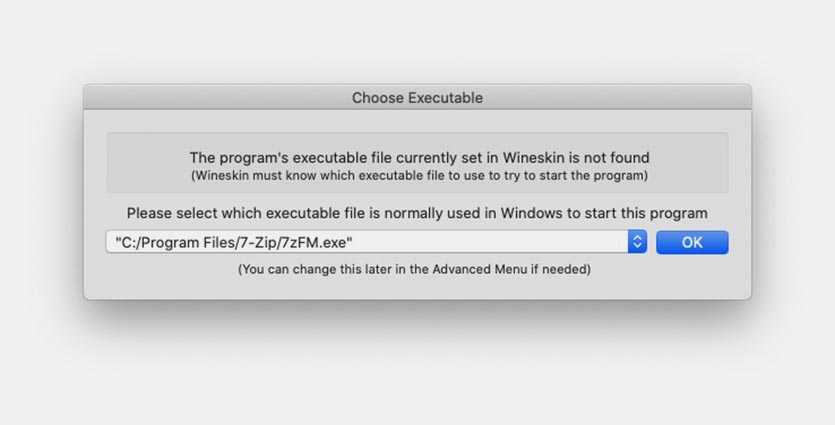
8. После установки укажите правильный *.exe файл для запуска программы и нажмите Ok. Приложение может подхватить не сам исполняемый файл, а, например, файл для деинсталляции программы.
9. Нажмите кнопку Advanced в меню Wineskin.
10. В настройках на вкладке Configuration можете изменить иконку приложения. На вкладке Options отключите все установленные флаги.
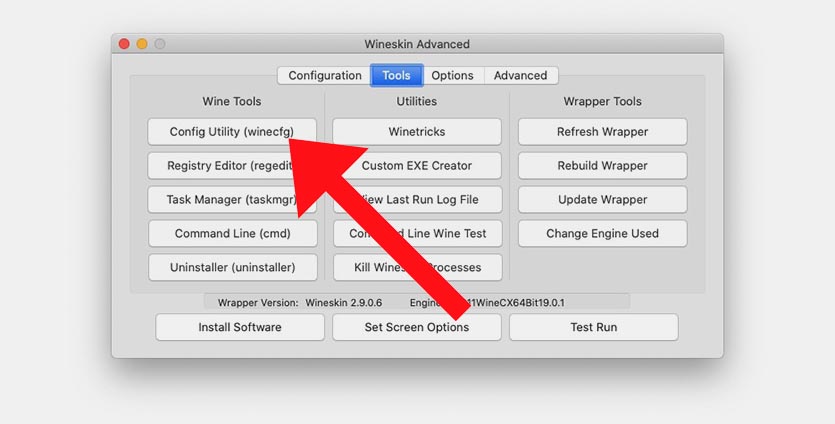
11. Перейдите на вкладку Tools и нажмите Config Utility (winecfg).
12. На вкладке Графика включите самую верхнюю опцию, нажмите Применить и закройте окно.
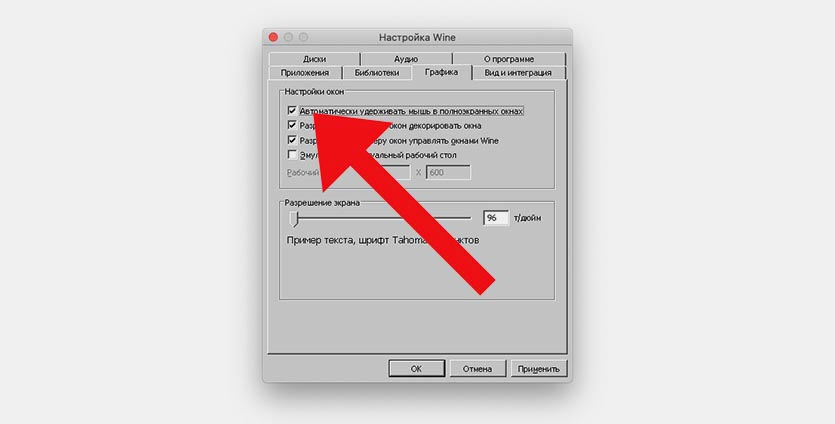
Готово! Теперь можете запускать созданное приложение. Оно будет доступно в папке /Applications/Wineskin или в Launchpad.
Вот так можно запросто запускать на Mac большинство Windows приложений. Кстати, можете установить 32-битные Windows-игры, аналоги которых для macOS не обновили под 64-битную архитектуру.
Источник
macOS
Translations of this page:  Français (Translators, please see Discussion page.)
Installing WineHQ packages
Official WineHQ packages of the development and stable branches are available for macOS 10.8 to 10.14 (Wine won’t work on macOS Catalina 10.15). Please test these packages and report any bugs at http://bugs.winehq.org.
- XQuartz >= 2.7.7
- Gatekeeper must not be set to block unsigned packages.
Installing from a .pkg file is recommended for inexperienced users.
To install from a .pkg file, double-click on the package, and the usual macOS installer wizard should open. The process should be self-explanatory. It is possible to install the package either for all users (needs administrator privileges), or just for your current user. After the installation is finished, you should find an entry «Wine Staging» or «Wine Devel» in your Launchpad. By clicking on it, a new Terminal window opens with a short introduction into some important wine commands. You can now directly start wine/winecfg/. from the Terminal, as the PATH variable is set correctly. For user convenience, the package also associates itself with all *.exe files, which means you can run windows executables just by double-clicking on them.
To install from a tarball archive, simply unpack it into any directory. There is no need to set DYLD_* environment variables; all paths are relative, so it should work as long as the directory structure is preserved (you can skip the /usr prefix though using —strip-components 1).
Installing Winehq packages using homebrew
Winehq packages can be installed using homebrew
XQuartz can be installed using;
To install wine the following command can be used;
wine-stable, wine-devel or wine-staging packages can be installed using the above example. The advantage of installing via homebrew means wine is available from a standard terminal session The —no-quarantine line to used to above brew adding the quarantine bit
Building Wine
Uninstalling Wine
- Remove the source tree and binaries.
Using MacPorts, uninstall the wine package you previously installed:
Replace wine with wine-devel if you installed the development version.
Otherwise and if you used `sudo make install`, revert it:
Then simply delete your local Wine source code directory:
- Clean-up pseudo C: drive and registry entries as well as all programs installed to C:
- Check the hidden directory `$HOME/.local/` where Wine stores some desktop menu entries and icon files as it interoperates with the X.Org Foundation and the Free Desktop.
Note: Files in this directory are unused on macOS unless you use a UNIX window manager and other X11 applications instead of the native MacOS apps.
Third Party Versions
Third party versions of Wine, such as Wineskin, Winebottler, and PlayOnMac, are not supported by WineHQ. If you are using one of those products, please retest in plain Wine before filing bugs, submitting AppDB test reports, or asking for help on the forum or in IRC.
Источник


