- Free up storage space on your Mac
- Find out how much storage is available on your Mac
- Manage storage on your Mac
- Store in iCloud
- Optimize Storage
- Empty Trash Automatically
- Reduce Clutter
- Where to find the settings for each feature
- Other ways that macOS helps automatically save space
- How to free up storage space manually
- How to Securely Wipe the Free Space on Your Mac
- What Happened to Secure Erase Free Space in macOS?
- Securely Wipe the Free Space on Your Mac Using the Command Line
- Securely Wipe the Free Space on Your Mac Using CCleaner
- Prevent Private Data from Being Recovered
- 8 Methods to Free Up Space and Manage Storage on Mac [2020]
- Is your Mac running low on storage and you can’t seem to free up space on Mac? Read on as we have listed 8 working solutions on how to clear space on Mac in this post.
- Part 1. How to See How Much Space Is Left on Mac
- How to See What’s Taking up Space on Mac
- Eight Solutions to Free Up Space on Mac
- 1. Downloads Folder
- 2. Unwanted Apps
- 3. Duplicate Photos and Media Files
- 4. Get rid of Trash
- 5. iTunes Backup
- 6. Temporary Files
- 7. Mac Mail Attachments
- 8. Move Files to an External Storage
- Part 4. How to Manage Storage on Mac
- • Manage iCloud Sync
- • Auto Empty Trash
- • Optimize Storage
- • Delete App Data
- • Organize Mac Partitions
- Part 5. How to Recover Lost Data While Clearing Space
- Step 1: Select a Location
- Step 2: Scan the Location
- Step 3: Preview and Recover
- Conclusion
Free up storage space on your Mac
Save space by storing your content in iCloud or using built-in tools to find and remove large or unneeded files.
The Optimized Storage features of your Mac help you save storage space by storing your content in iCloud and making it available on demand:
- When storage space is needed, files, photos, movies, email attachments, and other files that you seldom use are stored in iCloud automatically.
- Each file stays right where you last saved it, and downloads when you open it.
- Files that you’ve used recently remain on your Mac, along with optimized versions of your photos.
If you haven’t yet upgraded to macOS Sierra or later, learn about other ways to free up storage space.
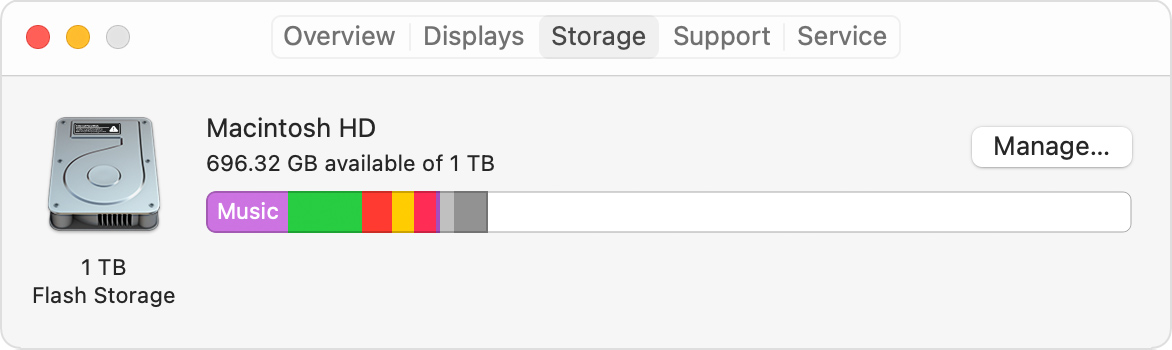
Find out how much storage is available on your Mac
Choose Apple menu > About This Mac, then click Storage. Each segment of the bar is an estimate of the storage space used by a category of files. Move your pointer over each segment for more detail.
Click the Manage button to open the Storage Management window, pictured below.
Manage storage on your Mac
The Storage Management window offers recommendations for optimizing your storage. If some recommendations are already turned on, you will see fewer recommendations.
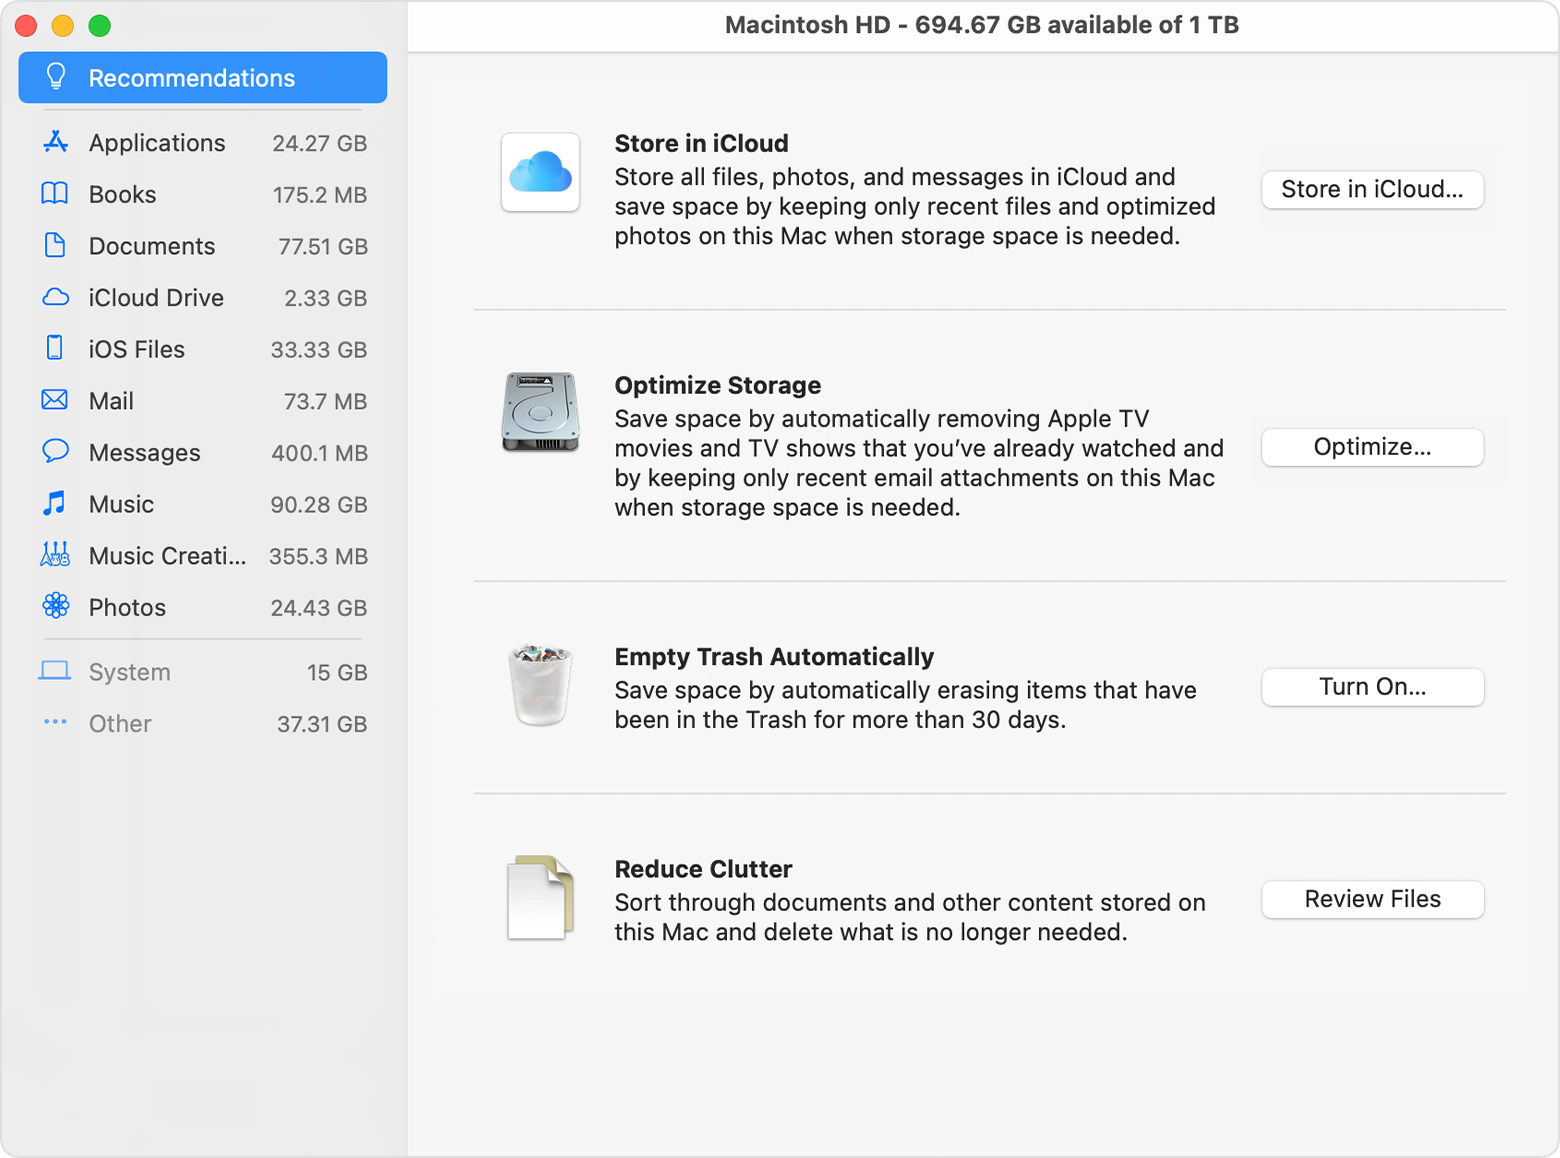
Store in iCloud
Click the Store in iCloud button, then choose from these options:
- Desktop and Documents. Store all files from these two locations in iCloud Drive. When storage space is needed, only the files you recently opened are kept on your Mac, so that you can easily work offline. Files stored only in iCloud show a download icon , which you can double-click to download the original file. Learn more about this feature.
- Photos. Store all original, full-resolution photos and videos in iCloud Photos. When storage space is needed, only space-saving (optimized) versions of photos are kept on your Mac. To download the original photo or video, just open it.
- Messages. Store all messages and attachments in iCloud. When storage space is needed, only the messages and attachments you recently opened are kept on your Mac. Learn more about Messages in iCloud.
Storing files in iCloud uses the storage space in your iCloud storage plan. If you reach or exceed your iCloud storage limit, you can either buy more iCloud storage or make more iCloud storage available. iCloud storage starts at 50GB for $0.99 (USD) a month, and you can purchase additional storage directly from your Apple device. Learn more about prices in your region.
Optimize Storage
Click the Optimize button to save space by automatically removing watched movies and TV shows. When storage space is needed, movies or TV shows that you purchased from Apple and already watched are removed from your Mac. Click the download icon next to a movie or TV show to download it again.
Your Mac will also save space by keeping only recent email attachments on this Mac when storage space is needed. You can manually download any attachments at any time by opening the email or attachment, or saving the attachment to your Mac.
Optimizing storage for movies, TV shows, and email attachments doesn’t require iCloud storage space.
Empty Trash Automatically
Empty Trash Automatically permanently deletes files that have been in the Trash for more than 30 days.
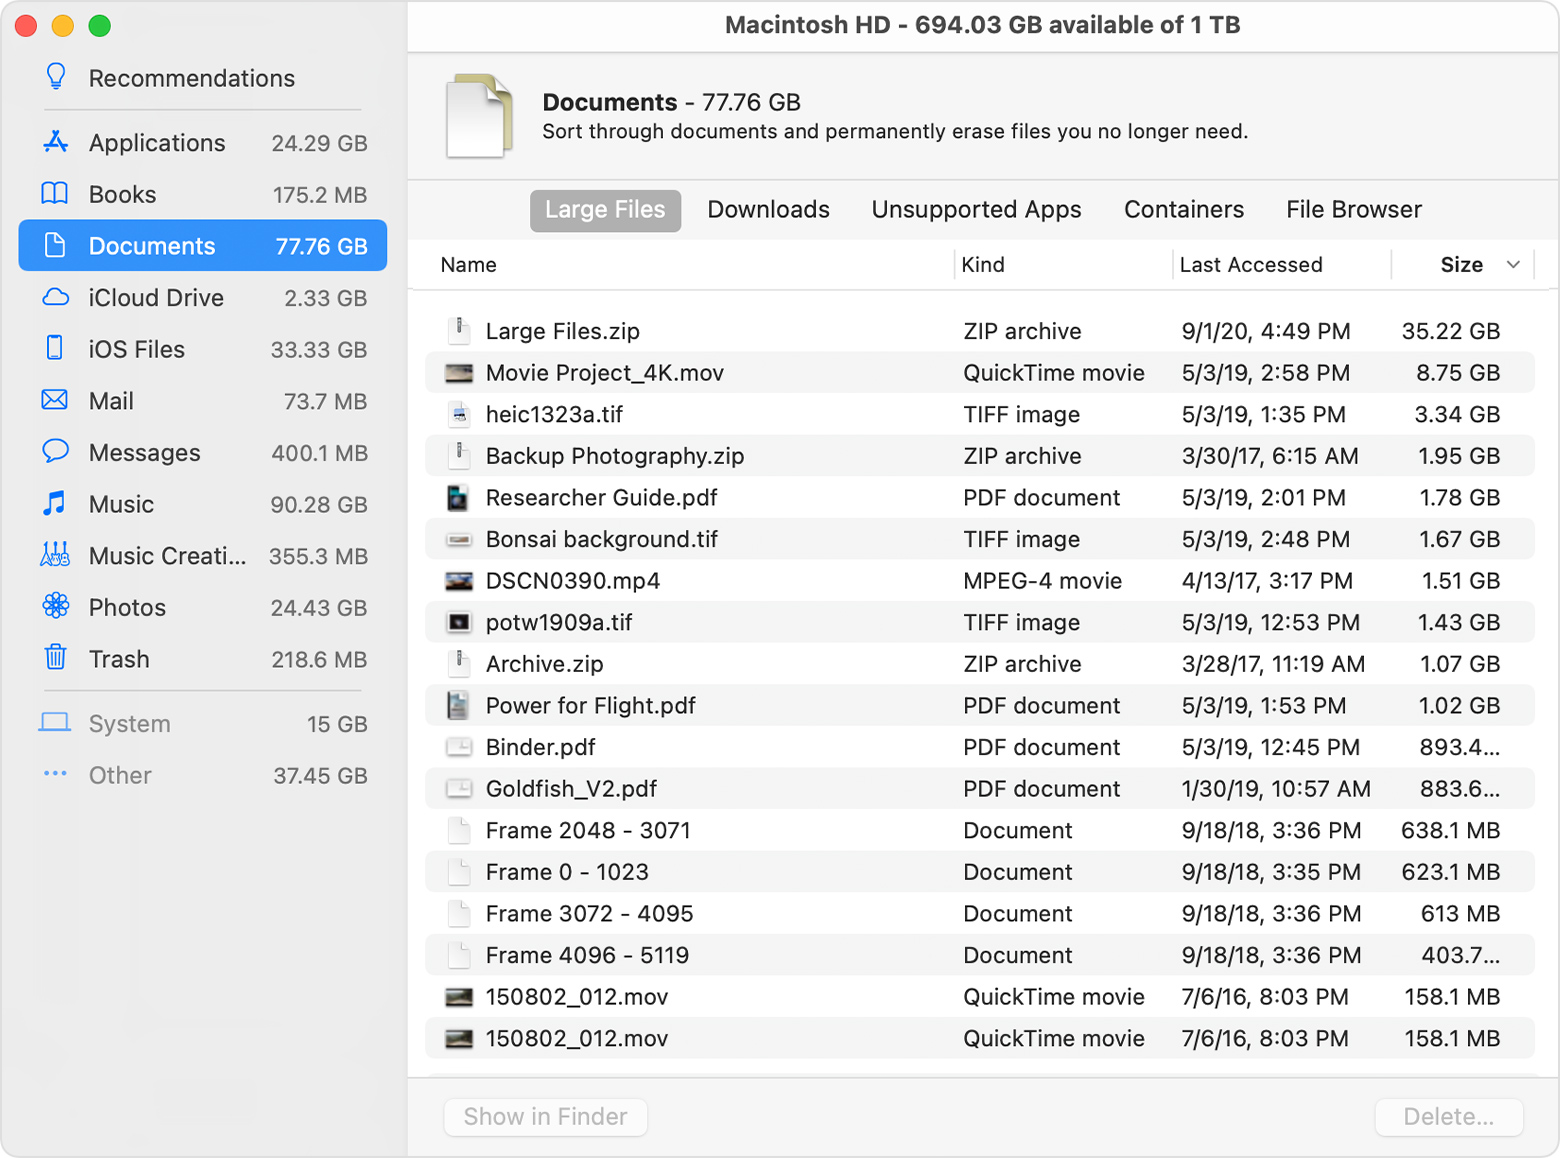
Reduce Clutter
Reduce Clutter helps you identify large files and files you might no longer need. Click the Review Files button, then choose any of the file categories in the sidebar, such as Applications, Documents, Music Creation, or Trash.
You can delete the files in some categories directly from this window. Other categories show the total storage space used by the files in each app. You can then open the app and decide whether to delete files from within it.
Where to find the settings for each feature
The button for each recommendation in the Storage Management window affects one or more settings in other apps. You can also control those settings directly within each app.
- If you’re using macOS Catalina or later, choose Apple menu > System Preferences, click Apple ID, then select iCloud in the sidebar: Store in iCloud turns on the Optimize Mac Storage setting on the right. To turn off iCloud Drive entirely, deselect iCloud Drive.
- If you’re using macOS Mojave or earlier, choose Apple menu > System Preferences, click iCloud, then click Options next to iCloud Drive. Store in iCloud turns on the Desktop & Documents Folders and Optimize Mac Storage settings.
- In Photos, choose Photos > Preferences, then click iCloud. Store in iCloud selects iCloud Photos and Optimize Mac Storage.
- In Messages, choose Messages > Preferences, then click iMessage. Store in iCloud selects Enable Messages in iCloud.
- If you’re using macOS Catalina or later, open the Apple TV app, choose TV > Preferences from the menu bar, then click Files. Optimize Storage selects “Automatically delete watched movies and TV shows.”
- In you’re using macOS Mojave or earlier, open iTunes, choose iTunes > Preferences from the menu bar, then click Advanced. Optimize Storage selects “Automatically delete watched movies and TV shows.”
- In Mail, choose Mail > Preferences from the menu bar, then click Accounts. In the Account Information section on the right, Optimize Storage sets the Download Attachments menu to either Recent or None.
Empty Trash Automatically: From the Finder, choose Finder > Preferences, then click Advanced. Empty Trash Automatically selects “Remove items from the Trash after 30 days.”
Other ways that macOS helps automatically save space
With macOS Sierra or later, your Mac automatically takes these additional steps to save storage space:
- Detects duplicate downloads in Safari, keeping only the most recent version of the download
- Reminds you to delete used app installers
- Removes old fonts, languages, and dictionaries that aren’t being used
- Clears caches, logs, and other unnecessary data when storage space is needed
How to free up storage space manually
Even without using the Optimized Storage features described in this article, you can take other steps to make more storage space available:
- Music, movies, and other media can use a lot of storage space. Learn how to delete music, movies, and TV shows from your device.
- Delete other files that you no longer need by moving them to the Trash, then emptying the Trash. The Downloads folder is good place to look for files that you might no longer need.
- Move files to an external storage device.
- Compress files.
- Delete unneeded email: In the Mail app, choose Mailbox > Erase Junk Mail. If you no longer need the email in your Trash mailbox, choose Mailbox > Erase Deleted Items.
Источник
How to Securely Wipe the Free Space on Your Mac


Do you have an older Mac with a regular HDD? Learn how to make sure deleted files cannot be recovered by securely wiping the free space on the drive.
When you delete files on a regular hard drive on your Mac (not an SSD), the files remain on the drive. But they’re no longer accessible by your Mac.
However, anyone who gets a hold of your Mac, and who has intermediate computer skills, might be able to recover deleted files from your drive. Unless you delete them securely first.
If you didn’t already securely delete your files, it’s not too late. If you have a regular spinning hard drive (HDD) in your Mac, you can securely wipe the free space on your Mac, preventing recovery of any files that were not securely deleted. If your Mac has an SSD, you do not need to securely wipe the free space and you shouldn’t.
Today we’ll discuss what happened to the Secure Erase Free Space feature in Disk Utility on your Mac and how to securely wipe the free space on your Mac’s HDD without that feature.
What Happened to Secure Erase Free Space in macOS?
The Secure Erase Free Space feature in Disk Utility on your Mac added a layer of privacy and security to file deletion. The feature allowed you to overwrite the free space on a drive to prevent deleted files from being recovered.
Modern versions of macOS, and later versions of OS X, like El Capitan, don’t include the Secure Erase Free Space feature in Disk Utility. Because most Macs now come with Solid State Drives (SSDs) instead of regular hard disks, Apple feels there is no need for the feature. When you erase files normally on an SSD, it’s difficult to recover that data.
Apple explained that you don’t need to securely erase your Mac’s SSD in their online knowledgebase:
With an SSD drive, Secure Erase and Erasing Free Space are not available in Disk Utility. These options are not needed for an SSD drive because a standard erase makes it difficult to recover data from an SSD.
Whether you have an SSD or an HDD, you should use FileVault to protect your data. FileVault encrypts your whole drive so all your files are protected. You need a password to access anything on the drive. Without it, your data remains encrypted and safe from unauthorized access
Securely Wipe the Free Space on Your Mac Using the Command Line
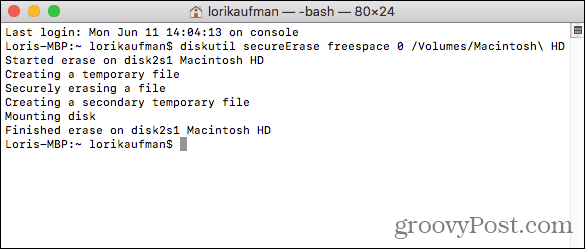
Before wiping the free space on your Mac using the command line, back up your data.
Once you’ve backed up your data, open the Terminal app from the Applications > Utilities folder.
Then, type the following command at the prompt and press Enter.
Make sure you include “freespace” in the command. This indicates you are only erasing the free space on the drive and not the entire drive.
The number “4” indicates the wipe level performed on the drive’s free space. You can use “4” for the wipe level, or select a different option from the following list:
- 0 – Single-pass zero-fill erase.
- 1 – Single-pass random-fill erase.
- 2 – US DoD 7-pass secure erase.
- 3 – Gutmann algorithm 35-pass secure erase.
- 4 – US DoE algorithm 3-pass secure erase.
The more passes you do when wiping the free space, the longer the process takes.
Replace “Macintosh\ HD” with the name of the volume you want to wipe the free space on. If the name of the volume contains a space, type a backslash in front of the space, like we did in our command. Make sure you include “/Volumes/” before the name of the volume.
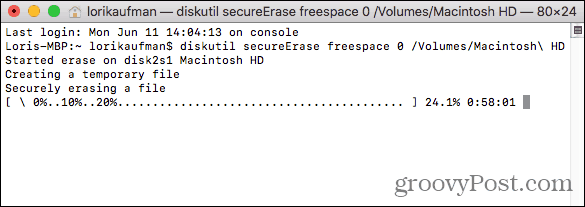
When the wiping process finishes, you’ll see a message and you’re returned to the command prompt.
Securely Wipe the Free Space on Your Mac Using CCleaner
CCleaner for Mac has fewer tools available than CCleaner for Windows. But you can use it to securely wipe the free space on an HDD using the free version of CCleaner. You can pay for the Pro version, but it’s not necessary.
Download and install CCleaner. When you open the program, click Tools on the left pane. Then, click Erase Free Space in the middle pane.
Select a volume you want to erase the free space on. If you select an SSD, a message displays in the Details box saying Erase Free Space is not available for SSDs.
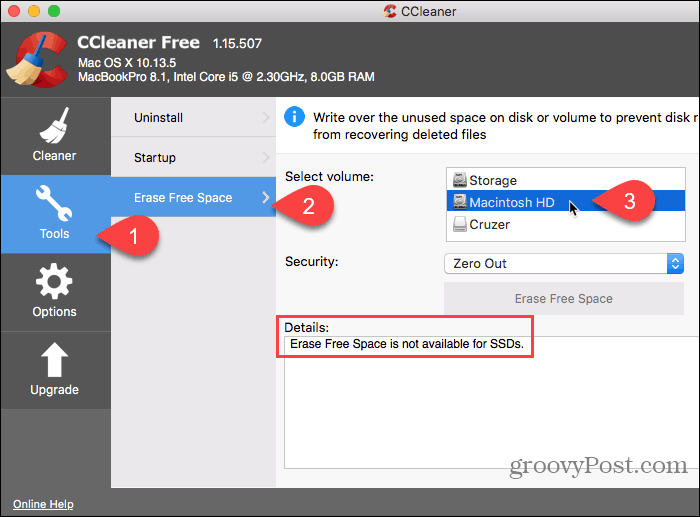
Once you select a regular HDD, choose one of the following options from the Security drop-down list.
Then, click Erase Free Space.
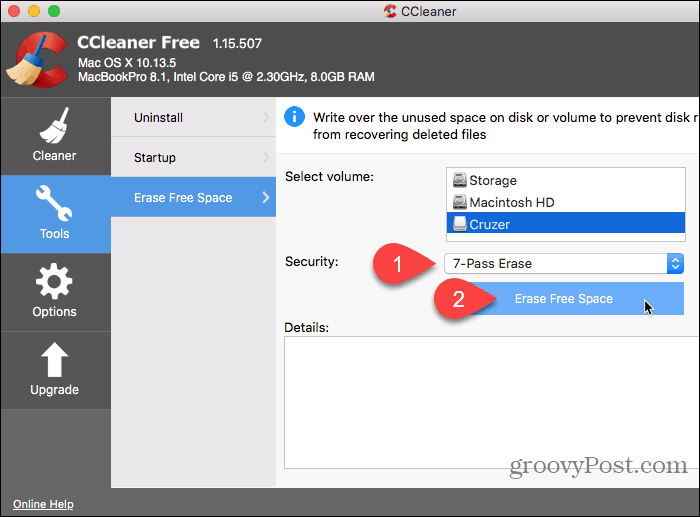
CCleaner warns you that the process may take several hours to complete.
To start erasing the free space on the selected drive, click Yes. If you’ve changed your mind, click No.
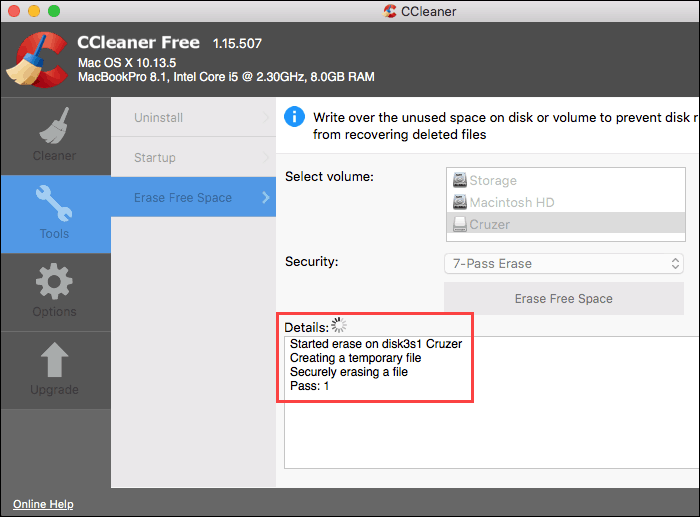
If you clicked Yes, enter your password if prompted.

The wiping process begins and the progress displays in the Details box.
Prevent Private Data from Being Recovered
Apple devices, including Macs, are known for lasting a long time. So, if you still have an older Mac with a regular HDD, use one of these methods to ensure your sensitive deleted files can’t be recovered.
If you also use a Windows PC, here are a few ways you can securely wipe free space in Windows.
Do you know of any other methods or tools for securely wiping free space on a Mac or other secure data removal options for modern versions of the Mac operating system? Share your thoughts and ideas with us in the comments below!
Источник
8 Methods to Free Up Space and Manage Storage on Mac [2020]
Is your Mac running low on storage and you can’t seem to free up space on Mac? Read on as we have listed 8 working solutions on how to clear space on Mac in this post.

Sue Wayne
Sep 08, 2021 • Filed to: Solve Mac Problems • Proven solutions
Truth to be told – this is one of the major queries of almost every Mac user these days. While Mac offers a wide range of features, most of the models suffer from limited storage. Therefore, a lot of people find it hard to manage storage on Mac and seek the assistance of external sources. Though, if you want, you can take some preventive measures and clear up space on Mac. Some several techniques and methods can help you do the same in less time. To make things easier for you, we have come up with several solutions that will clear space on Mac and resolve this situation.

Part 1. How to See How Much Space Is Left on Mac
Before you learn how to clear space on Mac, it is important to know about the system’s available storage. In this way, you can get a clear idea of how much space in left in Mac and you can clear other content accordingly. Here’s how to see how much space is left on your Mac storage.
- Firstly, launch Finder on your Mac and from its sidebar, go the Devices section, and select the root directory.
- Here, you can view all the partitions and external devices. Select the Macintosh HD (or Fusion drive). Right-click to get the context menu and go to the «Get Info» section.

A pop-up window will open stating all the essential details of the hard drive. The «Capacity» section will display the total storage while the «Available» option will inform you of the total free space on it.

How to See What’s Taking up Space on Mac
After knowing how much space is left on your Mac, you can also take some extra measures as well. For instance, you can know what type of data is accumulating how much space on your system. To get an extensive bifurcation of the storage, follow these steps:
- Go to Mac’s desktop and click on the Apple logo at the top left corner of the screen. From here, go to the «About This Mac» option.


Eight Solutions to Free Up Space on Mac
1. Downloads Folder
The Downloads folder is the default location on Mac that stores all the content that you have downloaded from the web. If you have been using your Mac for a while now, then the Downloads folder can accumulate a lot of data. Therefore, you should consider visiting the Downloads folder every now and then, and delete the unwanted files from it to clear disk space on Mac.
- To access your Mac’s Downloads, just click on the «Go» option on Finder and open the Downloads folder.

2. Unwanted Apps
We all use different kinds of apps on our Mac for numerous purposes. Though, there are times when the system ends up having too many unwanted apps. You can just inspect all the installed apps on Mac and get rid of the programs you no longer want. In this way, you can easily learn how to free up disk space on Mac and boost its processing as well.
- Just go to Mac’s Finder > Applications to view all sorts of apps installed on Mac under various categories.
- Select the application you wish to delete, right-click, and move it to Trash to get rid of it.

If you are removing any important application, then you would get a confirmation prompt like this. Just enter the admin username and password to confirm your choice and delete the app.


3. Duplicate Photos and Media Files
This is something that almost every Mac user suffers from. Since we all move our photos, videos, music, and other media files from one place to another, it often results in redundancy. If you wish to free up space on Mac, then check for any duplicate content and get rid of unwanted files.
- Mostly, users observe the presence of duplicate photos on Mac. To analyze this, go to Finder > Pictures from the sidebar.
- Here, you can find both the Photos Library and iPhoto Library. You can choose either of these options and import photos from one library to another to get rid of duplicate files.


4. Get rid of Trash
Whenever we delete something from Mac, it is moved to Trash. This lets us recover the files that we have deleted accidentally. Though, if you wish to clear space on Mac, then it is important to wipe the Trash folder as well. In this way, you can delete files from Trash permanently and clear disk space on Mac easily.
- If you want to empty the entire Trash folder, then select its icon first and go to Finder. Click on the «Empty Trash» option from here and confirm your choice.
![]()
In addition to that, you can also select the Trash icon from the dock and right-click. From the context menu, click on the «Empty Trash» option.
![]()
5. iTunes Backup
To make it easier for iOS users to manage their devices, Apple has provided several options in iTunes. Chances are that you must have taken its assistance to back up your iOS device as well. For instance, if you have an iPhone, then you can easily take its backup on iTunes as many times as you want. Though, multiple backups can take a toll on Mac storage and should be checked regularly. If you want to learn how to free space on Mac, then follow this simple drill.
- Start by launching iTunes on your Mac and go to its iTunes menu > Preferences.


6. Temporary Files
Just like every other leading operating system, Mac also stores temporary and cache data while processing. Ideally, these temp files help us with the processing of certain actions and the overall Mac performance. Nevertheless, they can also accumulate after a while and consume a large chunk of your Mac’s storage. Thus, it is recommended to remove temporary files every now and then to free up space on Mac.
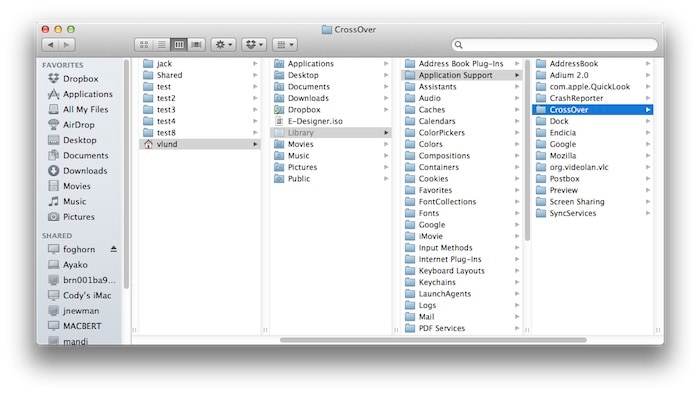
- Since every application can have its own temporary files, you can start by visiting the relevant folders. Visit Finder’s Go > Go to Folders and enter «
/Users/User/Library/Application Support/» in the address bar.

7. Mac Mail Attachments
Mac comes with tons of native apps like Mail that can help us manage our emails and messages in one place. Needless to say, the constant use of the mails and the downloading of several attachments can consume a lot of storage. If you want, you can get rid of individual or bulk attachments in the following way.
- Firstly, open the Mail app from Finder and go to the mail that has the respective attachment.
- Once the attachment is loaded, go to the Message option from the Finder and choose to Remove Attachment.
- If you want to manually delete bulk attachments that are already downloaded on Mac, then go to the
/Library/Mail folder.
Here, you can view all the stored Mac mail attachments. Make the relevant selection and delete the unwanted files.

8. Move Files to an External Storage
While we can delete unwanted content from Mac, there are certain files that we can’t get rid of. In this case, you can simply move them to external storage like an SD card, pen drive, or external hard disk. This will free up disk space on your Mac while still keeping your important data safe.
- Simply connect an external data source to your Mac. Most likely, you can see its icon on the desktop from where you can access the storage.


Part 4. How to Manage Storage on Mac
By following the above-listed techniques, you would be able to clear disk space on Mac. Apart from that, you can also manage storage on Mac more efficiently by following these suggestions:
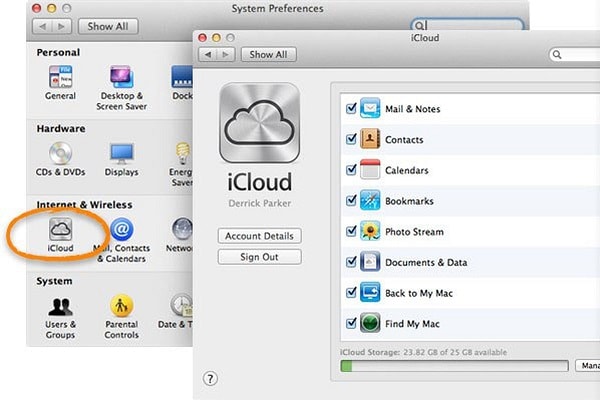
• Manage iCloud Sync
By default, every Apple ID gets access to 5 GB of free storage on iCloud. If you want, you can even buy more storage as well. You should make the most of it by syncing certain things on iCloud with your Mac. This will maintain a dedicated backup of your data (like Photos) and improve their availability. Simply Go to Finder > System Preferences and launch the iCloud app. Set up your account if you haven’t already and enable the syncing option for your photos, contacts, notes, etc.
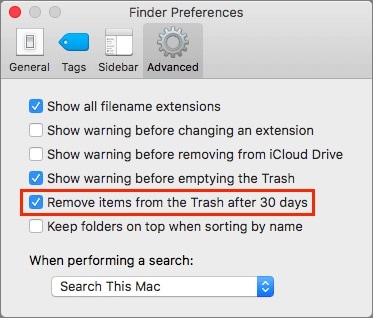
• Auto Empty Trash
A lot of users forget to empty the Trash after moving files to it. If you want, you can make sure that the data would only be stored for 30 days in Trash. After that, it will automatically be removed from Trash to make more space on Mac. Just go to Finder > Finder Preferences > Advanced. Now, enable the option to remove items from Trash after 30 days automatically.
• Optimize Storage
There are also different ways to manage storage on Mac by optimizing it. To start with, de-clutter your system and try to have an organized hierarchy of the file system. If you want, you can automate this feature as well. Just go to Finder and click on the Apple icon > About this Mac > Storage > Manager. Here, you can enable the Optimize Storage option to remove the iTunes movies and shows that you have already watched.
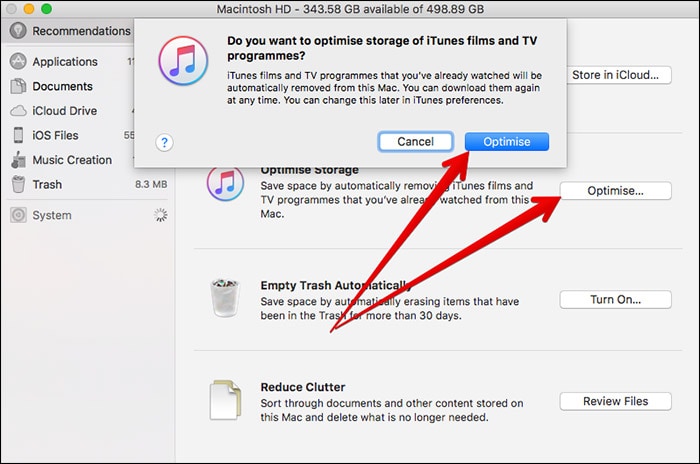
There is also an option for «Reduce Clutter» that you can turn on. This will organize your Mac and get rid of the documents you no longer need.
• Delete App Data
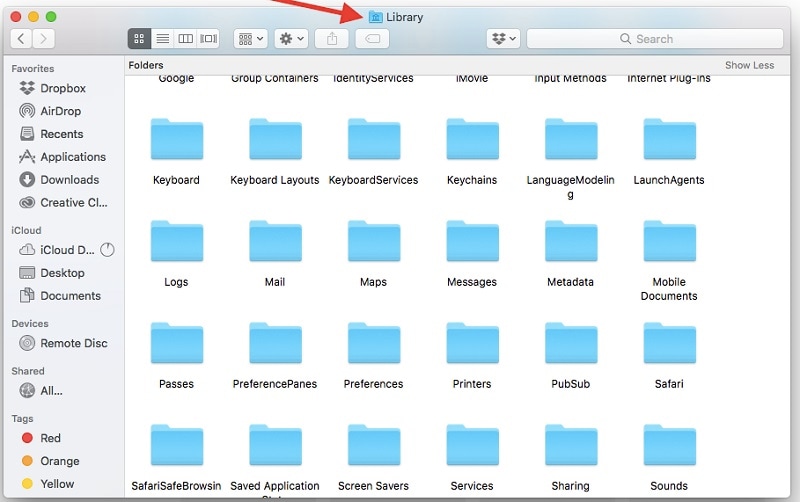
Sometimes, uninstalling apps is not enough as they can leave residual data on Mac. If you won’t remove the leftover app data, then it can consume a lot of storage of your Mac in the long run. Just go to your Mac’s Library and visit the folder of the app you have already uninstalled. From here, you can carefully remove the existing app data that is no longer needed by Mac.
• Organize Mac Partitions
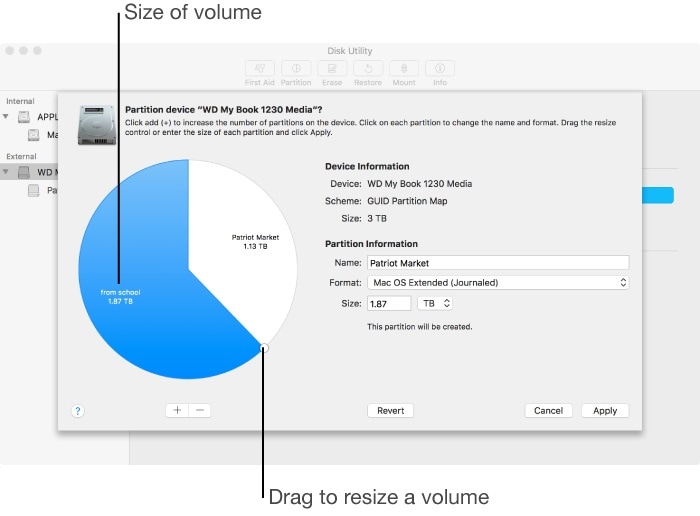
You might already know that Mac lets us create different partitions to logically separate the disk. It is recommended to empty the partition and delete it to defragment the disk space. Once you have taken a backup of your data, go to Applications > Disk Utility and view the existing partitions. Delete the unwanted partitions, create new ones, or merge existing partitions from here to make the most of the provided space.
Part 5. How to Recover Lost Data While Clearing Space
As you can see, there are different ways to learn how to make space on Mac by managing the storage and getting rid of unwanted content. Though, there are times when we end up deleting something by mistake. In this case, you can take the assistance ofВ RecoveritВ Data RecoveryВ for Mac to get back the lost, deleted, or inaccessible data. Recoverit 8.0 is the latest release of the application that provides a wide range of data recovery features and an extremely simple user interface. Here are some of the new and advanced features of this data recovery tool.
- Recoverit 8.0 runs an extensive scan on Mac through its advanced recovery algorithm. This yields comprehensive results in less time.
- Using Recoverit, you can get back all kinds of lost and deleted data back. The application supports 1000+ different data types for photos, videos, audios, files, documents, etc.
- It is fully compatible with every major file system used in Mac like APFS, HFS+, exFAT, and more.
- You can preview the extracted content on its native interface and pick the type of data that you wish to get back.
- It doesn’t matter if you have accidentally deleted something, the storage has been corrupted, or an entire partition has been formatted – Recoverit can handle every scenario.
- Apart from Mac’s HD, you can also perform data recovery on SD cards, cameras, external hard disks, pen drives, and all the popular sources.
Since the basic version of Recoverit 8.0 is available for free, you don’t have to spend a single dime to have a hands-on experience of the tool first. Later, you can follow these simple steps and restore your lost data from Mac using Recoverit 8.0:
Step 1: Select a Location
Install and launch Recoverit 8.0 on your Mac, whenever you wish to get back your lost files. On its home, you need to select a location to scan. This can be Mac’s entire storage, a partition, or even a particular folder. You can browse to a specific location of your choice as well.

Step 2: Scan the Location
As you would click on the «Start» button, Recoverit will scan the source and extract all the essential files from it. It might take a few minutes for the process to be completed, and hence, it is recommended not to close the application in between.

Step 3: Preview and Recover
When the scan is complete, the interface will let you preview all the extracted data. It will already list everything under different categories. Recoverit 8.0 now also provides a bigger and better preview for photos, videos, and documents. Select multiple files if you want to and click on the «Recover» button to save them to any location of your choice.

Conclusion
Who knew it would be so easy to manage storage on Mac and even recover lost data from it. To make things easier for you, we have listed eight different solutions on how to free up space on Mac. Furthermore, we have even provided a smart guide on how to see storage on Mac beforehand. In this way, you can see the difference in your Mac storage before and after following the listed suggestions. Additionally, if you have deleted something by mistake, then simply take the assistance of Recoverit Data Recovery. Developed by Wondershare, it is one of the most advanced and reliable data recovery tools for Mac that you should certainly keep handy.
Источник


