Setting up WireGuard on Windows
Published: July 17, 2019 • linux
A few months ago, I wrote a tutorial on how to install WireGuard, a simple, fast, and modern VPN, on Linux and open a VPN connection from an Android device. Because I work most time on Windows I was also especially interested in connecting my computer to a WireGuard VPN, but at that time, there was no Windows client available.
In the meantime, the developers of WireGuard released a Windows version. In this blog post, I show you how to install and configure WireGuard on Windows and establish a VPN connection to a WireGuard server running on a VPS.
This tutorial assumes that you already have a WireGuard server running somewhere. I connect the Windows client to a WireGuard server running on Amazon Lightsail, which is set up according to my previous blog post. If you follow my previous tutorial, skip the client setup section, and you also don’t have to generate the public/private key pair for the client.
The topology of our VPN that we build in this tutorial looks like this:

I’m using WireGuard in this example as a VPN and route all IP traffic from my Windows computer to the Internet through the Linux server.
You can use WireGuard also for connecting to a private network like a company LAN or for connecting two private networks over the public Internet; however, I will not cover these use cases there.
Installation
The first step is to download the software from the download page:
https://www.wireguard.com/install/
Install the msi file. After the installation, you should see the WireGuard icon in the icon bar.

WireGuard for Windows runs on Windows 7, 8, 8.1, 10, 2012, 2016, and 2019 and is available in a 64-bit and a 32-bit version. I’m testing the 64-bit version on Windows 10.
Be aware that all the WireGuard software packages are in a pre-release state and should only be used for testing. If you are concerned about security, I recommend waiting until the official release, and an independent third party audited the software.
Configuration
Next, we configure the VPN tunnel. This includes setting up the endpoints and exchanging the public keys.
Windows
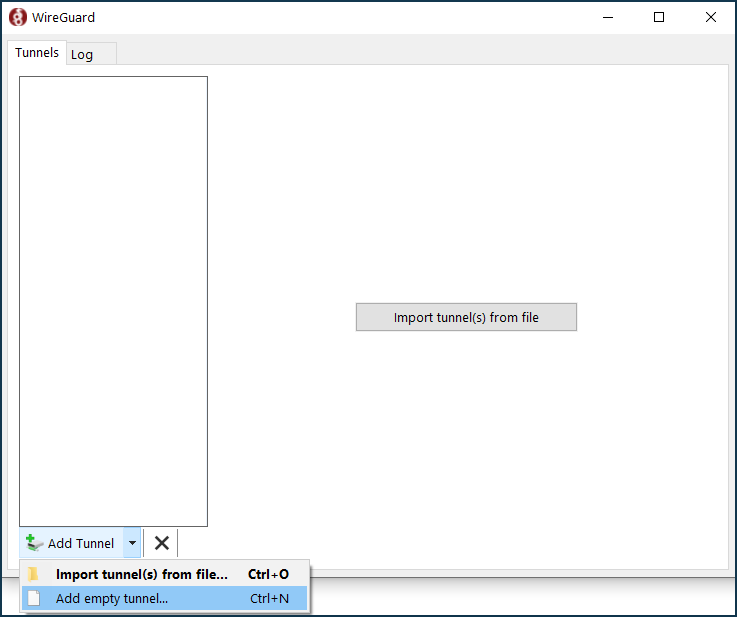
Open the WireGuard GUI and click on Add Tunnel -> Add empty tunnel. 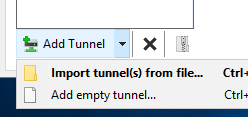
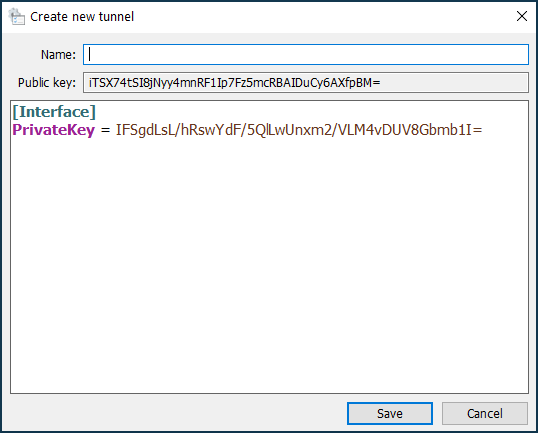
The software automatically creates the public/private key pair and displays it on the screen. 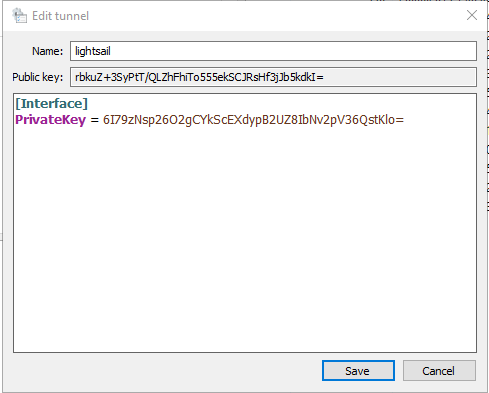
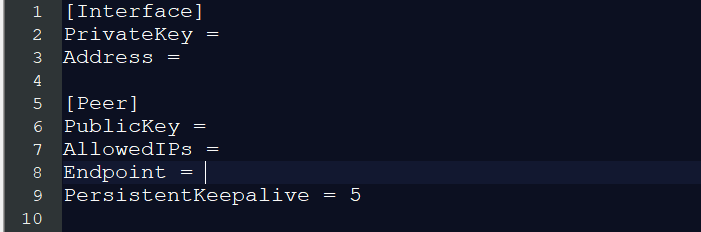
Give the tunnel a name and insert the following configuration. Change IP addresses and keys according to your environment.
- PrivateKey: Private key of this client
- Address: IP address of this client. It must be unique among all clients.
- DNS: IP address of a DNS server. In this case, I use the DNS server running on the WireGuard server.
- PublicKey: Public key of the server
- AllowedIPs: Specifies what IP addresses should be routed over the VPN. 0.0.0.0/0 is a catch-all configuration and routes everything over the VPN.
- Endpoint: External IP address of the server and listening port. Port must match ListenPort server configuration.
Server
On the server side you need to add a [Peer] section to the WireGuard configuration file ( /etc/wireguard/wg0.conf )
- PublicKey: Public key of the Windows client
- AllowedIPs: Specifies what IP addresses are allowed through this tunnel. This is the VPN IP address of the Windows computer.
Here a screenshot where you see the Windows client (left) and the Linux server (right) configuration.
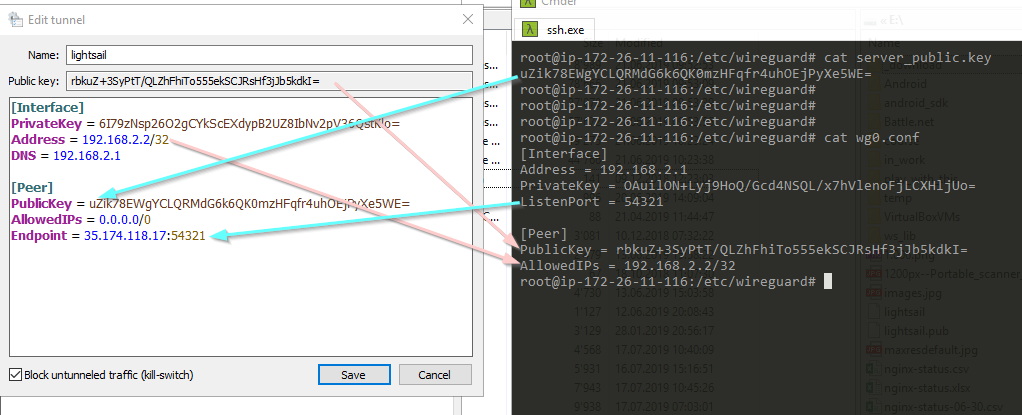
Make sure that you exchange the correct keys, and the IP addresses are correct.
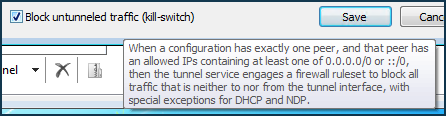
Block untunneled traffic
In the screenshot above, you might notice the option Block untunneled traffic. You can enable this option when your configuration has precisely one [Peer] section and AllowedIPs is set to a catch-all address.
If the option is enabled the WireGuard client adds Windows Firewall rules to block all traffic that is neither to nor from the tunnel interface.
As mentioned before, I use this configuration to route all IP traffic through the VPN, so it makes sense to enable this option to prevent accidentally sending IP packets outside the VPN.
If you use WireGuard for connection to a private network, like a company LAN or your home network, you don’t enable this option and configure AllowedIPs so that only IP addresses of your private network are routed through the VPN.
Activate
You should now be able to activate the VPN connection.
Click on Activate.
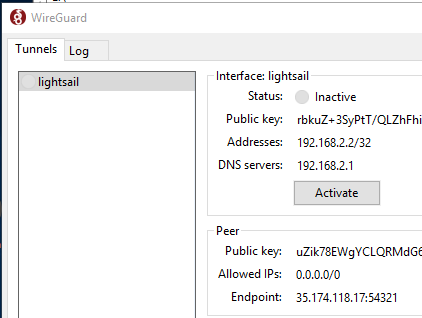
After a few seconds, the status should change to Active
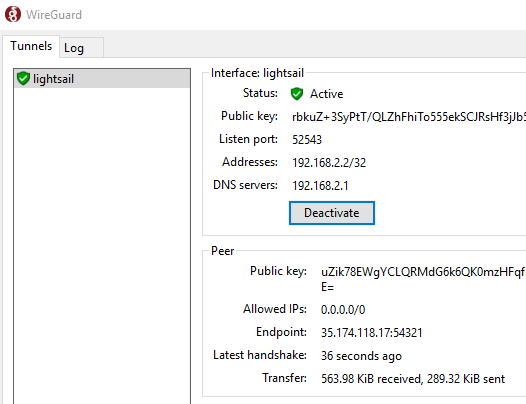
If that’s not the case, check the Log tab and double-check the client and server configuration.
Deactivate closes the VPN connection.
Checking VPN connection
To check if the VPN works correctly, open a browser with the URL: https://www.whatismyip.com/
Or enter the search term «my ip» into the Google search.
If the connection is routed through the VPN, it should show the IP address of the WireGuard server as the public address.
If you run your own DNS server, as I do in this example, also check if DNS requests are routed through the VPN. Go to https://www.dnsleaktest.com and run the extended test. The test runs for a few seconds and displays a list of servers that answered the DNS queries. Make sure that this list only contains the IP address of your DNS server.
Read this guide about DNS leaks to learn more why you want to test for DNS leaks and it also shows you other methods for preventing leaks.
Adding more clients
You can connect multiple clients to one server. Follow the configuration above and add a [Peer] section for each client to the server configuration file. Make sure that you assign a unique IP address for each client.
Don’t forget to restart WireGuard on Linux after you changed the configuration:
I’m running the Windows client now for a few days, and even it’s a pre-release, it is remarkably stable and works without any problems.
One feature I like is that the Windows version of WireGuard remembers the VPN connection state. When you reboot Windows while WireGuard is connected to the server, the software automatically reconnects and re-establishes the VPN tunnel when it starts up. This prevents you from accidentally connecting without a VPN.
Подключение по протоколу WireGuard VPN из Windows 10
Чтобы удаленно подключиться к локальной сети интернет-центра Keenetic, начиная с версии KeeneticOS 3.3 стало возможно использовать туннель WireGuard VPN.
Сначала необходимо выполнить настройку сервера WireGuard в Keenetic, которая показана в инструкции «Настройка WireGuard VPN между двумя роутерами Keenetic» , после переходите к настройке VPN-клиента.
NOTE: Важно! Если вы планируете настроить Keenetic в качестве VPN-сервера, начать необходимо с проверки того, что он имеет публичный «белый» IP-адрес, а при использовании сервиса KeenDNS, что он работает в режиме «Прямой доступ». При несоблюдении любого из этих условий подключение к такому серверу из Интернета будет невозможно.
Ниже приведем пример действий для подключения к серверу из операционной системы под управлением ОС Windows, на примере версии Windows 10 1909 (19H2).
Чтобы установить соединение к WireGuard -серверу Keenetic, в компьютере на базе ОС Windows, потребуется скачать и установить программу WireGuard с официального сайта.
1. Послу установки программы и запуска, нажимаем в нижнем левом углу на стрелку вниз напротив «Add Tunnel» — «Add empty tunnel. [Ctrl+N]».
Откроется окно настройки конфигурации подключения к удаленному WireGuard -серверу Keenetic — «Create new tunnel».
NOTE: Важно! Оставляем данное окно открытым, не закрываем его.
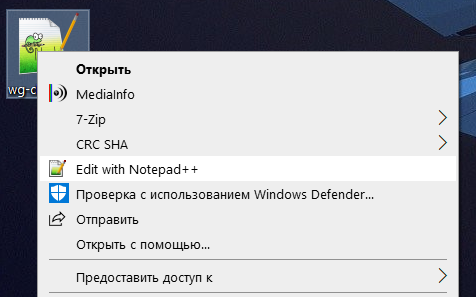
2. Скачиваем файл wg-client.conf к себе на компьютер, можно на Рабочий стол. Открываем в текстовом редакторе, например в Notepad++
Откроется готовая конфигурация, в которую необходимо будет ввести настройки подключаемого WireGuard -клиента Windows [Interface] и удаленного WireGuard -сервера Keenetic [Peer].
NOTE: Важно! Оставляем данное окно открытым, не закрываем его.
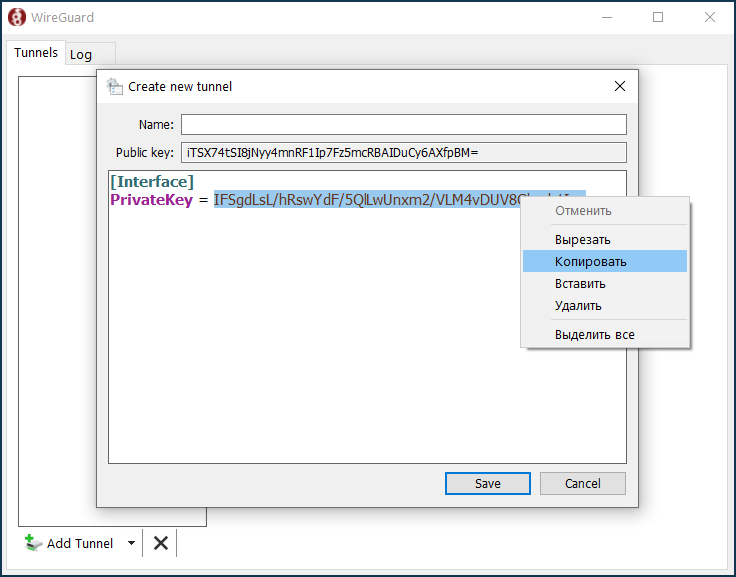
3. Возвращаемся к открытому окну «Create new tunnel» пункта 1 и копируем из поля «PrivateKey = » — приватный ключ WireGuard -клиента Windows в буфер обмена компьютера.
NOTE: Важно! Оставляем данное окно открытым, не закрываем его.
4. Скопированный в буфер обмена компьютера приватный ключ WireGuard -клиента необходимо добавить в готовую конфигурацию из пункта 2 в строку «PrivateKey = «.
NOTE: Важно! Оставляем данное окно открытым, не закрываем его.
5. Настраиваем удаленное подключение на стороне ранее настроенного WireGuard-сервера.
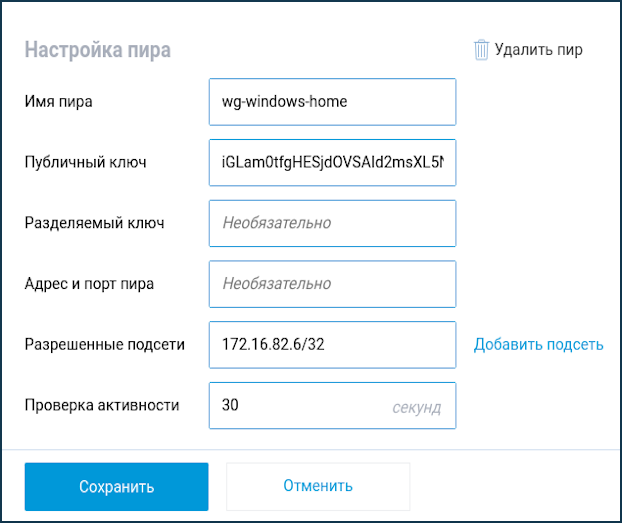
Подключитесь к веб-конфигуратору роутера и перейдите в меню «Интернет» — «Другие подключения». Нажмите на ранее созданное WireGuard -подключение («WG-S») и добавьте «Настройки пира». Нажав на «Добавить пир» откроется поле настроек пира, в котором укажите название туннеля «wg-windows-client».
В поле «Публичный ключ» вставляем ключ из пункта номер 1, который необходимо скопировать из поля «Public key» в буфер обмена компьютера.
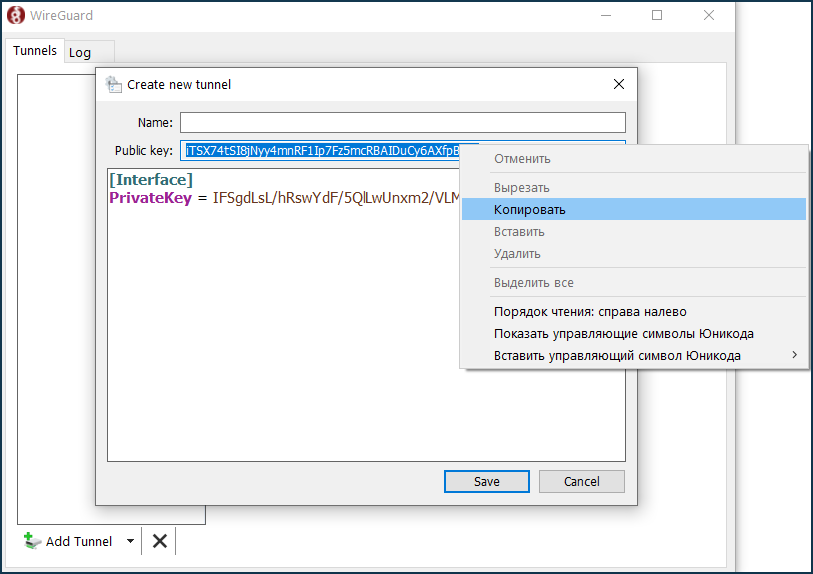
Окно «Create new tunnel» можно закрыть, нажимаем «Cancel».
NOTE: Важно! Оставляем окно подключения WireGuard открытым, не закрываем его.
Вставляем ключ в поле «Публичный ключ», в поле «Разрешенные подсети» указываем адрес, трафик с которого будет допущен до сервера в формате IP/bitmask — 172.16.82.6/32
В поле «Проверка активности» необходимо указать периодичность попыток проверки доступности удаленной стороны соединения. Обычно достаточно 10-15 секундного интервала между проверками. По умолчанию значение «Проверки активности» в настройках пира Keenetic указано 30 секунд.
6. Возвращаемся к настройке конфигурации wg-client.conf
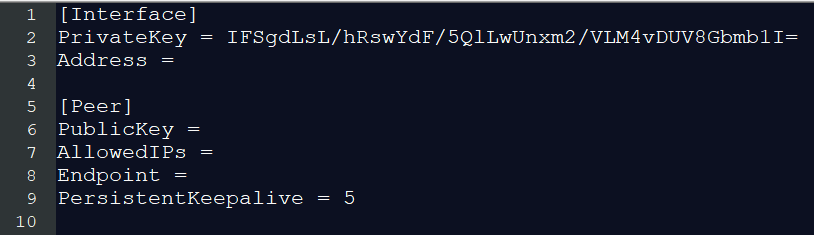
Настройка [Interface] клиента:
В поле «PrivateKey» интерфейса клиента уже введем созданный ключ WireGuard -клиента Windows в пункте 4.
В поле «Addresses» интерфейса клиента указываем IP-адрес, в формате IP/bitmask — 172.16.82.6/24 (это внутренний адрес туннеля). Можно использовать другую подсеть, при этом ее следует выбрать из частного диапазона адресов и избежать наложения с другими настроенными на данных устройствах подсетями.
Настройка [Peer] сервера:
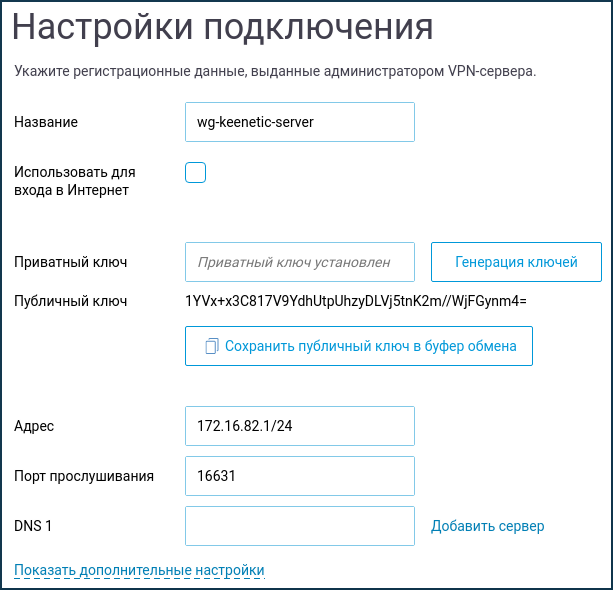
В поле «PublicKey» вставьте публичный ключ сервера, который можно скопировать в буфер обмена компьютера из настроек WireGuard в веб-интерфейсе роутера:
В поле «AllowedIPs» указываем разрешенные IP-адреса, в формате IP/bitmask — 172.16.82.1/32 (это внутренний адрес сервера) и 192.168.22.0/24 (адрес локального сегмента роутера Keenetic).
В поле «Endpoint» указываем публичный IP-адрес или доменное имя WireGuard -сервера, и порт прослушивания, на который будет устанавливать связь WireGuard -клиент.
В поле «PersistentKeepalive» указываем периодичность попыток проверки доступности удаленной стороны соединения. Обычно достаточно 10-15-секундного интервала между проверками.
Жмем сочетание клавиш Ctrl+S, либо нажимаем «Файл», «Сохранить».
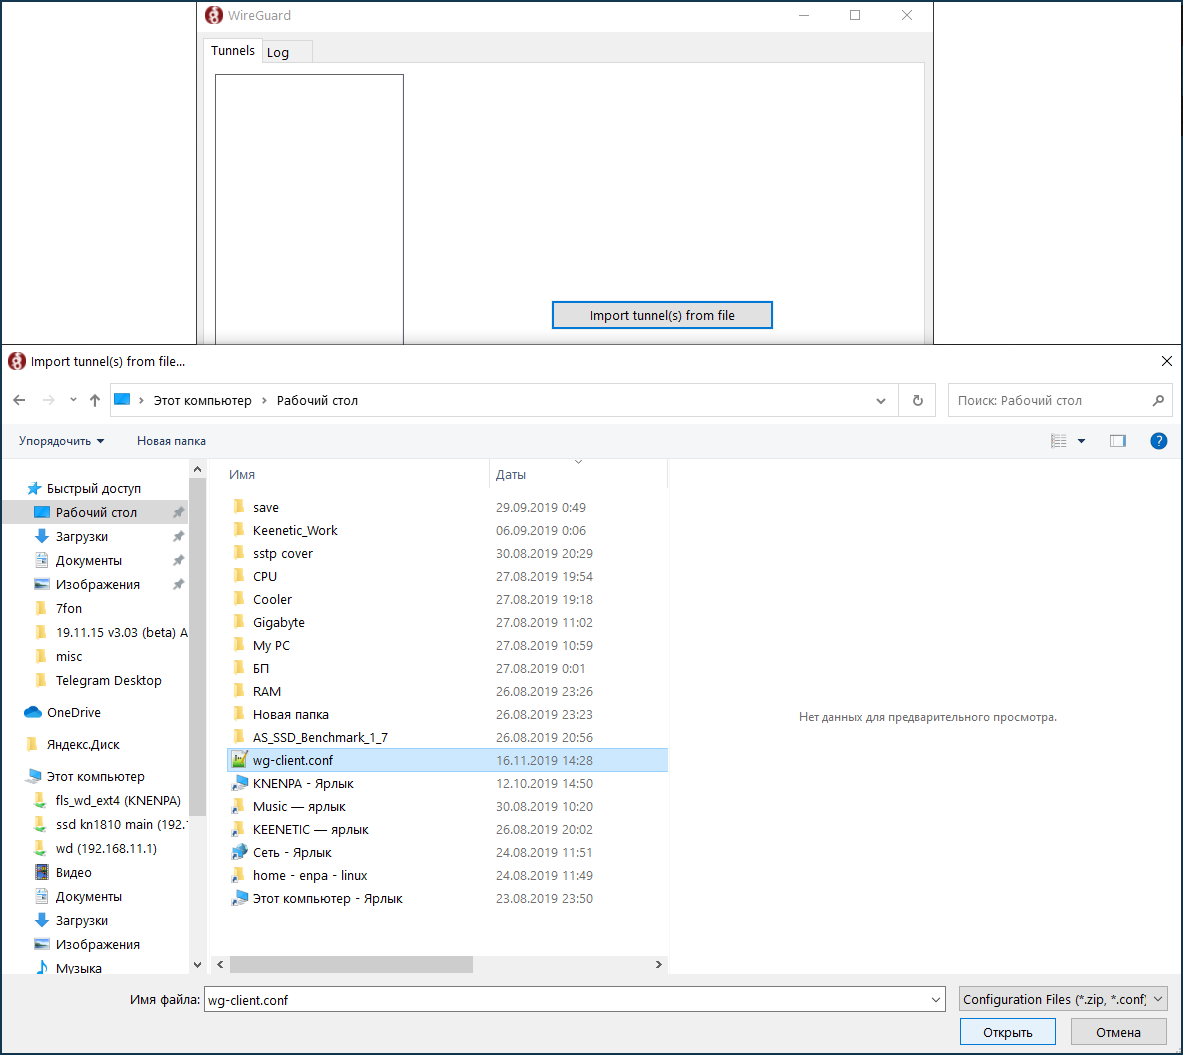
7. В открытом окне настроек подключения WireGuard из пункта номер 5, нажимаем на «Import tunel(s) from file» и выбираем на Рабочем столе файл «wg-client», жмем «Открыть».
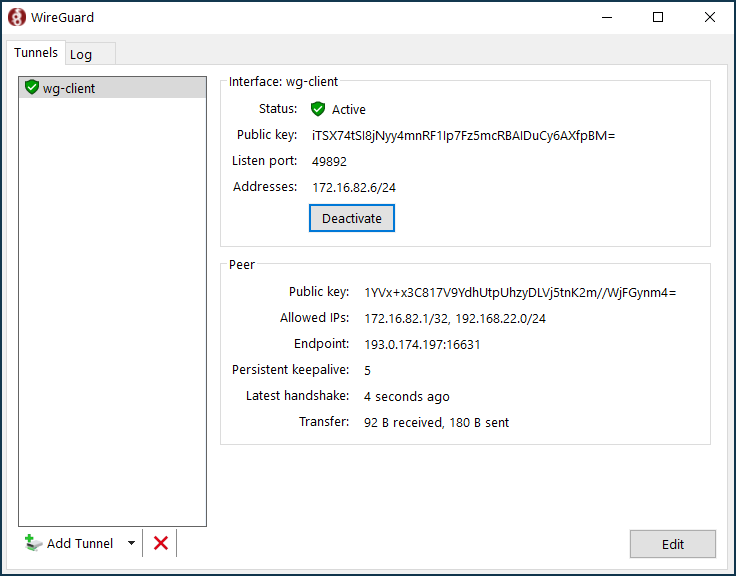
8. После добавления конфигурации «wg-client» в программу подключения WireGuard , в списке «Tunnels» появится новое подключение.

Если настройка выполнена правильно, напротив строки «Status» вы увидите зеленый индикатор.
Для проверки доступности сервера можно выполнить отправку ICMP-пакетов до IP-адреса в командной строке Windows.
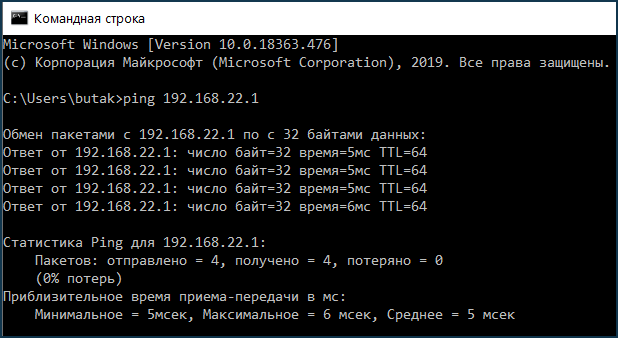
Проверяем доступность веб-интерфейса сервера (в нашем примере это Keenetic с IP-адресом 192.168.22.1).
Если вам нужно, чтобы подключенные клиенты получали через данное VPN-соединение доступ в Интернет, выполните дополнительную настройку из статьи » Доступ в Интернет через WireGuard-туннель «.
Обращаем ваше внимание, что на стороне VPN-клиента в файле конфигурации wg-client.conf в разделе «[Interface]» необходимо указать DNS-сервер в поле «DNS=» (в нашем примере указан адрес DNS-сервера от Google 8.8.8.8) и добавить адресное пространство 0.0.0.0/0 в разделе AllowedIPs = :
TIP: Примечание: При условии, что в конфигурации один пир и указана разрешенная сеть «все адреса», приложение будет автоматически формировать запрещающее трафик мимо туннеля правило сетевого экрана на компьютере.
Пользователи, считающие этот материал полезным: 5 из 5


