- Устройства, поддерживаемые Центром управления мышью и клавиатурой (Майкрософт).
- How to Install a Wireless Keyboard and Mouse
- Connect a wireless mouse and keyboard to your PC
- Unpack the Equipment
- Set Up the Keyboard and Mouse
- Position the Wireless Receiver
- Install the Software
- Connect the Receiver to the Computer
- Test the New Keyboard & Mouse
- How to Connect Apple Wireless Keyboard and Mouse to Windows
- Pair Apple Wireless Magic Mouse to Windows OS
- Step 1: Installing the right Drivers
- Method 1: Using TrackPadMagic to connect Apple Magic Mouse to Windows
- Method 2: Using BootCamp to connect Apple Magic Mouse to Windows
- Step 2: Magic Mouse Utilities (Optional)
- Step 3: Pairing Apple Magic Mouse using Bluetooth
- How to Connect Apple Wireless Keyword to Windows
Устройства, поддерживаемые Центром управления мышью и клавиатурой (Майкрософт).
Последняя версия Центра управления мышью и клавиатурой (Майкрософт) поддерживает несколько версий мышей и клавиатур Майкрософт. Выберите один из следующих заголовков, содержащих список поддерживаемых устройств:
Arc Touch Bluetooth Mouse
Arc Touch Mouse
Basic Optical Mouse v2.0
Basic Optical Mouse
Bluetooth Ergonomic Mouse
Bluetooth Mobile Mouse 3600
Comfort Mouse 3000
Comfort Mouse 4500
Comfort Mouse 6000
Explorer Mini Mouse
Explorer Touch Mouse
IntelliMouse Explorer 3.0
Microsoft Arc Mouse
Natural Wireless Laser Mouse 7000
Sculpt Comfort Mouse
Sculpt Ergonomic Mouse
Sculpt Mobile Mouse
Sculpt Touch Mouse
SideWinder X3 Mouse
SideWinder X5 Mouse
SideWinder X8 Mouse
Surface Mobile Mouse
Wedge Touch Mouse
Wireless Laser Mouse 6000 v2.0
Wireless Mobile Mouse 1000
Wireless Mobile Mouse 3000 v2.0
Wireless Mobile Mouse 3000
Wireless Mobile Mouse 3500
Wireless Mobile Mouse 4000
Wireless Mobile Mouse 6000
Wireless Mouse 1000
Wireless Mouse 2000
Wireless Mouse 5000
Wireless Mouse 900
Wireless Notebook Presenter Mouse 8000
All-in-One Media Keyboard
Comfort Curve Keyboard 2000
Designer Compact Keyboard
Digital Media Keyboard 3000
Natural Ergonomic Keyboard 4000
Sculpt Ergonomic Desktop
Sculpt Ergonomic Keyboard
SideWinder X4 Keyboard
SideWinder X6 Keyboard
Wired Keyboard 400
Wired Keyboard 600
Wireless Arc Keyboard
Wireless Comfort Keyboard 5000
Wireless Comfort Keyboard 5050
Wireless Keyboard 850
Wireless Keyboard 900
Wireless Keyboard 1000
Wireless Keyboard 2000 v2.0
Wireless Keyboard 3000 v2.0
Wireless Keyboard 3000
Wireless Keyboard 3050
Wireless Keyboard 6000 v3.0
Wireless Keyboard 800
Wireless Laser Keyboard 6000 v2.0
SideWinder X6 Keyboard
Wireless Natural MultiMedia Keyboard
Microsoft Number Pad
Некоторые устройства Майкрософт старых моделей больше не поддерживаются в последней версии Центра управления мышью и клавиатурой (Майкрософт). Однако они по-прежнему поддерживаются более старой версией Центра управления мышью и клавиатурой (Майкрософт) 2.3 в Windows 7 или более ранней версией ПО IntelliPoint 8.2 и IntelliType Pro 8.2 в Windows 7, Windows Vista и Windows XP.
Если вы установили последнюю версию Центра управления мышью и клавиатурой (Майкрософт) и вам не удается найти и настроить устройство, может потребоваться удалить Центр управления мышью и клавиатурой (Майкрософт) и использовать Центр управления мышью и клавиатурой (Майкрософт) 2.3 или IntelliPoint/IntelliType Pro. Скачайте ПО, воспользовавшись следующими ссылками:
Выберите следующий заголовок, чтобы просмотреть мыши Майкрософт, поддерживаемые в Центре управления мышью и клавиатурой (Майкрософт) 2.3 и программе IntelliPoint:
Центр управления мышью и клавиатурой (Майкрософт) 2.3
(Windows 7)
IntelliPoint 8.2
(Windows 7, Windows Vista, Windows XP)
How to Install a Wireless Keyboard and Mouse
Connect a wireless mouse and keyboard to your PC
:max_bytes(150000):strip_icc()/tim-fisher-5820c8345f9b581c0b5a63cf.jpg)
Installing a wireless keyboard and mouse is really easy and should only take about 10 minutes, but possibly longer if you’re not already familiar with how to deal with basic computer hardware.
Below are general steps, but know that the specific steps you need to take might be a bit different depending on the kind of keyboard/mouse you’re using.
:max_bytes(150000):strip_icc()/high-angle-view-of-keyboard-and-computer-mouse-on-table-897088664-5c65fde446e0fb000178c0fd.jpg)
If you haven’t yet purchased your wireless keyboard or mouse, see our best keyboards and best mice lists.
Unpack the Equipment
Installation begins with unpacking all the equipment from the box. If you purchased this as part of a rebate program, keep the UPC from the box.
Your product box will probably contain the following items: Wireless keyboard, wireless mouse, wireless receiver(s), batteries (if not, you may have to supply these), software (usually on a CD), and manufacturer instructions.
If you’re missing anything, contact either the retailer where you purchased the equipment or the manufacturer. Different products have different requirements, so check the included instructions if you have them.
Set Up the Keyboard and Mouse
Since the keyboard and mouse are wireless, they won’t receive power from the computer like wired ones do, which is why they require batteries.
Turn the keyboard and mouse over and remove the battery compartment covers. Insert new batteries in the directions shown (match + with the + on the battery and vice versa).
Place the keyboard and mouse wherever comfortable on your desk. Observe proper ergonomics when you position your new equipment. Making the correct decision now can help prevent carpal tunnel syndrome and tendonitis in the future.
If you have an existing keyboard and mouse that you’re using during this setup process, just move them elsewhere on your desk until this setup is complete.
Position the Wireless Receiver
The wireless receiver is the component that physically connects to your computer and picks up the wireless signals from your keyboard and mouse, allowing it to communicate with your system.
Some setups will have two wireless receivers—one for each device, but the setup instructions will otherwise be the same.
While the specific requirements vary from brand to brand, there are two considerations to keep in mind when choosing where to position the receiver:
- Distance from interference: Keep the receiver at least 8 inches (20 cm) away from sources of interference such as the computer monitor and computer case and other items that may cause interference like fans, fluorescent lights, metal filing cabinets, etc.
- Distance from keyboard and mouse: The receiver should be positioned somewhere between 8 inches (20 cm) and 6 feet (1.8 m) from the keyboard and mouse. (Many receivers are just small USB dongles. They plug right into the USB port. Don’t worry too much about interference or distance with these.)
Don’t connect the receiver to the computer yet.
Install the Software
Almost all new hardware offers accompanying software that must be installed. This software contains drivers that tell the operating system on the computer how to work with the new hardware.
The software provided for wireless keyboards and mice differ greatly between manufacturers, so check with the instructions included with your purchase for specifics.
Generally, though, all installation software is fairly straightforward:
- Insert the disc into the drive. The installation software should start automatically. Depending on the setup, the software might need to be downloaded from the manufacturer’s website. Follow the instructions exactly as they are provided.
- Read the on-screen instructions. If you’re not sure how to answer some questions during the setup process, accepting the default suggestions is a safe bet.
If you don’t have an existing mouse or keyboard, or they’re not functioning, this step should be your last one. Software is nearly impossible to install without a working keyboard and mouse!
Connect the Receiver to the Computer
Finally, with your computer turned on, plug the USB connector at the end of the receiver into a free USB port on the back (or front if need be) of your computer case.
If you have no free USB ports, you may need to purchase a USB hub which will give your computer access to additional ports.
After plugging in the receiver, your computer will begin to configure the hardware for use. When the configuration is complete, you’ll probably see a message on the screen similar to «Your new hardware is now ready to use.»
Test the New Keyboard & Mouse
Test the keyboard and mouse by opening some programs with your mouse and typing some text with your keyboard. It’s a good idea to test every key to ensure there are no problems.
If the keyboard or mouse doesn’t function, check to make sure there’s no interference and that the equipment is in range of the receiver. Also, check the troubleshooting information probably included with your manufacturer instructions.
Remove the old keyboard and mouse from the computer if they’re still connected.
If you plan on disposing of your old equipment, check with your local electronics store for recycling information. If your keyboard or mouse is Dell-branded, they offer a free mail-back recycling program (yes, Dell covers the postage) that we recommend you take advantage of.
You can also recycle them at Staples, regardless of the brand or whether it actually still works.
How to Connect Apple Wireless Keyboard and Mouse to Windows
Last Updated on March 27, 2020 by Amar Ilindra 7 Comments
Pairing Apple Wireless Mouse and Keyboard to Windows 8, Windows 8.1, Windows 7, Vista and XP is made easier with third-party tools. All you need to have is a Bluetooth enabled Laptop or a PC. If your machine is not Bluetooth enabled, you can still connect Apple Wireless Keyboard and Mouse to Windows operating system. To know how to pair them, keep reading.

At the end of this article, you will know how to pair and connect Apple Wireless mouse and Keyboard to Windows OS in matter of seconds.
Pair Apple Wireless Magic Mouse to Windows OS
First we’ll see how to connect Apple Wireless Mouse to Windows 8, Windows 8.1, Windows 7, Vista and XP. The procedure for connecting Apple Wireless mouse is almost same for all these variants of Windows OS. All you need to pick the right download link from the list. Keep reading to download magic mouse drives for Windows.
Before you download drivers for magic mouse, cross check yourself with all these check list.
- Make sure you placed two working AA size batteries in Apple magic mouse.
- Push the power button to top at the back of magic mouse to turn it on. Note the blinking green light.
- Confirm your laptop or PC is Bluetooth enabled. Else, you can buy a Bluetooth dongle from here or here
Once you are set to go with all these above thing, you can now eligible to connect Apple Wireless mouse to Windows Operating System.
Step 1: Installing the right Drivers
We are here showing two different methods to connect Apple magic mouse to Windows environment. All devices are not configured in the same manner. So, either method 1 or method 2 will work for sure to everyone. I recommend to try method 1 first as it will work in 90% of cases.
Method 1: Using TrackPadMagic to connect Apple Magic Mouse to Windows
TrackPadMagic works on Windows 8, Windows 7, Windows 7, Windows Vista, Windows XP and Windows 10. You can pick your operating system from below list.
Download Magic Mouse drivers from below list. Make sure you are downloading the right version.
link -> trackpadmagic.com
Apple Wireless Magic Mouse drivers for Windows 10
Apple Wireless Magic Mouse drivers for Windows 8.1 – 64 Bit
Apple Wireless Magic Mouse drivers for Windows 8.1 – 32 Bit
Apple Wireless Magic Mouse drivers for Windows 8 – 64 Bit
Apple Wireless Magic Mouse drivers for Windows 8 – 32 Bit
Apple Wireless Magic Mouse drivers for Windows 7 – 32 and 64 Bit
Apple Wireless Magic Mouse drivers for Windows Vista – 32 and 64 Bit
Apple Wireless Magic Mouse drivers for Windows XP – SP 1 SP 2 and Sp 3
Double click the downloaded exe file and follow the onscreen instructions to complete the installation. Now you have successfully installed the required drives that supports left click, right click and scrolling. Gestures will not work on Windows. Hope developers will solve this issue soon.
Now go to Step 2 (ignore method 2 if you followed method 1)
Method 2: Using BootCamp to connect Apple Magic Mouse to Windows
Follow this second method, if you find any problems with the drivers mentioned in method 1 else you can straight forward to step 2.
- Download 7-zip to extract the executable files. We are now going to use MAC drivers in Windows.
- Download the following bootCamp drivers for your Windows device
- Extract the downloaded file using 7-zip and then from the extracted file, again extract BootCampUpdate64.
- Now you will see a folder named BootCampUpdate64 in extracted contents of BootCampUpdate64. Inside you will find many folders, Go to BootCamp31ToBootCamp302 and then copy Binary.MultiTouchMouse_Bin file to your desktop.
- Rename Binary.MultiTouchMouse_Bin to Binary.MultiTouchMouse_Bin.exe
- Now double click Binary.MultiTouchMouse_Bin.exe and follow the onscreen instructions to complete the driver’s installation.
Step 2: Magic Mouse Utilities (Optional)
This step is optional. But I recommend you to install Magic Mouse Utilities to enjoy natural scrolling and to know about battery percentage remaining.
- Download and Install Apple wireless mouse Utilities from here
Step 3: Pairing Apple Magic Mouse using Bluetooth
Connecting to Bluetooth is different for different versions of Windows OS. Follow instructions as shown below. Cross check your Mouse is turned on before proceeding. Windows cannot detect your Wireless mouse unless you turned it on.
In Windows 8 and Windows 8.1:
- Scroll your laptop Mouse to top right corner of the screen and click Settings
- Select Change PC Settings
- Click PC and devices, Select Bluetooth
- It will show all available Bluetooth devices and under your Magic mouse, Click Pair.
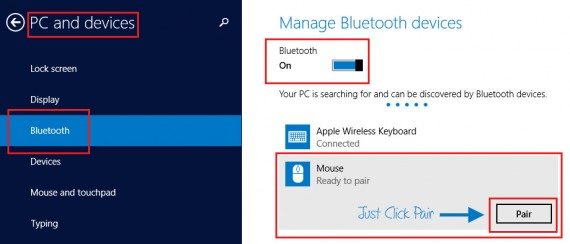
It will get connected automatically without any issues. In some devices, it will ask for passcode on your mouse. The default passcode for any Apple Wireless mouse is 0000
In Windows 7, Vista and XP:
- Click Start button
- Go to Devices and Printers
- Click Add device
- Select your Apple Magic Mouse and follow the onscreen instructions. If asked for any Password, try entering 0000.
Note: Remove and re-connect the device if it is already paired earlier.
Alright! You have just connected Apple Wireless mouse to Windows OS. All set to go. Keep rocking with you new Apple mouse.
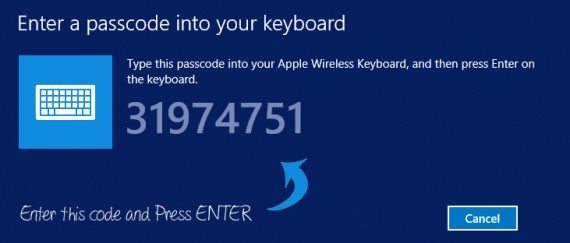
How to Connect Apple Wireless Keyword to Windows
Lucky, there is no need for any drivers to connect apple wireless keyboard to Windows operating system. All you have to do is pair it as a new device.
You are forced to press random numbers on your keyboard shown on the screen. Once you are done pressing those numbers, hit Enter to get connected.
Q. What is Passcode or Password for an Apple Wireless Mouse?
Q. Some keys are not working properly in Apple wireless Keyboard
A. Keys work bit differently. Here are some common keys to remember
- Command key = Windows Key
- Delete Key = Backspace key
- option key = Alt Key
- Return Key = Enter Key
Q. Function Keys behave strangely
A. Yes! Function keys on Apple keyboard will follow actual order as shown in your laptop built-in keyboard.
Q. Should I Turn Off Mouse and Keyboard?
A. No need. They will enter sleep mode if there is no activity for some time. You can press Enter on Keyboard and Left click on mouse to wake them up.
Q. How to check remaining battery percentage?
A. Install the utility provided in step 2 and then hover your mouse on mouse symbol shown in task bar.
That’s it folks. Let us know if you found any problems while connecting Apple wireless Mouse and Keyboard to your Windows OS and you can comment below if you need any help from us.


