- How to connect to a Wi-Fi network on Windows 10
- How to connect to Wi-Fi network using Taskbar
- Reconnect automatically
- How to connect to Wi-Fi network using Settings
- How to connect to Wi-Fi network using Control Panel
- How to connect to Wi-Fi network using Command Prompt
- New network connection
- Export Wi-Fi profile
- Import Wi-Fi profile
- More Windows 10 resources
- The Dell XPS 15 is our choice for best 15-inch laptop
- Halo: MCC’s live service elements make it better, not worse
- Microsoft’s Surface Duo is not ‘failing up’
- These are the best PC sticks when you’re on the move
- Беспроводная сеть – Отключено в Windows 10. Не включается Wi-Fi
- Почему не удается включить Wi-Fi на ноутбуке и как решить проблему?
- Решение через центр мобильности Windows 10
- Запускаем все службы
- Обновите BIOS
- Делаем так, чтобы Wi-Fi всегда был включен
How to connect to a Wi-Fi network on Windows 10
 Source: Windows Central
If you use a laptop, tablet, or even a desktop computer, it likely has a Wi-Fi connection, as it’s the most convenient medium to access a network and the internet without messing around with cables.
However, it’s only convenient as long as you know the steps to connect. If you’re using Windows 10, there are multiple ways quickly connect to the internet using a Wi-Fi connection, whether you’re setting up a device for the first time, connecting in a new place, or if you’re simply looking for an efficient way to connect multiple devices to the same network.
In this Windows 10 guide, we walk you through the steps to connect to a Wi-Fi network using the network flyout in Taskbar, Settings, Control Panel, and using command lines with Command Prompt.
How to connect to Wi-Fi network using Taskbar
To connect to a Wi-Fi network using the network flyout in taskbar, use these steps:
Click on the Network icon in the bottom-right corner of the taskbar. (If you don’t see the button, click the up arrow button on the left.)
Note: Alternatively, you can open Action Center (Windows key + A), and then click the Network button in the Quick actions section to access the network flyout.
Click the Connect button.
 Source: Windows Central
Quick tip: If you don’t see any network listed, click the Wi-Fi button to turn on the adapter from the flyout.
Confirm the network security key (password).
Source: Windows Central
Once you complete the steps, the device will connect to the network using the wireless connection.
Reconnect automatically
Windows 10 also offers an option to re-enable and reconnect the device automatically after disconnecting the adapter manually.
To schedule automatic reconnect to Wi-Fi networks, use these steps:
- Click on the network icon in the bottom-right corner of the taskbar.
Click the Wi-Fi button to turn off wireless connectivity.
Source: Windows Central
Use the drop-down menu and select when to re-enable and re-connect:
- Manually.
- In one hour.
- In four hours.
- In one day.
Source: Windows Central
After you complete the steps, Windows 10 won’t try to re-establish a wireless connection until the schedule you specified.
When you use this feature, the computer will only auto-connect to those networks that you’ve previously configured to connect automatically.
How to connect to Wi-Fi network using Settings
On Windows 10, you can also use the «Network & Security» settings page to pre-configure Wi-Fi connections manually, and then when the network is in range, it’ll connect automatically.
To set up a Wi-Fi connection with the Settings app, use these steps:
- Open Settings.
- Click on Network & Security.
- Click on Wi-Fi.
Click the Manage known networks option.
 Source: Windows Central
Click the Add a new network button.
Source: Windows Central
Click the Save button.
Source: Windows Central
After you complete the steps, the computer will connect automatically to the Wi-Fi network you specified when it’s range.
How to connect to Wi-Fi network using Control Panel
To connect to a wireless network with Control Panel, use these steps:
- Open Control Panel.
- Click on Network and Internet.
- Click on Network and Sharing Center.
Under the «Set up a new connection or network» section, click the Set up a new connection or network option.
Source: Windows Central
Select the Manually connect to a wireless network option.
Source: Windows Central
(Optional) Check the Connect even if the network is not broadcasting option.
Source: Windows Central
Once you complete the steps, the device will automatically connect to the Wi-Fi network.
How to connect to Wi-Fi network using Command Prompt
Alternatively, you can connect to a Wi-Fi network using the netsh command-line tool using Command Prompt.
To connect to a wireless access point with command lines, use these steps:
- Open Start.
- Search for Command Prompt, right-click the top result, and select the Run as administrator option.
Type the following command to view the available network profiles and press Enter:
netsh wlan show profile
Type the following command to connect to the Wi-Fi network and press Enter:
netsh wlan connect ssid=YOUR_WIFI_SSID name=PROFILE_NAME
In the command, remember to specify the SSID of the network and profile name with the network settings you’re trying to connect.
For example, this command connects to the tsunami network using the tsunami profile:
netsh wlan connect ssid=tsunami name=tsunami
 Source: Windows Central
Quick Tip: If you have more than one wireless adapter, you must also specify in the command which adapter you want to use. Here’s an example of the command: netsh wlan connect ssid=YOUR_WIFI_SSID name=PROFILE_NAME interface=Wi-Fi .
After you complete the steps, the device will connect to the wireless network.
New network connection
On Windows 10, you can use the netsh command tool to manage wireless adapters and networks. However, it only allows connections to previously known networks, because you must specify a network profile, which you can’t create with the tool.
If you must use Command Prompt to connect one or multiple devices to the same Wi-Fi network, there’s a workaround you can use. You can export the network profile that was created automatically during the first connection, and then import it using netsh to connect to the wireless network.
Export Wi-Fi profile
To export a Wi-Fi profile on Windows 10, use these steps:
- Open Start.
- Search for Command Prompt, right-click the top result, and select the Run as administrator option.
Type the following command to view the available network profiles and press Enter:
netsh wlan show profile
Type the following command to export a profile and press Enter:
netsh wlan export profile PROFILE-NAME key=clear folder=PATH\TO\EXPORT\FOLDER
For example, this command exports the tsunami profile to the Documents folder.
netsh wlan export profile tsunami key=clear folder=C:\Users\m\Documents
Source: Windows Central
Once you complete the steps, you can import the same XML file to connect other computers to the same network or reconnect your device if the profile is no longer available.
Import Wi-Fi profile
To import a Wi-Fi profile on Windows 10, use these steps:
- Open Start.
- Search for Command Prompt, right-click the top result, and select the Run as administrator option.
Type the following command to determine the name of the network adapter and press Enter:
netsh wlan show interfaces
Type the following command to import the network profile and press Enter:
netsh wlan add profile filename=»PATH\TO\PROFILE.XML» Interface=»YOUR_WIFI_ADAPTER_NAME» user=current
In the command, make sure to specify the path to the XML file and interface name.
For example, this command imports the xml profile located in the Documents folder to the Wi-Fi adapter:
netsh wlan add profile filename=»C:\Users\m\Documents\wi-fi-tsunami.xml» Interface=»WI-FI» user=current
Source: Windows Central
Type the following command to connect to the wireless network and press Enter:
netsh wlan connect ssid=YOUR_WIFI_SSID name=PROFILE_NAME
In the command, make sure to specify the SSID and profile name.
For example, this command connects to an access point using the tsunami SSID and tsunami profile name:
netsh wlan connect ssid=tsunami name=tsunami
Quick Tip: If you have more than one wireless adapter, you must also specify in the command which adapter you want to use. For example, netsh wlan connect ssid=YOUR_WIFI_SSID name=PROFILE_NAME interface=Wi-Fi
After you complete the steps, the device should connect to the network automatically.
More Windows 10 resources
For more helpful articles, coverage, and answers to common questions about Windows 10, visit the following resources:
![]()
The Dell XPS 15 is our choice for best 15-inch laptop
For a lot of people, a 15-inch laptop is a perfect size that offers enough screen for multitasking, and in a lot of cases, some extra performance from powerful hardware. We’ve rounded up the best of the best at this size.
![]()
Halo: MCC’s live service elements make it better, not worse
Halo: The Master Chief Collection is more popular than ever, but some fans don’t agree with the live service approach 343 Industries has taken with it. Here’s why those elements are, at the end of the day, great for the game and for Halo overall.
![]()
Microsoft’s Surface Duo is not ‘failing up’
Microsoft announced this week that it was expanding Surface Duo availability to nine new commercial markets. While Surface Duo is undoubtedly a work in progress, this is not a sign of a disaster. It’s also doesn’t mean that Surface Duo is selling a ton either. Instead, the reason for the expansion is a lot more straightforward.
![]()
These are the best PC sticks when you’re on the move
Instant computer — just add a screen. That’s the general idea behind the ultra-portable PC, but it can be hard to know which one you want. Relax, we have you covered!
Беспроводная сеть – Отключено в Windows 10. Не включается Wi-Fi
Сколько статей я уже написал о решении разных проблем с Wi-Fi сетью в Windows 10, и вот несколько дней назад сам столкнулся с такой проблемой. Сейчас все подробно расскажу. Возможно, кому-то пригодится моя информация. А может нам удастся собрать в комментариях новые и рабочие решения.
У меня была проблема, когда просто не удается включить Wi-Fi сеть. Драйвер установлен, все вроде работает, а беспроводная сеть отключена. Как ее включить – непонятно. Но проблему я решил. Как конкретно, я сама не понял. В любом случае, у меня есть что вам рассказать.
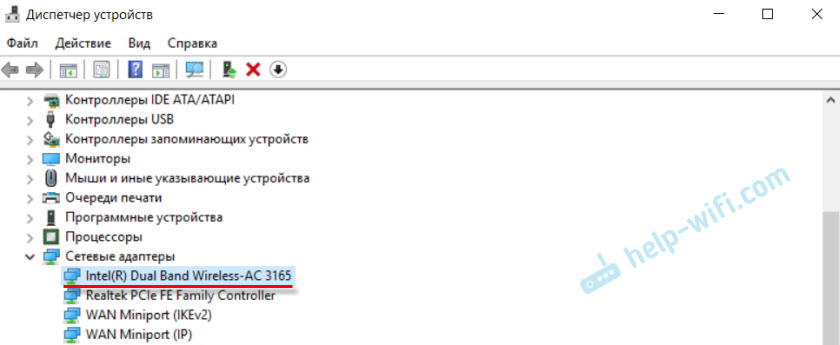
Купил я недорогой ноутбук Lenovo для работы. Установил на него Windows 10. Как обычно, зашел в диспетчер устройств, и увидел, что очень много неизвестных устройств. Драйвера не установились автоматически, в том числе на Wi-Fi модуль. Это как бы нормально.
Зашел на официальный сайт, нашел страничку с драйверами для своей модели ноутбука. Скачал основные драйвера и начал устанавливать. Установил драйвер на WLAN (Wireless LAN, он же Wi-Fi) . Все установилось без проблем. В диспетчере устройств появился адаптер Intel® Dual Band Wireless-AC 3165. Отлично. Перезагрузил ноутбук, и понял, что Wi-Fi не работает.
Проблема следующая: иконка на панели уведомлений в виде беспроводной сети с красным крестиком. Нажимаю на нее, там надпись «Беспроводная сеть – Отключено». Кнопка «Wi-Fi» активная. Нажимаю на нее – ничего не происходит.

Нажимаю еще несколько раз – кнопка становится неактивной.

Хорошо. Зашел в параметры, в раздел «Сеть и Интернет». Вкладка Wi-Fi есть. Там сеть отключена. Нажимаю на переключатель – он возвращается обратно! Нажимаю еще пару раз – зависает (как будто включается) . Но так и ничего не происходит.

Открываю папку «Сетевые подключения», там возле адаптера «Беспроводная сеть» статус «Нет подключения».

Захожу в диспетчер устройств, но там все в порядке. Беспроводной адаптер есть, и в свойствах написано, что он работает нормально.
Запускаю диагностику сетей Windows (нажав правой кнопкой мыши на иконку подключения на панели уведомлений) и вижу сообщение: «Включите беспроводную связь». С описанием:
Для включения беспроводной связи на компьютере используйте переключатель на передней или боковой панели компьютера или функциональные клавиши.

Нажимаю «Проверить, устранена ли проблема» и получаю такой результат: Беспроводная связь отключена – Не исправлено (см. подробнее в этой статье).

Ну и собственно все. Wi-Fi не включается, ноутбук не видит доступные сети и ничего не работает.
Почему не удается включить Wi-Fi на ноутбуке и как решить проблему?
Получается, проблема в том, что Windows 10 почему-то «думает», что Wi-Fi модуль отключен. Об этом сообщается после завершения диагностики неполадок. Но он включен и нормально работает.
Как решилась проблема у меня: потыкал кнопку F7. На ноутбуке Lenovo она отвечает за включение режима «В самолете». Но это не дало результата. Заново запустил установку драйвера Wi-Fi адаптера, заменил драйвер из списка уже установленных. У меня оказалось три подходящих драйвера. Затем скачал и установил какую-то дополнительную утилиту для своей модели ноутбука. Так же установил драйвер управления электропитанием. Все с официального сайта производителя ноутбука.
Но Wi-Fi так и не заработал. Я решил перезагрузить ноутбук, и после перезагрузки все заработало. Ноутбук увидел доступные Wi-Fi сети и без проблем подключился к моей домашней сети. Поэтому, мне сложно сказать, что конкретно решило проблему. Я думаю, что помогла установка утилиты, которая вроде бы отвечает за функциональные клавиши. Но возможно, я ошибаюсь.
Несколько советов:
- Перезагрузите ноутбук.
- Проверьте, запущена ли служба автонастройки WLAN по этой инструкции.
- Попробуйте заново запустить установку драйвер Wi-Fi адаптера и после установки выполните перезагрузку.
- Посмотрите, есть ли на вашем ноутбуке отдельный переключатель Wi-Fi. На новых моделях для этой задачи используются функциональные клавиши. Например, FN + F2, F7 и т. д. Все зависит от ноутбука. На функциональной клавиши должно быть изображение беспроводной сети, или самолета (режим «В самолете») .
- Установите все драйвера для своей модели ноутбука с официального сайта. Так же посмотрите утилиты. Особенно утилиту, которая отвечает за работу функциональных клавиш. Что-то типа Utility for Windows 10, System Interface Foundation for Windows 10, Energy Management, Hotkey Features Integration, ATKPackage.
- Попробуйте выполнить замену драйвера по этой инструкции.
- Удалите Wi-Fi адаптер с диспетчера устройств и перезагрузите ноутбук.
Статьи с решениями похожих проблем:
Решение через центр мобильности Windows 10
Обновление: в комментариях подсказали еще одно решение. Я когда писал о решении похожей проблемы в Windows 7, то описывал там способ, по которому можно было запустить беспроводную связь через Центр мобильности Windows. Честно говоря, я думал, что в Windows 10 этот центр мобильности убрали. Но нет. Как оказалось, его можно найти и запустить через поиск.

Запускаем. Там должна быть настройка «Беспроводная связь». И сообщение: «Беспроводная связь отключена». Просто нажимаем на кнопку «Включить. «.

Все должно заработать. Проверил все у себя на компьютере. Центр мобильности у меня есть, но нет настройки Wi-Fi. Не знаю, возможно, это зависит от обновления. В любом случае, эта информация не будет лишней. Может кому-то пригодится.
Запускаем все службы
Обновление: в комментариях подсказали, что причина может быть в отключенных службах. Обычно такое бывает из-за отключенной службы WLAN. Я писал об этом выше и давал ссылку на подробную инструкцию. Но в Windows есть возможность запустить все службы. Думаю, можно попробовать.
Нажимаем сочетание клавиш Win + R, вводим команду msconfig и нажимаем Ok. Ставим «Обычный запуск», нажимаем на кнопку «Применить» — «Ok» и перезагружаем компьютер.

Обновите BIOS
Обновление: есть отзывы, что эту проблему удалось решить только обновлением BIOS. Посмотрите на сайте производителя, строго для своей модели. Возможно, там есть новая версия BIOS. Обновите ее. Только делайте все строго по инструкции. Она так же должна быть на сайте производителя.
После обновления сделайте сброс настроек BIOS.
Делаем так, чтобы Wi-Fi всегда был включен
Обновление: если ничего не помогает, есть одно рабочее, но не очень простое решение. Суть в том, чтобы на Wi-Fi модуле заклеить контакт, который позволяет системе отключать Wi-Fi. После этого беспроводная сеть всегда будет включена. Даже функциональные клавиши, настройки и утилиты не смогут на это повалиять.
Обязательно пишите в комментариях, получилось ли у вас включить Wi-Fi. Что помогло и как решили эту проблему. Так же можете описать свой случай, рассказать о решениях, которые вам помогли.


