- Integrated Windows Authentication
- AD FS Troubleshooting — Integrated Windows Authentication
- Reason integrated windows authentication fails
- SPN misconfiguration
- Channel Binding Token
- Internet Explorer configuration
- Встроенная проверка подлинности Windows Integrated Windows Authentication
- Немножко всего .. из жизни администратора ms sql server
- понедельник, 6 апреля 2015 г.
- Настройка SPN для MS SQL Server — просто
- Service Principal Name
- Overview
- Extended Protection Scenarios
- Additional Information
- Compatibility
- Setup
- Windows Server 2012 or Windows Server 2012 R2
- Windows 8 or Windows 8.1
- Windows Server 2008 or Windows Server 2008 R2
- Windows Vista or Windows 7
- How To
- How to enable Extended Protection for Windows authentication
- Configuration
- Attributes
- Child Elements
- Configuration Sample
- Sample Code
Integrated Windows Authentication
Integrated Windows authentication enables users to log in with their Windows credentials, using Kerberos or NTLM. The client sends credentials in the Authorization header. Windows authentication is best suited for an intranet environment. For more information, see Windows Authentication.
| Advantages | Disadvantages |
|---|---|
| Built into IIS. | Not recommended for Internet applications. |
| Does not send the user credentials in the request. | Requires Kerberos or NTLM support in the client. |
| If the client computer belongs to the domain (for example, intranet application), the user does not need to enter credentials. | Client must be in the Active Directory domain. |
If your application is hosted on Azure and you have an on-premise Active Directory domain, consider federating your on-premise AD with Azure Active Directory. That way, users can log in with their on-premise credentials, but the authentication is performed by Azure AD. For more information, see Azure Authentication.
To create an application that uses Integrated Windows authentication, select the «Intranet Application» template in the MVC 4 project wizard. This project template puts the following setting in the Web.config file:
On the client side, Integrated Windows authentication works with any browser that supports the Negotiate authentication scheme, which includes most major browsers. For .NET client applications, the HttpClient class supports Windows authentication:
Windows authentication is vulnerable to cross-site request forgery (CSRF) attacks. See Preventing Cross-Site Request Forgery (CSRF) Attacks.
AD FS Troubleshooting — Integrated Windows Authentication
Integrated Windows authentication enables users to log in with their Windows credentials and experience single-sign on (SSO), using Kerberos or NTLM.
Reason integrated windows authentication fails
There are three main reason why integrated windows authentication will fail. They are: — Service Principal Name(SPN) misconfiguration — Channel Binding Token — Internet Explorer configuration
SPN misconfiguration
A service principal name (SPN) is a unique identifier of a service instance. SPNs are used by Kerberos authentication to associate a service instance with a service logon account. This allows a client application to request that the service authenticate an account even if the client does not have the account name.
An example of an how an SPN is used with AD FS is as follows:
- A web browser queries Active Directory to determine which service account is running sts.contoso.com
- Active Directory tells the browser that it’s the AD FS service account.
- The browser will get a Kerberos ticket for the AD FS service account.
If the AD FS service account has a misconfigured or the wrong SPN then this can cause issues. Looking at network traces, you may see errors such as KRB Error: KRB5KDC_ERR_S_PRINCIPAL_UNKNOWN.
Using network traces (such as Wireshark) you can determine what SPN the browser is trying to resolve and then using the command line tool, setspn — Q , you can do a lookup on that SPN. It may not be found or it may be assigned to another account other than the AD FS service account.
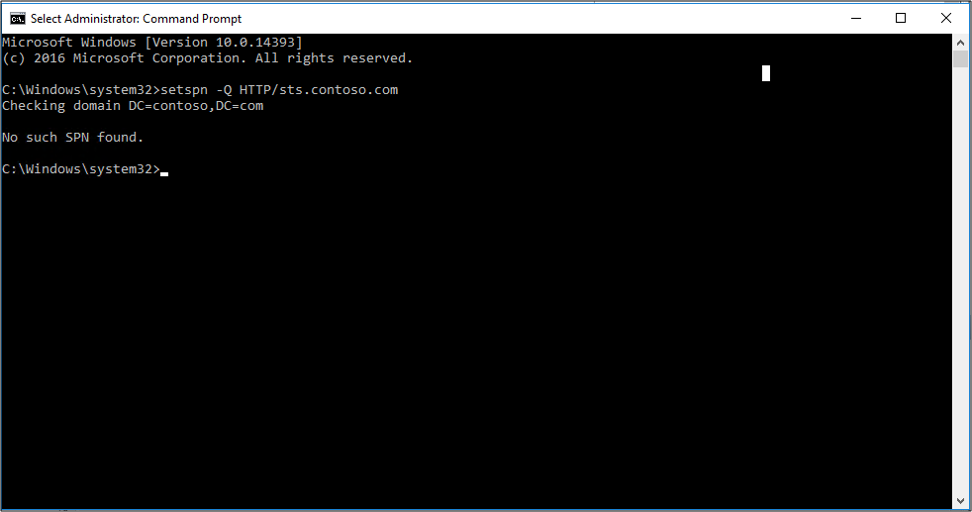
You can verify the SPN by looking at the properties of the AD FS service account.

Channel Binding Token
Currently, when a client application authenticates itself to the server using Kerberos, Digest, or NTLM using HTTPS, a Transport Level Security (TLS) channel is first established and authentication takes place using this channel.
The Channel Binding Token is a property of the TLS-secured outer channel, and is used to bind the outer channel to a conversation over the client-authenticated inner channel.
If there is a «man-in-the-middle» attack occurring and they are decrypting and re-encrypting the SSL traffic, then the key will not match. AD FS will determine that there is something sitting in the middle between the web browse r and itself. This will cause the Kerberos authentication to fail and the user will be prompted with a 401 dialog instead of an SSO experience.
This can be cause by:
- anything sitting in between the browser and AD FS
- Fiddler
- Reverse proxies performing SSL bridging
By default, AD FS has this set to «allow». You can change this setting using the PowerShell cmdlet Set-ADFSProperties -ExtendProtectionTokenCheck
Internet Explorer configuration
By default, Internet explorer will be have the following way:
- Internet explorer will receive a 401 response from AD FS with the word NEGOTIATE in the header.
- This tells the web browser to get a Kerberos or NTLM ticket to send back to AD FS.
- By default IE will try to do this (SPNEGO) without user interaction if the word NEGOTIATE is in the header. It will only work for intranet sites.
There are 2 main things that can prevent this from happening.
Enable Integrated Windows Authentication is not checked in the properties of IE. This located under Internet Options -> Advanced -> Security.
Встроенная проверка подлинности Windows Integrated Windows Authentication
Встроенная проверка подлинности Windows позволяет пользователям выполнять вход с использованием учетных данных Windows, используя Kerberos или NTLM. Integrated Windows authentication enables users to log in with their Windows credentials, using Kerberos or NTLM. Клиент отправляет учетные данные в заголовке авторизации. The client sends credentials in the Authorization header. Проверка подлинности Windows наилучшим образом подходит для среды интрасети. Windows authentication is best suited for an intranet environment. Дополнительные сведения: Проверка подлинности Windows. For more information, see Windows Authentication.
| Преимущества Advantages | Недостатки Disadvantages |
|---|---|
| Встроенные в IIS. Built into IIS. | Не рекомендуется для Интернет приложений. Not recommended for Internet applications. |
| Не отправляет учетные данные пользователя в запросе. Does not send the user credentials in the request. | Требует поддержки Kerberos или NTLM в клиенте. Requires Kerberos or NTLM support in the client. |
| Если клиентский компьютер принадлежит к домену (например, к приложению интрасети), пользователю не нужно вводить учетные данные. If the client computer belongs to the domain (for example, intranet application), the user does not need to enter credentials. | Клиент должен находиться в домене Active Directory. Client must be in the Active Directory domain. |
Если ваше приложение размещено в Azure и имеется локальный домен Active Directory, рассмотрите возможность Федерации локального AD с Azure Active Directory. If your application is hosted on Azure and you have an on-premise Active Directory domain, consider federating your on-premise AD with Azure Active Directory. Таким образом пользователи смогут входить с использованием локальных учетных данных, но проверка подлинности выполняется Azure AD. That way, users can log in with their on-premise credentials, but the authentication is performed by Azure AD. Дополнительные сведения см. в статье Проверка подлинности Azure. For more information, see Azure Authentication.
Чтобы создать приложение, использующее встроенную проверку подлинности Windows, выберите шаблон «приложение интрасети» в мастере проектов MVC 4. To create an application that uses Integrated Windows authentication, select the «Intranet Application» template in the MVC 4 project wizard. Этот шаблон проекта помещает в файл Web.config следующий параметр: This project template puts the following setting in the Web.config file:
На стороне клиента встроенная проверка подлинности Windows работает с любым браузером, поддерживающим схему проверки подлинности Negotiate , которая включает большинство основных браузеров. On the client side, Integrated Windows authentication works with any browser that supports the Negotiate authentication scheme, which includes most major browsers. Для клиентских приложений .NET класс HttpClient поддерживает проверку подлинности Windows: For .NET client applications, the HttpClient class supports Windows authentication:
Проверка подлинности Windows уязвима для атак с подделкой межсайтовых запросов (CSRF). Windows authentication is vulnerable to cross-site request forgery (CSRF) attacks. См. раздел предотвращение атак с подделкой межсайтовых запросов (CSRF). See Preventing Cross-Site Request Forgery (CSRF) Attacks.
Немножко всего .. из жизни администратора ms sql server
еще один блог об IT. по-простому
понедельник, 6 апреля 2015 г.
Настройка SPN для MS SQL Server — просто
Немного теории.
MS SQL Server поддерживает сетевую проверку через следующие типы проверок:
Kerberos – это сетевой протокол, позволяющий реализовать надежную проверку подлинности в клиента и сервера в сети, основанный на главном ключе ( master key ) и, так называемых, зашифрованных билетах( tickets ).
MS SQL Server поддерживает Kerberos для следующих сетевых протоколов:
— TCP \ IP
— Именованные каналы( Shared pipes )
— Shared memory .
Если протокол Kerberos не может быть использован, то используется протокол вызов-ответ( NTLM ).

Login failed for user ‘NT AUTHORITY\ANONYMOUS LOGON’. (Microsoft SQL Server, Error: 18456)
Login failed for user ‘(null)’
Login failed for user ”
Login failed. The login is from an untrusted domain and cannot be used with Windows authentication.
Linked server connections failing
SSPI handshake failed with error code 0x80090311 while establishing a connection with integrated security; the connection has been closed
SSPI handshake failed with error code 0x80090304 while establishing a connection with integrated security; the connection has been closed
.
Способ 1 Через команду « setspn » в командной строке
Пример : « setspn –A MSSQLSvc/SRV.domain.net:1433 domain\ServiceAccount»
Или « setspn –A MSSQLSvc/SRV. domain.net:inst1 domain\ServiceAccount»
в случае , если вы не уверены, что для данного сервера нет дубликатов, стоит зарегистрировать SPN c предварительной проверкой дубликатов, ключ команды -S:
Пример : « setspn –S MSSQLSvc/SRV. domain.net:1433 domain\ServiceAccount»
Или « setspn –S MSSQLSvc/SRV. domain.net:inst1 domain\ServiceAccount»
Для кластера необходимо регистрировать для каждой ноды и общего имени, для AlwaysOn решения так же для каждого инстанса на нодах плюс прослушиватель( Lisener ).
Service Principal Name
Overview
The element adds a Service Principal Name (SPN) to the collection of SPNs. Each SPN specifies a unique endpoint for client activity using the extended protection features for Windows authentication.
Extended protection enhances the existing Windows authentication functionality in order to mitigate authentication relay or «man in the middle» attacks. This mitigation is accomplished by using security information that is implemented through two security mechanisms:
- Channel-binding information that is specified through a Channel Binding Token (CBT), which is primarily used for SSL connections.
- Service-binding information that is specified through a Service Principal Name (SPN), which is primarily used for connections that do not use SSL, or when a connection is established through a scenario that provides SSL-offloading, such as a proxy server or load-balancer.
The element may contain a collection of elements, each of which contains a unique SPN for the service binding information. Each SPN represents a unique endpoint in the connection path, which may be a Fully Qualified Domain Name (FQDN) or NetBIOS name of the destination server or a proxy server. For example, if a client is connecting to a destination server through a proxy server, the SPN collection on the destination server would need to contain the SPN for the proxy server. Each SPN in the collection must be prefixed with «HTTP,» so the resulting SPN for «www.contoso.com» would be «HTTP/www.contoso.com.»
There are two attributes of the element that configure the channel-binding and additional behavior for IIS extended protection:
The tokenChecking attribute configures the behavior for checking for channel-binding tokens. The possible values for this attribute are:
| Name | Description |
|---|---|
| None | This value specifies that IIS will not perform channel-binding token checking. This setting emulates the behavior that existed before extended protection. The numerical value is 0 . |
| Allow | This value specifies that channel-binding token checking is enabled, but not required. This setting allows secure communication with clients that support extended protection, but still supports clients that are not capable of using extended protection. The numerical value is 1 . |
| Require | This value specifies that channel-binding token checking is required. This setting does not provide support for clients that do not support extended protection. The numerical value is 2 . |
The flags attribute configures additional behavior for extended protection. The possible flags are:
| Name | Description |
|---|---|
| None | This flag specifies that no additional behavior is enabled for extended protection. (For example, no proxy server is being used and SPN checking is enabled and requires FQDNs.) The numerical value is 0 . |
| Proxy | This flag specifies that part of the communication path will be through a proxy, or that the client is connecting directly to the destination server over HTTP. The numerical value is 1 . |
| NoServiceNameCheck | This flag specifies that SPN checking is disabled; this flag should not be used in scenarios where only SPNs are being checked. The numerical value is 2 . |
| AllowDotlessSpn | This flag specifies that SPNs are not required to be FQDNs. Setting this flag allows NetBIOS-based SPNs. Note: Setting this flag is not a secure scenario; non-FQDN-based names are vulnerable to name resolution poisoning attacks. The numerical value is 4 . |
| ProxyCohosting | This flag specifies that the entire client-to-server communication path will use HTTP only; no part of the communication path will use SSL, and SPN checking will be used. Note: When you specify this flag, you must also specify the Proxy flag. The numerical value is 32 . |
Extended Protection Scenarios
Consider the following example scenarios:
- In each of the following scenarios, you could also specify the AllowDotlessSpn flag if your networking environment supports NetBIOS-based SPNs; however, NetBIOS-based SPNs are not secure.
- For each of the following scenarios where SPN checking will be used and channel-binding token checking will not be used, you should not specify the NoServiceNameCheck flag.
| Scenario | Flags | Description |
|---|---|---|
| Client connects directly to destination server using HTTP | Proxy , ProxyCohosting | SPN checking will be used and channel-binding token checking will not be used. |
| Client connects directly to destination server using SSL | None | Channel-binding token checking is used and SPN checking is not used. |
| Client connects to destination server through a proxy server using HTTP for the entire path | Proxy , ProxyCohosting | SPN checking will be used and channel-binding token checking will not be used. |
| Client connects to destination server through a proxy server using SSL for the entire path | Proxy | SPN checking will be used and channel-binding token checking will not be used. |
| Client connects to proxy server using SSL and proxy server connects to the destination server using HTTP (SSL off-loading) | Proxy | SPN checking will be used and channel-binding token checking will not be used. |
Additional Information
More information about Extended Protection is available in the following topic:
Compatibility
| Version | Notes |
|---|---|
| IIS 10.0 | The element was not modified in IIS 10.0. |
| IIS 8.5 | The element was not modified in IIS 8.5. |
| IIS 8.0 | The element was not modified in IIS 8.0. |
| IIS 7.5 | The element of the element was introduced in IIS 7.5. |
| IIS 7.0 | N/A |
| IIS 6.0 | N/A |
Setup
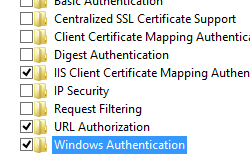
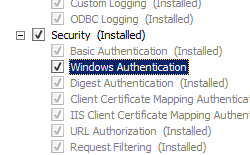
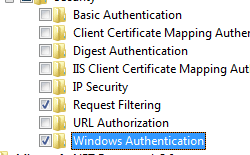
The default installation of IIS 7 and later does not include the Windows authentication role service. To use Windows authentication on IIS, you must install the role service, disable Anonymous authentication for your Web site or application, and then enable Windows authentication for the site or application.
After you install the role service, IIS 7 commits the following configuration settings to the ApplicationHost.config file.
Windows Server 2012 or Windows Server 2012 R2
- On the taskbar, click Server Manager.
- In Server Manager, click the Manage menu, and then click Add Roles and Features.
- In the Add Roles and Features wizard, click Next. Select the installation type and click Next. Select the destination server and click Next.
- On the Server Roles page, expand Web Server (IIS), expand Web Server, expand Security, and then select Windows Authentication. Click Next.
 .
. - On the Select features page, click Next.
- On the Confirm installation selections page, click Install.
- On the Results page, click Close.
 .
.Windows 8 or Windows 8.1
- On the Start screen, move the pointer all the way to the lower left corner, right-click the Start button, and then click Control Panel.
- In Control Panel, click Programs and Features, and then click Turn Windows features on or off.
- Expand Internet Information Services, expand World Wide Web Services, expand Security, and then select Windows Authentication.
- Click OK.
- Click Close.
Windows Server 2008 or Windows Server 2008 R2
- On the taskbar, click Start, point to Administrative Tools, and then click Server Manager.
- In the Server Manager hierarchy pane, expand Roles, and then click Web Server (IIS).
- In the Web Server (IIS) pane, scroll to the Role Services section, and then click Add Role Services.
- On the Select Role Services page of the Add Role Services Wizard, select Windows Authentication, and then click Next.
- On the Confirm Installation Selections page, click Install.
- On the Results page, click Close.
Windows Vista or Windows 7
- On the taskbar, click Start, and then click Control Panel.
- In Control Panel, click Programs and Features, and then click Turn Windows Features on or off.
- Expand Internet Information Services, then World Wide Web Services, then Security.
- Select Windows Authentication, and then click OK.
How To
How to enable Extended Protection for Windows authentication
Open Internet Information Services (IIS) Manager:
If you are using Windows Server 2012 or Windows Server 2012 R2:
- On the taskbar, click Server Manager, click Tools, and then click Internet Information Services (IIS) Manager.
If you are using Windows 8 or Windows 8.1:
- Hold down the Windows key, press the letter X, and then click Control Panel.
- Click Administrative Tools, and then double-click Internet Information Services (IIS) Manager.
If you are using Windows Server 2008 or Windows Server 2008 R2:
- On the taskbar, click Start, point to Administrative Tools, and then click Internet Information Services (IIS) Manager.
If you are using Windows Vista or Windows 7:
- On the taskbar, click Start, and then click Control Panel.
- Double-click Administrative Tools, and then double-click Internet Information Services (IIS) Manager.
In the Connections pane, expand the server name, expand Sites, and then the site, application, or Web service for which you want to enable Extended Protection for Windows authentication.
Scroll to the Security section in the Home pane, and then double-click Authentication.
In the Authentication pane, select Windows Authentication.
Click Enable in the Actions pane. 
Click Advanced Settings in the Actions pane.
When the Advanced Settings dialog box appears, select one of the following options in the Extended Protection drop-down menu:
- Select Accept if you want to enable extended protection while providing down-level support for clients that do not support extended protection.
- Select Required if you want to enable extended protection without providing down-level support.

Click OK to close the Advanced Settings dialog box.
Configuration
The element of the element is configurable at the site, application, or virtual directory level in the ApplicationHost.config file.
Attributes
| Attribute | Description |
|---|---|
| name | Optional string attribute. |
Specifies a unique SPN.
There is no default value.
Child Elements
Configuration Sample
The following sample displays a element that demonstrates enabling Windows authentication with extended protection for the Default Web Site, and adds two SPN entries to the collection of SPNs.
Sample Code
The following examples demonstrate configuring Windows authentication with extended protection for the Default Web Site, and adds two SPN entries to the collection of SPNs.


