- Используйте телефон в качестве микрофона в Linux
- 3 ответа
- WO Mic для Linux
- Фрагменты README (rev. 59091372580f481320224532aeaaea84c9c07848)
- diyism / Use your android phone as a karaoke microphone in Linux.md
- Arch Linux User Repository
- Search Criteria
- Package Details: womic 1.0-1
- Package Actions
- Dependencies (1)
- Required by (0)
- Sources (1)
- Latest Comments
- weirddan455 commented on 2020-10-30 19:46
- Wo mic linux install
- How To Install Wo mic in Windows 7, 8.1, 10, 11, Mac, Linux, and Ubuntu
- How To Install Wo mic Windows 7, 8.1, 10, 11?
- Method #1
- Method #2 Windows 7
- Method #3 Windows 8.1
- Method #4 Windows 10
- Method #5 On Windows 11
- Window 11 Guidelines
- Method #6 Install on Mac
- Method #7 on Linux
- Method #8 Install on Ubuntu
Используйте телефон в качестве микрофона в Linux
У меня двойная загрузка Windows и Ubuntu. Поскольку я не использую микрофон на своем рабочем столе, я начал использовать приложение под названием «WO Mic» для подключения микрофона моего телефона Android к своему рабочему столу в Windows. Хорошая альтернатива, верно?
Что ж, к сожалению, WO Mic не поддерживается ни в одной ОС на базе Linux, поэтому я хотел бы знать, есть ли какие-либо альтернативы или какие-либо приложения, которые могли бы использовать мой телефон в качестве микрофона в Ubuntu через WiFi или USB. (но желательно wifi).
3 ответа
Это программа? Вы пытались загрузить клиент / драйвер и следовать инструкциям для Ubuntu?
Загрузить модуль драйвера
Подключиться от клиента
Общаться по Wi-Fi. Вы можете найти IP-адрес в интерфейсе приложения WO Mic.
Подключение по Bluetooth.
xx: xx: xx: xx: xx: xx представляет Bluetooth-адрес телефона. Вы можете запросить его на своем телефоне: Настройки -> О телефоне -> Статус -> Адрес Bluetooth.
Приведенные выше примеры предназначены для 32-битной Ubuntu. Если вы используете 64-разрядную версию, замените имя файла клиента и драйвера на xxx-x86_64 после загрузки.
Мммм, я пробовал это приложение раньше, но оно не работает для меня, поэтому я рекомендую этот метод:
- Сначала установите ip camera на телефон, затем установите pulseaudio, после этого откройте ipcamera и запустите сервер на своем телефоне, убедитесь, что ваш компьютер подключен к той же сети.
- Откройте Chrome или Firefox и введите IP-адрес, который вам предоставляет ipcamera (ip будет отображаться в приложении).
- В браузере нажмите на аудиоплеер и выберите HTML5, и убедитесь, что вы что-то слышите.
- Откройте pulseaudio и перейдите на вкладку » Воспроизведение «, затем нажмите, покажите и выберите » Все потоки». Вы увидите приложение Chrome или Firefox, играющее на микрофоне.
- В разделе приложения выберите Lookback for Chrome или Firefox; это перенаправит звук с вашего телефона на канал микрофона, вы можете сделать то же самое, но с помощью VLC и лучше справляться с такими проблемами, как отставание.
Если ваша версия Linux использует pavucontrol(pulseaudio), вам следует сделать:
добавить в default.pa :
192.168.1.100 — это IP-адрес моего телефона в локальной сети, вы должны изменить его на IP-адрес вашего телефона.
В pavucontrol(регулятор громкости) на вкладке «Устройства ввода» включите «Встроенный звук» (а не «Встроенный аналоговый стереозвук») в качестве устройства ввода.
И перенаправьте звук MicClient на виртуальное устройство вывода, сначала в «pavucontrol / Устройства ввода», чтобы поставить галочку «Встроенный звук» на «Установить как резервный», а затем:
Теперь с WoMic в android и micclient-x86_64.AppImage в x64 linux, у вас есть набор домашнего караоке-оборудования с почти нулевой задержкой.
Если вы слышите много шумов, вы можете попробовать переключить «Настройки микрофона WO / Источник звука» в своем телефоне Android, например: nexus 6p должен выбрать «Микрофон (режим 2)».
Чтобы отключить перенаправление звука MicCleint на устройство вывода:
Если в вашем телефоне есть аудиоразъем, вы можете подключить от него дополнительный кабель к разъему для микрофона на рабочем столе. Затем просто установите приложение, которое перенаправляет вход микрофона вашего телефона из динамика, например микрофон.
Примечание. Убедитесь, что на телефоне отключен звук. Обычно у меня он отключен, и сначала я подумал, что он не работает.
Чтобы разместить свои источники, я должен упомянуть, что не я сам придумал эту идею. Я понял это из видео на YouTube
WO Mic для Linux
Установите WO Mic cient
В настоящее время мы поддерживаем только 64-битную архитектуру x86. Загрузите micclient-x86_64.AppImage, затем измените его на исполняемый файл
WO Mic Клиентские операции
Загрузите модуль aloop. Модуль должен формировать полнодуплексную звуковую карту с обратной связью.
Подключитесь от клиента.
Выполните следующие команды для подключения. Клиент WO Mic должен записывать аудиоданные в устройство обратной связи. Если вы столкнетесь с ошибками, попробуйте запустить программу от имени root, чтобы ее расписание было более агрессивным.
Подключение по Wi-Fi. Вы можете найти IP-адрес в пользовательском интерфейсе приложения WO Mic.
Подключитесь по Bluetooth. xx:xx:xx:xx:xx:xx представляет собой адрес Bluetooth телефона. Вы можете запросить его на своем телефоне: Настройки -> О телефоне -> Статус -> Адрес Bluetooth.
Теперь сторонняя программа может использовать захваченные данные через устройство обратной связи. Один пример:
Я использую Mumble (настольный клиент) + Murmur (в качестве сервера локальной сети) + Plumble (клиент Android/iOS). Это приводит к самой низкой задержке, которую я когда-либо достигал (звучит почти как обычный шлейф, теоретически задержка WiFi 7 мс + задержка кодека 2x 10 мс = 27 мс).
Фрагменты README (rev. 59091372580f481320224532aeaaea84c9c07848)
Установите все 3 программы, чтобы использовать лучшее качество и минимальную задержку. Установите для мобильного клиента постоянную потоковую передачу. копия mic_over_mumble везде — это будет использовать
/.mic_over_Mumble в качестве каталога конфигурации. Бежать mic_over_mumble , затем подключите мобильное устройство к серверу локальной сети. Затем настройте свои программы на использование монитора Mumble в качестве устройства ввода. Например, в OBS:
Источник
diyism / Use your android phone as a karaoke microphone in Linux.md
micclient+WoMic is close source, while Mumble is open source, so on armbian tv, I can only use Mumble+Murmurd+Plumble.
sudo apt install mumble mumble-server
sudo systemctl stop mumble-server.service
sudo /lib/systemd/systemd-sysv-install disable mumble-server
chmod 744 mic_over_mumble
#config echo cancellation
#config minimal delay 20ms
#next next and exit and murmurd server started
#muble client started, input a random user name
#install plumble free version on your phone
#start plumble and cancel certification generation
#input a random user name that is different to the mumble client user name on armbian tv
#now you can sing to your phone, and your voice will be played on the armbian tv immediately
====================»micclient-x86_64.AppImage»(on amd64 linux pc)+Wo Mic(on android)====================
If your linux release is using pavucontrol(pulseaudio), you should do:
add into default.pa :
192.168.1.100 is my phone IP in local network, you should change it to your phone’s LAN ip.
In pavucontrol(Volume Control), in «Input Devices» tab, enable «Built-in Audio»(not «Built-in Audio Analog Stereo») as input device.
And redirect MicClient audio to virtual output device, first in «pavucontrol/Input Devices» to tick «Built-in Audio» to «Set as fallback» and then:
Now with WoMic in android and micclient-x86_64.AppImage in x64 linux, you have a set of home karaoke equipment with near 0 latency.
If you hear many noises, you could try to switch the «WO Mic Settings/Audio source» in your android phone, for example: nexus 6p should choose «Mic(mode 2)».
To disable redirecting MicCleint audio to Output Device:
Источник
Arch Linux User Repository
Search Criteria
Package Details: womic 1.0-1
Package Actions
| Git Clone URL: | https://aur.archlinux.org/womic.git (read-only, click to copy) |
|---|---|
| Package Base: | womic |
| Description: | WO Mic can turn your phone to be a microphone for your computer. |
| Upstream URL: | https://wolicheng.com/womic/wo_mic_linux.html |
| Keywords: | appimage |
| Licenses: | unknown |
| Submitter: | miss_barfin |
| Maintainer: | miss_barfin |
| Last Packager: | miss_barfin |
| Votes: | 2 |
| Popularity: | 0.000481 |
| First Submitted: | 2020-05-05 15:33 |
| Last Updated: | 2020-05-05 15:33 |
Dependencies (1)
Required by (0)
Sources (1)
Latest Comments
weirddan455 commented on 2020-10-30 19:46
fuse2 should be added as a dependency (needed to open the .AppImage file)
Also, I wasn’t ever to get this to work correctly. The Windows version worked fine for me but this Linux version is lacking. It has no PulseAudio support, very limited configurability and documentation, and is just a binary blob in an AppImage. I was trying to use this for Discord (which requires PulseAudio) but I couldn’t get any PulseAudio applications to record sound off this thing no matter how much I fiddled with settings. The only thing I was able to do was record a .wav file using arecord but even that sounded extremely choppy.
I settled on using Mumble instead with this small bash script I found to set up a virtual mic in PulseAudio. GitHub link with instructions here: https://github.com/pzmarzly/mic_over_mumble
All the mumble software is open source and in the main Arch repositories and I have no problems with sound quality or getting it to work in Discord (or any other PulseAudio application since the implementation is done entirely in PulseAudio itself.)
Copyright © 2004-2021 aurweb Development Team.
AUR packages are user produced content. Any use of the provided files is at your own risk.
Источник
Wo mic linux install
Краткое описание:
Превратите свой телефон и компьютер в полноценный громкоговоритель.
От автора:
The microphone app with shortest lag!
WO Mic turns your Android phone to be a microphone for your Windows machine. You can use it for voice chatting, recording, and recognition on your PC. It has nearly unnoticeable lag, just like REAL microphone devices!
The connection between PC and Android phone can be via Bluetooth, USB, or WiFi.
От меня:
WO Mic превращает ваш Android телефон и компьютер в полноценный громкоговоритель.
Поддержка следующих соединений между ПК и Android:
Bluetooth
USB
WiFi
Для работы нужен сервер ПК.
Как соединить:
По Wi-fi:
1) Запускаем клиент(Телефон) и сервер(ПК), и они должны быть подключены к одному роутеру!
2) В клиенте, нажимаем кнопку меню, далее выбираем «Settings», там в параметре «Transport» Выбираем Wifi.
3) Затем нажимаем назад, и видим локальный ip. Заходим в сервер, выбираем Connection>connect>wifi и тут прописываем наш локальный ip, который показывается на экране телефона. Жмём Connect и все)
По Bт:
1) Запускаем клиент(Телефон) и сервер(ПК).(они должны быть уже спарены по вт, но не соединенны)
2) В клиенте, нажимаем кнопку меню, далее выбираем «Settings», там в параметре «Transport» Выбираем Bluetooth.
3) Заходим в сервер, выбираем Connection>connect>Bluetooth devise и тут выбираем наш телефон. и все)
клиент ПК:  wo_mic_client_setup.exe ( 6,85 МБ )
или тут Wo Mic (Пост Pioneer-A #89186888)
клиент ПК Mod: Wo Mic (Пост Pioneer-A #89265645)
Источник
How To Install Wo mic in Windows 7, 8.1, 10, 11, Mac, Linux, and Ubuntu
In this post, you are going to know how to install Wo mic in Windows 7, 8.1, 10, 11, Mac, Linux, and Ubuntu means full guide you will have.
In the first steps, you will know for Windows that’s is most of audience requests.
How To Install Wo mic Windows 7, 8.1, 10, 11?
Let’s get started!
Method #1
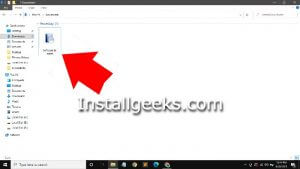
- You can install it at this method, after downloading Wo mic you will find the file in .exe format on your computer in folder C:\Users\YourUserName\Downloads.
- Double-click to start the installation.
- If you are using Wo mic for testing purposes, we recommend starting it manually.
- By default, the Wo mic will install as a service and start with Windows.

Method #2 Windows 7
- Download the installation file.
- Start the installation and double-click the downloaded download file. This will start the installation process.
- Select the items that need to be installed and click Next.
- You can also add Wo mic source code to the installation.
- Set whether you want Wo mic to start manually or by boot.
- You can configure and restart the server when you want, but Wo mic will start every time the machine restarts.
- You can also configure what port to use. Make sure this port is open to external access before proceeding to the next step. Carefully select this setting that cannot change without re-installing.
- Be attention!
- In this step, you can configure Wo mic manually every time you sign in.
- When it completes, the main Wo mic Window will appear. You are now ready to configure it.
Method #3 Windows 8.1
Installing Wo mic on windows 8.1 can quickly use the built-in. You can access Wo mic via LAN, WLAN, or VPN outside your home network. However, you can set up any computer as Wo mic by installing third-party applications such as the installer.
- This step-by-step guide shows you how to download and install on Windows 8.1 without installing third-party software or tools. I set up a Windows Wo mic on Windows 8.1.
- Files and folders share easily through an internal or external network via an any built-in option.
- Windows 8 and Windows 8.1 come with a built-in under Internet Information Service features to install before use.
Method #4 Windows 10
To place the Wo mic in Windows 10.
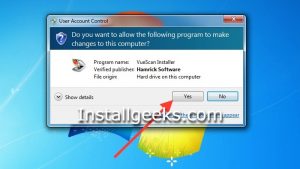
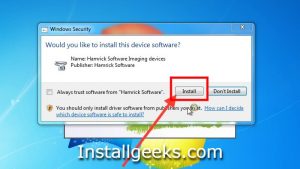
Now double-click the install icon to install the Wo mic. It will start installing it. It will also ask for system permissions to allow the installer which will ask for Yes or Not to install Wo mic in windows 10. 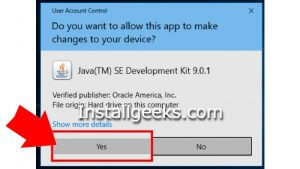
- Click the Yes button to start the installation. Shows Wizard was requesting acceptance of the License Agreement.
- Click the button and agree to accept the License Agreement. It will load the needed data and show the installation options.
- Select the appropriate option to allow all users or active users and click the following button. The next wizard provides options for selecting input items.
- It is mandatory to install the Wo mic. You can keep some items selected or unselected according to your needs. After selecting input items, click the next Button to install the installation. The following wizard offers the option to choose the installation method and Start Menu options.
- Now click the Next Button to proceed with the installation. Completes the installation and displays the final wizard with a success message.
- Now click the End button to stop the installer. It will also use Wo mic if you can keep the Wo mic on start option currently selected. Default screen.
- See your installed software in location: C:/Program Files
 Read more: Install Netflix
Method #5 On Windows 11
Firstly, you must download Wo mic on your PC and install it on your computer. Once complete and you open the software, you will see that it is empty. The editor relies heavily on the packages you will need to install.
You need to go to the tools and download the Control Package. Once you have that, you can start downloading what you need and use the new UI. Getting the most out of it will speed up your code-making process.
Another primary downside of Wo mic is the process of finding all the packages that need to be installed. When you have finished repairing the large screen, you should be as accurate as you want.
You can use JSOspN files to change anything you like on the user interface.The installation setup of Windows 11 ask that do you want to install or not so Click on Yes and run the installation file.Read more: Install YouTube
Window 11 Guidelines
You can download Wo mic from its official site. To install it in Windows 11, go through the following steps:
 Step 1: Open the downloaded .exe file from the download folder and start the installation process.Step 2: Select the location you want and click the following button to run it.Step 3: If you want Wo mic in your right-click menu, check the checkbox and click the option button.Step 4: Press the install button
Step 5: Finish with the installation process.
Method #6 Install on Mac
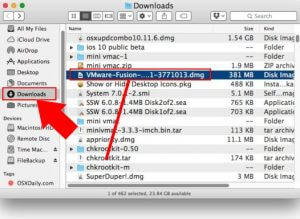
Downloading Wo mic software on Mac is very simple and can be completed in a few steps.
- First, download the appropriate package for your processor.
- Then double-click on the downloaded .exe file, and it will release automatically.
- To start the software, double-click the bulk of the downloaded app.
Method #7 on Linux
Creating any file or folder its too difficult for Linux that is why here are going to install Wo mic for free and accessible. You can use the command-line interface (end) faster than those who are more skilled at typing commands. They do not allow new users because anything can always go wrong.
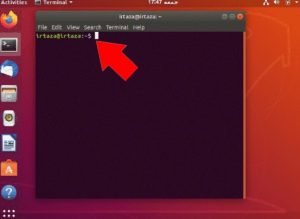 So it is better to use a graphics program (GUI) to do it. There are many alternative Software programs out there that can help you do this. But Wo mic is a full-fledged and free version that you can use. After that, you can easy run any command.
In this selection area, you can make sure you selected a file for running. On the right, a Window displays your location at same place.You need to make sure you click on the folders in the appropriate window.
- Now, go to the place where you want to place software files (maybe defult!).
- After that, it is about to be done.
 If you need to change file permissions, that’s as easy as right-clicking on any files or folders.
You need to use it, and that’s about it.
Method #8 Install on Ubuntu
To install Wo mic in Ubuntu, connect the Internet and launch Ubuntu from the left menu bar. In Ubuntu, click the Search icon located at the top right of the window. In the search box, search for the name Wo mic. 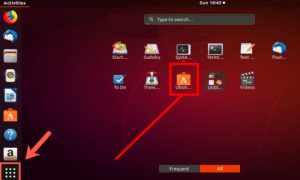
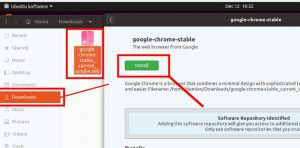 From the search results, click on the result representing that.
- Clicking on a search result shows detailed information about that result in a new window.
- This window contains an installation button that allows us to install the software.
- Click the install button to install it.
All done! you got all kind of information you were looking!
Источник


