- How to run a .NET Core console app as a service using Systemd on Linux (RHEL)
- .NET Core console application #
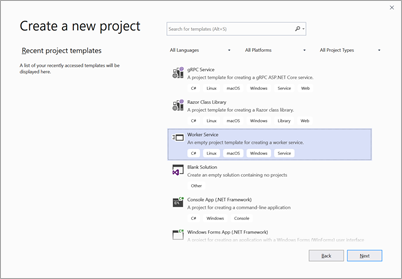
- .NET Core worker template #
- Adding .NET Core Systemd integration #
- Summary #
- Worker Service в .NET Core 3: что такое и зачем нужно
- Внедрение зависимости
- Конфигурация
- Логирование
- Worker Startup Class
- Scott Hanselman
- dotnet new worker — Windows Services or Linux systemd services in .NET Core
- About Scott
- .NET Core and systemd
- Create and publish an app
- In VS:
- Command Line:
- Create unit files
- Exploring journalctl
How to run a .NET Core console app as a service using Systemd on Linux (RHEL)
![]()
Niels Swimberghe — 1/31/2020 — .NET

This article walks us through running a .NET Core console application on systemd. After running a simple console app as a service, we’ll upgrade to the worker template which is designed for long running services/ daemons . Lastly, we’ll add the systemd package for increased integration with systemd.
To learn how to run ASP.NET Core services (web stuff) on Linux, check out «How to run ASP.NET Core as a service on Linux without reverse proxy, no NGINX or Apache».
- Red Hat Enterprise Linux (or a compatible Unix based OS)
- .NET Core 3.1 installed (Get started instructions from Red Hat)
- Sudo privileges
This walkthrough should work for most .NET Core supported Linux distributions, not just RHEL.
.NET Core console application #
Let’s start by making a new console application using the dotnet CLI:
Verify that the console app works by running ` dotnet run `. The output should be «Hello World!».
If the application works, we can publish it somewhere logical such as ‘/srv/HelloWorld’:
The published result contains an executable called ‘HelloWorld’ which will run the application. Let’s verify we can also run the published application:
To run services on Linux, Systemd uses ‘ service unit configuration ‘ files to configure services.
Let’s create the file ‘HelloWorld.service’ inside our project so we can store it in source control along with our code. Add the following content to the file:
Make sure to update the ‘User’ to your username. Refer to the comments in the file for a basic explanation. For more in depth information, read the freedesktop manual page or the Red Hat documentation.
Systemd expects all configuration files to be put under ‘/etc/systemd/system/’. Copy the service configuration file to ‘/etc/systemd/system/HelloWorld.service‘. Then tell systemd to reload the configuration files, and start the service.
Using the ` systemctl status ` command we can view the status of the service:
In addition to the status command, we can use the ‘journalctl’ command to read everything our service is printing to the console. Using the unit-flag (-u), we can filter down to our HelloWorld service.
The console app only logs «Hello world!» to the console and then exits. When querying the status, systemd reports the service is inactive (dead). That’s because the console app starts, runs, and immediately exits. That’s not very useful, so let’s add some code that will let the app run until told to stop. Update Program.cs with the following content:
Let’s publish the app again:
Now we have a minimal application that is continuously running until told to stop.
If the application stops due to a crash, systemd will not automatically restart the service unless we configure that. Add the ‘Restart’ & ‘RestartSec’ options to HelloWorld.service:
Copy the service file, reload, and restart the service:
Now the service will automatically restart in case of a crash. But when the OS reboots, the application will not automatically start. To enable automatic startup of the service on boot, run the following command:
This console app works fine, but Microsoft has provided the worker template which is a more robust solution for long running services/daemons. Let’s upgrade to using the worker template next.
.NET Core worker template #
Let’s create a new empty directory and create the worker using the dotnet CLI:
Verify the worker is functional using the command ` dotnet run `.
If the application works, publish it somewhere logical such as ‘/srv/Worker’:
Let’s verify we can also run the published application:
Create a s ervice unit configuration file called «Worker.service» inside our project:
Copy the service configuration file to ‘ /etc/systemd/system/Worker.service ‘ and tell systemd to reload the configuration files:
Using ‘journalctl’, we can verify that the application is contentiously running successfully. The following ‘journalctl’ command will follow the output of the application. Use Ctrl-C to exit the command.
The .NET Core worker now runs as a systemd service, but the integration between .NET Core and systemd can bi improved on by installing the systemd-integration.
Adding .NET Core Systemd integration #
Microsoft recently added a package to better integrate with systemd. The .NET Core application will notify systemd when it’s ready and when it’s stopping. Additionally, systemd will now understand the different log levels when the .NET Core application logs to output.
Using the dotnet CLI, add the ‘Microsoft.Extensions.Hosting.Systemd’ ( nuget ) package:
Next, we’ll need to add one line to the ‘Program.cs’, ` .UseSystemd() `:
Lastly, we need to update our service unit configuration file to specify ‘type=Notify’:
Let’s publish, reload, and restart the service:
With the Systemd integration in place, we can now use the priority-flag (-p) on ‘journalctl’ to filter the output according to the log levels below:
| LogLevel | Syslog level | systemd name |
| Trace/Debug | 7 | debug |
| Information | 6 | info |
| Warning | 4 | warning |
| Error | 3 | err |
| Critical | 2 | crit |
For example, the following command will only print output with log level 4 and below:
We won’t see much because there’s nothing being logged as a warning, error, or critical.
Update the ‘Worker.cs’ file to include ‘LogWarning’, ‘LogError’, ‘LogCritical’ and republish:
Republish and restart the service:
When we run the same ‘journalctl’ command, we can now see the warning output as bold white text, the error and critical output as red bold text.
The ‘UseSystemd’ function will not do anything when run outside of a systemd service.
The implementation checks if the OS is a Unix system and whether the parent process is systemd.
If not, the systemd integration is skipped.
Summary #
.NET Core has good support for running services on Linux. Using the worker template, we can create a long running service/daemon that integrates well with systemd. Using the systemd hosting integration, systemd is notified when the .NET Core application is ready & also understand the different log levels in .NET.
Источник
Worker Service в .NET Core 3: что такое и зачем нужно
В .NET Core 3 появился новый шаблон проекта под названием Worker Service. Этот шаблон разработан, чтобы дать вам отправную точку для создания кроссплатформенных сервисов. В качестве альтернативного варианта использования: он дает очень хорошую среду для создания консольных приложений, которая идеально подходит для контейнеров и микросервисов.

Подробнее о некоторых из преимуществ использования этого шаблона читайте под катом.
Внедрение зависимости
Шаблон Worker Service настраивает контейнер для внедрения зависимостей по умолчанию, готовый для использования. Это огромное преимущество по сравнению с общим шаблоном консоли.
Добавление служб включает обновление метода ConfigureServices в файле Program.cs:
Конфигурация
Те же настройки провайдеров конфигурации для ASP.NET Core дублируются здесь для Worker Services. Это дает нам мощную и знакомую среду для хранения информации о конфигурации:
- appsettings.json
- appsettings.<среда>.json
- User Secrets (только разработка)
- Переменные среды
- Аргументы командной строки
Для получения дополнительной информации о каждом из провайдеров, пожалуйста, смотрите мою предыдущую статью, размещенную здесь.
Логирование
Аналогично, провайдеры журналов были настроены в соответствии с настройками по умолчанию для ASP.Net Core, предоставляя вам следующих провайдеров:
- Console
- Debug
- EventSource
- EventLog (только при запуске на Windows)
Вы можете добавить провайдеров логирования, добавив метод ConfigureLogging к объекту Host в Program.cs:
Для получения дополнительной информации изучайте документацию по ASP.NET Core.
Worker Startup Class
Наконец, в файле Worker.cs будет существовать основная часть вашего кода. В базовом классе BackgroundService есть 3 переопределяемых метода, которые позволяют связать себя с жизненным циклом приложения:
ExecuteAsync – абстрактный метод, используемый в качестве основной точки входа для вашего приложения. Если этот метод прерывается, приложение закрывается.
StartAsync – Виртуальный метод, который, при переопределении, вызывается при запуске службы и может использоваться для одноразовой настройки ресурсов.
StopAsync – Виртуальный метод, который вызывается, когда приложение закрывается, и является хорошим местом для освобождения ресурсов и удаления объектов.
Источник
Scott Hanselman
dotnet new worker — Windows Services or Linux systemd services in .NET Core
 You’ve long been able to write Windows Services in .NET and .NET Core, and you could certainly write a vanilla Console App and cobble something together for a long running headless service as well. However, the idea of a Worker Process, especially a long running one is a core part of any operating system — Windows, Linux, or Mac.
Now that open source .NET Core is cross-platform, it’s more than reasonable to want to write OS services in .NET Core. You might write a Windows Service with .NET Core or a systemd process for Linux with it as well.
Go grab a copy of .NET Core 3.0 — as of the time of this writing it’s very close to release, and Preview 8 is supported in Production.
If you’re making a Windows Service, you can use the Microsoft.Extensions.Hosting.WindowsService package and tell your new Worker that its lifetime is based on ServiceBase.
If you’re making a Linux worker and using systemd you’d add the Microsoft.Extensions.Hosting.Systemd package and tell your new Worker that its lifetime is managed by systemd!
The Worker template in .NET Core makes all this super easy and familiar if you’re used to using .NET already. For example, logging is built in and regular .NET log levels like LogLevel.Debug or LogLevel.Critical are automatically mapped to systemd levels like Debug and Crit so I could run something like sudo journalctl -p 3 -u testapp and see my app’s logs, just alike any other Linux process because it is!
You’ll notice that a Worker doesn’t look like a Console App. It has a Main but your work is done in a Worker class. A hosted service or services is added with AddHostedService and then a lot of work is abstracted away from you. The Worker template and BackgroundService base class brings a lot of the useful conveniences you’re used to from ASP.NET over to your Worker Service. You get dependency injection, logging, process lifetime management as seen above, etc, for free!
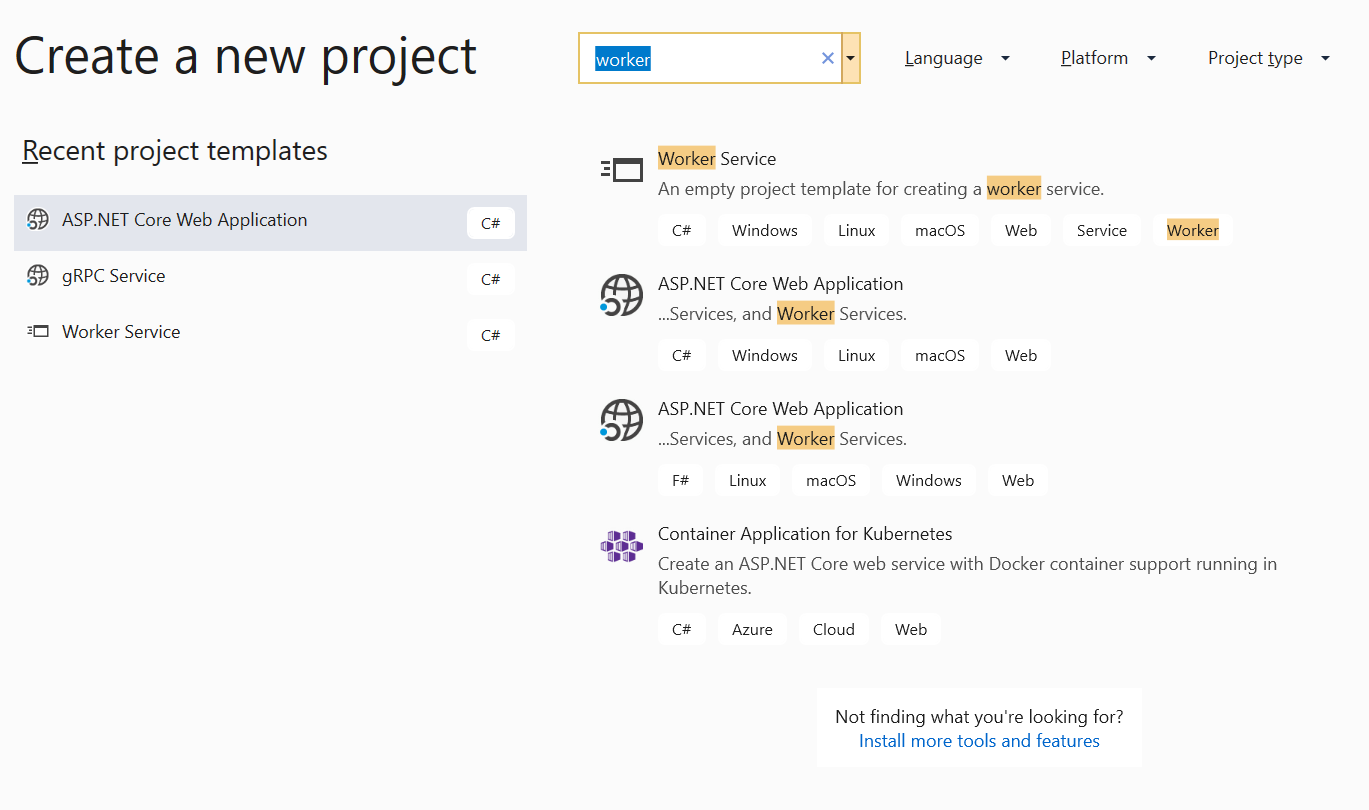
This is a very useful template and it’s available from the command line as «dotnet new worker» or from File New Project in Visual Studio 2019 Preview channel.
Also check out Brady Gaster’s excellent blog post on running .NET Core workers in containers in Azure Container Instances (ACI). This is super useful if you have some .NET Core and you want to Do A Thing in the cloud but you also want per-second billing for your container.
Sponsor: Get the latest JetBrains Rider with WinForms designer, Edit & Continue, and an IL (Intermediate Language) viewer. Preliminary C# 8.0 support, rename refactoring for F#-defined symbols across your entire solution, and Custom Themes are all included.
About Scott
Scott Hanselman is a former professor, former Chief Architect in finance, now speaker, consultant, father, diabetic, and Microsoft employee. He is a failed stand-up comic, a cornrower, and a book author.
Источник
.NET Core and systemd
August 19th, 2019
In preview7 a new package was added to the `Microsoft.Extensions` set of packages that enables integration with systemd. For the Windows focused, systemd allows similar functionality to Windows Services, there is a post on how to do what we discuss here for Windows Services in this post. This work was contributed by Tom Deseyn from Red Hat. In this post we will create a .NET Core app that runs as a systemd service. The integration makes systemd aware when the application has started/is stopping, and configures logs to be sent in a way that journald (the logging system of systemd) understands log priorities.
Create and publish an app
First let’s create the app that we will use. I’m going to use the new worker template, but this would also work well with an ASP.NET Core app. The main restriction is that it needs to be using a Microsoft.Extensions.Hosting based app model.
In VS:
Command Line:
When using the command line you can run:
dotnet new worker
This command will create you a new worker app the same as the VS UI. Once we have our app we need to add the Microsoft.Extensions.Hosting.Systemd NuGet package, you can do this by editing your csproj, using the CLI, or using VS UI:
Once you’ve added the NuGet package you can add a call to UseSystemd in your program.cs:
At this point you have configured your application to run with systemd. The UseSystemd method will noop when not running as a daemon so you can still run and debug your app normally or use it in production both with and without systemd.
Create unit files
Now that we have an app we need to create the configuration files for systemd that tell it about the service so that it knows how to run it. To do that you create a .service file (there are other types of unit file, the .service file is what we will use since we are deploying a service). You need this file on the Linux machine that you will be registering and running the app on. A basic service file looks like this:
This file needs to exist in the /etc/systemd/system/ directory, /etc/systemd/system/testapp.service in our case. By specifying Type=notify an application can notify systemd when the host has started/is stopping. Once the file exists in the directory run the following for systemd to load the new configuration file using the systemctl command which is how you interact with systemd:
sudo systemctl daemon-reload
After that if you can run the following to see that systemd knows about your service:
sudo systemctl status testapp (replacing testapp with the name of your app if you used a different name)
You should see something like the following:

This shows that the new service you’ve registered is disabled, we can start our service by running:
sudo systemctl start testapp.service
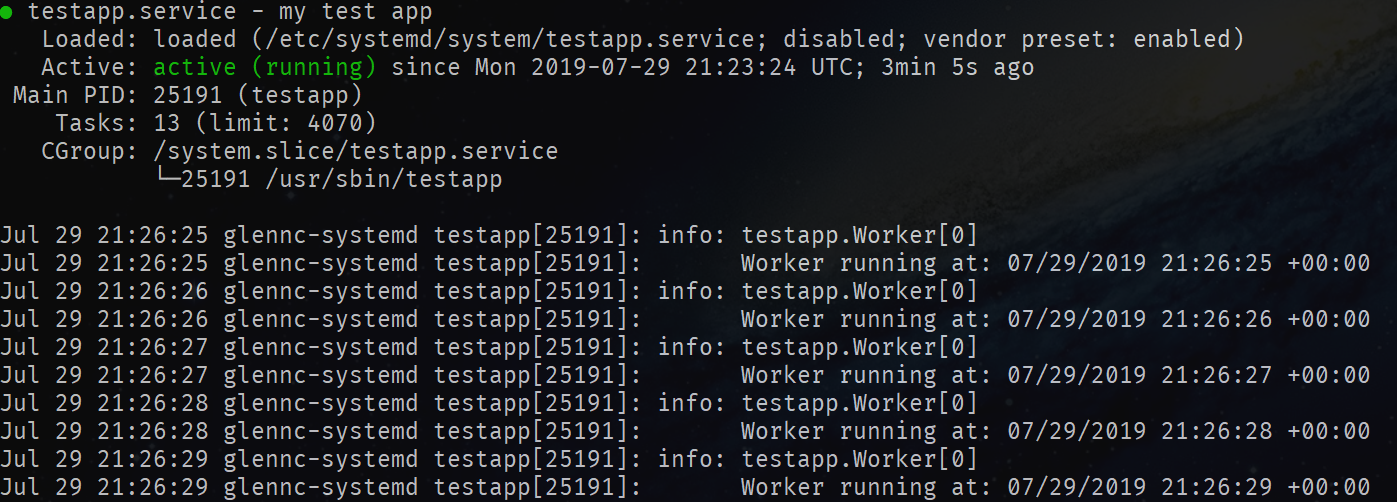
Because we specified Type=notify systemd is aware when the host has started, and the systemctl start will block until then. If you re-run sudo systemctl status testapp you will see something like the following:
If you want your service to start when the machine does then you can use:
sudo systemctl enable testapp.service
You will see that the status message now changes to say enabled instead of disabled when running systemctl status.
If you are having trouble getting your app to start for some reason then you should make sure that you can run the file in the ExecPath yourself in the terminal first, then use systemctl status to see what messages you are getting from the app when it fails to start.
Exploring journalctl
Now that we have an app running with systemd we can look at the logging integration. One of the benefits of using systemd is the centralized logging system that you can access with journalctl.
To start, we can view the logs of our service by using journalctl, a command to access the logs:
sudo journalctl -u testapp
This displays all the logs for the unit (-u) file with testapp in the name. You could be more specific by using testapp.service. If you run journalctl without specifying the service you are interested in then you will see logs from all services interleaved with each other as all logs are seen as one big log stream in this system. You use journalctl to focus that single log stream to what you are interested in at the time.
Running the command would give you output that looks like:
You can see the logging is different than when running from the terminal: each message is on a single line. systemd is also aware of the log priorities. To show this in action I added a few log statements to my testapp and run again:
Then if I run sudo journaltcl -u testapp I see:

In this log output the tool has highlighted the critical log message in red and shows that the lifetime of my app is now the SystemdLifetime proving to me that the integration has worked. The tool can do this because when calling UseSystemd we map Extensions.LogLevel to syslog log levels:
| LogLevel | Syslog level | systemd name |
| Trace/Debug | 7 | debug |
| Information | 6 | info |
| Warning | 4 | warning |
| Error | 3 | err |
| Critical | 2 | crit |
With this information I can run sudo journalctl -p 3 -u testapp which will filter log messages to only display critical and error logs.
Источник


