- Get started using Git on Windows Subsystem for Linux
- Git can be installed on Windows AND on WSL
- Installing Git
- Git config file setup
- Git Credential Manager setup
- Adding a Git Ignore file
- Git and VS Code
- Git line endings
- Git on Windows for Newbs
- Step 1: Install Git
- Step 2: Setup SSH Keys
- Setup SSH Key with Hosted Git Repository
- Step 3: Getting Started with Git
- Create a Remote Repository
- Create a Local Repository
- Clone a Remote Repository to a Local Repository
- Step 4: Working with the GUI Client
- Stage Changed
- Commits:
- Pushing
- A Small Guide to Git and Deployment
- Beanstalk Guides
- Table of Contents
- Choosing a Git distribution
- Installing Git
- Installing SSH keys on Windows
- Using OpenSSH and generating SSH keys with ssh-keygen
- Generating a key pair
- Checking your connection
- In case you have installed TortoiseGIT
- Having problems connecting to your Git repository on Windows 7?
- Alternative to OpenSSH — using PuTTY to access your Git repository
- Installing PuTTY
- Adding GIT_SSH variable to environment
- Generating SSH key with puttygen
- Adding your private key to pageant
- Checking your connection
- Setting up Git profile
- Summary
- Now what?
Get started using Git on Windows Subsystem for Linux
Git is the most commonly used version control system. With Git, you can track changes you make to files, so you have a record of what has been done, and have the ability to revert to earlier versions of the files if needed. Git also makes collaboration easier, allowing changes by multiple people to all be merged into one source.
Git can be installed on Windows AND on WSL
An important consideration: when you enable WSL and install a Linux distribution, you are installing a new file system, separated from the Windows NTFS C:\ drive on your machine. In Linux, drives are not given letters. They are given mount points. The root of your file system / is the mount point of your root partition, or folder, in the case of WSL. Not everything under / is the same drive. For example, on my laptop, I’ve installed two version of Ubuntu (20.04 and 18.04), as well as Debian. If I open those distributions, select the home directory with the command cd
, and then enter the command explorer.exe . , Windows File Explorer will open and show me the directory path for that distribution.
| Linux distro | Windows Path to access home folder |
|---|---|
| Ubuntu 20.04 | \\wsl$\Ubuntu-20.04\home\username |
| Ubuntu 18.04 | \\wsl$\Ubuntu-18.04\home\username |
| Debian | \\wsl$\Debian\home\username |
| Windows PowerShell | C:\Users\username |
If you are seeking to access the Windows file directory from your WSL distribution command line, instead of C:\Users\username , the directory would be accessed using /mnt/c/Users/username , because the Linux distribution views your Windows file system as a mounted drive.
You will need to install Git on each file system that you intend to use it with.

Installing Git
Git comes already installed with most of the Windows Subsystem for Linux distributions, however, you may want to update to the latest version. You also will need to set up your git config file.
To install Git, see the Git Download for Linux site. Each Linux distribution has their own package manager and install command.
For the latest stable Git version in Ubuntu/Debian, enter the command:
You also may want to install Git for Windows if you haven’t already.
Git config file setup
To set up your Git config file, open a command line for the distribution you’re working in and set your name with this command (replacing «Your Name» with your Git username):
Set your email with this command (replacing «youremail@domain.com» with the email you use on your Git account):
If you don’t yet have a Git account, you can sign-up for one on GitHub. If you’ve never worked with Git before, GitHub Guides can help you get started. If you need to edit your git config, you can do so with a built-in text editor like nano: nano
Git Credential Manager setup
Git Credential Manager enables you to authenticate a remote Git server, even if you have a complex authentication pattern like two-factor authentication, Azure Active Directory, or using SSH remote URLs that require an SSH key password for every git push. Git Credential Manager integrates into the authentication flow for services like GitHub and, once you’re authenticated to your hosting provider, requests a new authentication token. It then stores the token securely in the Windows Credential Manager. After the first time, you can use git to talk to your hosting provider without needing to re-authenticate. It will just access the token in the Windows Credential Manager.
To set up Git Credential Manager for use with a WSL distribution, open your distribution and enter this command:
Now any git operation you perform within your WSL distribution will use the credential manager. If you already have credentials cached for a host, it will access them from the credential manager. If not, you’ll receive a dialog response requesting your credentials, even if you’re in a Linux console.
If you are using a GPG key for code signing security, you may need to associate your GPG key with your GitHub email.
Adding a Git Ignore file
We recommend adding a .gitignore file to your projects. GitHub offers a collection of useful .gitignore templates with recommended .gitignore file setups organized according to your use-case. For example, here is GitHub’s default gitignore template for a Node.js project.
If you choose to create a new repo using the GitHub website, there are check boxes available to initialize your repo with a README file, .gitignore file set up for your specific project type, and options to add a license if you need one.
Git and VS Code
Visual Studio Code comes with built-in support for Git, including a source control tab that will show your changes and handle a variety of git commands for you. Learn more about VS Code’s Git support.
Git line endings
If you are working with the same repository folder between Windows, WSL, or a container, be sure to set up consistent line endings.
Since Windows and Linux use different default line endings, Git may report a large number of modified files that have no differences aside from their line endings. To prevent this from happening, you can disable line ending conversion using a .gitattributes file or globally on the Windows side. See this VS Code doc about resolving Git line ending issues.
Git on Windows for Newbs
Git has come a long way since its introduction, and has become significantly easier to work with in a Windows environment. In this tutorial, we are going to get setup with Git on Windows.
This article was written with the GUI in mind. I will NOT go over the command line usage, because there are many resources that already teach that aspect of Git. I made this for the true Windows users, the GUI ninjas. If you are like me and prefer a GUI over the command line, then this is the tutorial for you!
Step 1: Install Git
The first thing we need to do is install Git on Windows; you can do so with the following steps:
- Download and install the latest version of Git for Windows
- Use the default options for each step in the installation
- Remove Git Bash Desktop Icon
- Go to Start > All Programs > Git >Git GUI and make a Desktop Shortcut
Strangely, the last step seemed a bit confusing if you don’t have Windows Search enabled. You can also pin Git GUI to the taskbar and/or the Start Menu.
It is important that you use all the default settings because they are supported by all major repository vendors such as Github, Bitbucket, and Beanstalk.
Step 2: Setup SSH Keys
Compared to Git Bash, setting up a SSH Key for your computer is relatively easy. Simply open Git GUI.

Now click on Show SSH Key under the Help Menu.

It’s possible that there is already a SSH key on your system; it’s best to remove or backup the key if you do not know where it came from. To do so, simply remove all files within: C:\Users\ \.ssh. Be sure to replace with your Windows username.
You can generate a SSH key by clicking on the Generate Key button. When you do so, you will need to supply a passphrase for security purposes. Remember this passphrase; you will need to use it later.
Setup SSH Key with Hosted Git Repository
Github is not the only hosted Git repository available. It is, however, the most popular solution, and we’ll use it as an example.
The SSH key you created allows you to push your changes to a hosted repository. So, in order to push changes from your computer, Github needs to know your public SSH key. That is easily accessible; simply click the «Copy to Clipboard» button.
Next, you need to provide your hosted repo service with your public SSH key. Similar to Github, most of these sites usually have a tab, called «SSH Keys». Click the tab and add your SSH key to the website.

The Title field is just a label to identify the SSH key; it is for your purposes only. For example, «WindowsPc», «Macbook», «Linux». Just make sure it accurately describes what device the SSH key is assigned to.
Step 3: Getting Started with Git
Next, we need a Git repository, and we’ll create a new remote repository on Github.
Create a Remote Repository
When creating a remote repo, Github offers to initialize the repository for you. This is a nice option, but for the purpose of learning how to setup for alternative websites, we will not check the initialize box.

Create a Local Repository
Now, we’ll create a local repository. In our Git GUI, click on «Create New Repository».
Select the location you wish to store your repository in. It is important to note that the selected repository location MUST NOT exist. So select the location you wish, and append the name of the folder you want the repository to be in, like this:

In order for this new repository to be initialized, you must first create a file, any file, in your local repo. Then, you must Commit and Push to the remote Git repository location. We’ll review committing and pushing in Step 4; I recommend you skip ahead if you do not wish to clone a repository. Your remote Git location should look like similar to this: git@github.com:Username/repository-name.git.
Clone a Remote Repository to a Local Repository
As I noted before, Github can provide you with an already initialized repository, and you can get started a lot faster than you normally would. In order to clone a repository, click on the «Clone Existing Repository» link in the Git GUI window. An existing repository is one that is already initialized and/or has commits pushed to it.
In the Source Location field, fill in the Git remote repository location. The Target Directory field works much like how I showed you how to create a repository earlier. Short version: select the location and append the folder you want the files to be in. Git will attempt to create it, and it will fail if it already exists.

There you go; now you should be all set to work locally.
Step 4: Working with the GUI Client
The Git GUI makes it easier to perform Git-related tasks, such as staging changes, commits, and pushes.
Stage Changed
When you move files to a Git directory, you will see all the files in the «Unstaged Changes» window. This basically means that new files have been added, removed, updated, etc. You can click on the «Rescan» button in order to see any new changes that may have occurred.

When you click the «Stage Changed» button, it will attempt to add all the new files to the Git index.

Commits:
After you’ve staged your changes, you then need to commit them to your local repository. Type a Commit Message that makes sense to the changes that were made. When you are done, press the Commit button.

Pushing
Before others can access our new code, we need to push these changes to our hosted repository. Without pushing the changes, others would not be able to access the code.
Before we can proceed to push, we need set up a location to push to. Most folks refer to this location as «origin». If you wish, you can select an option in the «Further Actions» area, but in my experience, doing nothing will benefit you the most. You can always clone or push later.

After adding the remote origin, you can simply press the Push button. It will ask you where you want to push to; most likely «origin» will be pre-selected (and it may be your only option). So simply click on the Push button again.

Next, you will be bombarded with window after window. But don’t worry, this only happens the first time. Simply follow the instructions given to you.

Git will ask you the passphrase of your SSH Key.

Don’t panic if you see more then one request of your passphrase. It is completely normal! You don’t have to worry as long as you are not told the passphrase was incorrect. Seeing multiple requests for your passphrase usually only occurs once per SSH key.
In the event that your push was complete, you should be greeted with a window similar to this:

A Small Guide to Git and Deployment
Before I let you go, here’s a list of fantastic resources for continuing your Git learning.
Beanstalk Guides
Table of Contents
Setting up Git can be tricky on Windows compared to Linux or Mac, but if you follow the steps in this guide, you should have no problems using Git on Windows. We’ve done the hard work and chosen between the multiple options at key steps to help make things easier for you. This guide will take you through the steps to install and configure Git and connect it to remote repositories to clone, push, and pull. If you don’t have one already, create a Beanstalk account.
Choosing a Git distribution
There are two competing Git packages for Windows: a Cygwin-based Git and a version called msysGit. We will describe how to install the msysGit package. We recommend installing msysGit because we’ve found it’s easier to work with than the Cygwin based installation.
Installing Git
Once you have downloaded the msysGit executable, double click on it to start the installation wizard. Leave the default directory options. When you get to the “Adjusting your Path environment” setting, select the “Run Git from the Windows Command Prompt” option. Choosing this option will make it easy for you to run Git commands from the Windows Command Prompt (command line) if you choose. Command Prompt is a simple tool, where you can run commands, switch through folders, manage files and it can be ran by selecting Run… in Start menu, and executing cmd command.
You will notice that for the rest of this article we will use Git Bash for running Git commands. The Git Bash tool works in the same way as the default Windows’ Command Prompt, but has some special features. With Git Bash you’ll be able to use a number of UNIX command line tools along with access to Git, and we recommend it since it’s often simpler to use than the Windows Command Prompt.
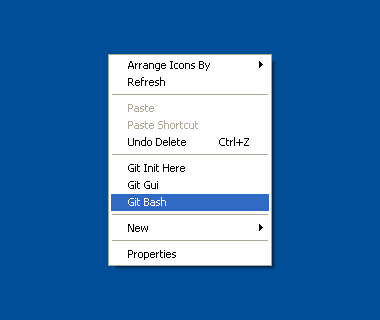
You can run it by right clicking your mouse on the desktop, and selecting Git Bash from pop up window.
When you reach the step “Configuring the line ending conversions”, make sure to leave the option “Checkout Windows-style, commit Unix-style line endings” selected. This option makes sure that Git converts LF to CRLF when checking out text files. When committing text files, CRLF will also be converted to LF. This is a compatibility measure to protect newlines in text files, allowing you to easily work with text files on Windows and on Unix-style platforms.
If you use an older version of msysGit, you may encounter a step called “Choosing the SSH executables”. If you encounter that dialog, we recommend that you choose the “Use OpenSSH” option.
After you have successfully installed Git on Windows, you’ll need to provide secure communication with your Git repositories by creating and installing SSH keys.
Installing SSH keys on Windows
To access your Git repositories you will need to create and install SSH keys. You can do this in two ways:
We recommend OpenSSH over PuTTY, and it’s installed with your Git copy. PuTTY is recommended only for advanced users who are already familiar with how Git with SSH keys work.
Using OpenSSH and generating SSH keys with ssh-keygen
To communicate with the remote Git repository in your Beanstalk account from your Windows computer, you will need to generate an SSH key pair for that computer. This process requires only a few steps, but you do first need to install msysGit using the full installer as described above.
Generating a key pair
To do this you need to run Git Bash, which can be found in your Start menu. Run the command:
It will ask for location and pass phrase. Accept the default location (usually C:\Documents and Settings\username\.ssh\ or C:\Users\username\.ssh ) by pressing Enter . After that, make sure to set a strong pass phrase for the key.
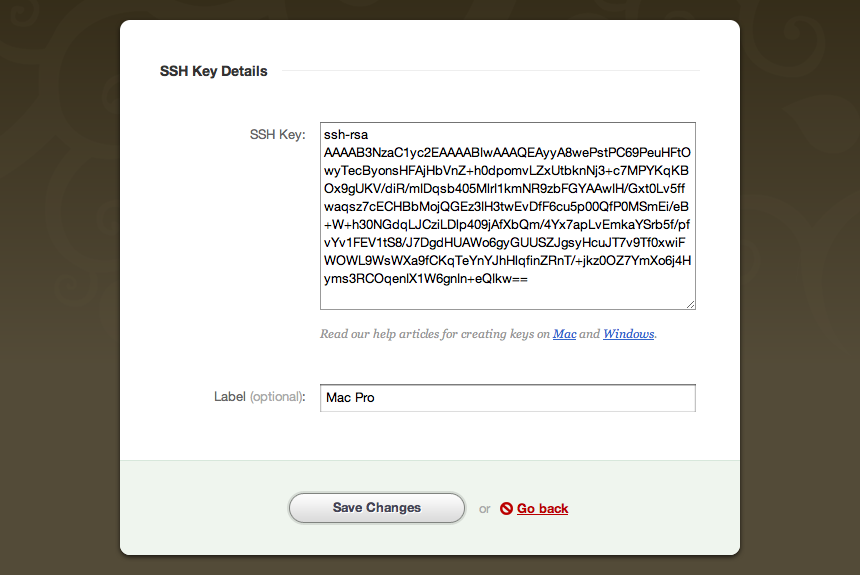
Now that the keys are generated, open the file id_rsa.pub (found in the default location from the previous step) with a text editor. The contents of this file is your new public key. If you copy it to your clipboard, you can add it to your Beanstalk profile (under the Profile and Settings → Keys= section).
Checking your connection
Before trying to access your Beanstalk repository, check if the connection to your remote repository works. In order to do that, run Git Bash, and enter this command, replacing accountname with your account name:
In this case, this is the URL to access Git on your Beanstalk account. If you are using another version control hosting service, the URL would be provided by them.
When authenticating or later when trying to connect to Git repository most likely you will encounter a message that looks like this:
You can type yes and press Enter , which will add your account’s hostname accountname.beanstalkapp.com to a known_hosts file. This step won’t need to be repeated later, unless your public key or your account names changes.
If you were authenticated correctly, you will see a message similar to this one:
In case you have installed TortoiseGIT
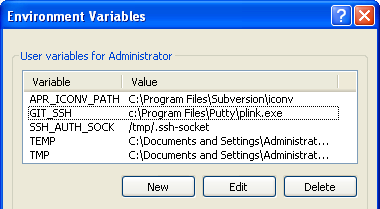
In our case environment variable looked like this: GIT_SSH=c:\Program Files\Putty\plink.exe . Environment variables can be found here:
- Windows XP: Control Panel → System Properties → Advanced → Environment variables
- Windows 7: Control Panel → System → Advanced system settings → Environment variables
Having problems connecting to your Git repository on Windows 7?
Alternative to OpenSSH — using PuTTY to access your Git repository
Installing Git and using PuTTY to connect to your Git repository can be troublesome, so we recommend that you use the OpenSSH method which we described in the steps above. Using OpenSSH is simple and straightforward, but if OpenSSH is not an option, or for some other reason you prefer to use PuTTY to connect to your repositories, here is a step by step guide on how to do so.
Like OpenSSH, you will generate SSH keys and use them to communicate with your remote Git repositories, only now you will use PuTTY’s tools for generating, storing, and using the keys.
Installing PuTTY
You can download the PuTTY installation package and run it. The latest installation package at the moment of writing this article is putty-0.60-installer.exe which can be found under “A Windows installer for everything except PuTTYtel” heading.
Install PuTTY to the default recommended location, typically c:\Program Files\PuTTY\ . Once installed, navigate to the installation folder where you will find:
You will also find some other files, but for this guide you only need to know about plink, puttygen, pageant and putty.
Adding GIT_SSH variable to environment
After you have installed PuTTY package, you’ll need to add a GIT_SSH variable to your environment variables which should point to the plink.exe file (including its entire path). Accepting our defaults from above, this will likely be: GIT_SSH=c:\Program Files\Putty\plink.exe
Environment variables can be found and created/edited here, depending on your version of Windows:
- Windows XP: Control Panel → System Properties → Advanced → Environment variables
- Windows 7: Control Panel → System → Advanced system settings → Environment variables
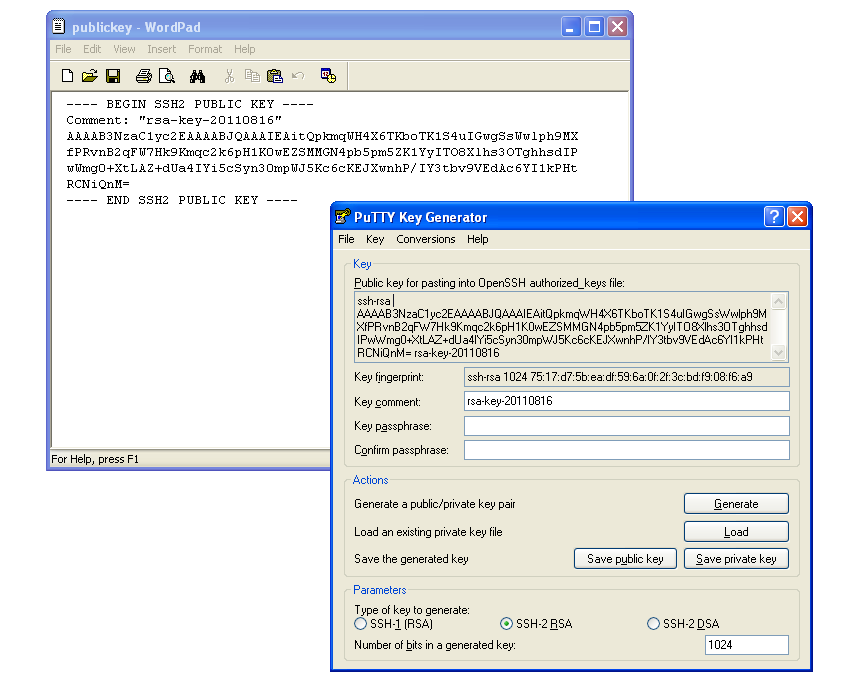
Generating SSH key with puttygen
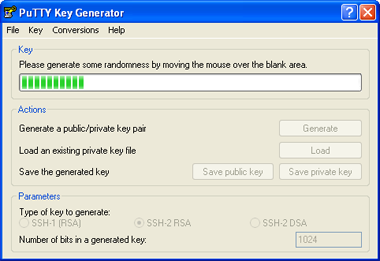
Before leaving puttygen, copy the public key to your clipboard and paste it into your version control hosting account (in Beanstalk, under the Profile and Settings → Keys section).
Please note that when you generate a key with puttygen, the public key that you copy from puttygen and the public key you save to a file for later use are not in the same format. You can see on the picture below that the public key was saved with new lines and without the “ssh-rsa” keyword. In order to copy and paste the public key to Beanstalk, you need to copy it in the same format as it was when it was generated by puttygen. That format should be: “ssh-rsa keycodegenerated”. All you need to do is modify your key in an editor like Notepad, and then add it to Beanstalk.
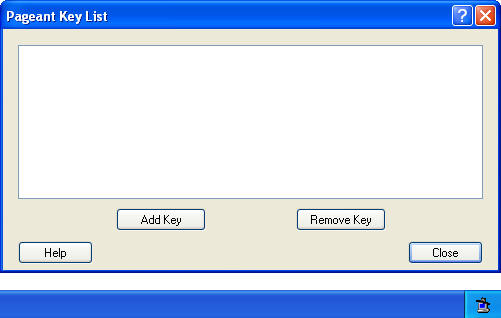
Adding your private key to pageant
Checking your connection
Once you have finished setting up PuTTY, all you need to do is check if the connection to your remote hosted Git repository works if you installed Git.
If you still haven’t installed Git download the msysGit executable, double click on it and the installation wizard should start. Leave the default directory options. When you get to the “Adjusting your Path environment” setting, select the “Use Git Bash only” option. Choosing this option will help you avoid path conflicts.
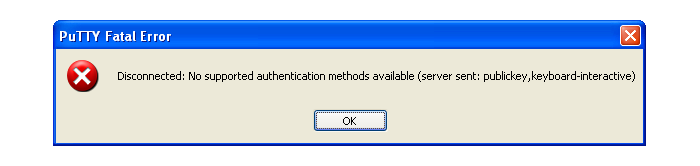
After you have installed Git run Git Bash and go to the directory where you have installed PuTTY and try to access your repository by typing this:
If you are not authenticated correctly, a message like the following screenshot will pop up:
If you are authenticated correctly, a new window will pop up with message like this:
Pop up window will close shortly after authentication is finished, which means authentication was successful and you should be able to manage your Git repositories from now on.
Setting up Git profile
In case you are using Beanstalk for version control, it would be best if your first name, last name and email address match to the ones you use in your account to avoid any conflicts.
Summary
In order to be able to use your repository you need to:
Now what?
Now that you have Git properly installed and configured, you can use a client of your choice. Whether you choose a terminal or a GUI, it is a good idea to learn the basic concepts and commands for versioning your files before. Here’s some recommended reading to get you started:
- Git Immersion Tutorial – an excellent step-by-step tutorial to using Git
- Pro Git E-book & Printed Edition
- The Git Parable – understand the concepts behind Git with a simple story by Tom Preston-Werner
 Igor BaloЕЎ is a QA engineer from Novi Sad, Serbia .


