- Set the folder permissions for Everyone on Windows-7 (10, 8.1), how to?
- The solution is simple to Set the folder permissions for Everyone on Windows 10, 8.1, 7, .. and MS Server 2016, 2019!
- 1.) . Set the folder permissions for Everyone! (Image 1 to 3) 2.) . File and Folder Permissions!
- 1.) Set the folder permissions for Everyone!
- How to change File and Folder permissions in Windows 10
- How to change File and Folder permissions
- 1] Type of users in Windows & Permissions
- 2] Change File and Folder Permissions which you own in Windows 10
- How to apply the same permission to subfolders and files
- 3] Manage permission when sharing a file or folder with other users
- 4] Change Files and Folders Permissions which you DONT own
- Folder with WRITE permission for a Windows Service and only READ permission for other apps
- 1 Answer 1
- How to Set File and Folder Permissions in Windows
- Data Security
- File and Folder Permissions
- Permission Types
- Editing Permissions
Set the folder permissions for Everyone on Windows-7 (10, 8.1), how to?
The solution is simple to Set the folder permissions for Everyone on Windows 10, 8.1, 7, .. and MS Server 2016, 2019!
1.) . Set the folder permissions for Everyone! (Image 1 to 3)
2.) . File and Folder Permissions!
1.) Set the folder permissions for Everyone!
1. Please Start the MS-Explorer for example via [Windows-Logo]+[E] keyboard shortcut.
2, Browse to Folder and select via right mouse click!
3, In Context-Menu go to (select) Properties and select the Tab Security
(. see Image-1 Point 1 to 3)
| (Image-1) Windows-7 — Set the folder permissions for Everyone on! |
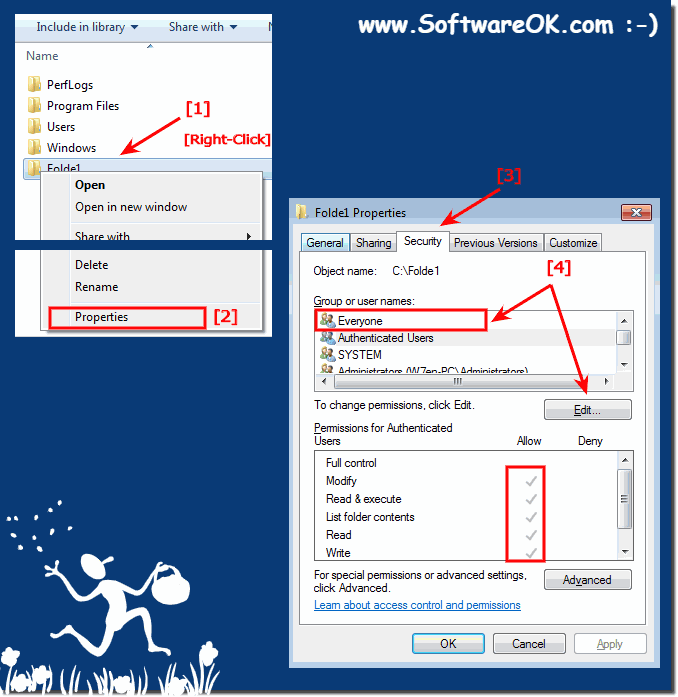 |
In order to secure a windows (7, 8.1, 10, ie 11) computer and its resources, you must consider the rights that users will have. You can safely a computer or multiple computers by imparting users or groups specific user rights. You can help secure an object, such as a file or folder, by assigning permissions to allow users or groups to perform specific actions on that object. (permission rights for users on windows)

| (Image-2) Folder permissions for User on Windows-7! |
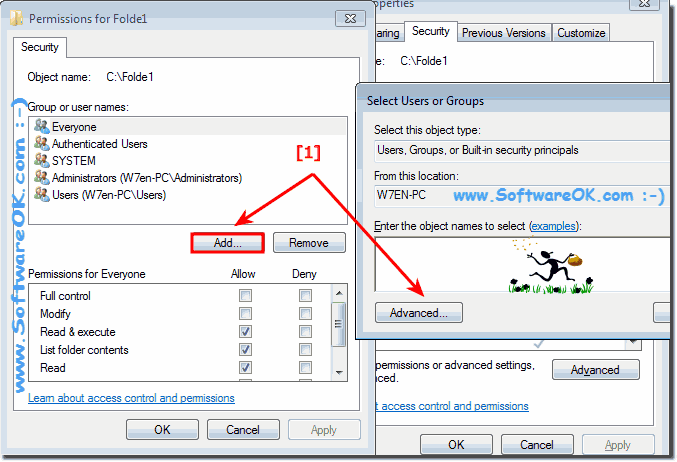 |
The windows permissions for Folders include Full Control, Modify, Read & Execute, List Folder Contents, Read, and Write access. For information about these permissions, see File and Folder Permissions. Each of these permissions consists of a logical group of special permissions, which are listed and defined below. Not all of the special permissions will apply to all objects
Please click Find Now and select Everyone (. see Image-3 Arrow-1,2,3)! and «OK»
How to change File and Folder permissions in Windows 10
Every file and folder on Windows 10 has permission attributes. It gives your authority to edit, read, write, execute, and modify it. It is relatively easy to change file and folder permissions in Windows 10. However, it depends on the specific criteria. In this post, we will show how you can change file and folder permissions in Windows 10.
How to change File and Folder permissions
I was talking about individual criteria that you need to meet. Those criteria are user authority or power. If you are an admin user, you can almost change anything in Windows. It includes the ability to modify files that are owned by others. However, if you are standard users, you are limited to changing files that only belong to you. In this post, we will discuss the following:
- Types of Users and Permissions
- Change Files and Folders Permissions which you own
- Manage permission when sharing a file or folder with other users
- Change Files and Folders Permissions which you DON’T own.
While it looks complicated, it is relatively easy to manage permissions. What you need to be careful about is the type of permissions.
1] Type of users in Windows & Permissions
While its not necessary, I think its a good idea that you know about this. There are broadly two types of users— local user accounts and local system accounts.
- Local user accounts include Administrators, Standard users, Child, and Guest account.
- Windows OS manages local System accounts. Accounts with a name such as System, Network service, Local service are all system accounts.
An Administrator can also take over System accounts as well or at least modify the file permissions along with other local user accounts.
Another essential thing, but you should know this. Some of these permissions will not be available for files.
- Full Control
- Modify
- Read and Execute
- List folder contents
- Read
- Write
- Special Permissions
2] Change File and Folder Permissions which you own in Windows 10
This section applies to all kinds of users. As long as you are managing files and folders which you won, there is not much of a problem. But at times, users have experienced that they are not able to edit files that they own or are created by them. Follow the steps to fix those problems.
- Right-click on any folder or file and click on Properties.
- Switch to Security tab, and you should see two sections
- Group or usernames that have an ownership right on that file
- Permissions for the selected user
- If you have trouble editing the file or copying files into that folder, then you need to change the permission. Click on the Edit button.
- It will open another window where you can select a user, and add missing permissions by checking the box against the type of permission.
- Once you are done, click on ok, and then apply the changes.
When changing permission for yourself, it is best to check on the box against Full Control. It will keep you off from any trouble you were having with the file or folder.
How to apply the same permission to subfolders and files
It only makes sense to have full control of all the files and folders inside it. Doing it one by one is cumbersome, and thats where you need to use the Advanced button.
- First, make sure to choose the set of permissions or Full control for the top folder
- Then go back to the Security tab, click on the Advanced button.
- Then select the user, which is yourself, and check the box which says—Replace all child object permission entries with inheritable permission entries from this object.
- Click on Apply and then Ok button.
In simple words, whatever the permission, the object, i.e. User, which in this case is you, will be applied to all files, and subfolders.
3] Manage permission when sharing a file or folder with other users
There can be multiple scenarios here:
- The file can be shared, but it cannot be modified.
- Folders shared with multiple users, but they are not allowed to delete the file or add any file.
- Some users are allowed to modify files while others can have read-only access.
Open the permission window by clicking on the Edit button. Next, select the user for which you want to modify. If the user is not there, you can add a new user by clicking on the Add button. It will open a search window which you can use to find the user. Add when you find it.
Once the user is available, select it and then assign appropriate permission. Select what you want to allow, and what you want to deny. It is how you would assign for yourself, except that you are doing it for some other account.
4] Change Files and Folders Permissions which you DONT own
That is where ownership comes into the picture. If you do not own a folder or someone else has modified files in such a way, then you can change it. However, only an admin user can change it for you.
Follow our detailed guide to learn how to take ownership of files and folders which you don’t own.
It might be too much to grasp for once, but once you are through, there will be no confusion left. I hope you were able to understand it clearly.
PS: Attribute Changer lets you change file & folder attributes in Windows 10 easily.
Date: November 14, 2019 Tags: Files, User Account
Folder with WRITE permission for a Windows Service and only READ permission for other apps
I want to write some files from a Windows Service, and be able to read them from other apps. But I don’t want other apps to be able to write to this folder.
Is there a standard folder for that (like there is App Data for storing data which does not have to be read from other apps)?
1 Answer 1
It is important to consider that Windows sets permissions to read and write files based on the user (or group he is member of) and the ACL entries in the file system. So «preventing other apps to write to this folder» is really «other apps which are started under a normal user».
You could place the service in a directory under
If the service runs under the local SYSTEM account, it has the permission to write to this folder. And normal users have only read access.
But be aware that this is not bullet-proof and you never know if someone with admin rights changes the permissions on your folder after the install.
I would only do it this way if I had control over the system and the other apps (e.g. in a corporate infrastructure with Active Directory and all machines in a domain).
Be also aware that «other apps» could also be Windows services running under SYSTEM or another user with local admin rights, so they would also be able to write to your folder.
Another solution would be to run the service under a dedicated user account (either local or Active Directory), and set the permission of your folder so that only this user has modify rights.
Please note that you have to give this user account the privilege «Log on as service» (via Local Security Policy or AD GPO).
But even in this case: if some other (admin) user has Restore Privileges, he could circumvent the ACL.
Another important note:
Running the service under SYSTEM means that this service is highly privileged, which may be a security risk.
Important note from eryksun (see comments) Thank you !
So you can prevent other services to write to your files.
How to Set File and Folder Permissions in Windows
Comes in handy when sharing a computer with family or coworkers
Normally, you don’t have to worry about permissions in Windows because that’s already taken care of by the operating system. Each user has their own profile and their own set of permissions, which prevents unauthorized access to files and folders.
There are times, however, when you might want to manually configure the permissions on a set of files or folders in order to prevent other users from accessing the data. This post is assuming the other “people” also have access to the same computer you are using.
If not, you may as well just encrypt your hard drive and that’s it. However, when others can access the computer, like family or friends, then permissions can come in handy.
Of course, there are other alternatives like hiding files and folders using file attributes or by using the command prompt to hide data. You can even hide an entire drive in Windows if you like.
If you are looking to set permissions in order to share files with others, check out my post on creating a hidden network share or how to share files across computers, tablets and phones.

Data Security
The only other occasion where you will need to mess around with folder or file permissions is when you get a Permission Denied error when trying to access data. This means you can take ownership of files that don’t belong to your current user account and still access them.
This is important because it means that setting permissions on a file or folder does not guarantee the security of that file or folder. In Windows, an administrator on any Windows PC can override the permissions on a set of files and folders by taking ownership of them. Once you have ownership, you can set your own permissions.
So what does this mean in English? Basically, if you have data you don’t want others to see, then you should either not store it on that computer at all or you should use an encryption tool like TrueCrypt.
For those tech-savvy readers, you’ll probably be saying “Hey wait, TrueCrypt has been discontinued due to security vulnerabilities and shouldn’t be used!” Well, that is correct, however, TrueCrypt has been audited by an independent organization and Phase I and Phase II have been completed.
The only version you should download is TrueCrypt 7.1a, the one that has been uploaded to a verified mirror on GitHub. If you are not comfortable at all using TrueCrypt, the only other suggestion I have is VeraCrypt, which was the successor to TrueCrypt, but fixed many of the flaws.
File and Folder Permissions
Now that we got all of that out of the way, let’s talk about permissions in Windows. Every file and every folder in Windows has its own set of permissions. Permissions can be broken down into Access Control Lists with users and their corresponding rights. Here is an example with the user list at the top and the rights at the bottom:

Permissions are also either inherited or not. Normally in Windows, every file or folder gets their permissions from the parent folder. This hierarchy keeps going all the way up to the root of the hard drive. The simplest permissions have at least three users: SYSTEM, currently logged in user account and the Administrators group.
These permissions usually come from the C:\Users\Username folder on your hard drive. You can access these permissions by right-clicking on a file or folder, choosing Properties and then clicking on the Security tab. To edit permissions for a particular user, click on that user and then click the Edit button.

Note that if the permissions are greyed out, like in the example above, the permissions are being inherited from the containing folder. I’ll talk about how you can remove inherited permissions further below, but first let’s understand the different types of permissions.
Permission Types
There are basically six types of permissions in Windows: Full Control, Modify, Read & Execute, List Folder Contents, Read, and Write. List Folder Contents is the only permission that is exclusive to folders. There are more advanced attributes, but you’ll never need to worry about those.
So what do each of these permissions mean? Well, here is a nice chart from Microsoft’s website that breaks on what each permissions means for files and for folders:

Now that you understand what each permission controls, let’s take a look at modifying some permissions and checking out the results.
Editing Permissions
Before you can edit any permissions, you have to have ownership of the file or folder. If the owner is another user account or a system account like Local System or TrustedInstaller, you won’t be able to edit the permissions.
Read my previous post on how to take ownership of files and folders in Windows if you are currently not the owner. Now that you are the owner, let’s get a few more things out of the way:
If you right-click on a file or folder, choose Properties and click on the Security tab, we can now try to edit some permissions. Go ahead and click the Edit button to get started.

At this point, there are a couple of things you can do. Firstly, you’ll notice that the Allow column is probably greyed out and can’t be edited. This is because of the inheritance I was talking about earlier.

However, you can check items on the Deny column. So if you just want to block access to a folder for a specific user or group, click the Add button first and once added, you can check the Deny button next to Full Control.

When you click the Add button, you have to type in the user name or group name into the box and then click on Check Names to make sure it’s correct. If you don’t remember the user or group name, click on the Advanced button and then just click Find Now. It will show you all the users and groups.

Click OK and the user or group will be added to the access control list. Now you can check the Allow column or Deny column. As mentioned, try to use Deny only for users instead of groups.

Now what happens if we try to remove a user or group from the list. Well, you can easily remove the user you just added, but if you try to remove any of the items that were already there, you’ll get an error message.

In order to disable inheritance, you have to go back to the main Security tab for the file or folder and click on the Advanced button at the bottom.

On Windows 7, you’ll one extra tab for Owner. In Windows 10, they just moved that to the top and you have to click Change. Anyway, in Windows 7, click on Change Permissions at the bottom of the first tab.

On the Advanced Security Settings dialog, uncheck the Include inheritable permissions from this object’s parent box.

When you do that, another dialog box will popup and it will ask you whether you want to convert the inherited permissions to explicit permissions or whether you just want to remove all the inherited permissions.

Unless you really know exactly what permissions you want, I suggest choosing Add (explicit permissions) and then just removing whatever you don’t want afterwards. Basically, clicking on Add will keep all the same permissions, but now they won’t be greyed out and you can click Remove to delete any user or group. Clicking Remove, will start you off with a clean slate.
In Windows 10, it looks slightly different. After clicking on the Advanced button, you have to click on Disable Inheritance.

When you click on that button, you’ll get the same options as in Windows 7, but just in a different form. The Convert option is the same as Add and the second option is the same as Remove.

The only thing you have to understand now is the Effective Permissions or Effective Access tab. So what is effective permissions? Well, let’s see the example above. I have a text file and my account, Aseem, has Full Control. Now what if I add another item to the list so that the group Users is denied Full Control.

The only problem here is that the Aseem account is also part of the Users group. So I have Full Control in one permission and Deny in another, which one wins? Well, as I mentioned above, Deny always overrides Allow, so Deny will win, but we can also confirm this manually.
Click on Advanced and go to the Effective Permissions or Effective Access tab. In Windows 7, click the Select button and type in the user or group name. In Windows 10, click the Select a user link.
In Windows 7, once you select the the user, it will instantly show the permissions in the list box below. As you can see, all of the permissions are unchecked, which makes sense.

In Windows 10, you have to click the View effective access button after selecting the user. You’ll also get a nice red X for no access and a green check mark for allowed access, which is a bit easier to read.

So now you pretty much know all there is to know about Windows file and folder permissions. It does take some playing around yourself in order to get the hang of it all.
The main points to understand are that you need to be the owner in order to edit permissions and that any administrator can take ownership of files and folders regardless of the permissions on those objects. If you have any questions, feel free to post a comment. Enjoy!
Founder of Online Tech Tips and managing editor. He began blogging in 2007 and quit his job in 2010 to blog full-time. He has over 15 years of industry experience in IT and holds several technical certifications. Read Aseem’s Full Bio


