- Создаём загрузочный USB диск с Windows из под Linux
- Подготовка USB диска
- Копирование файлов Windows на USB диск
- Делаем USB-диск загрузочным
- Если создаем MBR загрузочный диск
- Если создаем UEFI загрузочный диск
- Create a Bootable Windows 10 USB in Linux With Ubuntu/Debian GUI
- Method 1 . Create a Bootable Windows 10 USB in Linux with woeusbgui GUI app
- Clone WoeUSB
- Make a Bootable Windows 10 USB from Linux
- Method 2 . Bash shell script to create a bootable Windows 10 USB device from one ISO file
- Method 3 . Create a Bootable Windows 10 USB in Linux with CLI apps only
- Download and install ms-sys
- Create a ntfs partition
- Linux create windows 10 Bootable USB by coping installer files
- Use ms-sys command to write mbr to create a bootable Windows 10 pro usb in Linux
- Conclusion
- Write windows iso to usb from linux
- About
- How to Easily Create Windows 10 Bootable USB on Ubuntu or Any Linux Distro
- What you need
- Download Windows 10 ISO
- Creating a Windows 10 Bootable USB for UEFI Firmware
- Boot Windows 10 ISO Installer without USB (BIOS & UEFI)
- Creating a Windows 10 Bootable USB for Legacy BIOS Using WoeUSB
- How to Use WoeUSB From the Command Line
Создаём загрузочный USB диск с Windows из под Linux
В ubuntu уже есть приложение для создания образов дисков — Startup Disk Creator, но оно умеет создавать только загрузочные USB с Linux. Для создания загрузочного USB-диска с Windows из Linux, существует WinUSB, но она довольно давно не обновлялась, и честно говоря, у меня не заработала. Данный пост довольно подробный, и рассчитан преимущественно на людей, плохо знакомых с Linux.
Перед тем как я продолжу, следует указать что в Windows мире два метода загрузки:
- MBR, при котором в начале диска резервируется место, и располагается специальный загрузочный файл;
- EFI, при котором исполняемый файл загрузчика хранится в стандартном расположении на FAT32 файловой системе;
Если вы не знаете какой выбрать, то наиболее часто используемый вариант который работает без модификации файлов Windows — это msdos таблица разделов с fat32 файловой системой и загрузочным флагом.
Прежде всего USB-диск необходимо подготовить. В Linux наиболее простой и удобной для этих целей утилитой является gparted.
Ставим его если не установлен:
Подготовка USB диска
Выбираем нашу USB флэшку, отмонтируем её если она смонтирована:
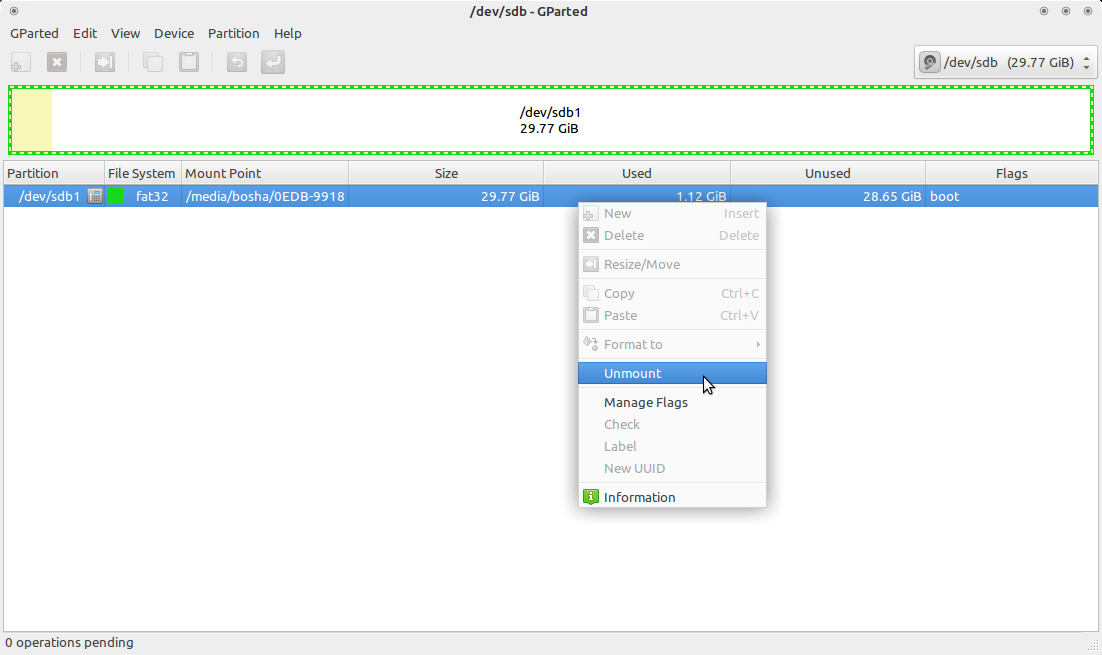
Отмонтирование USB диска в gparted
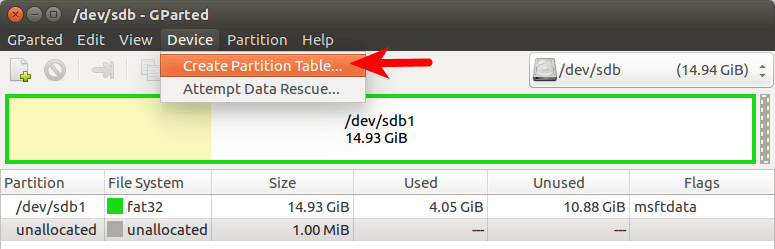
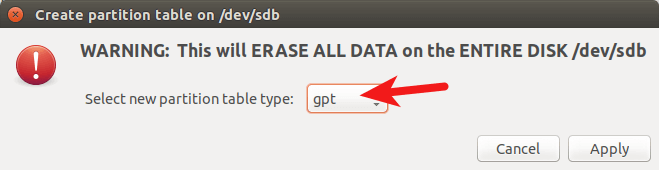
Теперь необходимо пересоздать таблицу разделов, при этом выбрать тип msdos . Заходим в меню Устройство (Device) и выбираем Создать таблицу разделов (Create partition table) :
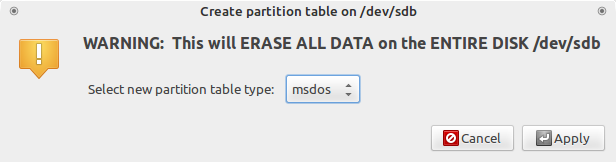
Gparted создание таблицы разделов
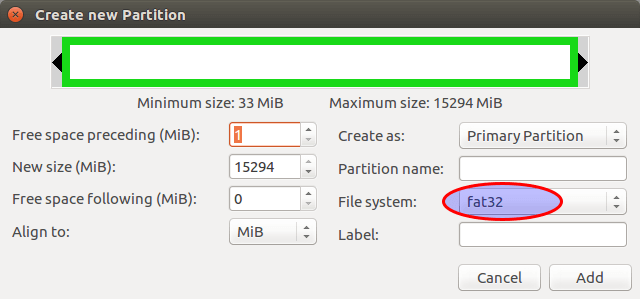
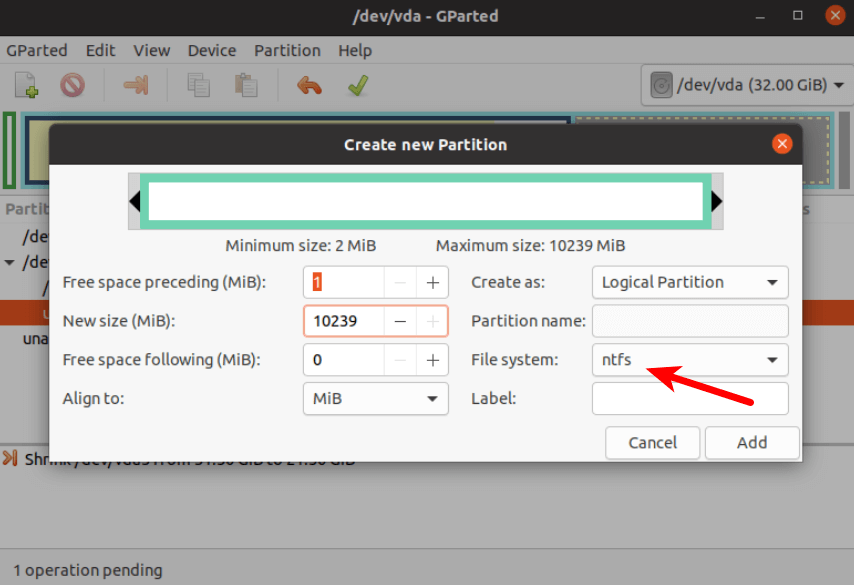
После этого выбираем неразмеченную область, нажимаем правой кнопкой мыши по ней же и выбираем пункт меню «Новый». В появившемся окне выбираем файловую систему NTFS или FAT32. Если у вас какая-то нестандартная сборка в которой могут быть файлы больше 4 гигабайт, то файловая система должна быть определенно NTFS, в противном случае, можно выбрать FAT32, и, тогда, так же можно будет загрузиться с UEFI. Так же необходимо указать метку для USB-диска. Важно: метка должна быть не просто «Windows», а какой либо более уникальной. Если файловая система FAT32, то метка должна быть указана заглавными буквами.
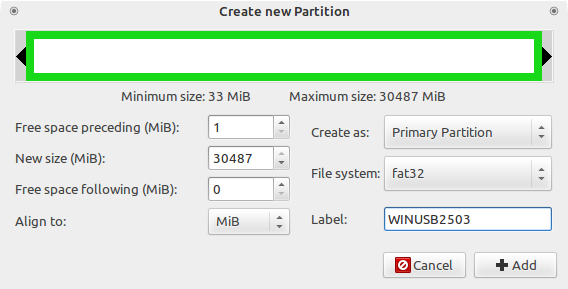
Создание нового раздела Gparted
Применяем все наши изменения:
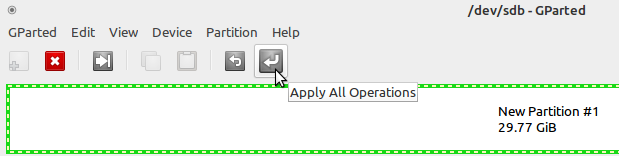
Применение изменений в Gparted
Выходим из gparted.
Копирование файлов Windows на USB диск
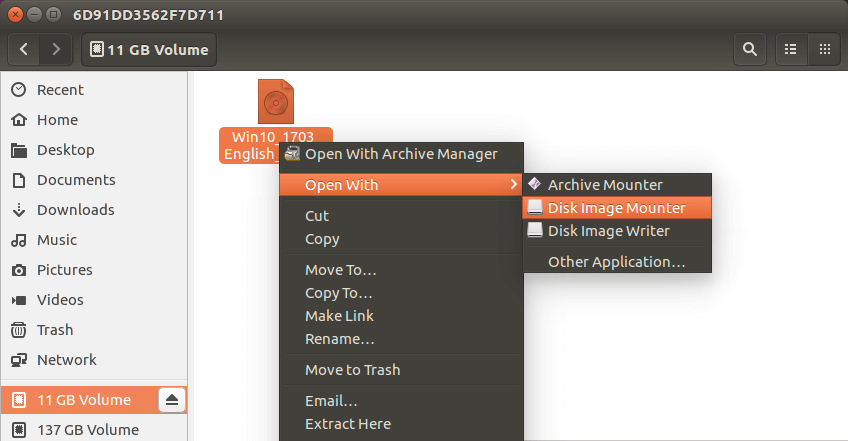
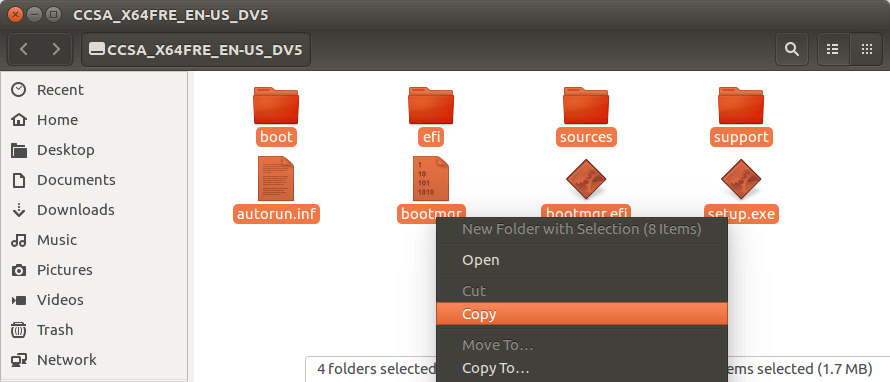
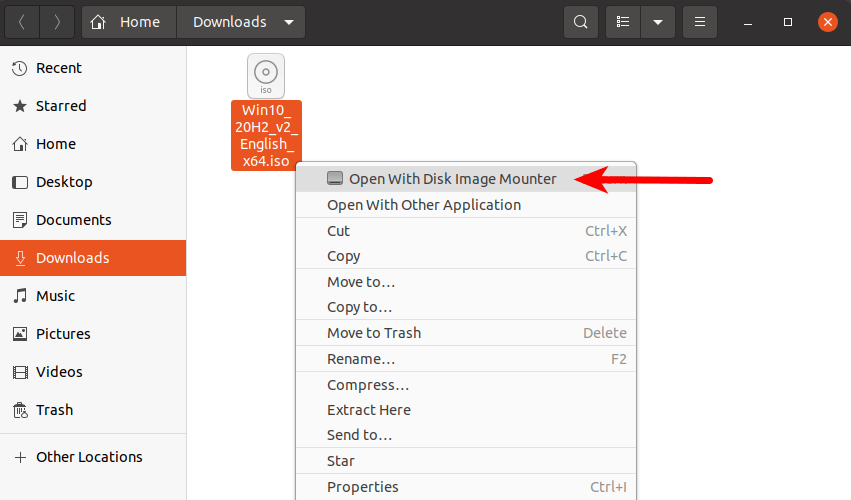
Теперь необходимо смонтировать образ с Windows и скопировать данные с него на наш подготовленный ранее usb диск. В большинстве современных рабочих окружений это можно сделать из файлового менеджера. По необходимому образу нажимаем правой кнопкой мыши, выбираем Открыть с помощью и выбираем Disk Image Mounter :
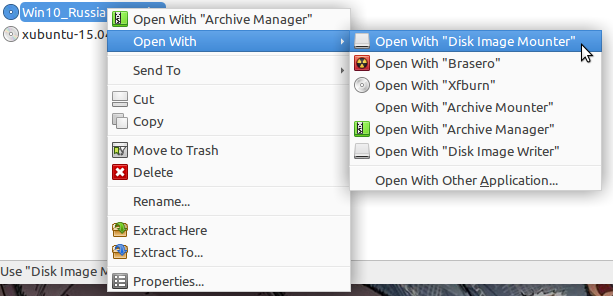
Монтирование образа с Windows в файлом менеджере Thunar
Если у вас нет такой утилиты, то можно смонтировать из командной строки:
Где $HOME/Загрузки/Windows.iso необходимо заменить на путь до образа с Windows. Образ будет смонтирован в директорию /mnt/cdrom .
Делаем USB-диск загрузочным
Если создаем MBR загрузочный диск
Для создания MBR загрузочной записи будем использовать grub:
- $user — имя текущего пользователя;
- $drive — название образа;
- /dev/sdX — расположение диска (в моем случае /dev/sdb ;
Если образ монтировали руками, то /media/$user/$drive/boot необходимо заменить на /mnt/cdrom/boot .
В случае, если не было никаких ошибок, то в консоли должны увидеть примерно следующее:
Теперь на USB-диске в директории boot/grub необходимо создать файл grub.cfg с таким содержимым:
В листинге выше, $USB_drive_label необходимо заменить на метку, которую мы присвоили диску на первом шаге. В данном случае WINUSB2503 .
Перезагружаемся, загружаемся с USB-диска и выбираем Start Windows Installation .
Если создаем UEFI загрузочный диск
С UEFI все несколько проще. Следует обратить внимание, что данный способ подходит только для Windows 7 x64 и выше.
После того, как все файлы скопировались, необходимо зайти в директорию efi/boot . Если в ней присутствуют файлы bootx64.efi или bootia32.efi то всё в порядке, можно пробовать загрузиться с диска.
Источник
Create a Bootable Windows 10 USB in Linux With Ubuntu/Debian GUI
Warning: Writing or selecting the wrong kind of boot record to a device (USB/hard disk) might destroy partition information or file system or data forever. Be careful with partition and disk names.
Method 1 . Create a Bootable Windows 10 USB in Linux with woeusbgui GUI app
This method is recommended for all new Linux users as it requires less typing at the CLI and easy to use. WoeUSB is a simple Linux program to create a Windows 10 USB stick installer from a real Windows DVD or ISO image. From the Github page:
WoeUSB is a simple tool that enable you to create your own usb stick windows installer from an iso image or a real DVD. It is a fork of Congelli501’s WinUSB. This package contains two programs:
- woeusb: A command-line utility that enables you to create your own bootable Windows installation USB storage device from an existing Windows Installation disc or disk image
- woeusbgui: A GUI wrapper of woeusb based on WxWidgets
It supports Windows Vista, Windows 7, Window 8.x, Windows 10. All languages and any version (home, pro, ltsb, …) and Windows PE.
Clone WoeUSB
Type the following git command git clone https://github.com/WoeUSB/WoeUSB.git
Set the application version string:
cd WoeUSB/
./setup-development-environment.bash
Install WoeUSB’s build dependencies on a Debian or Ubuntu Linux using the apt-get command or apt command sudo apt-get install devscripts equivs gdebi-core
mk-build-deps
sudo gdebi woeusb-build-deps_*.deb
dpkg-buildpackage -uc -b
sudo gdebi ../woeusb*.deb
Install WoeUSB to create usb stick windows 10 installer from an iso image on Linux
Make a Bootable Windows 10 USB from Linux
Method 2 . Bash shell script to create a bootable Windows 10 USB device from one ISO file
Install it as follows from the Github:
sudo apt install extlinux
mkdir
/bin/
curl -L https://git.io/bootiso -O
chmod +x bootiso
To list your usb pen drive run:
/bin/bootiso -l
To write create a bootable Windows 10 USB from an ISO image named
Create a Windows 10 USB bootable device from an ISO image using a bash shell script
Method 3 . Create a Bootable Windows 10 USB in Linux with CLI apps only
First you need to install a tool called ms-sys. It is a Linux cli app for writing Microsoft compatible boot records. This program does the same as Microsoft “ fdisk /mbr ” to a hard disk except that it does not copy any system files, only the boot record written.
- No ads and tracking
- In-depth guides for developers and sysadmins at Opensourceflare✨
- Join my Patreon to support independent content creators and start reading latest guides:
- How to set up Redis sentinel cluster on Ubuntu or Debian Linux
- How To Set Up SSH Keys With YubiKey as two-factor authentication (U2F/FIDO2)
- How to set up Mariadb Galera cluster on Ubuntu or Debian Linux
- A podman tutorial for beginners – part I (run Linux containers without Docker and in daemonless mode)
- How to protect Linux against rogue USB devices using USBGuard
Join Patreon ➔
Download and install ms-sys
Grab the latest version from this page. Use the wget command or curl command to grab the file:
cd /tmp/
wget https://nchc.dl.sourceforge.net/project/ms-sys/ms-sys%20development/2.5.2/ms-sys-2.5.2.tar.gz
Untar the tar ball named ms-sys-2.5.2.tar.gz using the tar command:
tar -zxvf ms-sys-2.5.2.tar.gz
If you do not have gnu gcc c/c++ compiler installed on a Debian or Ubuntu Linux, install it using the apt command or apt-get command:
sudo apt install build-essential
See the following links for more info:
Build and install it:
cd ms-sys-2.5.2
make
sudo make install
Create a ntfs partition
Linux create windows 10 Bootable USB by coping installer files
You need copy files from Windows 10 ISO image to usb disk. Create a folder on Linux using the mkdir command sudo mkdir /mnt/win10/
Mount Windows 10 ISO image in Linux using the mount command:
sudo mount -t udf -o loop,ro,unhide /mnt/win10/
## I got a win10 ltsb iso file in
/Downloads/ ##
sudo mount -t udf -o loop,ro,unhide
/Downloads/14393.0.160715-1616.RS1_RELEASE_CLIENTENTERPRISE_S_EVAL_X64FRE_EN-US.ISO /mnt/win10/
Mount usb pen drive too:
sudo mkdir /mnt/usb/
sudo mount /dev/sdc1 /mnt/usb/
df -h | grep ‘/mnt’
Ready to burn the Windows 10 ISO to a USB on Linux
Use ms-sys command to write mbr to create a bootable Windows 10 pro usb in Linux
In order to burn the Windows 10 ISO to a USB and boot it, run:
sudo ms-sys -7 /dev/sdc
Sample outputs:
Unmount /dev/sdc:
sudo sync
sudo umount /mnt/usb/
Now boot from USB pen and you should see Windows 10 installer as follows:
Conclusion
And there you have it. You just created a Windows 10 bootable USB stick on Linux using two different methods. Creating a Microsoft bootable Windows 10 USB stick from Linux is very simple, and I hope it helps you manage your enterprise workload without leaving Linux desktop.
🐧 Get the latest tutorials on Linux, Open Source & DevOps via
Источник
Write windows iso to usb from linux
Burn Windows ISO to USB Flash Drive on Linux
Windows2usb is a bash script which writes Microsoft Windows 7/8/8.1/10/11 installation DVD images to USB Flash Drive or external HDD on Linux. It was designed with compatibility in mind, and should work in all cases, contrary to other popular Linux tools.
- Fully automatic, no preparations required
- Supports BIOS and UEFI, FAT32 and NTFS
- Supports custom Windows ISOs with install.wim > 4GiB
- Uses stock Windows bootloaders where possible
- Does not break UEFI Secure Boot chain
Download latest portable AppImage version from the Releases page, set execution bit ( chmod +x windows2usb-*.AppImage ) and run it from the terminal.
The program prints removable storage list if no arguments are supplied.
If you don’t want to use AppImage, you’ll need to install all dependencies and download uefi-ntfs.img from Rufus project.
BIOS Boot (Legacy Boot/UEFI-CSM) uses stock Windows 7 MBR and FAT32 bootloader, courtesy of ms-sys project.
BIOS boot is supported only in recommended ‘mbr’ mode.
To burn ISO compatible with BIOS boot (and UEFI boot as well), run:
UEFI Boot is supported in all modes. Recommended mode: ‘mbr’.
To burn ISO in this mode, run:
‘MBR’, ‘GPT’ and ‘GPTNTFS’ modes utilize Windows UEFI bootloader from the ISO file, with Secure Boot support.
UEFI Boot with NTFS Partition and uefi-ntfs bootloader
A special ‘gpt+uefintfs’ mode uses uefi-ntfs bootloader from Rufus project. Windows2usb creates 2 partitions in this mode, small 1 MiB FAT32 partition with uefi-ntfs and huge NTFS partition with ISO data.
This mode was included earlier to work with installation disks where install.wim file is greater than 4 GiB, but since then split WIM file functionality was introduced, and now this mode may be considered obsolete.
This mode does not support Secure Boot (uefi-ntfs bootloader is not signed by Microsoft or other trusted party).
WoeUSB—uses GRUB for BIOS Boot.
bootiso—supports Windows and Linux ISOs.
Ventoy—Booting multi-tool with brilliant support of Windows ISO direct loading.
This script uses:
- lsblk and sfdisk from util-linux
- ms-sys for native Windows 7 MBR and NTFS bootloaders
- p7zip for ISO extraction
- autofsync to prevent filesystem bufferbloat and properly show copying progress (AppImage only)
- wimlib to split large install.wim files to fit FAT32 partition
About
Windows 7/8/8.1/10/11 ISO to Flash Drive burning utility for Linux (MBR/GPT, BIOS/UEFI, FAT32/NTFS)
Источник
How to Easily Create Windows 10 Bootable USB on Ubuntu or Any Linux Distro
This tutorial is going to show you an easy way to create a Windows 10 bootable USB on Linux. I use Ubuntu 20.04 as an example. The method applies to any Linux distribution. I use Windows to do online banking because my bank doesn’t support Linux and sometimes play games that can’t run on Linux.
What you need
- A computer running Linux
- A USB flash drive at least 8GB
- Windows 10 ISO
Download Windows 10 ISO
First, you should download Windows 10 ISO from Microsoft official download link. Note that you might not be able to download the ISO from this link on a Windows computer. This download link is visible to users on Linux computer. Once downloaded, follow the instructions below.
Note: It’s recommended to download the Windows 10 April 2018 update ISO, because the October Update ISO contains a file that is larger than 4GB, which can not be copied to a FAT32 partition.

Update: Microsoft doesn’t allow you to download the Windows 10 April 2018 Update ISO from their website anymore. You can download the ISO via this link: Win10 1803 English x64 ISO
Creating a Windows 10 Bootable USB for UEFI Firmware
This method works for UEFI firmware and is very simple. You create a GUID partition table on your USB stick, create a FAT32 file system on it, and then mount Windows 10 ISO image and copy those Windows 10 files to your USB stick and you are done. The following is a step-by-step guide.
First, install GParted partition editor on your Linux distribution. Ubuntu users run the following command.
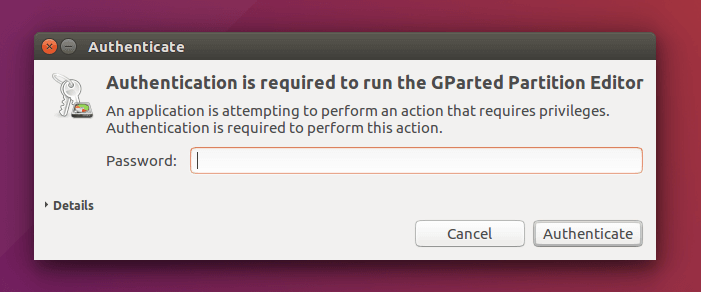
Then insert your USB stick to your computer. Make sure you back up important files in your USB stick if there’s any. Next, launch Gparted. You will need to enter your password in order to use GParted.
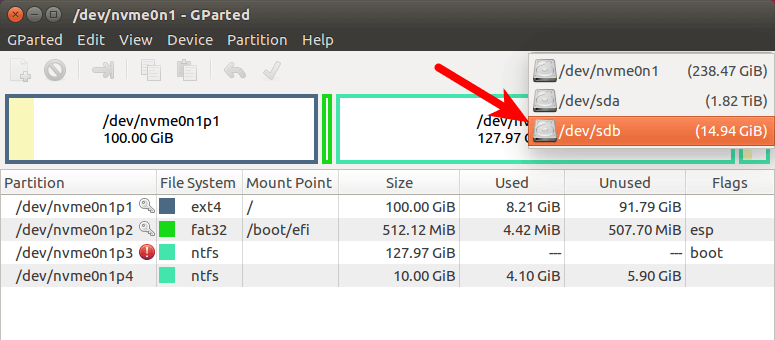
Select your USB stick from the drop-down menu on the upper-right corner. My USB stick is /dev/sdb . Yours may be different.
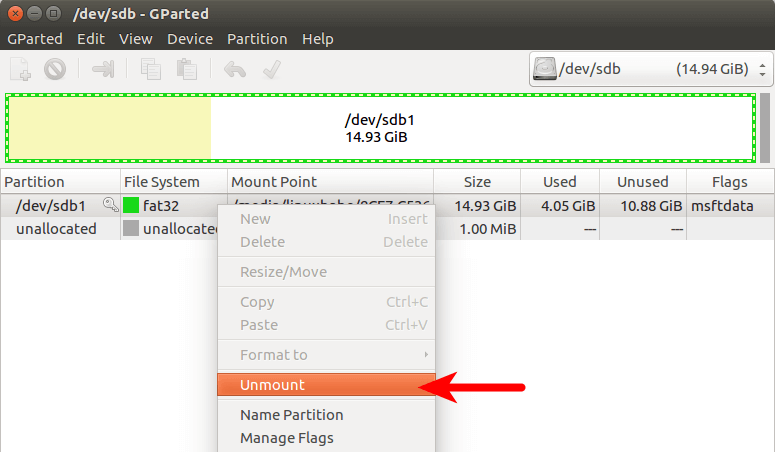
If there’s a key icon after the partition name, that means the partition is mounted. Make sure all partitions on your USB stick are unmounted. To unmount a partition, simply right-click on it and select unmount.
Next, on the menu bar, select Device > Create partition table.
Choose GPT as the partition table type and click Apply.
Then right-click on the unallocated space and select New to create a new partition.

Change file system type from ext4 to fat32 and click Add.
Note: The install.wim file in Windows 10 October 2018 update ISO is 4.1G, so if you downloaded this ISO image, you need to change ext4 to ntfs . If you downloaded Windows 10 April 2018 Update ISO, which contains a 3.9G size install.wim file, you can change ext4 to fat32
Update: It is my observation that my NTFS formatted USB stick isn’t bootable on my old laptop, which was bought in 2012. However, it is bootable on my desktop computer, which was bought in 2017. It has a graphical UEFI firware (I can use my mouse to configure firmware settings).
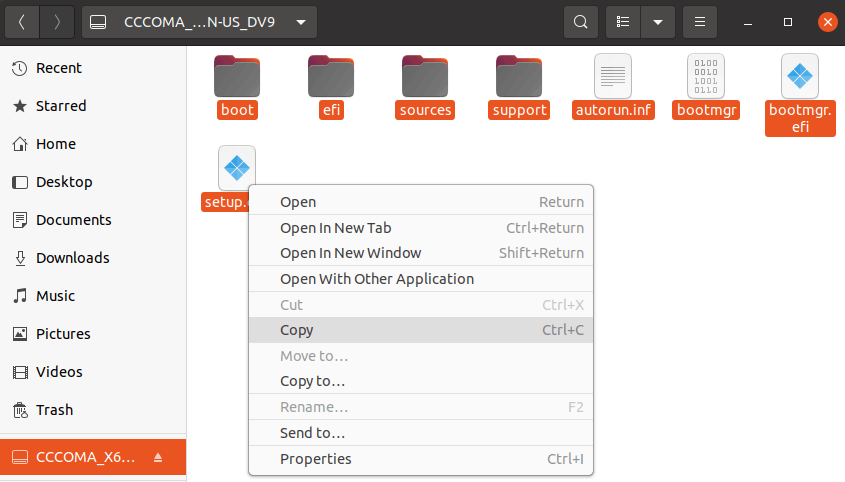
Next, click the green check button on the toolbar to apply this operation. Once that’s done, close GParted (This is important), then find your Windows 10 ISO in file manager. Open it with disk image mounter.
Open the mounted file system. Select all files and folders and copy them to your USB stick.
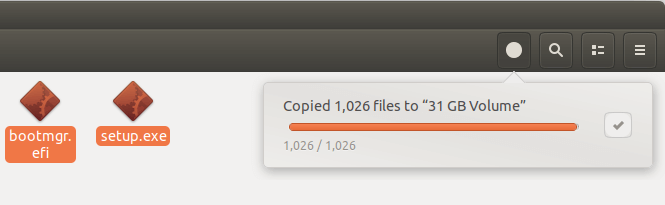
Sometimes the file manager on Ubuntu hangs and it seems that the copy operation has stopped. Actually it’s working, just be patient. When you see a check mark, it means the copy operation has finished.
If your file manager doesn’t have the Disk image mounter in the context menu, then you can use the following commands to mount. The first command will create a mount point for Windows 10 ISO and the second command will mount Windows 10 ISO under that mount point.
Now in your file manager, go to /mnt/windows10/ and copy all files and folders to your USB stick.
Once the file and folders are copied, your windows 10 bootable USB is created! You can shut down your computer, boot it from this USB stick and install Windows 10 in UEFI mode. Keep in mind that you may need to disable compatibility support module (CSM) in the firmware in order to boot in UEFI mode. You may also need to remove USB stick from your computer and insert it back in order for the firmware to detect the boot loader on your USB stick.
Boot Windows 10 ISO Installer without USB (BIOS & UEFI)
Ever wondered if you can boot Windows 10 ISO installer without a USB flash drive? Yes, you can do it with GRUB2, which is the standard boot loader on Linux.
GRUB2 can not boot Windows 10 ISO directly. You need to create a separate NTFS partition on your hard disk or SSD with a partition editor like GParted and extract the Windows 10 ISO to that partition. Download the Windows 10 ISO file. The latest Windows 10 ISO file is 5.8G. The new NTFS partition should be at least 7G and it should not be used to store any other files.
Then find your Windows 10 ISO in file manager. Open it with disk image mounter.
Open the mounted file system. Select all files and folders and copy them to the NTFS partition.
Sometimes the file manager on Ubuntu hangs and it seems that the copy operation has stopped. Actually, it’s working. Just be patient. When you see a checkmark, it means the copy operation has finished.
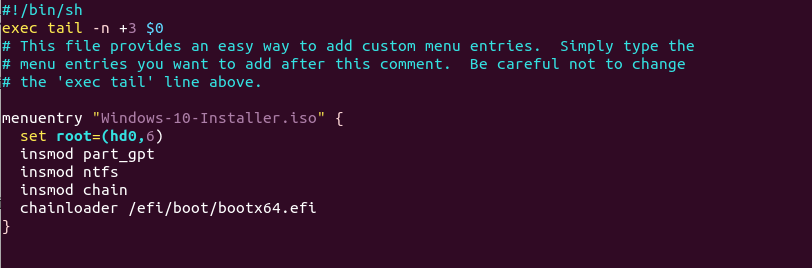
Next, open up a terminal window and edit the /etc/grub.d/40_custom file with a text editor such as Nano.
In this file, we can add custom entries to the GRUB boot menu. In this case, we want to add an entry to boot the Windows 10 installer. If your computer still uses the traditional BIOS firmware, then add the following lines in this file.
My NTFS partition is the 6th partition on my first disk, so I use (hd0,6) as the root. You can run sudo parted -l command to check your NTFS partition number. If your computer has multiple hard drives, use the drivemap command to set the partition (hd0,6) as the first hard disk, so Windows will be able to boot.
If your computer uses UEFI firmware, then add the following text in this file.
Save and close the file. (Press Ctrl+O , then press Enter to save a file in Nano text editor. Press Ctrl+X to exit.)
Then update GRUB boot menu.
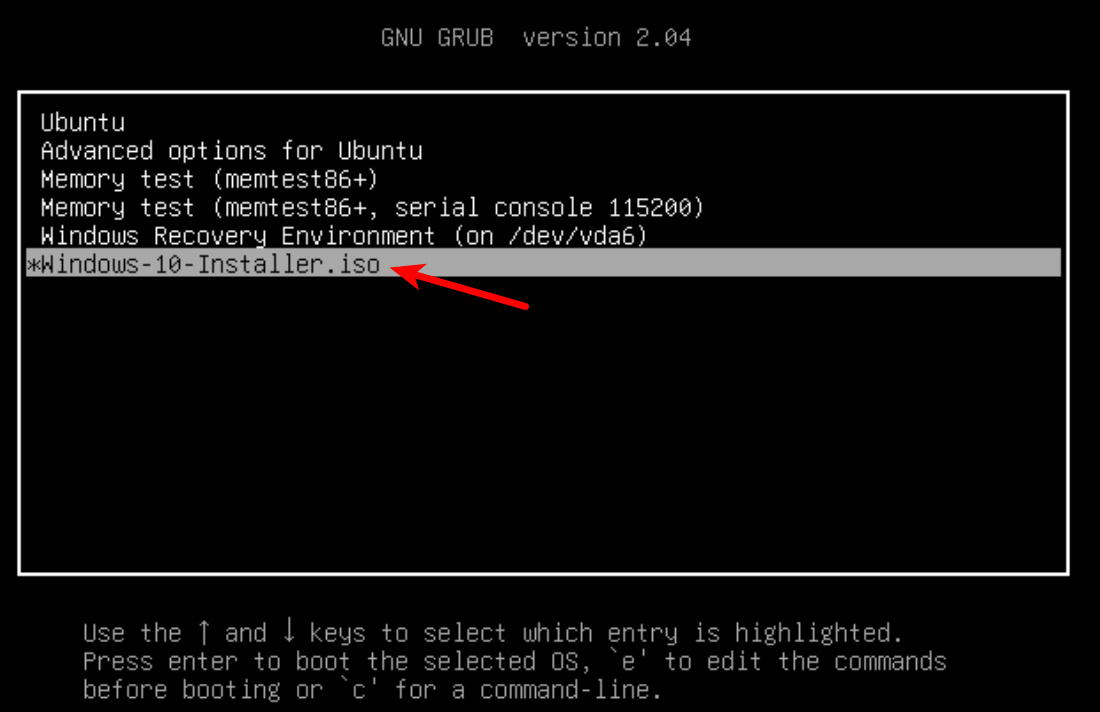
Next, set GRUB to boot the Windows 10 installer for the next boot with the following command.
Unplug all your external USB storage devices, then reboot your computer. GRUB will choose the Windows 10 installer.
GRUB2 can also boot Linux ISO files stored on the hard drive, so you don’t need to create Linux live USB.
Creating a Windows 10 Bootable USB for Legacy BIOS Using WoeUSB
WoeUSB is a fork of WinUSB. Both of them are open-source software (licensed in GPL) for making Windows bootable USB sticks on Linux platform, but the latter hasn’t been updated since 2012. You may be wondering why it’s named WoeUSB. The author said it’s a GNU convention to abbreviate software that support Windows to “woe”.
To install WoeUSB on Ubuntu 14.04/16.04/17.04, you can use the following PPA. Simply open up a terminal window and run the following commands one by one. Other Linux distro users can compile this software by following the instructions on the Github project page.
This PPA contains many other software. If you don’t need them, you can now remove this PPA from your system.
You can launch WoeUSB from Unity Dash or your application menu.
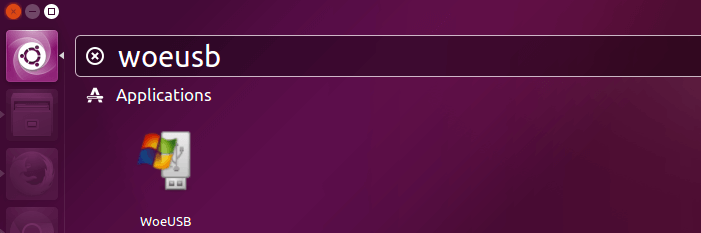
You can also start it from command line with:
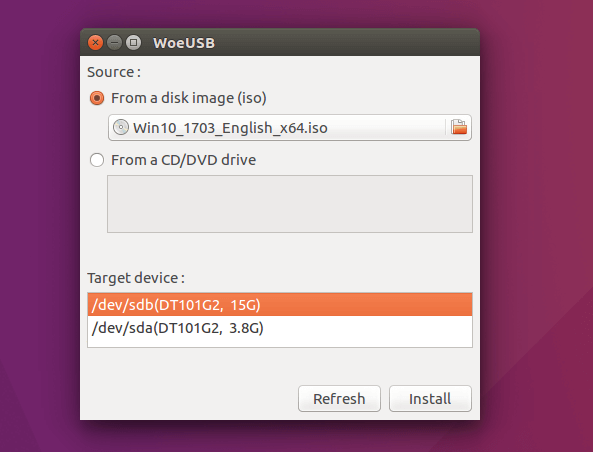
It’s very easy to use the WoeUSB GUI. Select Windows ISO image and your target USB device. Make sure your data on the USB device is backed up before hitting the Install button.
Then wait for the installation to complete.
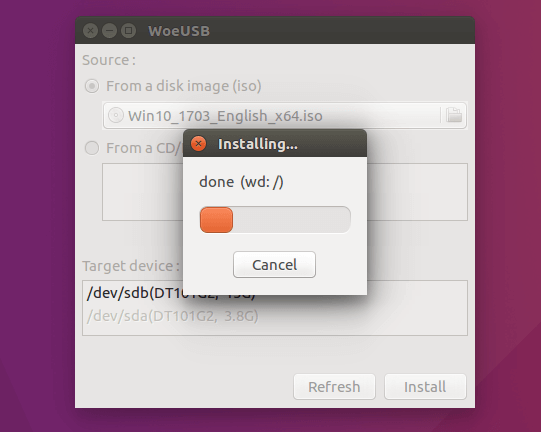
Once done, you can use the bootable USB to install Windows 10 on your computer.
How to Use WoeUSB From the Command Line
First, find the device name of your USB stick using the following command.
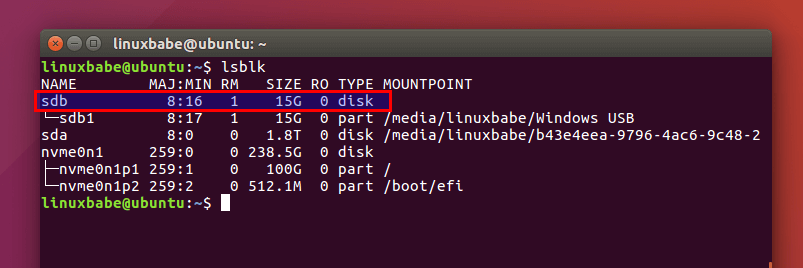
Mine is /dev/sdb . Make sure your USB is unmounted with the following command. Replace /dev/sdb1 with your own partition name.
Then create a bootable Windows 10 USB like below. Red texts shoudl be adapted to your own ISO file name and USB device name. The -v (—verbose) option will give more detailed output.
In my test, the Windows 10 USB created with WoeUSB can boot in both legacy and UEFI mode on my old computer. On my new computer, it can boot in legacy mode but failed in UEFI mode. I don’t know the exact reason, but it’s probably because of bug in this software.
That’s it! I hope this tutorial helped you create windows 10 bootable USB on Ubuntu or any Linux distribution. As always, if you found this post useful, then subscribe to our free newsletter to get new tutorials.
Источник


