- Howto: Linux write (burn) data to DVD or DVD/RW
- How do I write DVD?
- Ubuntu Documentation
- Introduction
- Why would I want to do this?
- Creating an iso image from a non-music CD or DVD
- GUI (Ubuntu 20.04.1 LTS, Focal Fossa)
- Command line
- Creating an iso image from a music CD or DVD
- Listening the audio tracks of an iso image from a music CD
- How to Ubuntu
- How to Burn an ISO to a CD or DVD
- Choosing a Disc
- R or RW
- Using Brasero
- Linux creating CD-ROM ISO images from a CD, DVD, Blu-ray
- How do I use dd command on Linux to create an ISO image?
- Burn an ISO File
- Содержание
- Burning to CD/DVD in Linux
- Burning to a CD/DVD in Windows
- Writing to a USB Stick in Linux
- Using the Terminal
- How you can check ISO
- How create isohybrid
- Using a Burning Application
- ImageWriter
- Writing to a USB Stick in Windows
- Using Rufus
Howto: Linux write (burn) data to DVD or DVD/RW
In order to write DVD/DVD-RW from shell prompt you need to install a package called dvd+rw-tools.
DVD is another good option for backup, archiving, data exchange etc. You can install dvd+rw-tools with following commands. Also note that this package works under *BSD, HP-UX, Solaris and other UNIX like operating systems.
Debian installation:
# apt-get install ‘dvd+rw-tools’
Fedora Core Linux installation:
# yum install ‘dvd+rw-tools’
RedHat Enterprise Linux installation:
# up2date ‘dvd+rw-tools’
In order to write DVD you need to install cdrecord tools.
How do I write DVD?
You need to use growisofs command, which combined mkisofs frontend/DVD recording program. From growisofs man page, “growisofs was originally designed as a frontend to mkisofs to facilitate appending of data to ISO9660 volumes residing on random-access media such as DVD+RW, DVD-RAM, plain files, hard disk partitions. In the course of development general purpose DVD recording support was implemented, and as of now growisofs supports not only random-access media, but even mastering of multiession DVD media such as DVD+R and DVD-R/-RW. In addition growisofs supports first-/single-session recording of arbitrary pre-mastered image (formatted as UDF, ISO9660 or any other file system, if formatted at all) to all supported DVD media types.”
First create the ISO image
# mkisofs -r -o /tmp/var-www-disk1.iso /var/www
Now use the growisofs command to write the ISO onto the DVD:
# growisofs -Z /dev/dvd=/tmp/var-www-disk1.iso
- No ads and tracking
- In-depth guides for developers and sysadmins at Opensourceflare✨
- Join my Patreon to support independent content creators and start reading latest guides:
- How to set up Redis sentinel cluster on Ubuntu or Debian Linux
- How To Set Up SSH Keys With YubiKey as two-factor authentication (U2F/FIDO2)
- How to set up Mariadb Galera cluster on Ubuntu or Debian Linux
- A podman tutorial for beginners – part I (run Linux containers without Docker and in daemonless mode)
- How to protect Linux against rogue USB devices using USBGuard
Join Patreon ➔
To append more data for same DVD:
# growisofs -M /dev/dvd /tmp/file.1
To format (erase) a DVD:
# dvd+rw-format -force /dev/dvd
OR
# dvd+rw-format -force=full /dev/dvd
The dvd+rw-format command formats dvd disk in the specified dvd drive.
To display information about dvd drive and disk using dvd+rw-mediainfo command:
# dvd+rw-mediainfo /dev/dvd
Источник
Ubuntu Documentation

Needs Updating
This article needs updating to include the latest versions of Ubuntu. More info.
Introduction
For an introductory explanation of ISO images and burning them see IsoImage.This page details how to create an ISO (.iso) file from a CD or DVD.
Why would I want to do this?
Iso images are useful because they are always available quickly. Two common uses of iso images are:
Creating images of discs that you copy frequently. This means that you can make copies in the future without the source disc — see BurningIsoHowto.
Creating images of discs you use frequently so that you do not have to have the disc in the drive to access them — see MountIso.
Creating an iso image from a non-music CD or DVD
GUI (Ubuntu 20.04.1 LTS, Focal Fossa)
- Insert the CD or DVD.
- Wait for the disk icon to display in the Dock. Your CD or DVD has now been mounted and can be read by Ubuntu.
- Click the «Show Applications» icon in the Dock to display a Search box.
- In the Search box, type «disks», then click the Disks application to open it.
- In Disks, click the «CD/DVD Drive» entry on the left to display the CD or DVD volume. (Don’t touch anything else in Disks unless you know what you’re doing.)
Click the menu icon in the top-right, then click «Create Disk Image. » to display the Create Disk Image dialog, as shown in this screenshot: create-file-rename.png
You can check your new .iso file by double-clicking it to mount it, then browsing it as you would if it were a CD or DVD.
Command line
dd if=/dev/cdrom of=file.iso (assuming /dev/cdrom is where the CD is mounted, and file.iso is the name you want to give the ISO, in the current directory)
Creating an iso image from a music CD or DVD
- Insert the CD or DVD.
- Wait for Sound Juicer to pop-up with the songs on the disc
- Close Sound Juicer
Click «Places» > «Computer» (the menu at the top of your screen)
The icon of the CD can also be found on the Desktop after the disc has been inserted. This icon can also be used for steps 5 — 10.
Listening the audio tracks of an iso image from a music CD
To be completed.
CreateIsoFromCDorDVD (последним исправлял пользователь lauracowen 2020-11-16 15:29:42)
The material on this wiki is available under a free license, see Copyright / License for details
You can contribute to this wiki, see Wiki Guide for details
Источник
How to Ubuntu
How to Burn an ISO to a CD or DVD
An .iso file is an image of a CD, DVD, or BluRay disc. It is a way of storing files in a computer as if they were on a disc. Unfortunately, individual files are not accessible easily, but can be extracted like a zip archive.
Choosing a Disc
Choosing the right disc to write an .iso to isn’t all that difficult. First, select your .iso and on the bottom left read how big it is. Now, you simply need to use a disc big enough to fit it on to. CDs are typically 700MB to 1.4GB, DVDs 4.7GB to 9.4GB, and BluRay Discs 25GB to 50GB (all three come in single or dual layer). Your computer also needs a disc drive (optical drive) capable of writing to your chosen disc. DVD Writer drives are fairly commonplace, as are Writable DVDs.
R or RW
R stands for Recordable, and RW for ReWriteable.
R discs can only be written to once. Once the data is there, it stays there, sort of. It’s actually possible to erase them afterwards, but then that’s it, you have a permanently blank disc. RW discs can be written to thousands of time. Generally the disc will become to scratched from human handling before it wears out.
As R and RW discs cost roughly the same amount, i would recommend RW.
The — (minus) was originally just a hyphen. but was changed (sort of) to be a minus (see what i mean) when the + (plus) discs were introduced.
Plus discs usually cost slightly more, as they support direct writing from a computer, whereas Minus discs require the files to be packaged into an .iso before writing. Seeing as we’re burning an .iso, it actually doesn’t matter, but Plus discs will be more flexible if your using them later.
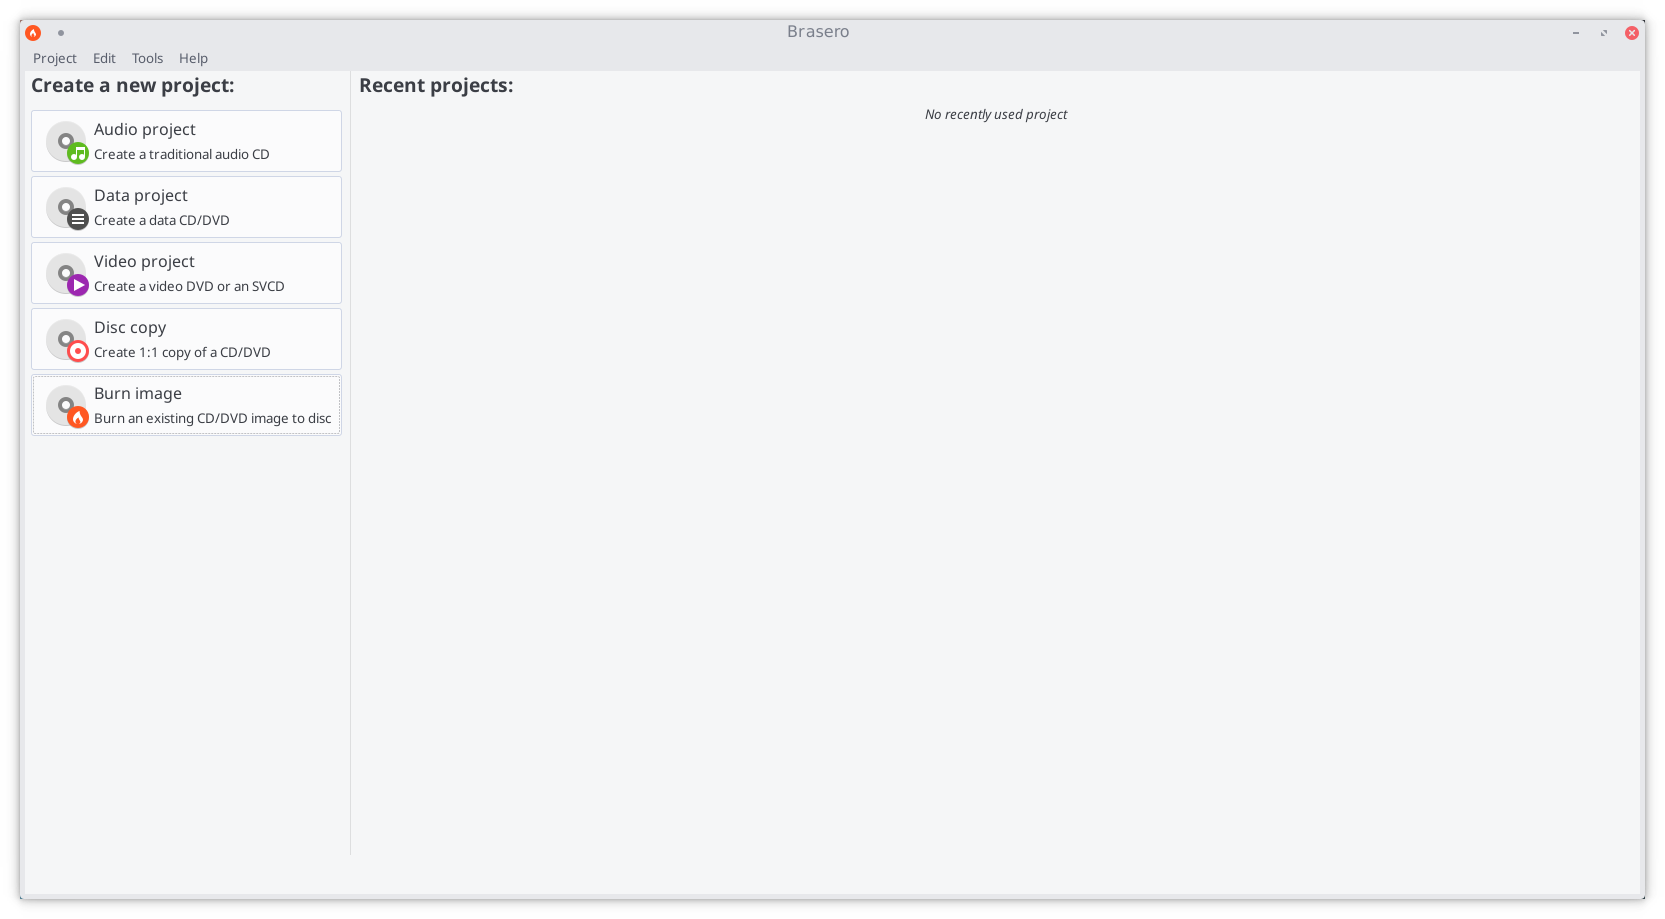
Using Brasero

Either double-click, or right-click and Write to Disc , and Brasero should open (unless you’ve installed another image burner). The file is already selected in the top box. Click the bottom box and select the disc you want to write to (if you haven’t inserted it yet, now would be a good time). Click Burn . Brasero will write the image to the disc. Wait for it to finish.
Источник
Linux creating CD-ROM ISO images from a CD, DVD, Blu-ray
dd is a perfect tool for copy a file, converting and formatting according to the operands. dd command works on Linux and a Unix-like system whose primary job is to convert and copy files. It can create exact CD-ROM ISO image or create a new CD/DVD iso image. This is useful for making a backup, as well as for hard drive installations, require a working the use of ISO images.

How do I use dd command on Linux to create an ISO image?
Put CD or DVD into CDROM/DVDROM drive.
Do not mount CD/DVD. Verify if the cd is mounted or not with the mount command:
$ mount
If CD/DVD was mounted automatically unmount it with the help of umount command:
$ sudo umount /dev/cdrom
OR
$ sudo umount /mnt/cdrom/
- No ads and tracking
- In-depth guides for developers and sysadmins at Opensourceflare✨
- Join my Patreon to support independent content creators and start reading latest guides:
- How to set up Redis sentinel cluster on Ubuntu or Debian Linux
- How To Set Up SSH Keys With YubiKey as two-factor authentication (U2F/FIDO2)
- How to set up Mariadb Galera cluster on Ubuntu or Debian Linux
- A podman tutorial for beginners – part I (run Linux containers without Docker and in daemonless mode)
- How to protect Linux against rogue USB devices using USBGuard
Join Patreon ➔
Warning: Reading and writing partitions or data from it has the VERY REAL potential to cause DATA LOSS. Use common sense. BACKUP ANYTHING YOU DO NOT WANT TO LOSE! Wrong command line option can result in DATA LOSS.
Create CD-ROM/DVD ISO image with dd command:
$ sudo dd if=/dev/cdrom of=/tmp/cdimg1.iso
Where,
Источник
Burn an ISO File
Содержание
As outlined in the Download Manjaro page, an ISO is not simply a ‘drag and drop’ or ‘copy and paste’ duplication of Manjaro’s installation files. It is in fact a copy of the raw computer code that makes up the files themselves. This is why it is necessary to use a software burning application to ‘burn’ an ISO file, that is, convert its raw code into the files onto a physical medium such as a DVD or USB flashdrive / datastick in order to use it. Once burned / converted, the files on that medium can then be used to run Manjaro directly without having to install it to your system (referred to as Live-CD or Live-USB mode), and/or install Manjaro on your system. Again however, it will not be necessary to to burn an ISO if you intend on running Manjaro in a virtual machine environment using Oracle’s Virtualbox. This is because Virtualbox is able to read ISO files directly as virtual disks.
Burning to CD/DVD in Linux
Several different software burning applications — if not already installed — should be available for installation from your distribution’s Software Center / Software Manager / Package Manager / repositories. Popular burners include XFBurn, K3b, and Brasero. Which one you may choose is entirely down to personal choice. However, a guide to burning your downloaded Manjaro ISO using Brasero has been provided below:
1. Insert a Blank CD/DVD (use a DVD if burning an ISO for anything other than the NET Edition)
2. Start the Brasero software burner
3. Click the Burn Image — Burn an existing CD/DVD image to disc button to open the Image Burning Setup window.
4. Click the button beneath the title Select a disc image to write to open up your file manager. Locate and double-click the downloaded ISO file to load it. Upon automatically returning to the Image Burning Setup window, note that the ISO file is now listed as the disc image to write.
5. Underneath the title Select a disc to write to the blank CD/DVD inserted should already have been automatically listed. Otherwise, click the button to select it manually.
6. Click the properties button to open the properties window, and then click the button beneath the title Burning Speed. Again, it is strongly recommended to select the slowest speed available. Once selected, click the Close button.
7. Click the Burn button to start the burning process. If necessary, follow any on-screen instructions provided.
Burning to a CD/DVD in Windows
In Windows 7 and later, support for burning an ISO to DVD is built-in. Simply right click on the on .iso file and select «Burn disk image». This will bring up a series of dialogues to walk you through the process.
For Windows Vista or older versions of Windows you will need to download 3rd party software. Several free software burner applications are available for Windows. One such tool is DeepBurner. The portable version can be downloaded from here.
Writing to a USB Stick in Linux
This section describes how to write a Linux ISO file to USB.
Windows ISO files are notoriously difficult and requires special attention. Read the forum post on HowTo create a bootable Windows ISO
Using the Terminal
To burn the iso on an usb stick, enter the following command in a terminal :
Where [drive letter] is the letter of your removable device. Please note that it is the device (e.g. /dev/sdb), and not the partition number (e.g. /dev/sdb1).
To find which drive letter it might be write:
How you can check ISO
Disk manjaro-mate-15.12-x86_64.iso: 7,5 GiB, 8006074368 bytes, 15636864 sectors Units: sectors of 1 * 512 = 512 bytes Sector size (logical/physical): 512 bytes / 512 bytes I/O size (minimum/optimal): 512 bytes / 512 bytes Disklabel type: dos
Disk identifier: 0x00000000 COPY TO CLIPBOARD
Disk manjaro-xfce-16.08-x86_64.iso: 1,5 GiB, 1561657344 bytes, 3050112 sectors Units: sectors of 1 * 512 = 512 bytes Sector size (logical/physical): 512 bytes / 512 bytes I/O size (minimum/optimal): 512 bytes / 512 bytes Disklabel type: dos Disk identifier: 0x06c2dccb . Device Boot Start End Sectors Size Id Type manjaro-xfce-16.08-x86_64.iso1 * 0 3050111 3050112 1,5G 0 Empty
manjaro-xfce-16.08-x86_64.iso2 224 63711 63488 31M ef EFI (FAT-12/16/32) COPY TO CLIPBOARD
Isohybrid have 2 partitions, you can check also with gparted after burn the iso on an usb stick.
How create isohybrid
Using a Burning Application
ImageWriter
ImageWriter should be available for installation from your distribution’s Software Center / Software Manager / Package Manager / repositories. Once Imagewriter has been downloaded and installed, ensure that your USB stick is plugged in before starting it.
A brief guide to writing the Manjaro .ISO image has been provided:
1. Click on the centre icon
2. Navigate to where the ISO image has been saved and select it
3. Ensure that your USB device has been selected from the drop-down menu
4. Click on the Write button
5. After the Write process has finished, reboot your system
Writing to a USB Stick in Windows
Using Rufus
Rufus Rufus is a utility that helps format and create bootable USB flash drives, such as USB keys/pendrives, memory sticks, etc.
When you use Rufus to write a Manjaro Live ISO to USB you must select DD mode when prompted to use standard or DD mode.
Источник


