- Question: Q: burn iso to usb on mac?
- All replies
- Как Записать ISO На USB Для Mac
- Способ 1: Записать ISO На USB Mac С Помощью Терминала
- Способ 2: Записать ISO На USB Mac С Помощью UNetbootin
- Способ 3: Создать ISO На USB На Mac С Помощью Virtualbox
- Дополнительные Cоветы: Как Записать ISO На USB В Windows
- Заключение:
- Creating bootable USB from ISO in MacOS
- Windows 10 bootable USB vs Linux ISO USB
- Step 1: Confirm partitions before inserting USB
- Step 2: Insert USB stick an re-run diskutil list
- Creating Windows bootable USB
- Step 3: format USB stick for Windows boot
- Step 4: Mount Windows ISO
- Step 5: Copy Windows files onto USB stick
- Step 6: Boot USB stick on your PC
- Creating Linux bootable USB
- Step 3: convert ISO into bootable DMG
- Step 4: write DMG image onto USB stick with dd
- Step 5: Boot USB stick on your PC
- Question: Q: How can I burn an ISO to USB without using the command line?
- All replies
Question: Q: burn iso to usb on mac?
So, I have an iso file I need to burn to a usb drive for use with a windows computer. It’s a bootible iso image that can be burned to a usb stick. I need to burn it to a usb drive for use with a windows computer. I’ve looked all over the internet for software that can be used to burn an iso image to a usb drive on a mac, but haven’t been successful. I can’t use the command line. I am blind, and must use a screen reader to use a computer. I cannot use the command line. Does anyone know of a way I can burn an iso file to a usb drive without the command line? Is their a third party program that can be used to burn iso images to a usb drive on mac os ten computers? thanks in advance
MacBook Pro, OS X Mountain Lion (10.8.5), late 2011
Posted on May 3, 2016 8:18 PM
Can anyone please send the link to download win clone? And, if at all possible, can anyone try to point me in the write direction for finding a program that will allow cloning an iso file to a usb drive on without needing to fight with the command line? I just want to make shure I download win clone from the websight who made it. Thanks in advance, and thank you for suggesting a program I can try to see if it works. Thanks.
Posted on May 10, 2016 6:12 PM
All replies
Loading page content
Page content loaded
Hey, this is Stephen again. Have any of you seen my post? No one has answered it. It has been almost a week and no one has replied to this post. Please find a way to answer my post to at least point me in the write direction for a way I can burn an iso file to a usb drive on os ten. I’m now working with a macbook air, early 2014. I am running os ten lcapitan, 10.11.4. Sorry for any spelling errors. Thanks in advance
May 9, 2016 2:37 PM
no problem, Stephen. As far as I know, you don’t need a program to transfer an iso to a usb drive. Just Make sure it’s formatted as either EXFat or Fat32
(which both macs and PC’s can read) and that it’s big enough, then just plug the formatted usb drive in, and drag n’ drop the iso onto the usb drive when it shows up. When it’s done copying, Eject it safely and you should be good to go
May 9, 2016 6:17 PM
Hey, thanks for answering. I’m not trying to copy the iso to the usb drive using the finder. A better turm would be, clone, the partition that is on the disk image. You know, like when you click on a disk image, and a new partition mounts in the finder? What I’m trying to do is clone the iso to a usb drive and make it bootible so my windows computer can boot from it. For windows, their is a program called, isotousb, that can be used to clone an iso file to and make it bootible. But I need to do it using a mac for use with my windows computer. However, their is no version of this program for a mac. And I can’t use the command line to clone it, because as I said before, I am blind, and can’t use the computer without a screen reader, so it’s hard for me to read each letter or number one by one, then switch to the turminnal to try and copy it in their. I was asking if anyone knew a program for a mac that can clone an iso file to a usb drive without having to fight with the command line? thanks in advance.
Источник
Как Записать ISO На USB Для Mac
Возможно, ваша система подверглась атаке вредоносного ПО или вам, возможно, придется перезагрузить систему, поскольку вы забыли пароль учетной записи администратора. Вы ищете лучший способ записать ISO на USB для Mac? Процесс записи ISO на USB Mac — совсем не простая задача.
Поскольку ISO не является собственным типом файлов Mac, вам придется обойти несколько методов или даже использовать сторонний инструмент для выполнения этой операции. В этой статье будет рассказано о нескольких способах сделать это бесплатно. Некоторые методы довольно просты, а некоторые могут показаться немного более сложными и могут не дать требуемых результатов.
Способ 1: Записать ISO На USB Mac С Помощью Терминала
Вы можете использовать интерфейс командной строки по умолчанию в вашей системе Mac для выполнения задачи записи ISO на USB. Следуйте инструкциям, приведенным ниже, чтобы записать ISO на USB Mac.
Шаг 1: Вставьте USB-накопитель в систему Mac.
Шаг 2: Запустите Терминал, выбрав Приложения> Утилиты> Терминал.
Шаг 3: Здесь введите «diskutil list» и нажмите клавишу Enter.
Шаг 4: Все диски будут перечислены, чтобы вам было легче найти правильный идентификатор для USB-накопителя. Запишите это и отключите диск, введя «sudo unmount / dev / driveidentifier», который вы записали.
Шаг 5: При появлении запроса введите пароль администратора, введите следующую команду и нажмите клавишу Enter: dd if = / path / toimage.iso of = / dev / driveidentifier
Приведенная выше команда запишет ISO на USB-накопитель на указанный вами диск. Однако некоторым пользователям этот метод может показаться сложным. Вы можете перейти к следующему решению, если оно вам покажется сложным.
Способ 2: Записать ISO На USB Mac С Помощью UNetbootin
- Шаг 1. В разделе «Распространение» в верхней части программного обеспечения выберите необходимый дистрибутив Linux. Вы даже можете предоставить файл ISO, щелкнув радиокнопку Diskimage, а затем используя значок с многоточием, чтобы выбрать файл ISO.
- Шаг 2. Укажите целевой диск и нажмите «ОК», и загрузочный диск будет создан. Этот метод возможен только в том случае, если у вас есть дистрибутив Linux, например Ubuntu.
Способ 3: Создать ISO На USB На Mac С Помощью Virtualbox
Если ни один из предложенных выше методов не сработает, этот метод наверняка поможет вам бесплатно записать ISO на USB. Для этого выполните шаги, указанные ниже.
- 01 Установите клиент Virtualbox в вашу систему Mac.
- 02 Создайте гостевую ОС в Windows и загрузите этот ISO-образ Windows в систему.
- 03 Оставьте остальные настройки в состоянии по умолчанию, если вы не знаете, как их изменить.
- 04 Внимательно следуйте инструкциям на экране, а затем загрузите систему в ОС Windows.
- 05 Загрузите инструмент записи ISO после загрузки системы в Windows и вставьте USB-накопитель. Теперь вы можете записать ISO-образ на USB.
Хотя этот метод довольно эффективен, он требует много времени и некоторых технических знаний, чтобы получить удовлетворительные результаты.
Дополнительные Cоветы: Как Записать ISO На USB В Windows
Если вы просто хотите записать ISO на USB в системе Windows 10 / 8.1 / 8/7, то PassFab для ISO — ваш лучший вариант. Это профессиональная программа, которая позволяет записывать загрузочный ISO-образ на USB-накопитель на любом компьютере под управлением Windows. Вы можете загрузить ISO-образ системы Windows или импортировать из него локальный ISO-образ. Вы даже можете записать CD или DVD, если в руке нет USB.
Заключение:
В этой статье вы можете узнать о различных способах записи ISO или DMG на загрузочный USB. Хотя некоторые методы просты, некоторые слишком сложны. Если вы ищете инструмент для выполнения этого процесса бесплатно, вы можете это сделать, но большинство методов, используемых в таких решениях, будут довольно сложными для начинающего пользователя, а также отнимут у вас много времени. Вместо этого вы можете выбрать инструмент PassFab для ISO, чтобы выполнить процесс записи ISO на USB в Windows. Этот метод настоятельно рекомендуется, поскольку он очень прост и может быть выполнен быстро без каких-либо проблем.
Источник
Creating bootable USB from ISO in MacOS
 macOS High Sierra
I needed to reinstall one of my Windows PCs at home recently, and realised that I only have Windows 7 DVDs, but no Windows 10s.
Since it’s possible to boot and install Windows 10 from USB, that’s what I decided to do: download Window 10 ISO and burn it one of the USB sticks I have. This approach will be simpler for any other ISO image like Ubuntu or CentOS, so there’s a separate Steps 3-5 for them at the end of the post.
Here are the steps I had to take on my MacBook, originally procedure was written in macOS High Sierra, but I tested it in MacOS Mojave 10.14.2 as well. All of these need to be done in the Terminal app.
Windows 10 bootable USB vs Linux ISO USB
Windows 10 is a very specific bootable media, so the process is a bit involved. For generic Linux installation ISOs this procedure would be simpler. So the first two steps are the same, then Windows and Linux have separate procedure.
Here’s what we will do for Windows ISO:
- erase USB stick and create MBR (master boot record)
- format USB stick with FAT-32 filesystem
- mount Windows 10 ISO image as a folder
- copy all the files from that folder onto the USB stick
Here’s what we would do for Linux ISO:
- use dd command to burn Linux installation ISO onto USB stick
Step 1: Confirm partitions before inserting USB
Use the diskutil command to list all disks and partitions on your Mac. This is simply so that you can run the same command again after inserting USB and easily spot the USB device.
Step 2: Insert USB stick an re-run diskutil list
This time I can see there’s a disk9 showing up, with 64GB of size which matches my USB stick size:
Chances are, your USB stick has a PC standard FAT16/FAT32 filesytem, and will be mounted automatically. Let’s check:
Sure enough, it’s mounted as /Volumes/NONAME!
Creating Windows bootable USB
IMPORTANT: these steps are only needed for Windows ISOs. If you’re burning a Linux ISO, skip this and go to the Creating Linux bootable USB section below, it has its own steps.
Step 3: format USB stick for Windows boot
This single command will erase the USB stick, make it bootable by adding a Master Boot Record (MBR) and create a Windows-friendly filesystem (FAT) on it:
You’ll have the new filesystem mounted automatically, as you can see it’s empty (1.1MB used of 14GB):
Great stuff, now we’re moving to the next phase: we need to mount the Windows ISO image as a folder and then copy all the files onto the freshly formatted /Volumes/WIN10 USB stick.
Step 4: Mount Windows ISO
Simply go to the directory where you have the ISO image and run the open command for it:
You’ll have the MacOS Finder window with Windows ISO content pop-up, just ignore it and go back to the terminal.
You should now have it mounted under folder like this:
Go into that folder and do ls to make sure you can see Windows DVD files there:
Step 5: Copy Windows files onto USB stick
Right, now we have to copy all the files from DVD ISO image onto our new USB stick.
IMPORANT: you should be in the /Volumes/CCSA_X64FRE_EN-US_DV5 directory when running this command below. That’s exactly where you are if you just completed Step 4.
The copy will take good 10-15min:
There should be no errors returned.
If you remember, in Step 3 we did the df command and the USB filesystem /Volumes/WIN10 was empty.
Just to get an idea that the copy was successful, let’s run the df command again to make sure the USB stick has roughly the same amount taken up now – 4.1GB as per output fragments in previous step.
Looks good! What’s left now is to eject the USB stick:
and to boot it on the PC as shown below.
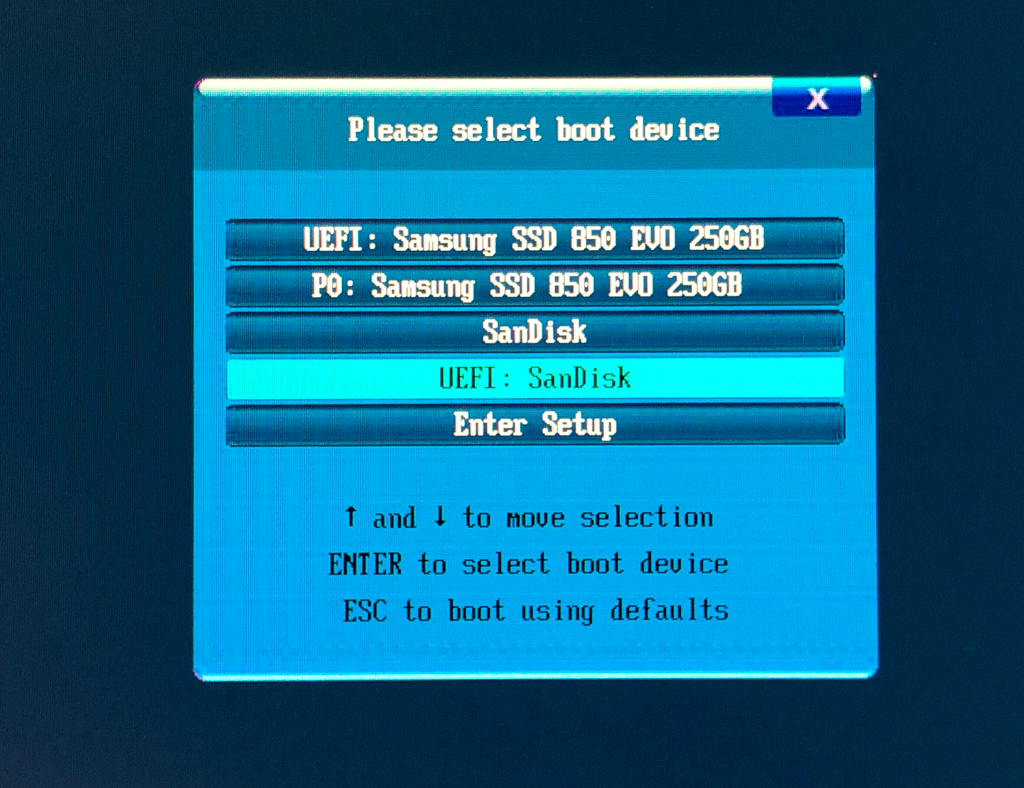
Step 6: Boot USB stick on your PC
IMPORTANT: recent enough PCs will likely offer you both legacy boot and UEFI boot. The rule of thumb is to boot UEFI if it’s available, especially if you’re booting Windows USB stick:
Creating Linux bootable USB
As I said earlier, non-Windows ISOs are much easier to deal with! So after the first 2 generic steps at the start of this post, we’ll be taking separate steps for Linux as shown below.
We need to unmount the USB disk we found in Step 2. It’s /dev/disk9 in our case:
Step 3: convert ISO into bootable DMG
WARNING: this is an important step, without it your USB stick won’t boot.
So I have this DVD ISO of the CentOS 7.4, let’s convert it before burning onto the USB stick.
Step 4: write DMG image onto USB stick with dd
Exellent, now we are ready to burn the ISO image. Let’s cd into the directory with all the ISOs that you have and burn it using the dd command.
dd command runs with the help of 3 command line parameters:
- if – specifying source data, that’s our ISO image file
- of – specifying the destination file or device, /dev/disk9 in our case
- bs – block size, just needs to be something big enough like 1m (meaning 1 megabyte)
Depending on the ISO size and the USB stick speed, you’ll have to wait 10-20min for this to complete.
Useful tip (cheers Jim!): if you want to confirm your current process, press Ctrl+t in the Terminal app and it should update output with dd progress (I highlighted the output below every tipe I pressed Ctrl+t):
finally, dd will complete a message like this:
Step 5: Boot USB stick on your PC
That’s it, we’re done! Eject the USB stick (no need to run any diskutil commands as it wasn’t mounted automaticaly) and boot on your PC.
IMPORTANT: recent enough PCs will likely offer you both legacy boot and UEFI boot. The rule of thumb is to boot UEFI if it’s available:
Источник
Question: Q: How can I burn an ISO to USB without using the command line?
This might be the last straw that makes me switch away from OSX!
El Capitan removed the ability to burn ISO to disk in the Disk Utility app (and don’t get me started on that new Disk Utility, if Steve was still alive, whoever was responsible for that piece of crap would have been fired on the spot, and probably punched in the head a few times too!)
Now we’re supposed to right click on the ISO in the finder and choose «Burn disk image . «. But the «Burn Disk» window that pops only has the option to burn to the Superdrive. I see no way to change it to burn to a USB drive (which is visible in the new horrible and disgustingly bad Disk Utility).
Posted on Feb 9, 2016 7:36 PM
All replies
Loading page content
Page content loaded
Give up & try the Burn app?
Toast Titanium will do it to if you want to purchase an app. There may be others in the App Store.
Feb 9, 2016 9:36 PM
You don’t «burn» a USB drive, you copy files onto it. Burning is for optical media.
Double-click the .iso and it should mount. Then copy the files from it onto the USB stick.
Feb 10, 2016 1:11 AM
You don’t «burn» a USB drive, you copy files onto it. Burning is for optical media.
Double-click the .iso and it should mount. Then copy the files from it onto the USB stick.
Good point Barney-15E, I read ‘USB drive’ & assumed Bebias was talking about a USB external optical drive, it probably isn’t the case.
Bebias, please tell us what the purpose of the .iso is — if it is for making a bootable OS from Linux or similar Barney-15E’s suggestion will fail to work. iso files contain the filesystem structure which is lost if you simply copy via the Finder, it breaks booting & features that require that partition structure. You would need to manually create the correct file system for it to work before copying.
You can use ‘dd’ to write the image in Terminal. The Raspberry Pi foundation has a reasonable explanation on that topic, replace the sdcard with your USB disk.
Disk Utility can still restore volumes on 10.11…
It may not work with your .iso, I have had mixed success with certain .iso files, some really need to be burned to CD/ DVD to boot a computer.
Feb 10, 2016 11:27 AM
I still call it «burning» for a flash drive. If you want to be really technical, when writing to a flash memory, you ARE burning it. But that’s being pedantic.
Anyway, to answer your question, I want to write a bootable ISO (hence the whole point of an ISO file) to a USB flash drive without using the terminal, I know all about the ways to burn it using the terminal, but I used to be able to do it easily with the disk utility and now I can’t,
Since lately I have been so disgruntled with OSX, I am using this as a litmus test to decide if I switch away from it.
Feb 11, 2016 7:44 PM
Did you read all of my post and follow the link?
Disk Utility can still restore volumes on 10.11…
A disk image is effectively the same as an .iso, however I have not always been able to boot from an .iso written by Disk Utility — in fact some won’t even write via Disk Utility.
The feature you want is called ‘restore’ it has always been called restore in Disk Utility on OS X. It has just been moved to a menu in 10.11.
I still call it «burning» for a flash drive. If you want to be really technical, when writing to a flash memory, you ARE burning it. But that’s being pedantic.
You may call it ‘burning’ if you like, however ‘burning’ concerns CD’s & DVD’s (optical media that is written by a light source).
The words you use cause you to look for something that doesn’t exist — this is probably why you are getting frustrated, also i f you want to be really pedantic, you are not ‘burning’ to a USB flash drive, you are ‘writing’ to it.
Let us know if that works for you.
Feb 11, 2016 8:28 PM
Yeah, being pedantic, when writing to flash memory, electronically you are «burning» through insulators with high voltage 😉
But, indeed, that probably caused confusion.
As for your reply, yes I did read and tried the options mentioned, but the «restore» function does not work with any of the ISO files I have. In the documents, they mention «disk image» which Apple defines explicitly as a DMG file (only). I could convert the ISO to DMG, but that does’t always go well and it requires the command line, which I am trying to avoid here.
And as an aside, every time I open Disk Utility it hurts! Why can’t I even resize so I can see the names of the volumes.
Feb 11, 2016 9:09 PM
And as an aside, every time I open Disk Utility it hurts! Why can’t I even resize so I can see the names of the volumes.
No idea, it’s madness & downright hostile for anyone with multiple disks or monitors over 640×480. I suspect it is to make 10.12 look like an essential upgrade 🙂
I have previously changed the suffix to .dmg to make Disk Utility happier sometimes, however that is rarely successful, I can’t recall the distro.
The ‘convert’ option in Disk Utility has some equivalence to the ‘hdiutil’ command, so if that is the ‘convert command’ you are are referring to that may also be handled by Disk Utility (I’m not in front of 10.11 at the moment to check in it’s DU, it’s probably under the Images menu).
Restoring often requires you to ‘scan for restore’ too, which checksums the content IIRC.
I think I tried this eons ago but it wasn’t for me so I stuck with dd & the other commands.
Unetbootin is another option, I think that creates it’s own boot environment & chainloads like USB loader.
Feb 11, 2016 9:32 PM
BTW as I have been searching more on that, it seems a lot of reputable sites actually call it «burning» an ISO to a USB drive. So if people were confused by my title, it seems they’ll be confused by a lot of the web! 😉
Update: I am giving it a bit more time, but it looks like I will be leaving OSX behind as my main computing platform.
Feb 13, 2016 3:39 PM
BTW as I have been searching more on that, it seems a lot of reputable sites actually call it «burning» an ISO to a USB drive. So if people were confused by my title, it seems they’ll be confused by a lot of the web! 😉
It’s just me it confused, so keep dragging this point up, I enjoy being ridiculed when trying to offer help!
Update: I am giving it a bit more time, but it looks like I will be leaving OSX behind as my main computing platform.
If you care to share the instructions that require the commandline I may be able to point towards you to how to do that in the GUI as mentioned you can convert & restore disk images in Disk Utility.
What OS you thinking about using instead?
Feb 14, 2016 11:21 AM
Restore volumes on 10.11 does not seem to work, always giving «Restore process has failed.»
I am trying to copy a Windows disc to a USB stick. The instructions do mention to erase the volume to restore first, which leads to a choice of format and scheme, with 18 possible permutations. I tried all those that seemed likely, with no success.
If anyone from Apple is listening, I agree with Bebias that right clicking a disc image in the finder should give the option of not only burning a disc, but also of writing to a USB stick. The two actions are similar from a user perspective.
Aug 24, 2016 3:43 PM
If anyone from Apple is listening, I agree with Bebias that right clicking a disc image in the finder should give the option of not only burning a disc, but also of writing to a USB stick. The two actions are similar from a user perspective.
Don’t count on anyone from Apple listening here, tell them directly if you want any chance of it being added as a feature…
Have you tried Etcher?
I don’t know what the Windows disk is so it may not work, let us know what happens.
Aug 24, 2016 5:23 PM
I was able to use the command line approach per your old post to write the image. It is a Windows install disk. Unfortunately the PC doesn’t seem to want to boot off of the USB stick I created this way. I suppose Microsoft copy protection measures may be in play? The motivation is simply to restore a PC whose hard drive failed. Why not use the disk directly? Well, the PC has an optical drive that can’t recognize the DVD, while ironically, the Mac sees it fine. So I thought maybe I could use the Mac to make something the PC could read.
Aug 25, 2016 12:13 PM
I don’t know what could be wrong with your USB stick but there are many reasons booting can fail when imaging install disks like this…
- The source may be incorrectly copied to an iso/ disk image.
- Cloning DVD/CD media to USB is not guaranteed to work. Some boot systems have additional partitions that may or may not need to be included on media that has particular structure specific to those media types.
- Occasionally you may find an elaborate workaround to ‘chainload’ from a linux or other bootable media, that may get around an incorrectly setup disk (grub, unetbootin, rEFIt or rEFIned on EFI systems).
- Cloning images back to a disk requires specific tools depending on the OS & boot method it employs, sometimes a dd is enough but only if that image was originally intended to boot from USB and the structure is compatible.
- Booting can fail due to BIOS/ UEFI settings or incompatibilities.
- Some USB sticks are just plain weird — they do not all support booting for whatever reason because they violate the USB spec or just behave strangely.
I do not know what copy protection Windows disks use — I thought most of it was embedded into the OS & MS get their money via the activation fees. I have previously downloaded MS test virtual machines which can be activated if you have a suitable key. Have a look for a trial download of the version you are trying to install. Otherwise there may be a way to request a suitable installer from Microsoft or your original PC manufacturer (assuming you registered it).
Personally I’d try to use Disk Utility to image from the DVD straight to the USB stick to rule out the chance of issues with the iso. If that fails, try the same with Etcher or another tool that clones disks, be sure to select an appropriate partition scheme — I think older Windows would prefer MBR whilst newer new can use GPT/GUID partition tables.
Another option is a disk repair tool to try to recover/ clone/ fix the original disk.
Источник


