- NTFS-3G
- Contents
- Installation
- Manual mounting
- Formatting
- Configuring
- Default settings
- Linux compatible permissions
- Allowing group/user
- Basic NTFS-3G options
- Allowing user to mount
- Resizing NTFS partition
- Troubleshooting
- Compressed files
- Damaged NTFS filesystems
- Metadata kept in Windows cache, refused to mount
- Deleting Windows hibernate metadata
- Mount failure
- Windows mount failure
- Beta features and releases
- Как монтировать NTFS в Linux
- Установка компонентов
- Ручное монтирование
- Автоматическое монтирование
- ИТ База знаний
- Полезно
- Навигация
- Серверные решения
- Телефония
- Корпоративные сети
- Как смонтировать раздел NTFS в Linux
- Смонтировать раздел NTFS с разрешением только для чтения
- Определить раздел NTFS
- Создать точку монтирования и смонтировать раздел NTFS
- Смонтировать раздел NTFS с разрешениями на чтение и запись
- Обновить репозитории пакетов
- Установите Fuse и ntfs-3g
- Смонтировать раздел NTFS
NTFS-3G
NTFS-3G is an open source implementation of Microsoft NTFS that includes read and write support (the Linux kernel only supports reading NTFS). NTFS-3G developers use the FUSE file system to facilitate development and to help with portability.
Contents
Installation
Manual mounting
Two options exist when manually mounting NTFS partitions. The traditional:
The mount type ntfs-3g does not need to be explicitly specified in Arch. The mount command by default will use /usr/bin/mount.ntfs which is symlinked to /usr/bin/ntfs-3g after the ntfs-3g package is installed.
The second option is to call ntfs-3g directly:
See ntfs-3g(8) for the available options.
Formatting
Configuring
Your NTFS partition(s) can be setup to mount automatically, or pre-configured to be able to mount in a certain way when you would like them to be mounted. This configuration can be done in the static filesystem configuration (fstab) or by the use of udev rules.
Default settings
Using the default settings will mount the NTFS partition(s) at boot. With this method, if the parent folder that it is mounted upon has the proper user or group permissions (e.g. /run/media/ /), then that user or group will be able to read and write on that partition(s).
Linux compatible permissions
Permissions on a Linux system are normally set to 755 for folders and 644 for files. It is recommended to keep these permissions in use for the NTFS partition as well if you use the partition on a regular basis. The following example assigns the above permissions to a normal user:
Alternatively, if the Windows permissions do matter to you, you can use the ntfsusermap(8) command to map Windows users to Linux ones. ntfs-3g will handle the translation of these permissions.
Allowing group/user
In /etc/fstab you can also specify other options like those who are allowed to access (read) the partition. For example, for you to allow people in the groupid group to have access:
By default, the above line will enable write support for root only. To enable user writing, you have to specify the user who should be granted write permissions. Use the uid parameter together with your user id to enable user writing:
If you are running on a single user machine, you may like to own the file system yourself and grant all possible permissions:
Basic NTFS-3G options
For most, the above settings should suffice. Here are a few other options that are general common options for various Linux filesystems. For a complete list, see ntfs-3g(8) § OPTIONS .
umask umask is a built-in shell command which automatically sets file permissions on newly created files. For Arch Linux, the default umask for root and user is 0022. With 0022 new folders have the directory permissions of 755 and new files have permissions of 644. You can read more about umask permissions here. fmask and dmask Like umask but defining file and directory respectively individually. noauto If noauto is set, NTFS entries in /etc/fstab do not get mounted automatically at boot. uid The user id. This allows a specific user to have full access to the partition. Your uid can be found with the id command.
The following option is specific to ntfs-3g only:
windows_names prevents files, directories and extended attributes to be created with a name not allowed by windows.
Allowing user to mount
By default, ntfs-3g requires root rights to mount the filesystem if it is a block device, even with the user option in /etc/fstab . See ntfs-3g-faq for details. The user option in the fstab is still required.
For non-blockfiles like normal images, ntfs-3g on the command-line should work out-of-the-box with normal user privileges as the underlying FUSE calls are redirected to the setuid-root fusermount when direct kernel interaction is unavailable.
Resizing NTFS partition
Most systems that are purchased already have Windows installed on it, and some people would prefer not wipe it off completely when doing an Arch Linux installation. For this reason, among others, it is useful to resize the existing Windows partition to make room for a Linux partition or two. This is often accomplished with a Live CD or bootable USB thumb drive.
For Live CDs the typical procedure is to download an ISO file, burn it to a CD, and then boot from it. InfraRecorder is a free (as in GPL3) CD/DVD burning application for Windows which fits the bill nicely. If you would rather use a bootable USB media instead, see USB flash installation media for methods to create bootable USB stick.
There are a number of bootable CD/USB images avaliable. This list is not exhaustive, but is a good place to start:
- GParted — Small bootable GNU/Linux distribution for x86 based computers. It enables you to use all the features of the latest versions of the GParted application. Does not include additional packages System Rescue CD may incorporate, and disk encryption schemes may not be supported.
http://gparted.sourceforge.net/ || gparted
- Parted Magic — Very good complete hard disk management solution. With the Partition Editor you can re-size, copy, and move partitions. You can grow or shrink your C: drive. Create space for new operating systems. Attempt data rescue from lost partitions.
https://partedmagic.com/ ||
- SystemRescueCD — Good tool to have, and works seamlessly in most cases. Once booted, run GParted and the rest should be fairly obvious.
https://www.sysresccd.org/ || systemrescuecdAUR
Note that the important programs for resizing NTFS partitions include ntfs-3g and a utility like (G)parted or fdisk, provided by the util-linux package. Unless you are an «advanced» user it is advisable to use a tool like GParted to perform any resize operations to minimize the chance of data loss due to user error.
If you already have Arch Linux installed on your system and simply want to resize an existing NTFS partition, you can use the parted and ntfs-3g packages to do it. Optionally, you can use the GParted GUI after installing the GParted package. At the core of the resizing is the ntfsresize(8) command.
Troubleshooting
Compressed files
When mounting an NTFS filesystem for Windows 10, and reading files or directories, you may
- see broken symbolic links to ‘unsupported reparse point’, or
- see the error message cannot access some_file: Input/output error (in this case you see Could not load plugin /usr/lib64/ntfs-3g/ntfs-plugin-80000017.so: Success in the journal).
The reason for this are NTFS reparse points, and that NTFS-3G does not support some types of reparse points by default. NTFS-3G plugins may be used to provide compatibility with a part of the features defined by the following reparse points
- System compression
- Deduplicated files
- OneDrive files
See this page for further details.
System compression a.k.a. «Compact OS» compresses certain files. There are two possible workarounds for System compression.
You may install the NTFS-3G plugin ntfs-3g-system-compression AUR . Currently only reading is supported by this plugin, but not writing, i.e. creating or updating files is not supported.
Alternatively, disable the System compression feature in Windows 10
Damaged NTFS filesystems
If an NTFS filesystem has errors on it, NTFS-3G will mount it as read-only. To fix an NTFS filesystem, load Windows and run its disk checking program, chkdsk.
Note that ntfsfix can only repair some errors. If it fails, chkdsk will probably succeed.
To fix the NTFS file system, the device must already be unmounted. For example, to fix an NTFS partition residing in /dev/sda2 :
If all went well, the volume will now be writable.
Metadata kept in Windows cache, refused to mount
When dual booting with Windows 8 or 10, trying to mount a partition that is visible to Windows may yield the following error:
The problem is due to a feature introduced in Windows 8 called «fast startup». When fast startup is enabled, part of the metadata of all mounted partitions are restored to the state they were at the previous closing down. As a consequence, changes made on Linux may be lost. This can happen to any NTFS partition when selecting «Shut down» or «Hibernate» under Windows 8 or 10. Leaving Windows by selecting «Restart», however, is apparently safe.
To enable writing to the partitions on other operating systems, be sure fast startup is disabled. This can be achieved by issuing as an administrator the command:
You can check the current settings on Control Panel > Hardware and Sound > Power Options > System Setting > Choose what the power buttons do. The box Turn on fast startup should either be disabled or missing.
Deleting Windows hibernate metadata
As an alternative to above clean shutdown method, there is a way to completely destroy NTFS metadata that was saved after hibernating. This method is only feasible if you are not able or unwilling to boot into Windows and shut it down completely. This is by placing remove_hiberfile option when you are mounting your NTFS file system using ntfs-3g.
Mount failure
If you cannot mount your NTFS partition even when following this guide, try using the UUID instead of device name in /etc/fstab for all NTFS partitions. See fstab#File system UUIDs for an example.
Windows mount failure
Windows will not recognize a NTFS partition that does not have a corresponding partition type. A common pitfall when creating an NTFS partition to work with Windows is forgetting to set the partition type as NTFS. See fdisk or one of the partitioning tools.
Beta features and releases
There is a web page on «advanced features», maintained by Jean-Pierre André, one of the NTFS-3G authors. It provides:
- Documentation on handling of NTFS features in NTFS-3G, including:
- Symlinks, junctions, and other reparse points
- Extended attributes (xattrs) as an interface for ADS streams and special NTFS attributes
- Security and permission, including POSIX mapping and ACL mapping
- Plugins for parsing special reparse points.
Information provided in the documentation apply to the Tuxera version (2017.3.23) too. The system-compression and dedupe plugins work with the Tuxera version, but the onedrive plugin requires a tweak of the plugin-loading system only available in advanced releases.
Источник
Как монтировать NTFS в Linux
Инструкция на примере Linux CentOS 7.
Установка компонентов
Для начала необходимо установить пакет ntfs-3g. В противном случае, при попытке запустить команду на монтирование раздела NTFS мы получим ошибку mount: unknown filesystem type ‘ntfs’.
Сначала устанавливаем расширенный репозиторий:
yum install epel-release
Затем сам пакет ntfs-3g
yum install ntfs-3g
После установки данного пакета в системе появятся дополнительные команды mount.ntfs-fuse и mount.ntfs-3g., а также команда mount распознает опцию -t ntfs.
Ручное монтирование
Монтирование NTFS на чтение и запись выполняется любой из трех команд:
mount -t ntfs /dev/sdb1 /mnt
mount -t ntfs-3g /dev/sdb1 /mnt
mount.ntfs-3g /dev/sdb1 /mnt
* в данном примере, примотировано устройство /dev/sdb1 в раздел /mnt. Понять, какой устройство нужно монтировать можно при помощи команды fdisk -l
Автоматическое монтирование
Чтобы раздел автоматически монтировался при перезапуске компьютера, открываем на редактирование файл:
/dev/sdb1 /mnt ntfs defaults 0 0
* в данном примере мы раздел /dev/sdb1 будем монтировать в каталог /mnt.
Чтобы применить настройку и проверить ее, вводим:
Посмотреть примонтированные разделы и файловые системы можно командой:
Источник
ИТ База знаний
Курс по Asterisk
Полезно
— Узнать IP — адрес компьютера в интернете
— Онлайн генератор устойчивых паролей
— Онлайн калькулятор подсетей
— Калькулятор инсталляции IP — АТС Asterisk
— Руководство администратора FreePBX на русском языке
— Руководство администратора Cisco UCM/CME на русском языке
— Руководство администратора по Linux/Unix
Навигация
Серверные решения
Телефония
FreePBX и Asterisk
Настройка программных телефонов
Корпоративные сети
Протоколы и стандарты
Как смонтировать раздел NTFS в Linux
New Technology File System
3 минуты чтения
NTFS — это система хранения файлов, стандартная для компьютеров Windows, но системы Linux также используют ее для организации данных.
Онлайн курс по Linux
Мы собрали концентрат самых востребованных знаний, которые позволят тебе начать карьеру администратора Linux, расширить текущие знания и сделать уверенный шаг к DevOps

Большинство систем Linux монтируют диски автоматически. Однако в конфигурациях с двойной загрузкой, где требуется обмен файлами между двумя системами с разделами NTFS, эта процедура выполняется вручную.
Эта статья покажет вам, как смонтировать раздел NTFS в Linux с разрешениями только для чтения или чтения и записи.
Смонтировать раздел NTFS с разрешением только для чтения
Выполните следующие действия, чтобы смонтировать раздел NTFS с доступом только для чтения.
Примечание. Раздел только для чтения позволяет пользователям читать файлы. Чтобы включить запись в раздел NTFS, обратитесь ко второму разделу статьи.
Определить раздел NTFS
Перед монтированием раздела NTFS определите его с помощью команды parted :
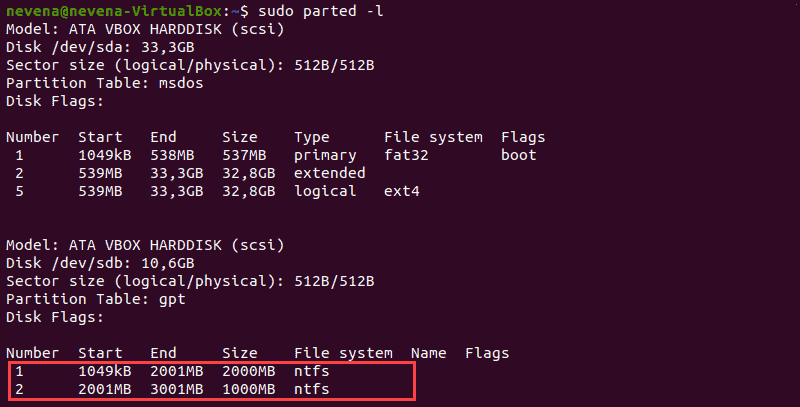
В приведенном выше примере два раздела NTFS находятся на диске /dev/sdb . Прежде чем продолжить, запишите номер раздела, который вы хотите смонтировать.
Вы также можете использовать команды fdisk и grep , чтобы показать на диске только разделы NTFS:
Создать точку монтирования и смонтировать раздел NTFS
В этом примере мы смонтируем раздел /dev/sdb1 с разрешением только для чтения.
Сначала создайте точку монтирования с помощью команды mkdir :
Затем смонтируйте раздел в созданный вами каталог. Используйте команду mount и путь к разделу, который вы указали ранее:
Используйте инструмент для освобождения диска, чтобы проверить подробную информацию обо всех файловых системах и убедиться, что вы успешно смонтировали раздел:
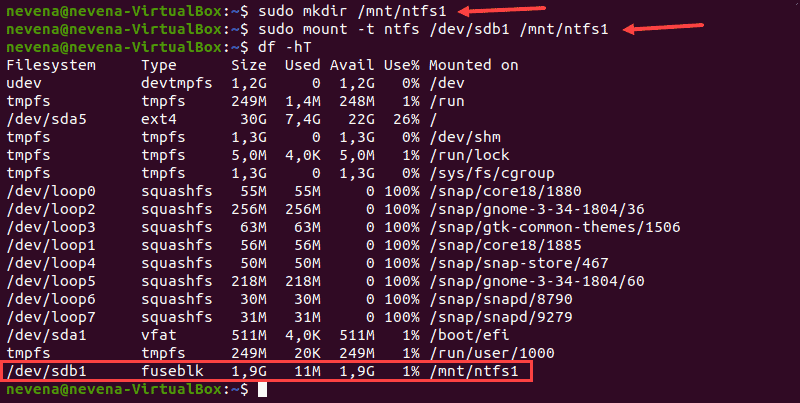
Раздел /dev/sdb1 отображается как смонтированный в нижней части списка. Теперь у вас есть доступ только для чтения к этому разделу NTFS.
Смонтировать раздел NTFS с разрешениями на чтение и запись
Чтобы смонтировать раздел NTFS с разрешениями на чтение и запись, вам необходимо установить fuse и ntfs-3 в вашей системе.
Выполните следующие действия, чтобы завершить процесс монтирования.
Примечание. В некоторых дистрибутивах Linux по умолчанию уже установлены fuse и ntfs-3g .
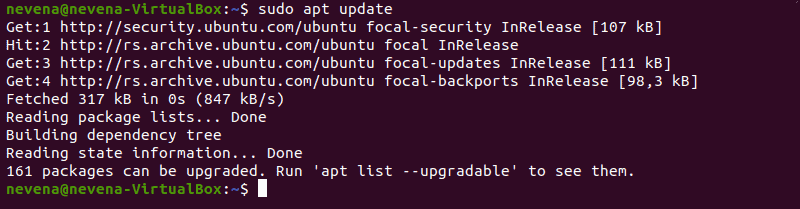
Обновить репозитории пакетов
Выполните следующую команду, чтобы загрузить и обновить репозитории пакетов:
Установите Fuse и ntfs-3g
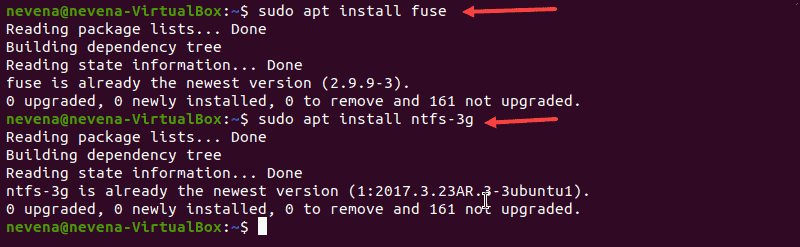
Чтобы установить fuse в вашей системе Linux из репозитория по умолчанию, используйте соответствующий менеджер пакетов. В нашем примере мы используем apt в Ubuntu.
Когда установка завершится, установите ntfs-3g , запустив:
В случае, если fuse и ntfs-3g уже установлены, вывод выглядит примерно так, как показано ниже:
Смонтировать раздел NTFS
После установки пакетов программного обеспечения fuse и ntfs-3g смонтируйте раздел NTFS.
Сначала создайте точку монтирования с помощью команды mkdir :
Затем используйте команду mount , чтобы смонтировать нужный раздел. Например, /dev/sdb2 :
Чтобы проверить, смонтирован ли раздел, выполните команду df :

Теперь у вас есть права на чтение и запись для подключенного раздела NTFS.
Примечание. Для монтирования раздела через ntfs-3g рекомендуется ядро Linux версии 2.6.20 или новее.
Мини — курс по виртуализации
Знакомство с VMware vSphere 7 и технологией виртуализации в авторском мини — курсе от Михаила Якобсена
Источник


