- Шаг 2. Написание и запуск кода Step 2: Write and run code
- Python on Windows FAQ
- How do I run a Python program under Windows?В
- How do I make Python scripts executable?В
- Why does Python sometimes take so long to start?В
- How do I make an executable from a Python script?В
- Is a *.pyd file the same as a DLL?В
- How can I embed Python into a Windows application?В
- How do I keep editors from inserting tabs into my Python source?В
- How do I check for a keypress without blocking?В
Шаг 2. Написание и запуск кода Step 2: Write and run code
Предыдущий шаг: создание проекта Python Previous step: Create a new Python project
Хотя управление файлами проекта осуществляется в обозревателе решений, с содержимым файлов, например файлов исходного кода, вы обычно работаете в окне редактора. Although Solution Explorer is where you manage project files, the editor window is typically where you work with the contents of files, like source code. Редактор определяет тип редактируемого файла, включая язык программирования (на основе расширения файла), и обеспечивает характерные для этого языка возможности, например раскраску синтаксических конструкций и автоматическое завершение с помощью IntelliSense. The editor is contextually aware of the type of file you’re editing, including the programming language (based on the file extension), and offers features appropriate to that language such as syntax coloring and auto-completion using IntelliSense.
После создания проекта Python Application в редакторе Visual Studio откроется пустой файл по умолчанию с именем PythonApplication1.py. After creating a new «Python Application» project, a default empty file named PythonApplication1.py is open in the Visual Studio editor.
В редакторе начните вводить print(«Hello, Visual Studio») . По мере ввода функция IntelliSense в Visual Studio покажет варианты автозавершения. In the editor, start typing print(«Hello, Visual Studio») and notice how Visual Studio IntelliSense displays auto-completion options along the way. Выделенный параметр в раскрывающемся списке — это вариант завершения по умолчанию, который применяется при нажатии клавиши TAB. The outlined option in the drop-down list is the default completion that’s used when you press the Tab key. Завершения очень удобны при использовании длинных инструкций или идентификаторов. Completions are most helpful when longer statements or identifiers are involved.

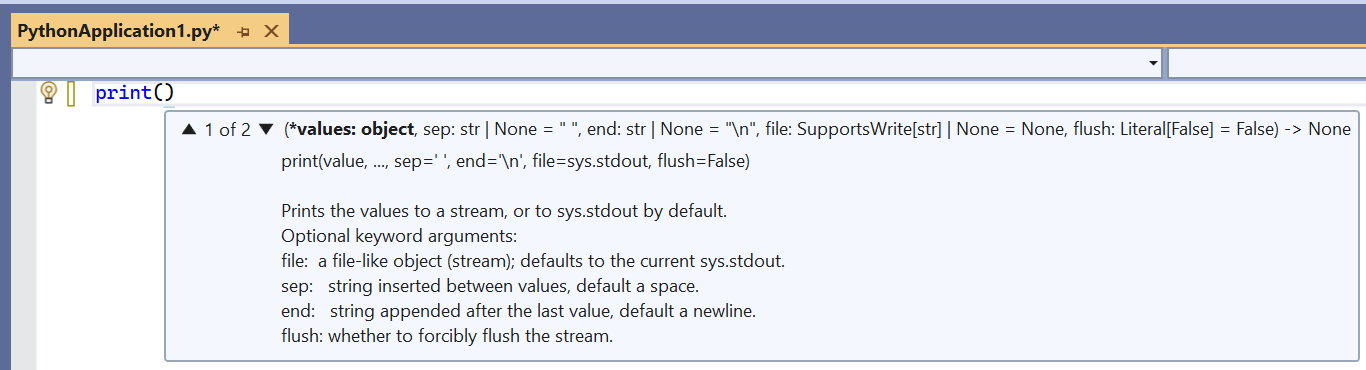
Функция IntelliSense отображает различные сведения в зависимости от используемой инструкции, вызываемой функции и т. д. IntelliSense shows different information depending on the statement you’re using, the function you’re calling, and so forth. Если в функции print ввести ( после print для указания вызова функции, будет показана полная информация об использовании этой функции. With the print function, typing ( after print to indicate a function call displays full usage information for that function. Во всплывающем окне IntelliSense также полужирным шрифтом выделяется текущий аргумент (в этом случае это value): The IntelliSense pop up also shows the current argument in boldface (value as shown here):
Завершите инструкцию следующим образом: Complete the statement so it matches the following:
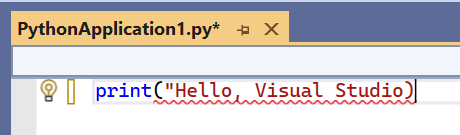
Обратите внимание на раскраску синтаксических конструкций, которая позволяет отличить оператор print от аргумента «Hello Visual Studio» . Notice the syntax coloration that differentiates the statement print from the argument «Hello Visual Studio» . Кроме того, на время удалите последний символ » в строке и обратите внимание на то, как код, содержащий синтаксические ошибки, подчеркивается в Visual Studio красной линией. Also, temporarily delete the last » on the string and notice how Visual Studio shows a red underline for code that contains syntax errors. Чтобы исправить ошибку, снова добавьте символ » . Then replace the » to correct the code.
Visual Studio предоставляет полный контроль над внешним видом и поведением среды разработки, что позволяет настроить ее, как вам нравится. Because one’s development environment is a very personal matter, Visual Studio gives you complete control over Visual Studio’s appearance and behavior. Выберите пункт меню Сервис > Параметры и изучите параметры на вкладках Среда и Текстовый редактор. Select the Tools > Options menu command and explore the settings under the Environment and Text Editor tabs. По умолчанию вы видите ограниченный набор параметров. Чтобы просмотреть все параметры для каждого языка программирования, щелкните Показать все параметры внизу диалогового окна. By default you see only a limited number of options; to see every option for every programming language, select Show all settings at the bottom of the dialog box.
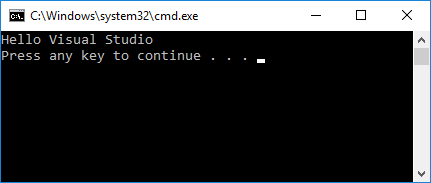
Чтобы выполнить весь написанный код, нажмите клавиши CTRL+F5 или выберите команду меню Отладка > Запуск без отладки. Run the code you’ve written to this point by pressing Ctrl+F5 or selecting Debug > Start without Debugging menu item. Если в коде все еще есть ошибки, в Visual Studio будут выведены предупреждения. Visual Studio warns you if you still have errors in your code.
При запуске программы появляется окно консоли с результатами, так же как при запуске интерпретатора Python с файлом PythonApplication1.py из командной строки. When you run the program, a console window appears displaying the results, just as if you’d run a Python interpreter with PythonApplication1.py from the command line. Чтобы закрыть это окно и вернуться в редактор Visual Studio, нажмите любую клавишу. Press a key to close the window and return to the Visual Studio editor.
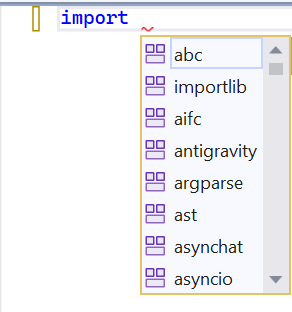
Помимо инструкций и функций, IntelliSense выводит варианты для завершения операторов Python import и from . In addition to completions for statements and functions, IntelliSense provide completions for Python import and from statements. Эти варианты позволяют легко узнать, какие модули доступны в вашей среде и какие члены доступны в определенном модуле. These completions help you easily discover what modules are available in your environment and the members of those modules. В редакторе удалите строку print и начните вводить import . In the editor, delete the print line and start typing import . Список модулей появляется после ввода пробела: A list of modules appears when you type the space:
Завершите строку, введя или выбрав sys . Complete the line by typing or selecting sys .
В следующей строке введите from , чтобы снова вывести список модулей: On the next line, type from to again see a list of modules:
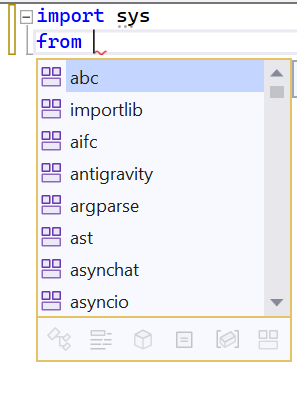
Выберите или введите math , а затем пробел и import , чтобы отобразился список элементов модуля: Select or type math , then continue typing with a space and import , which displays the module members:

Затем импортируйте элементы sin , cos и radians . Обратите внимание, как для каждого из них будут выводиться варианты автозавершения. Finish by importing the sin , cos , and radians members, noticing the auto-completions available for each. По завершении код должен выглядеть следующим образом: When you’re done, your code should appear as follows:
Принцип функции завершения заключается в следующем — по мере ввода появляются подстроки со словами, в которых совпадают части или буквы в начале слова, и даже отображаются пропущенные символы. Completions work with substrings as you type, matching parts of words, letters at the beginning of words, and even skipped characters. Дополнительные сведения см. в руководстве по редактированию кода. See Edit code — Completions for details.
Добавьте еще код для печати значений косинуса в интервале до 360 градусов. Add a little more code to print the cosine values for 360 degrees:
Снова запустите программу, нажав клавиши CTRL+F5 или выбрав пункт меню Отладка > Запуск без отладки. Run the program again with Ctrl+F5 or Debug > Start without Debugging. По завершении закройте окно вывода. Close the output window when you’re done.
Python on Windows FAQ
How do I run a Python program under Windows?В
This is not necessarily a straightforward question. If you are already familiar with running programs from the Windows command line then everything will seem obvious; otherwise, you might need a little more guidance.
Unless you use some sort of integrated development environment, you will end up typing Windows commands into what is variously referred to as a “DOS window” or “Command prompt window”. Usually you can create such a window from your search bar by searching for cmd . You should be able to recognize when you have started such a window because you will see a Windows “command prompt”, which usually looks like this:
The letter may be different, and there might be other things after it, so you might just as easily see something like:
depending on how your computer has been set up and what else you have recently done with it. Once you have started such a window, you are well on the way to running Python programs.
You need to realize that your Python scripts have to be processed by another program called the Python interpreter. The interpreter reads your script, compiles it into bytecodes, and then executes the bytecodes to run your program. So, how do you arrange for the interpreter to handle your Python?
First, you need to make sure that your command window recognises the word “py” as an instruction to start the interpreter. If you have opened a command window, you should try entering the command py and hitting return:
You should then see something like:
You have started the interpreter in “interactive mode”. That means you can enter Python statements or expressions interactively and have them executed or evaluated while you wait. This is one of Python’s strongest features. Check it by entering a few expressions of your choice and seeing the results:
Many people use the interactive mode as a convenient yet highly programmable calculator. When you want to end your interactive Python session, call the exit() function or hold the Ctrl key down while you enter a Z , then hit the “ Enter ” key to get back to your Windows command prompt.
You may also find that you have a Start-menu entry such as Start ‣ Programs ‣ Python 3.x ‣ Python (command line) that results in you seeing the >>> prompt in a new window. If so, the window will disappear after you call the exit() function or enter the Ctrl-Z character; Windows is running a single “python” command in the window, and closes it when you terminate the interpreter.
Now that we know the py command is recognized, you can give your Python script to it. You’ll have to give either an absolute or a relative path to the Python script. Let’s say your Python script is located in your desktop and is named hello.py , and your command prompt is nicely opened in your home directory so you’re seeing something similar to:
So now you’ll ask the py command to give your script to Python by typing py followed by your script path:
How do I make Python scripts executable?В
On Windows, the standard Python installer already associates the .py extension with a file type (Python.File) and gives that file type an open command that runs the interpreter ( D:\Program Files\Python\python.exe «%1» %* ). This is enough to make scripts executable from the command prompt as вЂfoo.py’. If you’d rather be able to execute the script by simple typing вЂfoo’ with no extension you need to add .py to the PATHEXT environment variable.
Why does Python sometimes take so long to start?В
Usually Python starts very quickly on Windows, but occasionally there are bug reports that Python suddenly begins to take a long time to start up. This is made even more puzzling because Python will work fine on other Windows systems which appear to be configured identically.
The problem may be caused by a misconfiguration of virus checking software on the problem machine. Some virus scanners have been known to introduce startup overhead of two orders of magnitude when the scanner is configured to monitor all reads from the filesystem. Try checking the configuration of virus scanning software on your systems to ensure that they are indeed configured identically. McAfee, when configured to scan all file system read activity, is a particular offender.
How do I make an executable from a Python script?В
See cx_Freeze for a distutils extension that allows you to create console and GUI executables from Python code. py2exe, the most popular extension for building Python 2.x-based executables, does not yet support Python 3 but a version that does is in development.
Is a *.pyd file the same as a DLL?В
Yes, .pyd files are dll’s, but there are a few differences. If you have a DLL named foo.pyd , then it must have a function PyInit_foo() . You can then write Python “import foo”, and Python will search for foo.pyd (as well as foo.py, foo.pyc) and if it finds it, will attempt to call PyInit_foo() to initialize it. You do not link your .exe with foo.lib, as that would cause Windows to require the DLL to be present.
Note that the search path for foo.pyd is PYTHONPATH, not the same as the path that Windows uses to search for foo.dll. Also, foo.pyd need not be present to run your program, whereas if you linked your program with a dll, the dll is required. Of course, foo.pyd is required if you want to say import foo . In a DLL, linkage is declared in the source code with __declspec(dllexport) . In a .pyd, linkage is defined in a list of available functions.
How can I embed Python into a Windows application?В
Embedding the Python interpreter in a Windows app can be summarized as follows:
Do _not_ build Python into your .exe file directly. On Windows, Python must be a DLL to handle importing modules that are themselves DLL’s. (This is the first key undocumented fact.) Instead, link to python NN .dll ; it is typically installed in C:\Windows\System . NN is the Python version, a number such as “33” for Python 3.3.
You can link to Python in two different ways. Load-time linking means linking against python NN .lib , while run-time linking means linking against python NN .dll . (General note: python NN .lib is the so-called “import lib” corresponding to python NN .dll . It merely defines symbols for the linker.)
Run-time linking greatly simplifies link options; everything happens at run time. Your code must load python NN .dll using the Windows LoadLibraryEx() routine. The code must also use access routines and data in python NN .dll (that is, Python’s C API’s) using pointers obtained by the Windows GetProcAddress() routine. Macros can make using these pointers transparent to any C code that calls routines in Python’s C API.
Borland note: convert python NN .lib to OMF format using Coff2Omf.exe first.
If you use SWIG, it is easy to create a Python “extension module” that will make the app’s data and methods available to Python. SWIG will handle just about all the grungy details for you. The result is C code that you link into your .exe file (!) You do _not_ have to create a DLL file, and this also simplifies linking.
SWIG will create an init function (a C function) whose name depends on the name of the extension module. For example, if the name of the module is leo, the init function will be called initleo(). If you use SWIG shadow classes, as you should, the init function will be called initleoc(). This initializes a mostly hidden helper class used by the shadow class.
The reason you can link the C code in step 2 into your .exe file is that calling the initialization function is equivalent to importing the module into Python! (This is the second key undocumented fact.)
In short, you can use the following code to initialize the Python interpreter with your extension module.
There are two problems with Python’s C API which will become apparent if you use a compiler other than MSVC, the compiler used to build pythonNN.dll.
Problem 1: The so-called “Very High Level” functions that take FILE * arguments will not work in a multi-compiler environment because each compiler’s notion of a struct FILE will be different. From an implementation standpoint these are very _low_ level functions.
Problem 2: SWIG generates the following code when generating wrappers to void functions:
Alas, Py_None is a macro that expands to a reference to a complex data structure called _Py_NoneStruct inside pythonNN.dll. Again, this code will fail in a mult-compiler environment. Replace such code by:
It may be possible to use SWIG’s %typemap command to make the change automatically, though I have not been able to get this to work (I’m a complete SWIG newbie).
Using a Python shell script to put up a Python interpreter window from inside your Windows app is not a good idea; the resulting window will be independent of your app’s windowing system. Rather, you (or the wxPythonWindow class) should create a “native” interpreter window. It is easy to connect that window to the Python interpreter. You can redirect Python’s i/o to _any_ object that supports read and write, so all you need is a Python object (defined in your extension module) that contains read() and write() methods.
How do I keep editors from inserting tabs into my Python source?В
The FAQ does not recommend using tabs, and the Python style guide, PEP 8, recommends 4 spaces for distributed Python code; this is also the Emacs python-mode default.
Under any editor, mixing tabs and spaces is a bad idea. MSVC is no different in this respect, and is easily configured to use spaces: Take Tools ‣ Options ‣ Tabs , and for file type “Default” set “Tab size” and “Indent size” to 4, and select the “Insert spaces” radio button.
Python raises IndentationError or TabError if mixed tabs and spaces are causing problems in leading whitespace. You may also run the tabnanny module to check a directory tree in batch mode.
How do I check for a keypress without blocking?В
Use the msvcrt module. This is a standard Windows-specific extension module. It defines a function kbhit() which checks whether a keyboard hit is present, and getch() which gets one character without echoing it.


