- How to Remove Installed Updates in Windows 10 and Windows Server?
- How to Uninstall Windows Updates Using the Control Panel?
- How to Prevent (Block) a Specific Update from Installing in Windows 10?
- WUSA.exe: Removing Windows Updates via the Command Line
- How to Uninstall a Windows Update using WSUS?
- Removing Windows Update Using the GPO
- How To Uninstall Windows Updates When Computer Is Not Booting?
- Description of the Windows Update Standalone Installer in Windows
- Introduction
- More Information
- References
How to Remove Installed Updates in Windows 10 and Windows Server?
Sometimes it happens that the security updates for Microsoft products (released under MS Patch Tuesday) cause problems with the OS or third-party software. The issues caused by the updates can be either mass and occur in a large number of devices or private that occur in some combinations of the Windows OS version and some apps.
If the Windows (or Office) patch causes a problem on the computers of many users, and this is confirmed by Microsoft experts, the update is pulled by the company and after a while is replaced by a new one with the bugs fixed. But if necessary, in Windows there is a way to uninstall any security update or patch.
In this article we’ll show how to properly uninstall updates in Windows OS (the article covers Windows 10, 8.1, 7 and Windows Server 2016, 2012/R2, 2008/R2). These ways of removing updates can be used if you installed the update manually from a CAB or MSU file, your device automatically received it from the Windows Update servers or your WSUS server.
There are several ways to uninstall updates in Windows (Windows Server):
How to Uninstall Windows Updates Using the Control Panel?
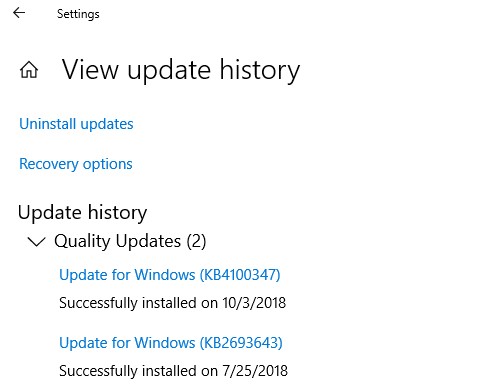
Let’s look on how to uninstall updates in Windows 10. Open the menu Settings app and go to the Update & Security -> Windows update -> View Update History -> Uninstall updates.
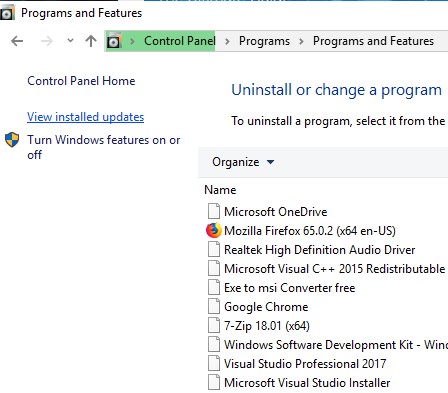
You can also go to the “Uninstall an update” panel using the classic Control Panel (Control Panel\Programs\Programs and Features) and press the button “View installed updates”.
A list of all Windows and Office updates installed on your device will appear. Find the necessary update in the list (or, to be more precise, unnecessary :)), select it, click the Uninstall button. The uninstall update wizard starts.
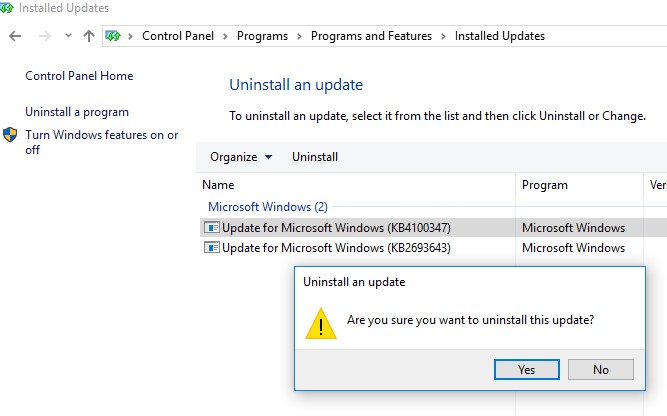
Click Yes when prompted if you want to uninstall this update.
And wait till it is uninstalled. After the update is removed, Windows may request a system restart.
How to Prevent (Block) a Specific Update from Installing in Windows 10?
If your computer is configured to automatically receive Windows updates through Windows Update or WSUS, this update will most likely be installed on your computer again. But you can prevent the installation of a specific update by hiding (blocking) it. To do this, use the official tool Microsoft Show or Hide Updates https://support.microsoft.com/en-us/help/3073930/how-to-temporarily-prevent-a-driver-update-from-reinstalling-in-window
- Download and run the wushowhide.diagcab;
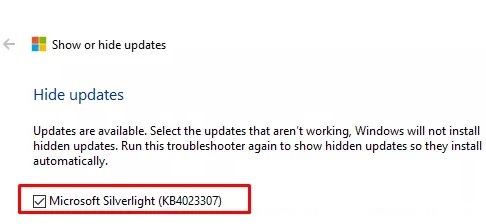
- Select the option Hide Updates;

- Select the update you want to hide and click Next;
- After that, this update won’t be installed in Windows automatically via Windows Update. You can remove the hidden update by selecting it in the Show hidden updates.

WUSA.exe: Removing Windows Updates via the Command Line
Windows updates can also be uninstalled from the command prompt. To do it, there is a built-in CLI tool wusa.exe (Windows Update Standalone Installer).
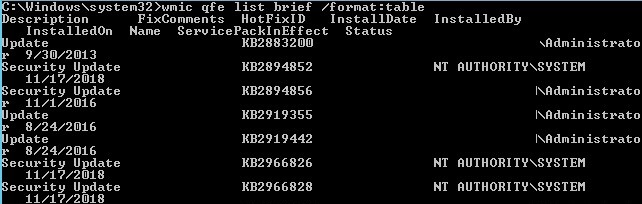
You can list all updates installed on a computer with the command:
wmic qfe list brief /format:table
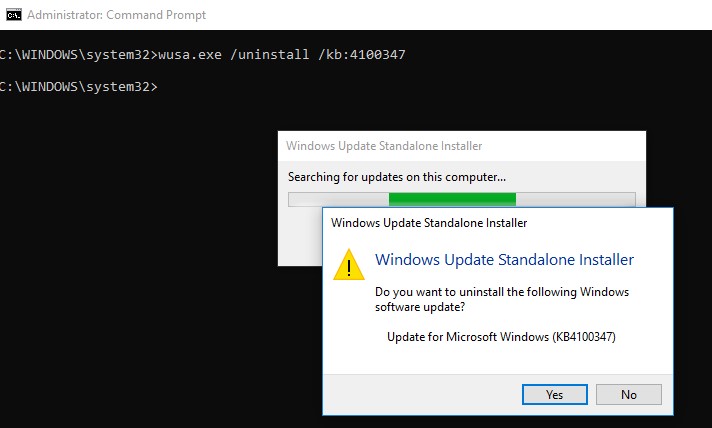
Using the following command, running as administrator, you can remove the specific update (KB 4100347):
wusa.exe /uninstall /kb:4100347
A user must confirm the removing of the update.
If the update has to be uninstalled in a quiet mode without a user request and notifying about of the subsequent system reboot, the command will look like that:
wusa.exe /quiet /uninstall /kb:4100347 /promptrestart
If you need to suppress the reboot request, use the command:
wusa.exe /quiet /uninstall /kb:4100347 /norestart
You can also remove the update from PowerShell using the PSWindowsUpdate module. The Remove-WindowsUpdate cmdlet is used:
Remove-WindowsUpdate -KBArticleID KB4100347 -NoRestart
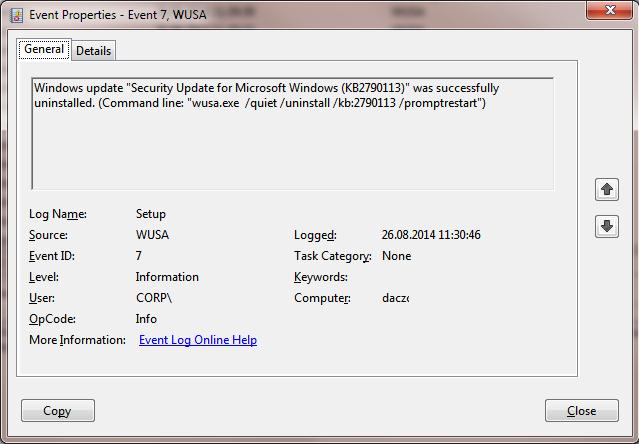
The Windows update uninstall event is recorded to the Setup log with the EventID 7 from the WUSA source:
Using PsExec you can uninstall an update on a remote computer, the command is as follows:
psexec.exe \\RemotePCName C:\Windows\System32\wusa.exe /quiet /uninstall /kb:4100347 /warnrestart:600
How to Uninstall a Windows Update using WSUS?
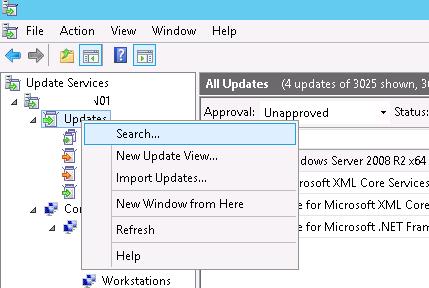
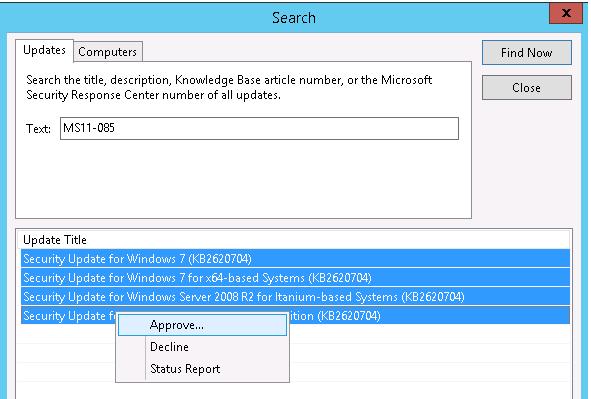
If a corporate WSUS server is used in your company to install updates on a domain computers and servers, you can remove the update approved for install using the Update Services management console. To do it, right-click the Updates branch and then click Search in the menu.
Specify the KB number or a security bulletin you need to find and click Find now. In the list containing the updates that have been found for different Windows versions, select the updates to be uninstalled and click Approve in the menu.
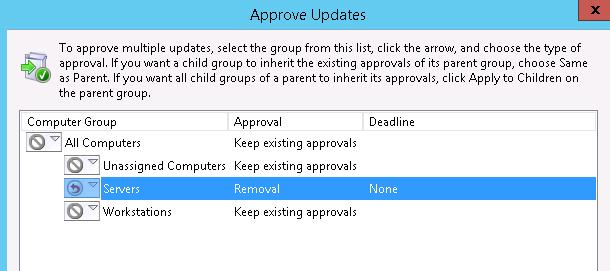
Then select the WSUS Target group you need and choose Approved for Removal in the drop-down list.
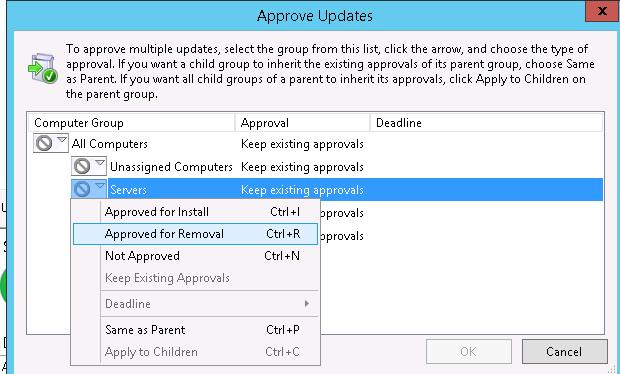
In our example, we want to uninstall update on a group of computers named Servers (more about WSUS GPO targeting).
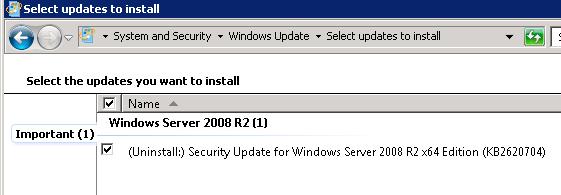
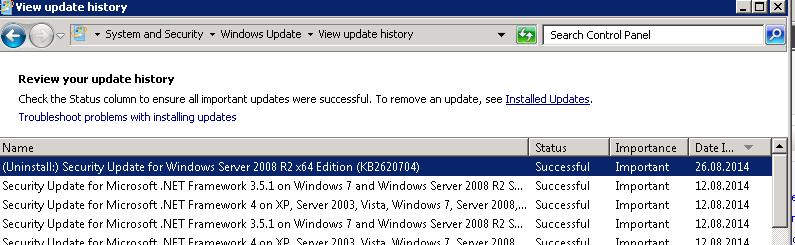
After updating data on the side of WSUS clients (which occurs on a schedule in accordance with the WSUS policy and the synchronization frequency, which is set by the Automatic Update detection frequency, or can be done manually by running wuauclt /detectnow ) , the corresponding update appears with the prefix (Uninstall:) in its name in the Windows Update panel.
After the update has been uninstalled, this event is displayed in Windows Update History.
Removing Windows Update Using the GPO
If you want to remove a specific update on multiple computers of Active Directory domain that doesn’t use WSUS, you can use Startup/Shutdown GPO scripts.
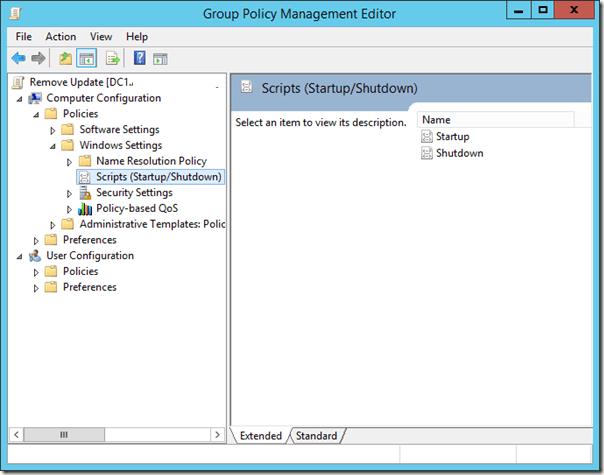
To do it, create a new GPO object linked to the necessary OU, AD site or computer group. Then create a new startup script with the wusa.exe command in the section Computer Configuration -> Policies -> Windows Settings -> Scripts (Startup/Shutdown).
You can also use PowerShell startup scripts to remove installed updates.
How To Uninstall Windows Updates When Computer Is Not Booting?
Sometimes it happens that you cannot remove an update directly from the Windows, since the OS simply not booting after installing the problematic update. In this case, you may have to boot the computer from the rescue or install boot disk and delete the updates via DISM (see the article “Computer Won’t Start After Windows Update”) or using the “Hotfix uninstall” utility from the MSDaRT.
So, we have covered common scenarios of how to uninstall updates on Windows computers.
Description of the Windows Update Standalone Installer in Windows
Introduction
This article describes the Windows Update Standalone Installer (Wusa.exe) in the following Windows operating systems:
Windows Server 2008
Windows Server 2008 R2
Windows Server 2012
Windows Server 2012 R2
Windows Server 2016 Technical Preview
The Wusa.exe file is in the %windir%\System32 folder. The Windows Update Standalone Installer uses the Windows Update Agent API to install update packages. Update packages have an .msu file name extension. The .msu file name extension is associated with the Windows Update Standalone Installer.
More Information
An .msu file contains the following contents.
Windows Update metadata
Describes each update package that the .msu file contains.
One or more .cab files
Each .cab file represents one update.
This .xml file describes the .msu update package. Wusa.exe uses the .xml file when you perform an unattended installation of the update by using the Package Manager tool (Pkgmgr.exe).
For example, you download hotfix 934307. The Windows6.0-KB934307-x86.msu file is in the C:\934307 folder. You type the following command at a command prompt to expand the .msu file to a temporary folder:
expand -f:* «C:\934307\Windows6.0-KB934307-x86.msu» %TEMP%
Then, you type the following command at a command prompt:
A properties file
This file contains string properties that Wusa.exe uses. For example, this file contains the title of the associated article in the Microsoft Knowledge Base.
When you use Wusa.exe to install an update package, Wusa.exe expands the contents of the .msu file to a temporary folder. Then, Wusa.exe performs the following steps:
Wusa.exe uses the Windows Update metadata in the .msu file to search for applicable updates.
Wusa.exe copies the contents of the applicable updates to the Windows Update sandbox. The Windows Update sandbox is a protected folder.
Wusa.exe calls the appropriate function in the Windows Update Agent API according to the mode in which you start Wusa.exe.
When the Windows Update wizard finishes the installation, the Windows Update Agent API returns a status. Then, Wusa.exe works synchronously with the Windows Update Agent API.
Note Each update in an .msu update package is installed in a separate session. Only one instance of Wusa.exe runs when you use Wusa.exe. Wusa.exe does not change the contents of the updates in .msu files. The Windows Update infrastructure performs the required actions according to the contents of the update.
When you start Wusa.exe in interactive mode, a welcome screen displays high-level information about the update. If you continue to install the update, Wusa.exe calls the appropriate function in the Windows Update Agent API to start the Windows Update wizard. The Windows Update wizard displays the Microsoft Software License Terms that are associated with the update package. Wusa.exe calls the Windows Update Agent API to continue the installation. Then, Wusa.exe waits until the Windows Update wizard finishes the installation.
To install an .msu update package, run Wusa.exe together with the full path of the file.
For example, if the Windows6.0-KB934307-x86.msu file is in the D:\934307 folder, type the following command at a command prompt to install the update package:
wusa.exe d:\934307\Windows6.0-KB934307-x86.msuYou can also double-click the .msu file to install the update package.
You can use Wusa.exe to uninstall an update in Windows 7, Windows Server 2008 R2, Windows 8, and Windows Server 2012.
Note You cannot use Wusa.exe to uninstall updates in Windows Vista or Windows Server 2008. You can use Windows Defender Software Explorer to manually uninstall the updates. For more information about Software Explorer, go to the following Microsoft website:
Using Software Explorer in Windows Defender
You can use the following switches together with Wusa.exe.
Run Wusa.exe in quiet mode without user interaction. When the tool runs in quiet mode, it runs without user interaction. The computer restarts if this is required.
For example, if the Windows6.0-KB934307-x86.msu file is in the D:\934307 folder, type the following command at a command prompt to install the update package without user interaction:
wusa.exe d:\934307\Windows6.0-KB934307-x86.msu /quiet
Note When you use this switch, the Microsoft Software License Terms do not appear.
Prevents Wusa.exe from restarting the computer. The /norestart switch is ignored if the /quiet switch is not present. If you run Wusa.exe together with these two switches, you must manually restart the operating system after the installation is complete if the installation requires you to restart the computer.
For example, if the Windows6.0-KB934307-x86.msu file is in the D:\934307 folder, type the following command at a command prompt to install the update package:
wusa.exe D:\934307\Windows6.0-KB934307-x86.msu /quiet /norestart
Uninstalls the specified package or KB number.
Specifies the package to be uninstalled by using its KB number. Can be passed only together with the /uninstall switch.
Wusa.exe extracts the package contents to a destination folder.
When this switch is combined with the /quiet switch, Wusa.exe prompts you before it begins a restart for install and uninstall operations.
When this switch is combined with the /quiet switch, Wusa.exe forcibly closes applications and then begins a restart.
Note The .msu files can be installed to an offline image by using the DISM.exe /Add-Package option together with the Windows 7 or Windows 8 OEM Preinstallation Kit (OPK) or the Windows Automated Installation Kit (AIK). For more information, go to the following Microsoft TechNet website:
Operating System Package Servicing Command-Line Options
To view the Windows Update Standalone Installer event log, follow these steps:
Click Start  , type event viewer in the Start Search box, and then click Event Viewer in the Programs list. In Windows 8 and Windows Server 2012, on the Start screen, type event viewer, click Settings, and then click View event logs under Settings.
 If you are prompted for an administrator password or for confirmation, type the password, or click Continue.
In Event Viewer, expand Windows Logs, and then click Setup.
Setup events appear in the middle pane.
In the Actions pane, click Filter Current Log.
In the Event sources list, click to select the WUSA check box, and then click OK.
References
For more information about the Windows Update Agent API, go to the following Microsoft website:


