- Обновление BIOS/UEFI Lenovo Thinkpad в Linux
- Обновить BIOS в Lenovo Thinkpad
- Скачать правильную прошивку
- Перепаковка загрузочного образа
- Загрузка образа на “флэшку”
- Загрузка с “флэшки”
- Обновление UEFI/BIOS в Linux
- FAT32 ESP
- Подготовка
- How to update Lenovo BIOS from Linux without using Windows
- Procedure to update Lenovo BIOS from Linux
- Step 1. Download Lenovo BIOS
- Step 2. Install geteltorito cli on Linux
- Step 3. Extract the image from iso file
- Write x230.img to the USB pen
- Step 4. Updating the BIOS on Lenovo x230 laptop from Linux using a USB flash pen
- Video demo: Updating the BIOS on Lenovo Thinkpad laptops from Linux using a usb pen
- Conclusion
- X230 bios update linux
- X230 Bios Update
- Re: X230 Bios Update
- Re: X230 Bios Update
- Re: X230 Bios Update
- Re: X230 Bios Update
- Re: X230 Bios Update
- Re: X230 Bios Update
- Re: X230 Bios Update
- Re: X230 Bios Update
- Community Guidelines
- Check out current deals!
- Most Popular Posts
- Welcome to Ideation!
Обновление BIOS/UEFI Lenovo Thinkpad в Linux
15.12.2020
Уже несколько лет являюсь пользователем Lenovo Thinkpad и внезапно узнал, что можно обновлять BIOS 😉
Обычно эту микропрограмму производители обновляют довольно нерегулярно или совсем не делают этого. Каких-то финтифлюшек не приносят и багов особо в них не находят. Поэтому особо и не следил за этой темой.
Если кратко, то весь процесс можно описать в несколько шагов:
Обновить BIOS в Lenovo Thinkpad
- Скачать правильную прошивку к твоей модели устройства в виде ISO
- Перепаковать загрузочный образ
- Загрузить полученный образ диска на USB-диск
- Загрузиться с “флэшки”
- Дождаться обновления (обычно занимает не более 5-10 минут)
Скачать правильную прошивку
На мой взгляд это самый важный шаг из всех последующих, так как при обновлении такого ответственной части устройства потенциально может привести к окирпичиванию.
Самый правильный путь это перейти на официальный сайт support.lenovo.com и найти в поиске раздел по поддержке нужного устройства и из подраздела
Драйверы и Программное обеспечение -> BIOS скачать последний выпуск образа с названием “ BIOS Update (Bootable CD) “.
Перепаковка загрузочного образа
Не помню, когда последний раз пользовался CD на компьютере и тем более создавал загрузочный диск. Очень выручают в этом деле “флэшки” 😉
Для перепаковки ISO в IMG-формат загрузочного диска можно воспользоваться перловым скриптом geteltorio. В зависимостях у него есть инструмент genisoimage. В Ubuntu он установлен по умолчанию, а в других популярных дистрибутивах доступен в официальных репозиториях.А вот скрипт придётся скачать:
После того, как загрузочный образ и скрипт загружены, а genisoimage установлен, для перепаковки требуется выполнить всего одну команду:
Загрузка образа на “флэшку”
Загрузка выполняется с помощью команды dd, а USB-диск можно увидеть командой blkid.
Загрузка с “флэшки”
Оставьте флэшку в ноутбуке и перезагрузитесь. С помощью F12 или Enter вызовите промежуточное меню временного приоритета загрузки и укажите приоритет загрузки с USB-накопителя. И…дождитесь завершения обновления BIOS/UIFI.
Обычно, никаких действий, кроме подтверждения всех предупреждений: что это потенциально опасная процедура, что батарея ноутбука заряжена и тому подобное.
Источник
Обновление UEFI/BIOS в Linux
Не секрет, что производители материнских плат и ноутбуков не всегда дают возможность пользователям Linux обновить UEFI/BIOS прошивку так же ненавязчиво, как это делают пользователи Windows. Тем не менее для HP EliteBook 840G1, которым я пользуюсь, сделать это немногим сложнее.

Для этого дела понадобятся следующие артефакты:
- FAT32 EFI System Partition (ESP)
- WINE
- Переменный электрический ток
FAT32 ESP
Ноутбуки линейки HP EliteBook содержат 3 режима загрузки. Узнать какой из режимов выбран можно в настройках UEFI/BIOS → System Configuration → Boot Mode . Данный раздел следует читать, если только выбран последний, бескомпромиссный режим UEFI , в остальных случаях можно проскочить.
- Legacy
- UEFI Hybrid with compatibility support module (CSM)
- UEFI Native without CSM
Если вы внимательно читали топик про Linux kernel EFI Boot Stub, то вы наверняка знаете, что и как нужно сделать, для того, чтобы создать дисковый раздел. Можно использовать gdisk , parted или KDE Disk Partition для создания ESP раздела. Вот так выглядит уже готовый раздел.

Рекомендуется ESP раздел монтировать в /boot/efi , а не просто в /boot , для того чтобы можно было хранить образы ядра Linux и файлы загрузчика ОС на штатных линуксовых ФС, вместо того, чтобы все держать в FAT32 EFI System Partition.
Мы уже знаем, что UEFI/BIOS будет искать \EFI\BOOT\bootx64.efi , для чего абсолютный путь к файлу должен быть /boot/efi/EFI/Boot/Bootx64.efi , иначе все пропало и UEFI/BIOS не найдет загрузчик ОС! Обновлению системной прошивки это не помешает, но для чего же тогда нужна прошивка, если нельзя загрузить операционную систему? Очень немаловажно, что по-умолчанию GRUB-2 не копирует необходимый файл и поэтому bootx64.efi надо скопировать вручную.
Подготовка
Берем свежую прошивку с сайта HP, выбираем Linux в выпадающем списке ОС, затем BIOS, скачиваем… и обнаруживаем исполняемый файл для Windows — sp64081.exe . Нет, глаза нас не подвели.
Опытные пользователи бывают готовы к подобным сюрпризам, для чего держат Windows VM либо пользуются не-эмулятором WINE или и то и другое вместе, бо случаи бывают разные. Для распаковки файла возможностей WINE вполне достаточно. Запускаем:
Программа завершает работу с бестактной ошибкой, напоминая лишний раз о том, что нам подсунули не то, что мы ожидали.
Однако, это не должно никого волновать, так как файлы распакованы верно а сверх этого ничего и не требовалось.
Из этого списка нам понадобятся только 3 файла: L71_0137.bin , HpBiosUpdate.efi и HpBiosUpdate.s12 и теперь внимание: скопировать файлы нужно точно в указанные места.
Чтобы попасть в меню настройки UEFI/BIOS надо после включения нажать клавишу Esc или F10 а далее File → Update System BIOS .
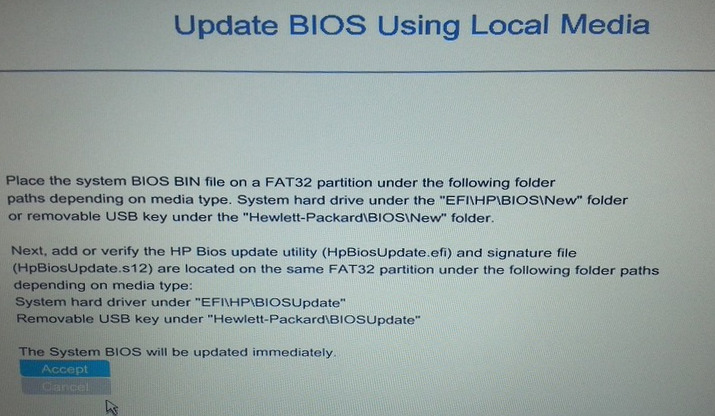
После выбора Accept , процесс обновления стартует без прочих реверансов. Видимо зная цену своим аккумуляторам, производители обновляют прошивку только при включенном электрическом питании компьютера. 2-3 минуты, и процесс благополучно завершен.
UPDATE: По итогам здравых идей в комментариях необходимы некоторые дополнения.
- Можно скопировать те же самые 3 файла на USB флешку, в прописанных путях и используя её обновить прошивку. Разметка файловой системы должна быть FAT32 ESP.
- Можно обновиться из File → Update System BIOS напрямую по интернету, если подключен сетевой кабель. Обновление не будет работать через WiFi соединение.
- Вместо WINE для распаковки архива достаточно использовать 7z e sp64081.exe .
Источник
How to update Lenovo BIOS from Linux without using Windows
Procedure to update Lenovo BIOS from Linux
- Download Lenovo BIOS Bootable CD for your Laptop model
- Use the geteltorito command to extract bootable image
- Run the dd command to write extracted image to USB stick or pen
- Reboot the laptop
- Interrupt boot process by pressing the ENTER key
- Press F12 key and select USB mass storage device as boot source
- The BIOS update utility should run now
Let us see all steps in details. I am going to update my BIOS for the Lenovo x230 laptop.
The procedure discussed here is for an older model of Lenovo ThinkPad and other models. These days latest models of ThinkPads support direct BIOS/Firmware updates using Linux CLI and GUI. See this guide about those options.
- No ads and tracking
- In-depth guides for developers and sysadmins at Opensourceflare✨
- Join my Patreon to support independent content creators and start reading latest guides:
- How to set up Redis sentinel cluster on Ubuntu or Debian Linux
- How To Set Up SSH Keys With YubiKey as two-factor authentication (U2F/FIDO2)
- How to set up Mariadb Galera cluster on Ubuntu or Debian Linux
- A podman tutorial for beginners – part I (run Linux containers without Docker and in daemonless mode)
- How to protect Linux against rogue USB devices using USBGuard
Join Patreon ➔
Step 1. Download Lenovo BIOS
Step 2. Install geteltorito cli on Linux
Type the following apt command/apt-get command to install it on a Debian/Ubuntu Linux:
$ sudo apt install genisoimage
Fedora Linux user should type the following dnf command:
$ sudo dnf install geteltorito genisoimage
CentOS/RHEL user need to type the following yum command:
$ sudo yum install genisoimage
SUSE/OpenSUSE Linux user type the following zypper command:
$ sudo zypper install genisoimage
Arch Linux user install the geteltorito AUR package using the following method:
Another option is to just grab the Perl script:
$ wget https://userpages.uni-koblenz.de/
krienke/ftp/noarch/geteltorito/geteltorito/geteltorito
$ chmod +x geteltorito
Step 3. Extract the image from iso file
geteltorito is an El Torito boot image extractor. The syntax is:
## Use geteltorito.pl on an Arch Linux ##
geteltorito -o
geteltorito -o x230.img g2uj28us.iso
Sample outputs:
Write x230.img to the USB pen
You can identify USB stick with the following command:
$ dmesg | more
$ sudo blkid
Run the following command to write the image named x230.img to the USB stick:
$ sudo dd if=x230.img of=/dev/sdb bs=64K
Please note that you can display progress with dd command:
$ sudo dd if=x230.img of=/dev/sdc bs=64K status=progress
Finally, reboot your Linux based laptop with the reboot command or shutdown command:
$ sudo reboot
OR
$ sudo shutdown -h 0
Step 4. Updating the BIOS on Lenovo x230 laptop from Linux using a USB flash pen
First, interrupt boot process by pressing the ENTER key. Next hit the F12 key and select USB mass storage device as boot source. Make sure your laptop power supply plugged in. In some case, the battery must charge to 80-100%. Make sure you follow on screen info to update the BIOS.
Video demo: Updating the BIOS on Lenovo Thinkpad laptops from Linux using a usb pen
This video will give all guidance without using an old-fashioned MS-Windows or CD. You can update the BIOS on your Lenovo laptops from Linux using a USB flash stick:
Conclusion
You learned about updating Lenovo BIOS or firmware from Linux for older models. Newer models of Thinkpad support updating Linux using the CLI or GUI tools. See “Thinkpad update firmware on Linux (X1 extreme/P1 gen2)” for more information.
🐧 Get the latest tutorials on Linux, Open Source & DevOps via
Источник
X230 bios update linux


![]()
United States of America
![]()
- Posts: 83
- Registered: 07-19-2017
- Location: United States of America
- Views: 671
- Message 1 of 9
X230 Bios Update
We are trying to upgrade the Bios during our Windows 10 migration. The Bios package is called during Winpe and the command is WINUPTP.EXE -s. But it errors out saying this is not supported in current windows environment.
![]()
United States of America
51991 Page Views
![]()
- Posts: 900
- Registered: 06-09-2015
- Location: United States of America
- Views: 51991
- Message 2 of 9
Re: X230 Bios Update
Are you trying to execute this in a 32-bit PE environment or 64-bit? If 64-bit, it won’t work.
![]()
United States of America
![]()
- Posts: 83
- Registered: 07-19-2017
- Location: United States of America
- Views: 671
- Message 3 of 9
Re: X230 Bios Update
Yes we use 64 bit. So how can we run ? Any other way ?
![]()
United States of America
51991 Page Views
![]()
- Posts: 900
- Registered: 06-09-2015
- Location: United States of America
- Views: 51991
- Message 4 of 9
Re: X230 Bios Update
You may want to consider updating post deployment. If you have to update the BIOS in your OSD task sequence, make sure the step to execute the flash is in full OS phase.
![]()
United States of America
![]()
- Posts: 83
- Registered: 07-19-2017
- Location: United States of America
- Views: 671
- Message 5 of 9
Re: X230 Bios Update
Thanks. But what steps is required for Flash ?
![]()
United States of America
51991 Page Views
![]()
- Posts: 900
- Registered: 06-09-2015
- Location: United States of America
- Views: 51991
- Message 6 of 9
Re: X230 Bios Update
![]()
United States of America
![]()
- Posts: 83
- Registered: 07-19-2017
- Location: United States of America
- Views: 671
- Message 7 of 9
Re: X230 Bios Update
Thanks. When i call this command i get an error code of 1 — «Process completed with exit code 1». Any log file to look in ? Also BIOS update is called in the Full OS (not in WINPE). The same command is used. As per SCCM TS logs
Command line «C:\_SMSTaskSequence\Packages\ABC00091\WINUPTP.EXE» -s returned 1
![]()
United States of America
51991 Page Views
![]()
- Posts: 900
- Registered: 06-09-2015
- Location: United States of America
- Views: 51991
- Message 8 of 9
Re: X230 Bios Update
![]()
United States of America
167955 Page Views
![]()
- Posts: 7158
- Registered: 10-29-2009
- Location: United States of America
- Views: 167955
- Message 9 of 9
Re: X230 Bios Update
«1» means that the update was successful but you need to reboot
- Introduction
- Community Spotlight
- Welcome & FAQs
- Forum Housekeeping
- Recently Released Service Tips — Read Only
- Recently Released Critical Drivers — Read Only
- Special Events
- Lenovo @ MWC 2021
- Lenovo @ CES 2021
- Lenovo @ IFA 2019
- Lenovo @ CES 2019
- Special Event Archive
- ThinkPad Notebooks
- ThinkPad X1 Fold
- ThinkPad: T400 / T500 and newer T series Laptops
- ThinkPad: P and W Series Mobile Workstations
- ThinkPad: X Series Laptops
- ThinkPad: X Series Tablet and Helix Laptops
- ThinkPad: S Series, ThinkPad Yoga and Twist Laptops
- ThinkPad: 11e (Windows), 13, E and Edge series Laptops
- ThinkPad: L, R and SL series Laptops
- ThinkPad Chromebooks: 11e, X and Yoga
- ThinkPad; T61 and prior T series plus Other Legacy ThinkPads
- ThinkBook Notebooks
- ThinkBook Notebooks
- ThinkBook Plus Notebooks
- Lenovo Notebooks
- Lenovo Yoga Series Notebooks
- Lenovo IdeaPad 1xx, 3xx, 5xx & 7xx, Edge, LaVie Z, Flex Notebooks
- Lenovo B and G Series Notebooks
- Lenovo U and S Series Notebooks
- Lenovo P, Y and Z series Notebooks
- Lenovo C, E, K, M, N and V Series Notebooks
- Lenovo Chromebooks
- Lenovo Phones
- A5 [L18021] Smartphones
- A Series, Vibe B & Vibe C Smartphones
- P1, P1m, P70 & P90 Series Smartphones
- P2 [P2a42] Smartphones
- K9 [L38043] and K9 Note [L38012] Smartphones
- K8 [XT1902] Smartphones
- K and Vibe Z Series Smartphones
- S and Vibe X Series Smartphones
- Smartphone Accessories and Wearables
- Legion Phone Duel
- Legion Phone Duel 2
- Lenovo Mirage AR
- Mirage AR Hardware – Technical Questions
- Star Wars™: Jedi Challenges
- MARVEL Dimension of Heroes
- Gaming – Lenovo Legion
- Gaming Laptops
- Gaming Desktops
- Y Gaming Accessories & Curved Gaming Monitors
- Legion Game Hub
- ThinkPad Tablets
- ThinkPad Tablets
- Lenovo Tablets
- Android Yoga Series Tablets
- Lenovo Android based Tablets and Phablets
- Windows based Tablets
- Yoga Book Community
- Yoga Book C930
- Yoga Book (Android)
- Yoga Book (Windows)
- ThinkCentre Desktops
- ThinkCentre A, E, M, S Series
- Lenovo Desktops
- Lenovo All In One (AIO) Desktops
- Lenovo Desktop Towers
- Lenovo Beacon, Stick 300, D, J and S Series Desktops
- ThinkStation
- ThinkStation Workstations
- Datacenter Systems
- BladeCenter / Flex Systems
- Converged Systems — HX Series
- ThinkSystem
- System x — X6, M5, M4
- ThinkServer
- Lenovo Sales Configurators
- Datacenter Storage
- Enterprise Storage
- LenovoEMC Storage
- Lenovo Iomega Networking Storage
- Datacenter Networking
- Datacenter Networking Hardware
- Networking Management/Devops
- Datacenter Systems Management
- Server System Management
- Lenovo XClarity
- Solutions on Lenovo Servers
- LiCO — Lenovo Intelligent Computing Orchestration
- External Displays, Options and Accessories
- Displays, Options and Accessories
- Virtual & Mixed Reality
- Lenovo Explorer
- Mirage Solo & Mirage Camera
- VR Classroom
- VR Classroom Hardware
- VR Classroom Software, Content, and Educator Resources
- Software and Operating System
- Pre-Installed Lenovo Software and Applications
- Enterprise Client Management
- Lenovo Patch for SCCM
- Security & Malware
- Windows 11
- Windows 10
- Windows 8.1, 8, 7, Vista and XP Discussions
- Smart Office
- ThinkSmart
- Smart Home
- Lenovo Smart Display & Lenovo Smart Clock with Google Assistant
- Lenovo Link App, Smart Home Essentials and Smart Frame
- Lenovo Smart Tablets with Amazon Alexa
- Lenovo Smart Tablets with Google Assistant
- Lenovo Developer Community
- Windows Ecosystem Developers
- Android Ecosystem Developers
- Lenovo Technologies
- Special Interest Discussions
- General Discussion
- Feedback on the support site
- Linux Operating Systems
- Fedora
- Red Hat and CentOS
- Ubuntu
- Debian
- Other Linux Discussions
- Ideation — Idea Exchange
- XClarity Ideation
Community Guidelines
Please review our Guidelines before posting.
Check out current deals!
Most Popular Posts
- Lenovo Community Participation Rules 9
- Re:DPC_Watchdog Violation error on Legion T5-28IMB05 Desktop (Lenovo) — Type 90NC 5
- Re:X1 carbon gen 9, missing Power Plans 4
- Thinkpad i7-7820HQ not supported for Win 11 4
- Re:Secure Boot Option Not Functioning 3
- Re:Thinkpad i7-7820HQ not supported for Win 11 3
- Windows 11 Release 3
- Re:E520 i7 Windows 11 not compatible — Why 3
- Re:Trackpoint randomly stops working 3
- A540-24ICB: updated to Windows 11 successfully 3
- Username
- Match exact username (no wildcards)
- User ID
- Email address
- Match exact email address (no wildcards)
- IP address
- Match any of the above criteria
- Duration of ban(Days)
- Duration of ban(Hours)
- Duration of ban(Minutes)
- Make ban permanent
- Internal reason for ban
- Public reason for ban
Please log in to ‘Like’ this post
Welcome to Ideation!
Ideation sections have been created for customers to engage with us by discussing and promoting ideas and improvements relating to Lenovo’s products and services.
As a reminder, your participation in Ideation is governed by Lenovo’s website Terms of Use and by Lenovo’s Forums Community Guidelines. Additional terms governing the Ideation Program are included in the Ideation Terms and may be found here. For your convenience, here’s a
Quick summary of the highlights:
- This area is for ideas – improving our products or suggesting entirely new products – please keep technical support issues on the other boards designated for that purpose
- You’re giving your ideas freely for us to use so we can improve our offerings to you
- The ideas you give us are your own and are not confidential
- If we decide we want exclusive use of your idea, you’re agreeing to sell it to us at a fixed price
By clicking on “Yes” below you certify that you have read and agree to the Community Guidelines and the Ideation Terms, and acknowledge that by submitting any ideas, material, or information on the Ideation site you grant Lenovo the right to use any such submissions by you in any way without acknowledging, notifying, or compensating you, as described in those documents.
Источник


