- Xbox 360 Controller Driver 0.16.11 for Mac OS X
- The Xbox 360 console software is updated periodically with new features, download the latest firmware to take advantage of them.
- Download
- What’s New
- Specs
- Related Drivers 10
- Question: Q: how to install xbox 360 controller on mac mavericks?
- All replies
- Xbox 360 controller and mac os
- About
- How to pair the Xbox 360 controller to Mac
- Before we start
- Before you do: Clean up your Mac
- How to use the Xbox 360 controller on Mac
- Free Drivers
- 1. Install the driver
- 2. Connect the Xbox 360 Controller to your Mac
- 3. Test the Controller
- 4. Configuring for multiple games on your Mac
- 5. Use Joystick Mapper
- Declutter your Mac to make more room for games
Xbox 360 Controller Driver 0.16.11 for Mac OS X
The Xbox 360 console software is updated periodically with new features, download the latest firmware to take advantage of them.
Download
What’s New
Specs
Related Drivers 10
I have created a USB driver which allows you to use wired XBox 360 Controllers via USB, and wireless XBox 360 Controllers via the Microsoft Wireless Gaming Receiver for Windows, on your OSX machine, including support for the Apple Force Feedback library. The driver is licenced under the GPL.
I’ve released a version which will hopefully install and work fine on 32-bit Snow Leopard. It also contains 64-bit binaries, however I’ve been unable to test them because Apple have disabled my MacBook from booting into 64-bit mode. I have however been informed that 64-bit and 32-bit builds are both working.
I have got the Microsoft ChatPad working with my wired controller. The latest release of the driver includes support, and I’ll be updating the USB information section of this website shortly. I’ve not yet checked the wireless receiver for compatibility.
Sadly, my PowerMac has died, which as my primary development machine has slowed progress.
I have added a version of the driver without support for the Guitar Hero controller, to allow the Guitar Hero for Mac game to work (it attempts to access hardware directly, which doesn’t work if a real driver has claimed the device).
If you find the driver does not work for you, please attempt and find out as much as you can about the device, preferably using the Apple «USB Prober» application provided with the developer tools, but the output of System Profiler for the device may be enough. E-mail it back and I’ll try and work with you to get it working.
Force feedback-enabled games
Games I’ve currently tested for force feedback support (only games that support basic rumble will probably function currently, as I’ve only implemented triangle, square and sine wave-type effects. I also lack any other force feedback device for comparison 🙂 ):
Источник
Question: Q: how to install xbox 360 controller on mac mavericks?
how to install wired xbox 360 controller on mac mavericks?
i installed this driver
but is not working
iMac, OS X Mavericks (10.9)
Posted on Nov 18, 2013 12:51 PM
All replies
Loading page content
Page content loaded
This worked for someone in another discussion. Make sure it works before you click solved or Csound 1 will be telling you to repost. 😁
Nov 18, 2013 2:29 PM
Has anybody managed to get this to work? The driver does not work on Mavericks for me. The Xbox360 preferences pane installs just fine, however it does not recognise the controller.
Mine is plugged in with the USB cable. OSX Mavericks. I’ve tried the latest driver from Tattiebogle.net.
Jan 5, 2014 1:45 PM
I’m using the wireless controller, which I got working under Mavericks but after a while (usually, it seems, after the Mac has gone to sleep and resumed) the controller isn’t recognised. A full restart of the Mac seems to be necessary to get it to reconnect, which is a pain. Anyone have it working reliably for a number of days, after Mac sleeping? Happy to invest in a wired controller if that’s the issue, no mention of Mavericks on the Tattiebogle website.
Jan 13, 2014 6:11 AM
I just got it recognized in 10.9. I read on another post somewhere to instsll the .11 version and not the newest version. (FYI: The newest version forces a restart after installation.)
As expected it added a preferences pane and it is recognized. BUT the controller name comes up as «Controller 1 (Wired)». I was expecting to say «Xbox 360 Controller» So far I have tried it with the Dolphin Wii Emulator only. In the emulator there is only one option for the controller and it says, «Input/0/Controller». Unfortunately, it does not work. Choosing a different option allows the keyboard controls to work only.
Jan 14, 2014 8:58 PM
Here’s where the problem seems to be for me. I should have read the FAQ more closely! 😊
Jan 17, 2014 3:45 PM
So you are trying to use the wireless controller? All that I have read points to more reliability for the wired when using it on a computer. Perhaps you should save money for a wired one?
I also forgot to mention the installation procedures on the .11 version. My controller does get recognized but as a genereric controller. Not specific to xbox360. But you can try this:
-Uninstall the pref pant and the couple of other files that have been written to your MAC. Use the search on «controller»
-once deleted run the .11 version of tthe driver. MAKE SURE THE CONTROLLER IS NOT IN THE USB PORT.
-after the installation is complete open up preferences adn you should see an xbox360 option
-open it and then plug in the controller
-it should then get recognized. You may need to play with some of the options.
Источник
Xbox 360 controller and mac os
XBox 360 Controller driver for Mac OS X
This driver supports the Microsoft Xbox 360 controller, including access to rumble motors and LEDs, on the Mac OS X platform. It includes a plugin for the Apple Force Feedback Framework so some games will be able to activate them, along with a Preference Pane with which allows you to test everything is installed correctly. Both wired 360 controllers connected via USB, and wireless 360 controllers connected via the Wireless Gaming Receiver for Windows, are supported.
This project is a fork of the Xbox360Controller project originally created by Colin Munro.
See the releases page for the latest compiled and signed version of the driver. Most users will want to install and run this.
If you are interested in installing as a developer please see below.
The driver exposes a standard game pad with a number of standard controls, so any game that supports gaming devices should work. In some cases this may need an update from the manufacturer of the game or a patched version. The Preference Pane uses the standard Mac OS X Frameworks for accessing HID devices and accessing Force Feedback capabilities, so should be a good test that the installation is functional.
Anything below this probably doesn’t affect end users, so you can stop reading now if you just want to use the driver.
You’ll need the full xcode installed via the app store. The command line tools are not enough.
From the command line, run: ./build.sh
If you’d like to build the .pkg file, there is an installer project for Packages. Download packages at http://s.sudre.free.fr/Software/Packages/about.html and the resulting dmg file will be copied to the build directory.
The distribution currently consists of 3 projects — one for the driver (implemented in C++, as an I/O Kit C++ class), one for the force feedback support plugin (implemented in C, as an I/O Kit COM plugin) and one for the Preference Pane (implemented in Objective C as a preference pane plugin). Ideally these 3 targets should be in the same project, but I’ve not worked on this yet.
To build, use the standard Xcode build for Deployment on each of the 3 projects. Build Feedback360 before 360Controller, as the 360Controller project includes a script to copy the Feedback360 bundle to the correct place in the .kext to make it work.
To debug the driver, sudo cp -R 360Controller.kext /tmp/ to assign the correct properties — note that the Force Feedback plugin only seems to be found by OSX if the driver is in /System/Library/Extensions so I could only debug it in place.
To test the Preference Pane, just double-click the resulting file.
Yosemite and signed drivers
Since Yosemite (Mac OS X 10.10) all global kexts are required to be signed. This means if you want to build the drivers and install locally, you need to have a mac developer account.
If you’d like to avoid paying apple for the developer account and want to disable the signature checking, execute the following commands inside a terminal:
Note that this is probably a bad idea unless you understand the implications of running unsigned driver code.
Most of the debugging I did was via printing out text. In 360Controller, you can use IOLog(), and the output will appear in system.log. In Feedback360 normal fprintf(stderr. ) , and the output will appear on the console of whatever application is attempting to use Force Feedback. In Pref360Control, NSLog() works as it’s an Objective C program, and will output to the console of the Preferences application.
Copyright (C) 2006-2013 Colin Munro
This driver is licensed under the GNU Public License. A copy of this license is included in the distribution file, please inspect it before using the binary or source.
About
XBox 360 controller driver for OSX official repo
Источник
How to pair the Xbox 360 controller to Mac

Before we start
Having spent some years coding applications for macOS we’ve created a tool that everybody can use. The all-round problem fixer for Mac.

So here’s a tip for you: Download CleanMyMac to quickly solve some of the issues mentioned in this article. But to help you do it all by yourself, we’ve gathered our best ideas and solutions below.
Features described in this article refer to the MacPaw site version of CleanMyMac X.
Whether you’re trying to no-scope that enemy on COD or score a last-minute slam-dunk on NBA, the touchpad just doesn’t do it.
So, we thought we’d share the best tips on how to connect an Xbox 360 controller to your Mac, to make them tense gaming moments a little easier.
Before you do: Clean up your Mac
BUT, before we get into all the juicy techy stuff, let’s remind you of how beneficial cleaning up your Mac can be.
Before installing any new hardware, it’s important to have an un-cluttered file space so the new software can run efficiently, and you can keep an eye on what’s where.
With CleanMyMac X, it’s easy. It’s one-click cleaning approach and powerful scanning means you can swiftly dispose of useless documents and apps which may be slowing your Mac down.
So, to get optimal controller connectivity, you should download CleanMyMac and tidy up your digital space – prior to any installations. Now, onto how to use an Xbox 360 controller on a Mac.
How to use the Xbox 360 controller on Mac
Not many of us know it, but there could be a handy use for all those old Xbox 360 or Xbox One controllers lying around. But, before you get set up, you need to have the correct hardware installed on your Mac to enable connectivity.
First of all, you will need either a wired or wireless Xbox controller. Both work fine, but for all those passionate gamers with a tendency to erupt, a wireless device would be best to save any damages to wires (or opponents). These wireless receivers can be bought for around $20 on Amazon, and can handle up to 4 Xbox 360 controllers.
Free Drivers
Obviously, Macs don’t have an in-built driver for Xbox controllers as Apple are in no way affiliated with Microsoft. Similarly, Microsoft doesn’t supply drivers for Mac users for their hardware, which leaves us wanting users having to find our own way.
So back in 2006, it was music to gamer’s ears to hear that Tattie Bogle had developed their own driver free of charge to users across the gaming globe. However, this driver hasn’t been updated since 2012, and is therefore sticky when it comes to compatibility with MacOS X.
For a more streamlined approach to this conundrum, download GitHub’s free driver – it’s maintained and updated frequently and is free to all Mac users.
1. Install the driver
After opening the GitHub link, double click on the DMG file visible under ‘Assets’. This will start the installing process, where you will have to follow the appropriate instructions.
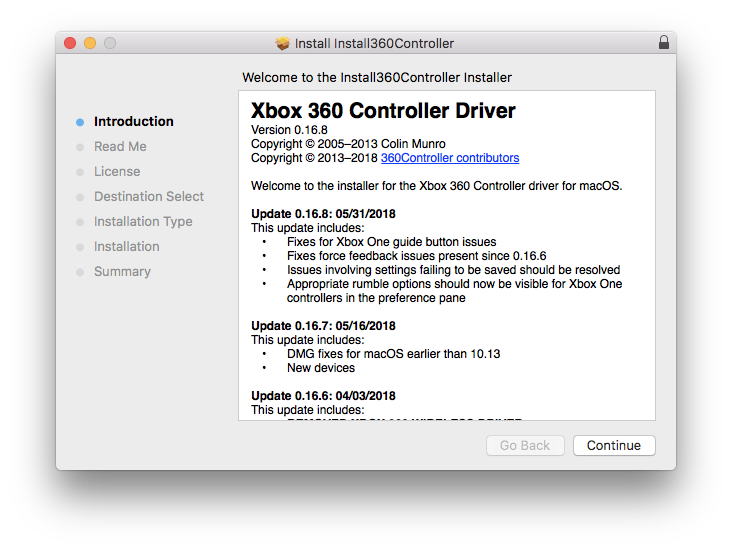
Remember though, as with any new program installation, it will reboot your Mac, so don’t panic. After the restart, you should be able to find ‘Xbox 360 Controllers’ in the system preferences.
2. Connect the Xbox 360 Controller to your Mac
Now you’ve installed the driver, the next step is to connect the controller, which is simple and only needs to be done once.
Firstly, you need to plug the USB receiver into a free USB port on your Mac. Once plugged in, the USB receiver’s light should start blinking
Press the big Xbox logo button on the controller so it lights up green
Press the button on the USB receiver
Press the connect button on the controller, which can be found at the top — in-between the left and right toggles
The top left quarter of the circle around the Xbox button should now light up, indicating you are the first controller connected
Now the controller and Mac are linked — so in the future if you want to connect again, all you need do is press the big Xbox logo button to get going. Told you it was simple!
3. Test the Controller
As with all things techy, there’s always loopholes. So, it’s important to test the connections to ensure the controller works before we embark upon a mobile-gaming-gallivant.
Go to ‘System Preferences’, ‘Xbox 360 Controllers’ and you’ll see a screen like below.
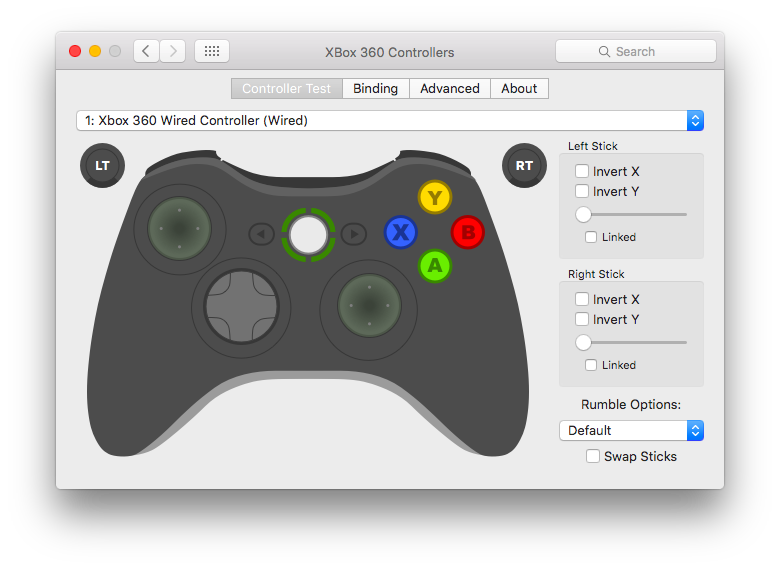
This is a control pad, which indicates whether all the buttons on the controller are working properly. That’s about all you can do on this, as well as shutting the controller down by clicking ‘power off’.
4. Configuring for multiple games on your Mac
We all have different tastes in games — some of us like sports and some of us like military, there’s no right or wrong (asides from Half-Life, that’s just awesome and it’s not up for debate).
With these different games come different control configurations, which can get tedious when you only have one type of controller.
For full flexibility of use, there are many tools and apps available which allow you to play any game with any Mac compatible joystick or controller – even the ones that are not compatible with joysticks.
5. Use Joystick Mapper
Out of the many apps to choose from, Joystick Mapper is our pick. And at only $4.99 from the App Store, it’s real value for money – especially when considering the amount of effort it takes to develop such a complex tool.
Here’s how it works –
Once you download the Joystick Mapper app, you need to create a pre-set for your game preferences. To do this, open the app and click ‘Add new pre-set’.
Enter a name for future reference such as ‘My Game’, and for each joystick, click ‘Add a new joystick’.
Now that you’ve identified the joystick, you need to ‘bind’ joystick inputs to keyboard or mouse movements — which is easier than it sounds.
Click on ‘Add new bind’, and then ‘Scan’, and press the button of your game controller that you’d like to use. Next select a mouse or keyboard action, and that will ‘bind’ the chosen inputs.
Simply repeat this process until you’ve bound all the buttons you’d like to use.
If by chance you’re using a controller other than an Xbox 360 or Xbox One, you can replicate these actions and apply them to different controllers. To do this, simply click the ‘Clone’ icon in the top right corner. To put the pre-set into action, set a checkmark before the preferred pre-set/profile you’ve created for the game you’re about to play. Now, you’re good to go!
BUT – don’t close the Joystick Mapper app before starting the game, it needs to keep running to work. Simply select ‘cmd + H’ to hide the window.
Declutter your Mac to make more room for games
Remember, all of these processes won’t work as effectively if you have a messy Mac.
On average, there is a whopping 62GB of junk found on Macs, with jam-packed caches and folders full of useless documents cluttering the hard drive.
This considerably slows down the performance of your Mac, preventing quick and easy installations, and can even hinder the controller connectivity.
CleanMyMac X is an app dedicated to cleaning your Mac head-to-toe. It scans everything on the computer — even old folders that have been evading your wrath for years — identifying what needs to be removed.

The Mac is inspected rigorously, and with its smart one-click clean-up, CleanMyMac sweeps away the unwanted rubbish to organize folders and speed up performance.
Furthermore, CleanMyMac X is free to download. So, what are you waiting for? Download it for free here.
Источник


