- Как начать разрабатывать под iOS
- Установка Xcode
- Patch Xcode
- Первый шаг в разработке приложений под Mac. Обзор и установка Xcode.
- Xcode IDE
- Interface Builder
- Instruments and Shark
- Что такое Cocoa
- Где взять Xcode
- Xcode install (on MacOS)
- About Xcode
- Overlapping installers
- What Has Been Installed?
- Delete first
- More version information
- Xcode Version
- Swift version
- UnInstall Command Line Tools
- Install Command Line Utilities only
- Xcode IDE install from Terminal
- A) Initial install from Terminal CLI
- After starting again
- B) Initial IDE install using web App Store
- Xcode size
- Xcode IDE Upgrade
- Xcode FileMerge tool
Как начать разрабатывать под iOS
Как начать разрабатывать под iOS и Mac OS? Такой вопрос нередко встречается на форумах посвященных программированию. В большинстве случаев ответы на такой вопрос, это: установить на мак Xcode, скачать SDK, взять книгу по Objective-C и вперёд. Но новичку в разработке под мак, перед собственно самим программированием, встретится несколько неприятных моментов. Например: а что если нет мака?
Если мака нет, его можно конечно купить. Но можно использовать бюджетный вариант и запустить Mac OS в виртуальной машине. Я использовал вот эту сборку для VMware на довольно не мощном компьютере. Процесс установки виртуальной машины пропустим, об этом можно прочитать на самом рутрекере.
Установка Xcode
После запуска мака, нужно установить среду разработки Xcode. Для этого заходим в AppStore, находим поиском Xcode и устанавливаем. Он бесплатный.

В общем-то всё! Можете начинать делать свои программы и игры. Но тестировать вы сможете их только в симуляторе iPhone или iPad. Для того чтобы протестировать своё приложение на реальном устройстве, вам нужно получить сертификат разработчика Apple, стоит он $99 в год. Но для начала можно использовать бюджетный вариант… 🙂
Patch Xcode
Необходимо пропатчить сам Xcode и каждый проект который вы хотите протестировать на вашем айфоне или айпаде. Для этого, качаем JailCoder и запускаем.
Теперь по-порядку:
- Наживаем «Guided Patch»
- Выполняем инструкции на экране
- Вводим пароль: jailcoder
Xcode пропатчен. Чтобы пропатчить проект, нужно выбрать «Patch My Project» и перенести файл проекта (*.xcodeproj) в окно JailCoder.
И вот, вы сделали свой первый проект «Hello, world!» и готовы запустить его на вашем новеньком айпаде. Если ваше устройство не взломано (jailbreak), то сделать это не получится. Я делал jailbreak по этой инструкции и всё получилось. Если же устройство взломано, то компилируем проект и забираем файл *.app.
Осталось запустить iTunes, подключить устройство к компьютеру, перетащить новый *.app файл в окно iTunes и синхронизироваться.
Вот так можно сэкономить немного денег на покупке мака, сертификата и начать программировать под iOS.
Источник
Первый шаг в разработке приложений под Mac. Обзор и установка Xcode.
Опубликовано 28.11.2009 · Обновлено 07.06.2017
Xcode — это пакет инструментов для разработки приложений под Mac OS X и iPhone OS, разработанный Apple. Последняя версия Xcode 3.2, бесплатно поставляется на дистрибутивном диске Mac OS X Install DVD вместе с операционной системой Mac OS X 10.6, хотя и не устанавливается по умолчанию. Третья версия не поддерживается старыми версиями Mac OS, для которых XCode также доступен бесплатно через Apple Developer Connection. Обновления можно бесплатно скачать на официальном сайте поддержки.
Xcode тесно интегрирован с фреймворком Cocoa. Создается производительная и простая в использовании среда разработки. Его используют и при разработке самой Apple Mac OS X. Этот набор инструментов включает:
- Xcode IDE (для кодирования, создания и отладки приложений)
- Interface Builder (для разработки пользовательского интерфейса)
- Инструменты для анализа поведения и производительности
- Десятки дополнительных инструментов
Остановимся на каждом инструменте поподробнее, а затем установим Xcode.
Xcode IDE
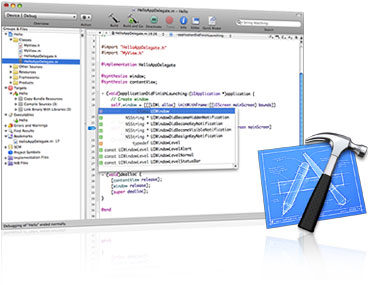
Xcode IDE предоставляет вам все, что нужно: от профессиональных редакторов, с функцией автозавершения кода и Cocoa рефакторинга, до настройки open-source компиляторов. Xcode IDE р азработан с нуля, чтобы вы могли воспользоваться всеми возможностями Cocoa и новейшими технологиями Apple.
Разработка с Xcode позволяет сосредоточиться именно на самом процессе разработки, а не на прочих процессах. Просто нажмите на зеленую кнопку Build and Go , чтобы начать процесс создания вашего приложения. Если будут найдены ошибки в вашем исходном коде, отображается сообщение в виде пузырей. 🙂 После создания вашего проекта, в окне редактора появляется панель отладчик а, и при наведении мыши показываются значения переменных. Если вы разработали приложение для iPhone, Xcode автоматически установит его на устройство.
Interface Builder

Interface Builder упрощает создание пользовательского интерфейса (UI). С его помощью можно легко, без написания кода, создать слои из окон, различные кнопки, ползунки и другие элементы управления. Затем вы можете превратить этот прототип UI в реальное приложение, добавив новые возможности. Xcode работает с Interface Builder в режиме реального времени, так что вы видите в графическом интерфейсе (Interface Builder) то, что вы пишете в Xcode.
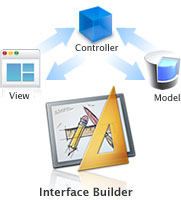
Вы можете легко создавать пользовательские интерфейсы, поскольку Cocoa был построен с использованием шаблона Model-View-Controller (MVC). На самом деле, UI фактически являются архивами объектов Cocoa, которые не требуют генерации кода. Изменения в интерфейсе пользователя (UI) не требуют перекомпиляции (перепроверки) кода, а изменения в коде, не требуют перекомпиляции UI.
Instruments and Shark

Огромный мир Mac и iPhone приложений предоставляет пользователю большой опыт, на который следует опираться при создании своей программы. Приложение должно содержать в себе элегантный пользовательский интерфейс и оптимальную производительность. Developer Tools включает мощные инструменты оптимизации и анализа ( Instruments and Shark ), которые помогут вам найти «проблемные места» в вашем Mac и iPhone приложении.
Есть инструменты и для сбора данных об использование дисков, памяти и процессора вашего Mac или вашего iPhone, подключенного к компьютеру. Собранные данные отображаются графически в реальном времени , что позволяет легко определить проблемные зоны приложения, и затем перейти к проблемным строкам кода.
Эти инструменты помогают создать великолепный пользовательский интерфейс, который будет сопровождаться столь же впечатляющей отзывчивостью.
Что такое Cocoa

Большая часть Cocoa осуществляется в Objective-C. Objective-C — это компилируемый объектно-ориентированный язык программирования корпорации Apple, построенный на основе языка С и парадигм Smalltalk.
Запущенное приложение Objective-C может загрузить интерфейс (Interface Builder автоматически создаст nib файл ), подключиться к Cocoa объектам интерфейса вашего приложения, а затем выполнить построение UI. Нет необходимости перекомпиляции. Поскольку Objective-C является расширением языка С, можно легко «смешивать» С и даже C + + в приложениях Cocoa.
Где взять Xcode
Xcode находится на втором установочном диске Mac OS X. Программа не устанавливается по умолчанию вместе Mac OS X, поэтому попробуйте сделать это сами с диска. Но бывает, что программа уже установлена (путь к Xcode: Macintosh HD › Developer › Application). Если такой папки нет, попробуйте воспользоваться поиском.
Есть 3 версии: только Xcode, только iPhone SDK, Xcode + SDK вместе. На данный момент у меня установлен Xcode + iPhone SDK версии 3.1.2. Получить бесплатно последнюю версию Xcode и SDK можно и на developer.apple.com. Предпочтительнее этот вариант, потому что велика вероятность, что Xcode на диске далеко не последней версии. Но для этого придется зарегистрироваться в сети Apple Developer Network. Она предусматривает несколько вариантов членства, включая бесплатный (на этом уровне закрыт доступ к продажам через магазин iPhone).
Ну вот и все! Первый шаг на пути становления Mac-разработчиком сделан! В этой статье я описал основные характеристики, возможности Xcode и принципы его работы. Далее я расскажу, как сделать свое первое приложение для iPhone/iPod Touch «Hello World». Чтобы случайно его не пропустить и быть в курсе новых материалов сайта, рекомендую подписаться на RSS-ленту или присоединиться к нам в твиттер.
Источник
Xcode install (on MacOS)
Xcode IDE contain Command-Line utilities. But separate Command-Line installer cause errors for use by Homebrew, Python, and other development tools
This tutorial describes the installation and usage of Apple’s Xcode set of utilities for macOS developers.
Xcode is Apple’s free app for developing custom programs for all Apple devices (macOS, iPhone, iPad, Apple Watch). Increasingly, Machine Learning developers are using the Swift language.
Since the Apple Store only handles individual .app files, other mechanisms are needed to install additional programs needed as a pre-requisite by Homebrew, Python, and other development programs.
BTW Xcode only works on macOS. There is no Windows PC version.
About Xcode
Otherwise, read on for a run-around.
Use an internet browser to view Apple’s Xcode marketing page at:
Xcode “includes everything you need to create amazing apps for all Apple platforms. Now Xcode and Instruments look great in the new Dark Mode on macOS Mojave. The source code editor lets you transform or refactor code more easily, see source control changes alongside the related line, and quickly get details on upstream code differences. You can build your own instrument with custom visualization and data analysis. Swift compiles software more quickly, helps you deliver faster apps, and generates even smaller binaries. Test suites complete many times faster, working with a team is simpler and more secure, and much more.”.
BTW the “Apple platforms” include MacOS, iPhone, iPad, Apple TV, and Apple Watch.
Xcode does not come with macOS because of its large size and because many users of macOS don’t need it to do software development.
Developers who use another IDE (such as Visual Studio, Eclipse, etc.) would only need to install Xcode’s command line utilities for the GCC compiler Python needs to build code.
PROTIP: Newer versions of Xcode installer also installs a Git client.
Overlapping installers
Imagine a Venn diagram of overlapping circles:
The Xcode IDE, which can be installed on a Terminal command line interface (CLI) or
Either way, Xcode contains:
- Command Line Utilities which can be installed separately on a Terminal command line session.
PROTIP: Xcode IDE cannot be installed if Command Utilities has already been installed.
However, you can switch:
So choose which one you want installed.
What Has Been Installed?
In a Terminal window, find out what has been installed:
That’s the same command as:
If the Xcode-select command is not found, choose to either install Command Line Tools or install the full Xcode IDE.
You have Command Line Tools installed and not the full Xcode if you see the path where CommandLineTools are installed:
If all you need is Command Line Tools, you’re good to go.
Alternately, if the full Xcode was installed, you would instead see:
Get a list of its folders if Xcode IDE was installed:
The response would be:
Delete first
PROTIP: If you want the full Xcode IDE when you have the Command Line Tools installed, first uninstall Command Line Tools, then install the full Xcode IDE.
More version information
Xcode Version
From within a Terminal, type:
If Command Line Tools was installed, you would see:
If Xcode is installed, you would get a version code that should match up with the Build Number on the Apple web page:
For a more precise version number and other info (macOS Mavericks version and up):
A sample response, at time of writing:
The previous command was constructed based on a search of tools package names:
Get the version of GCC installed:
If Xcode was installed, you would see (at time of writing):
Previously, it was instead:
If Command Line Utilities is installed, you would see (at time of writing):
Identify the path where the make utility Java uses:
a. If Xcode is installed, the response is:
b. If Command Line Utilities is installed, the response is:
c. If no Xcode is installed:
Swift version
Get the version of the Swift program used to develop iOS mobile apps:
Sample response at time of this writing:
If jamf installed Xcode, you’ll also see:
The above appears regardless of whether Command Line Utilities or Xcode is installed.
From here, uninstall and install Command Line Tools or install the full Xcode IDE.
UnInstall Command Line Tools
PROTIP: This is also how you upgrade Command Line Tools.
Go to the parent folder where Command Line Tools is installed:
Get a list of its folders:
If Command Line Tools were installed, the response would be :
Remove all files in that folder, which requires a password for elevated permissions to get all the files:
The response is a lot of files removed (to the Trash).
Now you can choose to either install Command Line Tools or install the full Xcode IDE.
Install Command Line Utilities only
To install the whole Xcode IDE:
You should see this pop up:

Manually click “Install”, “Agree”, then “Install” to the “Updates Available” pop-up.
NOTE: The xGB download takes 13 minutes on a 10mbps line.
When you see “The software was installed.”, click “Done” to dismiss the pop-up.
Xcode IDE install from Terminal
Make sure you have at least 13GB free on your hard-drive before attempting installation.
- Click the Apple icon to select “About this Mac”.
- Click “Storage” tab.
In an internet browser, get to the “Mac App Store Preview” for Xcode at
https://apps.apple.com/us/app/Xcode/id497799835?mt=12

Click View in Mac App Store, then “Open App Store.app” in the pop-up.
Provide your Apple ID and password. Get one if you don’t already have one.
PROTIP: DO NOT install a beta version of Xcode.
The blue “OPEN” icon appears at the upper-right when the app is installed. But don’t click it because we are done.
In Finder, look for Xcode.app in the /Applications folder.
Alternately, on the Touchpad pinch 4 fingers together to click the App Store. Type enough of “Xcode” to filter out others.
To view the version, cursor to the top of the screen and click the program name next to the Apple icon to select “About Xcode”:

A) Initial install from Terminal CLI
Open a Terminal.app console window at any directory to install -all the latest Xcode from Apple:
The response on Catalina version of macOS:
Click the Apple icon at the upper-right corner and select “Shut Down…”.
After starting again
Set Apple’s licensing agreement bit:
Manually agree to the terms.
Get the version number of the new version.
B) Initial IDE install using web App Store
Sign in to Apple Developer with your email address then click the arrow icon. Enter your password, then click the arrow icon.
Below is the “Software Update” approach:
You’ll need to establish an Apple ID if you haven’t already.
Click the cloud icon Download and provide your Apple ID.
Go through Apple’s location verification if prompted.

Confirm your account.
Click “Allow” to the pop-up “Do you want to download?”.
Xcode size
CAUTION: Make sure that your machine has enough free space available.
These are massive files that may take a while to download if you don’t have a fast internet connection.
NOTE: Each version of Xcode is related to a specific version of the Apple OS Mac operating system.
| File | Date | Download | Unpacked |
|---|---|---|---|
| Xcode_12.1 | 2020-10-01 | 10.5 GB | 11.5 GB |
| Xcode_11.5 | 2020-06-01 | 7.5 GB | ? GB |
| Xcode_10.2.1 | 2019-04-17 | ? GB | 6.1 GB |
| Xcode_9.0 | 2017-09-19 | . ? GB | ? GB |
| Xcode_8.2.1 8C1002 | 2016-12-19 | ? GB | ? GB |
| Xcode_8_beta_2.xip | 2016-07-05 | 5.9 GB | 12.32 GB |
| Xcode_7.31 | 2016-05-03 | 3.8 GB | ? |
| Xcode_4.1 | 2014- | 2.9 GB | ? |
| Xcode_3.2.4 | 2014- | 2.? GB | ? |
Switch to Finder Downloads folder to watch progress on the file name ending with “Download”. The one with a clock icon which signifies downloading.
Return to the versions instructions above to view the updated version.
Delete the installer after you’re done, to reclaim disk space.
Xcode IDE Upgrade
Over time, Apple updates Xcode and its command line utilities.
Click the Apple icon, then click System Preferences. Here is an example notification:

Xcode FileMerge tool
Xcode graphically compares files and directories.
Open Xcode. This takes a few seconds.
Right-click on Xcode icon. Select “Open Developer Tool”. Select “FileMerge”.
Источник


