- Команда xinput: опции, ключи и примеры использования
- xfce4-terminal
- Как установить PostgreSQL на Linux и создать базу и пользователя
- Как скопировать вывод команды из терминала в буфер обмена Linux и MacOS
- Как создать неизменяемый файл в Linux / MacOS / FreeBSD
- Как удалить все Docker образы и контейнеры
- Bash вывода && управляющие конструкции || коротко о главном
- Так ли безопасен Linux? Несколько коммитов с уязвимосятми в stable
- Microsoft открывает исходники, а её IDE супер-популярна
- Пример своей консольной команды в Django проекте
- Как на Bash посчитать число строк в проекте (директории)
- Как на Bash получить файлы, изменённые за сегодняшний день
- Как установить часовой пояс в Linux
- Как найти самые большие папки и файлы в Linux
- Команда grep – полезные ключи и примеры использования
- Linux :: два, три, пять… указателей мыши
- Ubuntu Wiki
- Input
- Dynamic Input Configuration with xinput
- Input Configuration with InputClass sections
- Example: Disabling middle-mouse button paste on a scrollwheel mouse
- Contributed Documentation
- Don’t Zap
- Using GNOME
- Using KDE
- Using the command line
- Sticky Keys
- How to Change Mouse and Touchpad Settings Using Xinput in Linux
- List Input Devices
- View Properties of a Connected Device
- Change Properties of a Connected Device
- Making the Changes Persistent
- Conclusion
- About the author
- Nitesh Kumar
Команда xinput: опции, ключи и примеры использования
List available input devices, query information about a device and change input device settings.
- Disconnect an input from its master:
- Reattach an input as slave to a master:
xfce4-terminal
The XFCE4 terminal emulator. Open a new terminal window: xfce4-terminal…
Manual page viewer for X Window System. Start xman in…

Как установить PostgreSQL на Linux и создать базу и пользователя
PostgreSQL — система управления базой данных общего назначения. Одна из самых распространённых баз данных, используемая на многих коммерческих и некоммерческих проектах.
Как скопировать вывод команды из терминала в буфер обмена Linux и MacOS
Скорее приятный, чем необходимы «трюк», но возможность использовать возможность скопировать вывод в буфер обмена – действительно круто иной раз выручает.

Как создать неизменяемый файл в Linux / MacOS / FreeBSD
Само собой, root может всё (если введёт пару команд), однако, это вполне легальный способ запретить изменение файла.

Как удалить все Docker образы и контейнеры
Не всегда нужно удалять всё, но объяснение данного «рецепта» объяснит как в целом удалять образы и контейнеры.
Bash вывода && управляющие конструкции || коротко о главном
Небольшая заметка о конструкциях Bash, в которых путается большинство новичков. А именно: >,

Так ли безопасен Linux? Несколько коммитов с уязвимосятми в stable
Исследователи сумели пройти code-review с реквестами в ядро Linux, заведомо содержащими добавление уязвимостей.

Microsoft открывает исходники, а её IDE супер-популярна
Решил сложить пару фактов и немного над этим поразмыслить. Реально ли Microsoft «переобулись»?

Пример своей консольной команды в Django проекте
Если вы работали с Django проектом, то, скорее всего, запускали команды из консоли (manage.py). В Django есть простой способ писать свои команды для управления проектом.

Как на Bash посчитать число строк в проекте (директории)
Ниже будет представлен однострочник, решающий данную задачу на Bash + пошаговое описание его работы.

Как на Bash получить файлы, изменённые за сегодняшний день
Bash имеет огромные возможности по программированию/скриптованию и администрированию операционной системы. Не важно: Linux это, FreeBSD, или MacOS – на Bash можно сделать многое.

Как установить часовой пояс в Linux
В рамках первичной настройки Операционной Системы важно установить и по какому времени вы живёте, ведь при следующем обновлении времени через Интернет ваше время слетит.

Как найти самые большие папки и файлы в Linux
Когда кончается место на жестком диске, возникает закономерный вопрос: на что же оно было потрачено, какие файлы разрослись больше положенного?

Команда grep – полезные ключи и примеры использования
У команды «grep» довольно много различных особенностей. особенно, если учесть, что с английского это «решето» – а что может войти в решето , не факт что выйдет!
Источник
Linux :: два, три, пять… указателей мыши
Не знаю зачем мне это пригодится, но очень вдруг захотелось иметь два указателя мыши в Linux, ведь две «мыши» у меня есть — собственно беспроводная мышь и тач-пад. Идея пришла в тот момент, когда я подключил вторую мышь, т.е. третье устройство управления указателем.
Сколько мышей, столько и курсоров, но как?
Давайте посмотрим — что скажет нам xinput:
Я честно не знаю — почему USB-свисток от Logitech — выводится дважды. Буду благодарен, если кто-то подскажет — почему.
Но я отвлекся! Из выхлопа видно, что у нас всего 4 мыши:
Для того, чтобы увидеть второй курсор создадим группу:
Теперь на экране ДВА указателя мыши, но второй пока неподвижен, а управляют все три устройства одним и тем же указателем. Давайте скажем X-серверу, что Logitech будет управлять тем самым неподвижным до сих пор курсором. Для этого еще раз посмотрим на
Теперь можно различить две группы устройств ввода. «Virtual core» и «logitech», однако мы видим что устройство logitech до сих пор входит в группу Virtual core. Исправим ситуацию — присоединим устройстов с (Logitech) к группе с (logitech)
Теперь мышь от Logitech управляет ранее неподвижным курсором.
Создадим еще одну группу и присоединим к ней наш тачпад:
После этого мы видим три указателя мыши и управляем каждым с отдельного устройства!
Чем это может быть полезно — пока не придумал. Just for fun — посмотреть в изумленные глаза Windows-пользователя и с гордостью сказать:
Источник
Ubuntu Wiki
Input
Ubuntu supports input-hotplug. With this functionality, it’s likely that you won’t need to do any configuration at all to make your devices work, assuming they’re recognized and set up by the kernel. However, if you do need to do adjust things, read on.
Dynamic Input Configuration with xinput
The xinput command line tool can be used for some on-the-fly configuration adjustments.
To view a listing of the input devices X sees, run:
Individual devices can be queried for more details by using the numerical id or the name:
xinput can also be used to alter the button mappings on mice and adjust the acceleration and feedback settings.
Different input drivers may also expose arbitrary properties for applications to set. Synaptics touchpads are particularly configurable like this, but other devices have some more general properties.
Input Configuration with InputClass sections
To set e.g. the Coordinate Transformation Matrix in an xorg.conf type file (e.g., /etc/X11/xorg.conf.d/90-rotate-screen.conf), set the «TransformationMatrix» option (NOT «CoordinateTransformationMatrix» or «Coordinate Transformation Matrix». ) in an InputDevice or InputClass section; for example:
Example: Disabling middle-mouse button paste on a scrollwheel mouse
Scrollwheel mice support a middle-button click event when pressing the scrollwheel. This is a great feature, but you may find it irritating. Fortunately it can be disabled.
First, you need to know the id of the mouse, like this:
My mouse has the Logitech logo printed on it, so I gather I need the last entry.
I can view the current button mapping thusly:
Really, only the first three numbers have meaning for me. They represent the left, middle, and right mouse buttons.
I can turn the middle mouse button off by setting it to 0:
Or I can turn the middle-mouse button into a left-mouse button by setting it to 1:
To make this set on a per-user basis, I can plug that line into my
/.xstartup or other init file. It can also be done via configuring a matching InputClass section on xorg.conf.
Contributed Documentation
The following documentation was provided by various people in the past. Generally, much of it was written for pre-InputHotplug X, so may or may not still work in Intrepid.
Input Device Coordinate Mapping — How to set the mapping of an input device to a display through X
General Multimedia keyboard — Probably out of date as of Intrepid due to input-hotplug
USB keyboard — Probably out of date as of Intrepid due to input-hotplug
Apple Keyboard — Probably out of date as of Intrepid due to input-hotplug
Game Controller Config
Don’t Zap
Using GNOME
Get to the System->Preferences->Keyboard menu.
If this doesn’t work (e.g. the option is unchecked but the key sequence still works), you can edit your /etc/X11/xorg.conf as explained below
Using KDE
Open System Settings and go to Input Devices.
In the Keyboard section open the Advanced tab.
Check the Configure keyboard options box if it’s not already enabled.
Expand the Key sequence to kill the X server option and check the box labelled Control + Alt + Backspace.
Make sure to click the Apply button to apply the changes.
Using the command line
You can type the following command to enable Zapping immediately.
If you’re happy with the new behaviour you can add that command to your
/.xinitrc in order to make the change permanent.
Sticky Keys
It may be worth mentioning that the Accessibility shortcuts (for both KDE and Gnome) are enabled by holding the shift-key for 8 seconds. (This is easy to do if, say, selecting multiple items with the mouse). As a result, it’s easy to inadvertently enable «Sticky Keys». Now, if you press Ctrl and then release it, and a bit later, you press Alt-Bksp (the shortcut to delete a whole word), then Boom! Bye-bye X-session Sad
Also, unlike Ctrl-Alt-Del, the Ctrl-Alt-Bksp shortcut is not trapped. It’s instant death (without confirmation) for the X-server, and too bad about your unsaved files. That’s why DontZap is a good default.
For anyone missing the ability to kill the X-server in emergency, may I point out Alt-SysRq-R, followed by Ctrl-Alt-F1 (the first puts the keyboard back into Raw mode, i.e. outside the control of the X-server; the latter switches Virtual Terminal.) Or you can use Alt-SysRq-K to kill the current session.
X/Config/Input (последним исправлял пользователь tsimpson 2012-12-21 12:38:00)
Источник
How to Change Mouse and Touchpad Settings Using Xinput in Linux
This article explains changing various options for an input device being handled by the libinput library. To check and configure available options, a command line tool called “xinput” will be used.
Note that this guide works with X display server only. For Wayland, you have to rely on system settings provided by the distribution or use a centralized configuration utility like gsettings.
List Input Devices
Xinput comes pre-installed by default on Ubuntu. If for some reason it is not installed on your system, run the command below to install it:
To list all built-in and external input devices connected to your system, run the command below:
You will see some output in terminal like this:
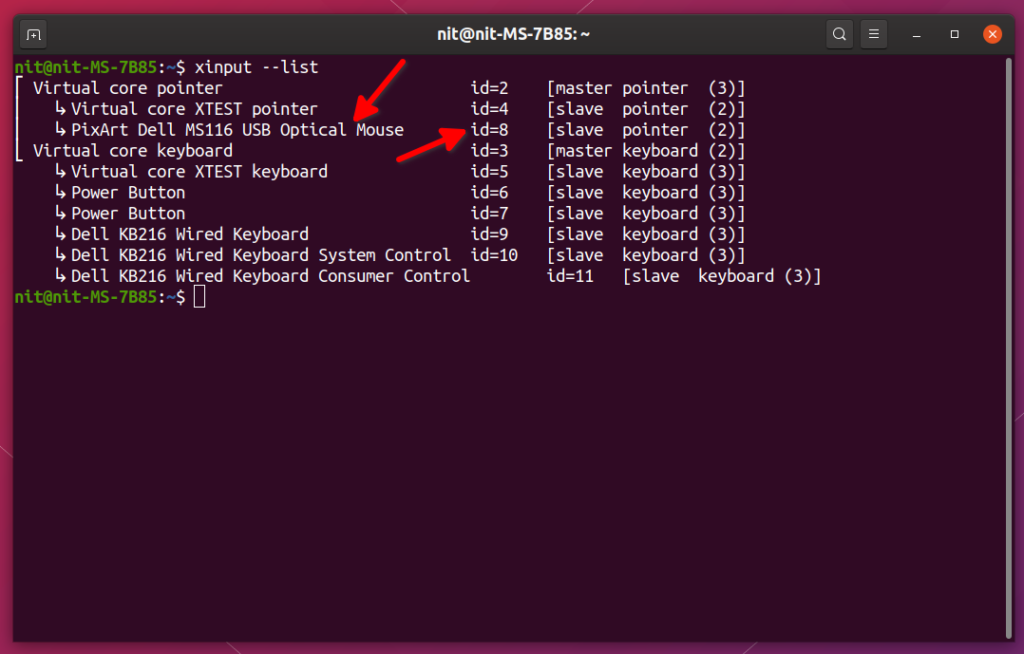
The entry under “Virtual core pointer” (highlighted by red arrows) is a wired USB mouse connected to my system. You will have to use exact name or id shown in the screenshot above to configure mouse or touchpad settings through the xinput command line tool.
Note that in the screenshot above, xinput is showing properties of devices connected to my system. Device names and IDs will be different for your system depending on your hardware configuration and external devices connected via USB, Bluetooth, or wireless receivers.
View Properties of a Connected Device
To see current status and various options active for the device listed above, run a command in the following format:
For the Dell mouse listed above, the command would be:
There is a limitation with using this command. IDs shown in the terminal output tend to change when you connect a listed device to a different port. As the IDs keep changing, there is always a chance of accidentally changing settings for a different device. To overcome this issue, it is better to use full device name as identifier instead of its id. So for the Dell mouse listed above, the better command would be:
The area highlighted below in red rectangle shows current configuration for the device. You can only change options that are shown in the output. Depending on the capabilities of your device, some extra options may be listed while others can be omitted altogether.

Change Properties of a Connected Device
Now that you know how to check the properties of a connected input device, settings for it can be easily changed using some simple commands.
For instance, to enable or disable natural scrolling, you have to run commands in the following format:
“285” is the id for natural scrolling, as shown in the screenshot above. “0” disables natural scrolling while “1” enables it. Once again, using IDs is not a reliable way to change these settings. A better approach is to use the full property identifier.
Note that you are not supposed to touch property identifiers having the word “Default” in it. These are reference fallback values and any attempt to change them will result in xinput throwing an error.
To know more about other options and those listed in the terminal output above, visit the following page.
Making the Changes Persistent
The method explained above changes settings for active session only. When you reboot the system, these changes will be gone. To make them persistent, two approaches can be used.
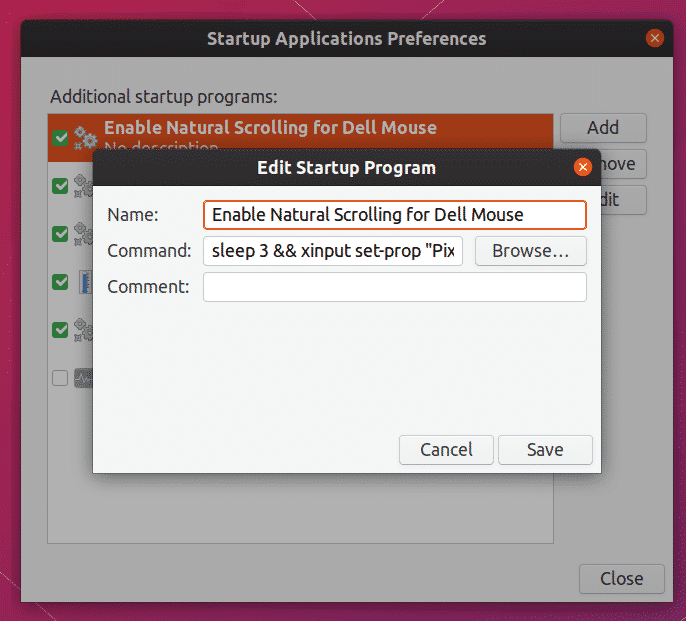
The first method requires you to add these commands to startup applications. You can add as many entries as you want using a nice graphical interface. No root permissions are required to create these entries, plus changing them later is super easy.
To add the command to startup applications, launch “Startup Applications” app from the application launcher. Click on “Add” button to add an entry. Set a description and enter appropriate xinput command as per your needs. Make sure that checkbox is checked once you have saved the entry.
That’s it, the xinput command you have entered will run automatically on system startup. I have added a little bit of delay to the command to wait for the session to load properly. For reference, here is the command used below in the screenshot below:
The second method requires you to run some commands as root and edit a text file. The advantage of using this method is that you don’t have to create separate entries for each option in a GUI and everything just resides in one text file, making it easier to share it between devices.
Run the commands below to create required directory and the conf file:
Notice the “99” part in the filename. It indicates the load order of the files that exist in “xorg.conf.d” folder. A file that has the highest number as prefix will be loaded last, overriding any options specified in previous files in case there are duplicates. By specifying “99” or any other number as a prefix, you can ensure that it is loaded after other files.
Open “99-libinput.conf” file with root access in your favorite text editor. Enter the code snippet below after making necessary changes as per your requirements.
- Identifier “Dell Mouse” can be any name that you assign to the device to identify it (change as needed)
- MatchProduct “PixArt Dell MS116 USB Optical Mouse” is the exact device name you found in the “xinput –list” command used above (change as needed)
- Option “NaturalScrolling” “true” enables natural scrolling system wide (change as needed)
By correctly specifying “MatchProduct”, you will be able to limit the configuration options to a specific device only. Changes made in the conf file will take effect when you reboot next time. You can add any number of options in the “InputClass” section. A list of various options that can be added to the file is available here.
Conclusion
The method explained above is especially useful when you want to use per device configuration rules. Default system settings interface in GNOME and KDE provide only some of the most commonly used options available for various input devices. To configure advanced options for an input device, you have no choice but to either use “xinput” or create a dedicated configuration file.
About the author
![]()
Nitesh Kumar
I am a freelancer software developer and content writer who loves Linux, open source software and the free software community.
Источник


