- Yandex Disk
- Contents
- Installation
- Commands
- Arch Linux User Repository
- Search Criteria
- Package Details: yandex-disk 0.1.6.1074-1
- Package Actions
- Dependencies (4)
- Required by (2)
- Sources (3)
- Latest Comments
- sistematico commented on 2021-06-10 22:09
- flow206 commented on 2021-05-24 17:30
- lybin commented on 2020-01-29 20:47
- timhs commented on 2020-01-29 20:28
- lybin commented on 2020-01-29 10:45
- sistematico commented on 2020-01-29 10:28
- lybin commented on 2020-01-22 11:11
- sistematico commented on 2019-12-23 23:28
- sergeimipt commented on 2019-12-18 14:28
- zkiroel commented on 2019-12-18 11:42
- Yandex Disk (Русский)
- Contents
- Установка
- Команды
- Arch Linux User Repository
- Search Criteria
- Package Details: yandex-disk 0.1.6.1074-1
- Package Actions
- Dependencies (4)
- Required by (2)
- Sources (3)
- Latest Comments
- ziggi commented on 2017-05-03 20:55
- mexus commented on 2017-05-03 19:17
- Установка Яндекс Диск в Linux
- Установка Яндекс Диск в Linux
Yandex Disk
Yandex Disk is a free cloud storage service created by Yandex that gives you access to your photos, videos and documents from any internet-enabled device. The Yandex Disk client console lets you:
- synchronize files and folders with your Disk,
- get public links to files and folders,
- customize folder syncing.
Contents
Installation
yandex-disk AUR client for Linux can be installed in from the AUR. Note that it is a CLI client — there is no official GUI for it at the moment. For alternatives see #Unofficial clients.
To setup your proxy, user and local folder, enter
Syncing will start after completing this step, now you are ready to use Yandex Disk.
Commands
You can manage your folder using any filemanager or console.
Full list of commands is available in man yandex-disk or using
Here are some examples of use:
- setup — Launch the setup wizard.
- start — Launch as daemon and start syncing folders. The current sync status is recorded in the file «.sync/status».
- stop — stop daemon.
- status — show daemon status: sync status, errors, recently synced files, disk space status. If FILE is shown, the status for this file will be returned.
- token — receive OAuth token, encode and save it in a special file (by default — /.config/yandex-disk/passwd). If the options -p PASSWORD or —password PASSWORD are not shown, then the password must be entered from STDIN.
- sync — sync the folder and log out (if the daemon is running, wait for syncing to finish).
- publish — make the file/folder public and remove the link to STDOUT. The item will be copied to the sync folder. Use the option —overwrite to rewrite existing items.
- unpublish — removes public access to the file/folder.
Источник
Arch Linux User Repository
Search Criteria
Package Details: yandex-disk 0.1.6.1074-1
Package Actions
| Git Clone URL: | https://aur.archlinux.org/yandex-disk.git (read-only, click to copy) |
|---|---|
| Package Base: | yandex-disk |
| Description: | Yandex.Disk keeps your files with you at all times. |
| Upstream URL: | http://disk.yandex.ru/ |
| Licenses: | custom |
| Submitter: | ziggi |
| Maintainer: | sistematico |
| Last Packager: | sistematico |
| Votes: | 127 |
| Popularity: | 0.26 |
| First Submitted: | 2013-08-27 11:59 |
| Last Updated: | 2021-06-10 22:08 |
Dependencies (4)
Required by (2)
Sources (3)
Latest Comments
sistematico commented on 2021-06-10 22:09
@flow206 thank you very much! Version bumped.
flow206 commented on 2021-05-24 17:30
The build is broken. Failed to download the old version yandex_disk_0.1.5.1039_amd64.deb
And thank you for providing this package!
lybin commented on 2020-01-29 20:47
@timhs, the problem on your side.
timhs commented on 2020-01-29 20:28
I took a look at repo.yandex.ru and it looks like there is only the old yandex-disk_0.1.5.1039_amd64.deb there.
lybin commented on 2020-01-29 10:45
Thank you, also can transfer to a prepare section some commands, Arch unpacks deb already: https://aur.archlinux.org/cgit/aur.git/tree/PKGBUILD?h=upwork
sistematico commented on 2020-01-29 10:28
$ yandex-disk —version Yandex.Disk 0.1.5.1039 © 2019 YANDEX
lybin commented on 2020-01-22 11:11
@sistematico, pls change source url to https:// may be we will solve problem, I think hard cache somewhere.
sistematico commented on 2019-12-23 23:28
sergeimipt commented on 2019-12-18 14:28
it is again 0.1.5.1010 for me. There must be a problem on the Yandex server end. https://repo.yandex.ru/yandex-disk/deb/pool/main/y/yandex-disk
zkiroel commented on 2019-12-18 11:42
well thanks for the repo had to edit pkgbuild for 0.1.5.1010 version, maybe I had to install latest but nwm and change md5, and works like a sharm
Copyright © 2004-2021 aurweb Development Team.
AUR packages are user produced content. Any use of the provided files is at your own risk.
Источник
Yandex Disk (Русский)
Яндекс Диск — бесплатный облачный сервис от Яндекса, который позволяет синхронизировать фотографии, видео и документы между любыми устройствами, имеющими доступ в интернет. Консольный клиент позволяет:
- Синхронизировать файлы и папки на Диске
- Настроить общий доступ к файлам и папкам через ссылки
- Настроить синхронизацию
Contents
Установка
Yandex-disk AUR может быть установлен из AUR. На данный момент доступна только консольная версия клиента без GUI.
Для настройки прокcи, имени пользователя и локального каталога введите:
После этого начнется автоматическая синхронизация. Яндекс Диск готов к использованию!
Команды
Вы можете управлять Яндекс Диском через файловый менеджер или консоль.
Полный список команд для консоли доступен через man yandex-disk или
- setup — запустить мастер первоначальной настройки.
- start — запустить как демон и начать синхронизацию папки. В файл «.sync/status» записывается текущий статус синхронизации.
- stop — остановить демон.
- status — показать статус демона: статус синхронизации, ошибки, последние синхронизированные файлы, состояние дискового пространства. Если указан FILE, будет возвращен статус для этого файла.
- token — получить OAuth токен, зашифровать и сохранить его в специальном файле (по умочанию — /.config/yandex-disk/passwd). Если не указаны опции -p PASSWORD или —password PASSWORD, то пароль требуется ввести из STDIN.
- sync — синхронизировать папку и завершить сеанс (если демон запущен, необходимо дождаться завершения синхронизации).
- publish — сделать файл/папку публичной и вывести ссылку в STDOUT. Объект будет скопирован в папку для синхронизации. Для перезаписи существующих объектов используйте опцию —overwrite.
- unpublish — удаление публичного доступа к файлу/папке.
Источник
Arch Linux User Repository
Search Criteria
Package Details: yandex-disk 0.1.6.1074-1
Package Actions
| Git Clone URL: | https://aur.archlinux.org/yandex-disk.git (read-only, click to copy) |
|---|---|
| Package Base: | yandex-disk |
| Description: | Yandex.Disk keeps your files with you at all times. |
| Upstream URL: | http://disk.yandex.ru/ |
| Licenses: | custom |
| Submitter: | ziggi |
| Maintainer: | sistematico |
| Last Packager: | sistematico |
| Votes: | 127 |
| Popularity: | 0.26 |
| First Submitted: | 2013-08-27 11:59 |
| Last Updated: | 2021-06-10 22:08 |
Dependencies (4)
Required by (2)
Sources (3)
Latest Comments
ziggi commented on 2017-05-03 20:55
> In the systemd service file I’ve found the following line:
> ExecReload=/usr/bin/killall -qw yandex-disk
>
> I really appreciate your work and I beg your pardon, ziggi, but are
> you kidding me? 🙂 Why bother implementing a «reload» command if it
> merely kills ALL the processes that have «yandex-disk» in their names?
>
> There is a wonderful systemctl command named ‘reload-or-restart’ that
> restarts a service if it doesn’t have the «reload» command
> implemented, so what you have done is certainly a misuse of the
> ExecReload parameter. If you can prove me wrong please let me know.
I kill the process and him will be started automatically soon.
> Also in the docs they mention that the daemon has to be stopped with
> the command «yandex-disk stop»: https://yandex.com/support/disk/cli-
> clients.html#cli-daemon__cli-commands . There is the «ExecStop»
> parameter (man 5 systemd.service) which one can utilize to achieve the
> desired behaviour. Well I guess nothing bad will happen if the daemon
> is stopped with the SIGTERM signal, but nevertheless.
«yandex-disk stop» doesn’t kill the systemd daemon.
> And I can’t keep myself from mentioning the «RestartSec» parameter
> which is set to 60. Do you have any special reason to override the
> default systemd behaviour? I mean, is anything bad going to happen if
> it is restarted with, let’s say, a second timeout?
Yes, without some delay daemon won’t start. And I don’t know exactly how much him need.
> The last but not the least. You have that weird shell script that
> apparently parses the configuration file and appends the parsed values
> to the yandex-disk command line. Well, to begin with, it happily
> parses all the commented lines producing stuff like `—#proxy=socks4`.
> And why did you even bother with that? The daemon reads that file by
> default (unless you specify the «-c»/»—config» option).
Because «-c» option is not supported with «—no-daemon» mode. But I found the way how it can be fixed.
P.S. This service works good but if you want to suggest any changes — just show me your service configuration file. Because any program has specific behavior and any decision has specific causes. Anyway, thanks for reporting.
mexus commented on 2017-05-03 19:17
In the systemd service file I’ve found the following line:
ExecReload=/usr/bin/killall -qw yandex-disk
I really appreciate your work and I beg your pardon, ziggi, but are you kidding me? 🙂 Why bother implementing a «reload» command if it merely kills ALL the processes that have «yandex-disk» in their names?
There is a wonderful systemctl command named ‘reload-or-restart’ that restarts a service if it doesn’t have the «reload» command implemented, so what you have done is certainly a misuse of the ExecReload parameter. If you can prove me wrong please let me know.
Also in the docs they mention that the daemon has to be stopped with the command «yandex-disk stop»: https://yandex.com/support/disk/cli-clients.html#cli-daemon__cli-commands . There is the «ExecStop» parameter (man 5 systemd.service) which one can utilize to achieve the desired behaviour. Well I guess nothing bad will happen if the daemon is stopped with the SIGTERM signal, but nevertheless.
And I can’t keep myself from mentioning the «RestartSec» parameter which is set to 60. Do you have any special reason to override the default systemd behaviour? I mean, is anything bad going to happen if it is restarted with, let’s say, a second timeout?
The last but not the least. You have that weird shell script that apparently parses the configuration file and appends the parsed values to the yandex-disk command line. Well, to begin with, it happily parses all the commented lines producing stuff like `—#proxy=socks4`. And why did you even bother with that? The daemon reads that file by default (unless you specify the «-c»/»—config» option).
Источник
Установка Яндекс Диск в Linux
У многих компаний существуют свои облачные хранилища, на которых вы можете бесплатно хранить свои файлы. Такое хранилище есть у Google, Mail.ru, DropBox, Mega, а также у Яндекса. В отличие от Mail.ru, у которого больше нет полноценного клиента для Linux у Яндекса такой клиент есть, правда, работает он только через терминал.
В этой небольшой статье мы рассмотрим как установить Яндекс Диск на Linux и как пользоваться программой для синхронизации локальной папки с удалённым диском. Мы рассмотрим все действия на примере Ubuntu.
Установка Яндекс Диск в Linux
Сначала надо добавить официальный репозиторий диска в Ubuntu. Для этого выполните такую команду:
echo «deb http://repo.yandex.ru/yandex-disk/deb/ stable main» | sudo tee -a /etc/apt/sources.list.d/yandex-disk.list
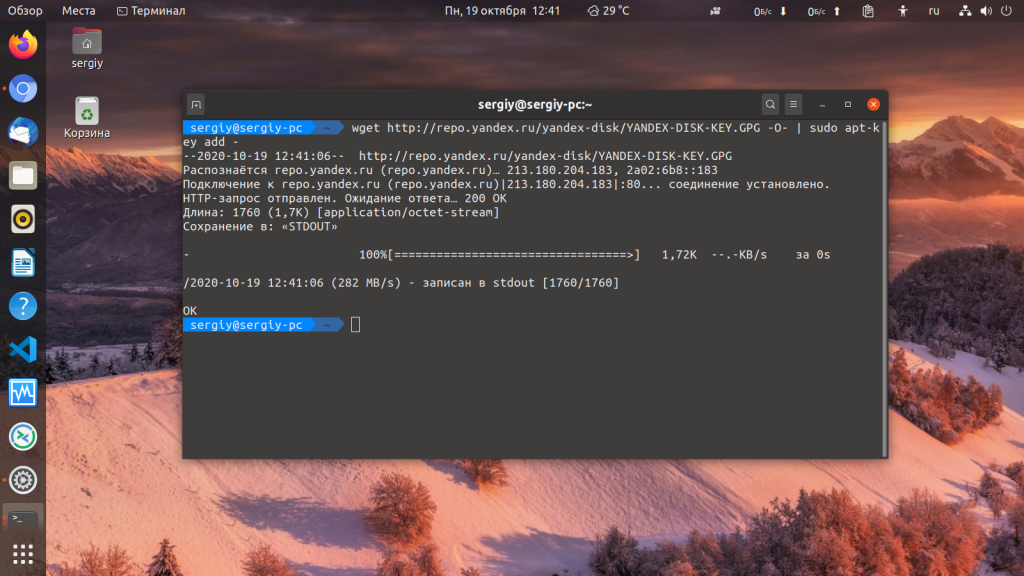
Затем добавьте в систему ключ этого репозитория:
wget http://repo.yandex.ru/yandex-disk/YANDEX-DISK-KEY.GPG -O- | sudo apt-key add —
А потом обновите список пакетов:
sudo apt update
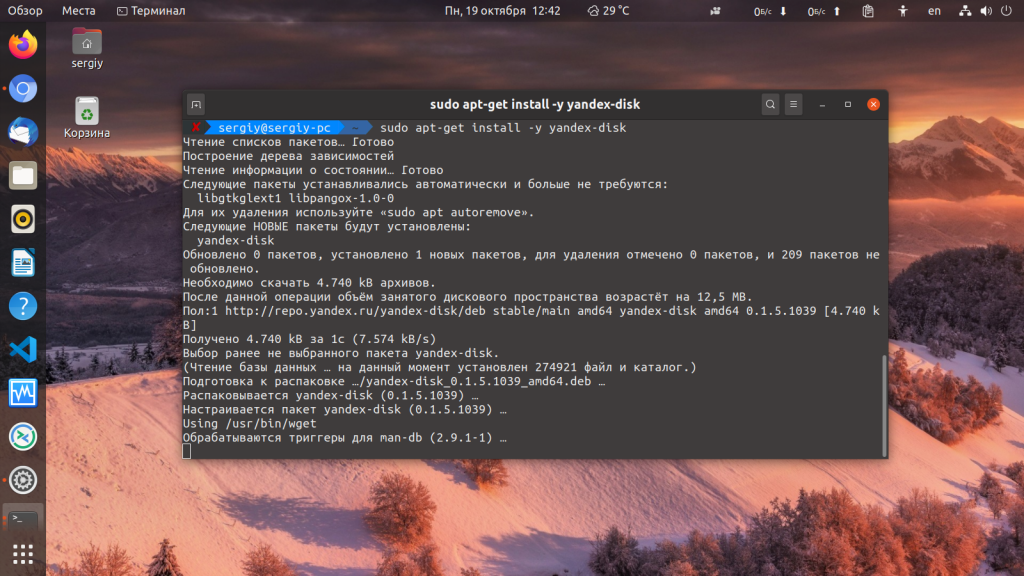
Установка Яндекс Диска Linux выполняется командой:
sudo apt install yandex-disk
Этот способ будет работать не только для Ubuntu, но и для всех дистрибутивов, основанных на Debian и использующих файловый менеджер apt. Если вам надо установить программу в CentOS или Fedora добавьте такой репозиторий Yandex Disk:
sudo vi /etc/yum.repos.d/yandex.repo
[yandex]
name=Yandex
failovermethod=priority
baseurl=http://repo.yandex.ru/yandex-disk/rpm/stable/$basearch/
enabled=1
metadata_expire=1d
gpgcheck=1
gpgkey=http://repo.yandex.ru/yandex-disk/YANDEX-DISK-KEY.GPG
Затем импортируйте ключ репозитория:
sudo rpm —import http://repo.yandex.ru/yandex-disk/YANDEX-DISK-KEY.GPG
И установите программу:
sudo yum install yandex-disk
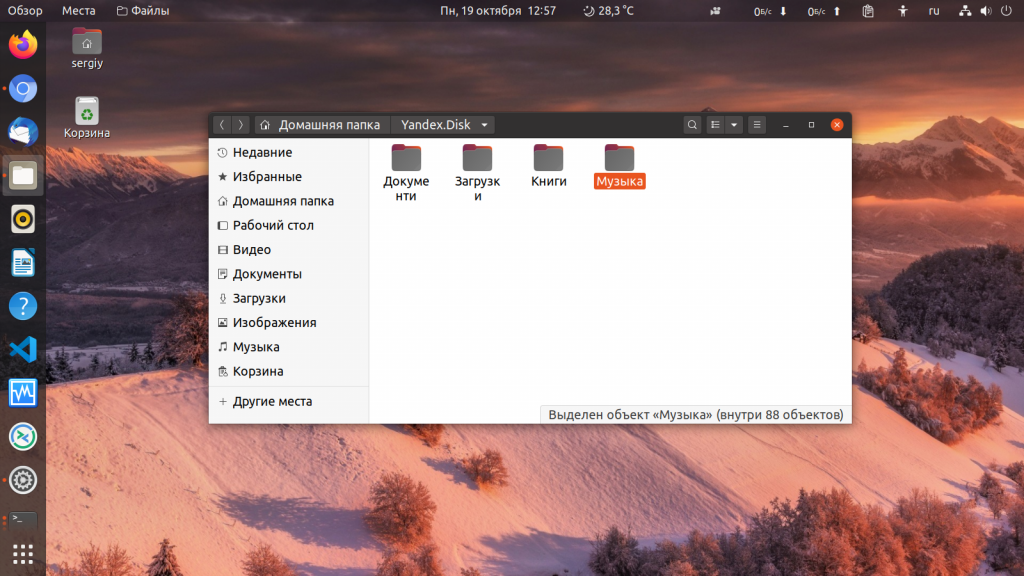
Когда программа будет установлена, её надо настроить. Для того чтобы подключить Яндекс Диск выполните эту команду:

Утилита спросит нужно ли использовать прокси. Если вы живете в России и никаких ограничений для доступа к яндексу нет, то прокси можно не использовать. Потом надо ввести логин и пароль от вашего аккаунта Яндекс, а затем останется только ввести путь к папке, которую надо синхронизировать. Если это поле оставить пустым, то будет выбрана папка по умолчанию — /home/имя_пользователя/Yandex.Disk. Теперь вы можете использовать Яндекс Диск чтобы управлять своими файлами:
Можно, например, создать несколько символических ссылок из этой папки в домашнюю папку и так автоматически синхронизировать файлы или целые папки. К тому же у Яндекс Диска есть приложение, поэтому вы сможете получить доступ к вашим данным и на смартфоне. Теперь вы знаете как выполняется подключение яндекс диска Linux, а также как настроить программу для использования. А каким облачным хранилищем пользуетесь вы? Напишите в комментариях!
Источник


