- yandex.tank
- Tutorials
- Preparing requests
- URI-style, URIs in load.yaml
- URI-style, URIs in file
- URI+POST-style
- Request-style
- Run Test!В
- Results
- Tags
- Autostop
- HTTP and Net codes conditions
- Average time conditions
- Logging
- Results in phout
- Graph and statistics
- Thread limit
- Dynamic thread limit
- Custom stateless protocol
- Gatling
- Getting started
- Getting Help
- What are the Yandex.Tank components?В
- Running Yandex.Tank
- See also
- yandex/yandex-tank
yandex.tank
Установка: если вы обладатель убунты, вам нужно просто выполнить несколько команд: В противном случае вам прийдется сделать больше телодвижений:
Сначала нужно убедиться, что в системе установлены пакеты python-psutil, python-ipaddr, python-progressbar, python-lxml.
Затем нужно забрать по адресу 64-битного репозитария бинарную сборку, состоящую из 2 пакетов — сам яндекс-танк и фантом. Фантом — это веб-сервер, он же высокопроизводительный асинхронный генератор нагрузки , при помощи которого возможно генерировать десятки тысяч HTTP-запросов в секунду, написан на с++. Можно забрать эти два бинаргых пакета также у меня: phantom-0.14.0-pre44.1.el6.x86_64.rpm и yandex-tank-1.4.6-8.noarch.rpm.
После установки этих двух пакетов можно приступать к тестированию. Создаем папку test. В папке создаем файл load.ini, который состоит из секций и параметров. Содержание файла load.ini: В качестве адреса можно использовать как ip-шник, так и полное доменное имя. Танк позволяет создать 3 вида нагрузки: Причём эти виды нагрузки можно комбинировать в одном тесте. В следующей строке описывается профиль нагрузки: Теперь запускаем сам яндекс-танк:
После чего в консольном экране начинает выводиться информация:
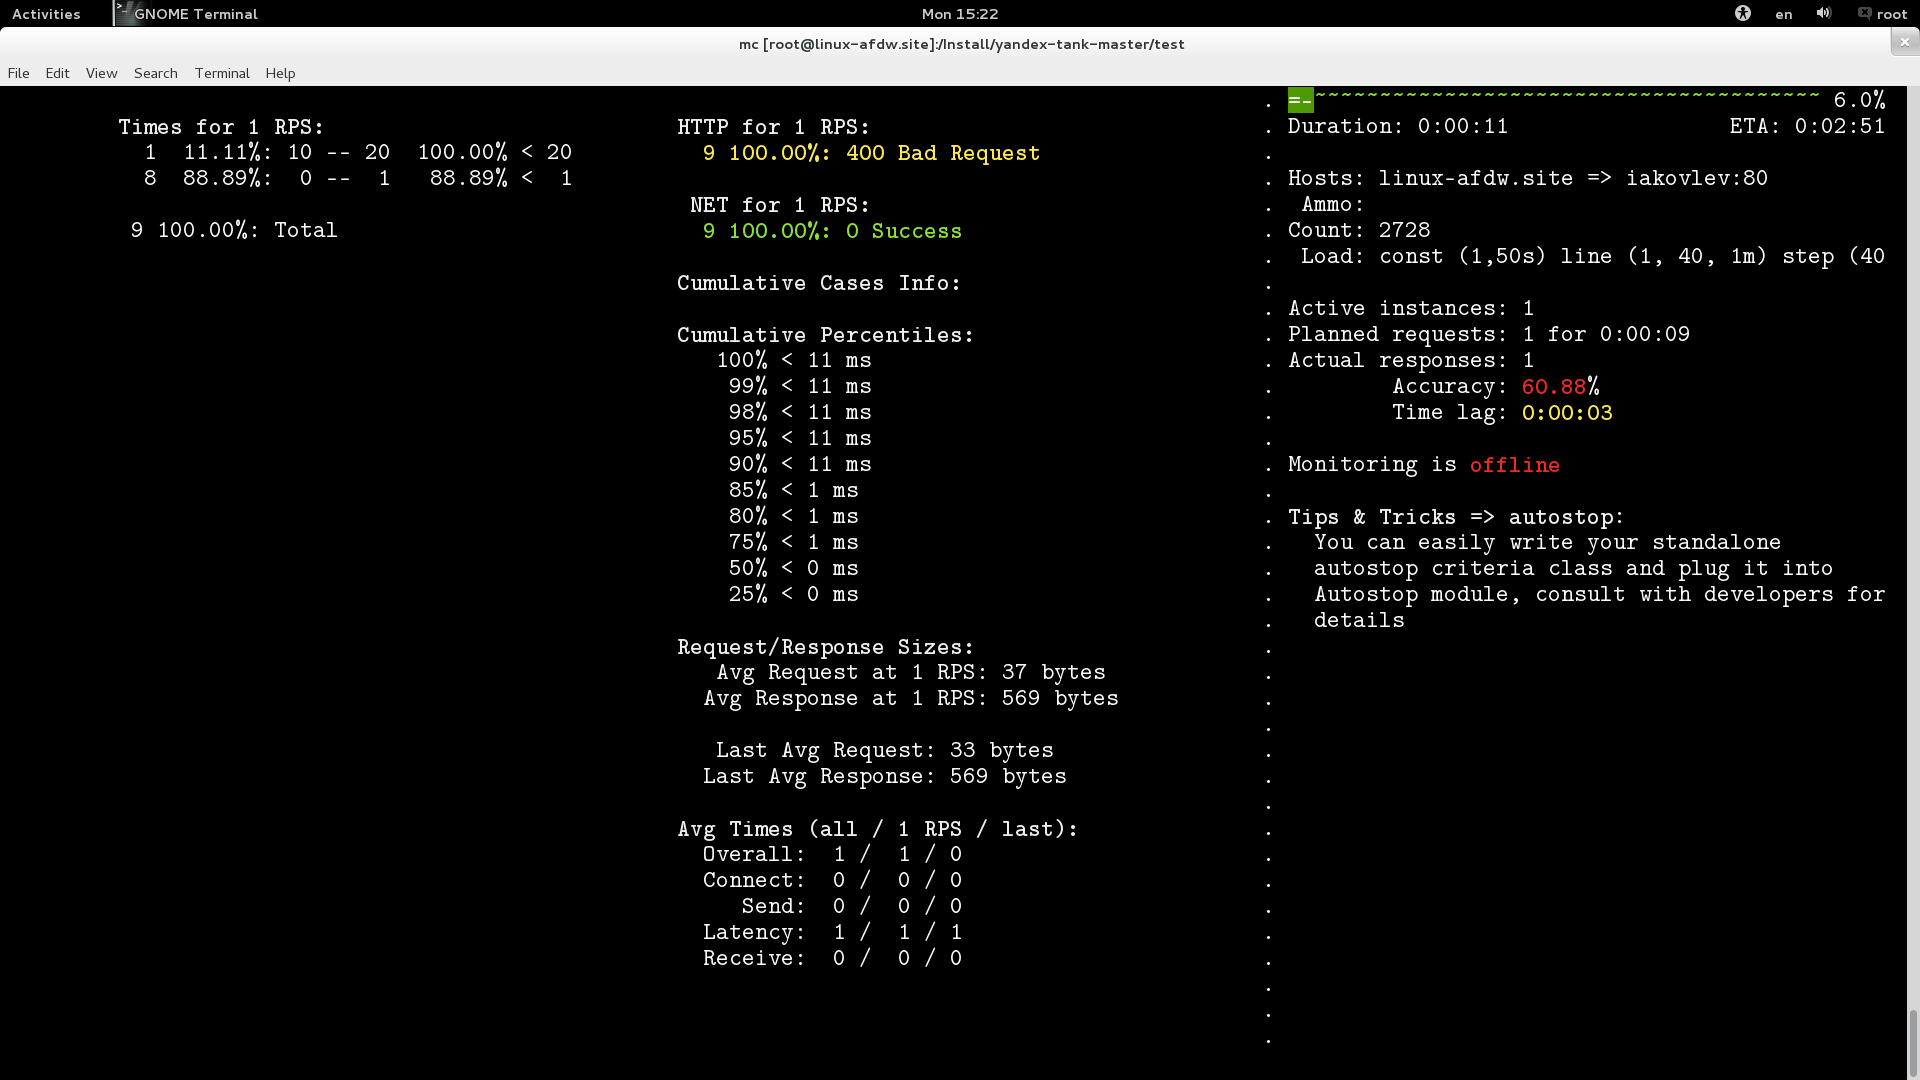
Вот этот кусок вывода — усредненные значения таймингов — т.е. время на коннект и т.д. — в данном случае везде все очень быстро: Cumulative Percentiles — накопительная часть. Times for 1 RPS — линейно возрастающая статистика. HTTP for 14 RPS — агрегационная статистика по ошибкам и обьемам запросов.
В правой части экрана — информация о том, куда стреляем, какими патронами, какая нагрузка, Сразу после запуска теста в веб-броузере можно открыть адрес http://localhost:8080/, где в режиме реального времени можно смотреть процесс тестирования.
Все результаты складываются в текущую папку test
Для тестирования урлов по защищенному протоколу ssl можно использовать следующий сценарий:
Перед тем, как начинать тестировать сайт, расположенный не в локальной сети, а в удаленной, сначала убедитесь в том, что путь не очень далек:
Tutorials
So, you’ve installed Yandex.Tank to a proper machine, it is close to target, access is permitted and server is tuned. How to make a test?
This guide is for phantom load generator.
Create a file on a server with Yandex.Tank: load.yaml
And run: $ yandex-tank -c load.yaml
phantom have 3 primitives for describing load scheme:
- step (a,b,step,dur) makes stepped load, where a,b are start/end load values, step — increment value, dur — step duration.
- line (a,b,dur) makes linear load, where a,b are start/end load, dur — the time for linear load increase from a to b.
- const (load,dur) makes constant load. load — rps amount, dur — load duration.
You can set fractional load like this: line(1.1, 2.5, 10) — from 1.1rps to 2.5 for 10 seconds.
step and line could be used with increasing and decreasing intensity:
You can specify complex load schemes using those primitives.
schedule: line(1, 10, 10m) const(10,10m)
linear load from 1 to 10rps during 10 minutes, then 10 minutes of 10rps constant load.
Time duration could be defined in seconds, minutes (m) and hours (h). For example: 27h103m645
For a test with constant load at 10rps for 10 minutes, load.yaml should have following lines:
Preparing requests
Request-style is default ammo type.
Regardless of the chosen format, resulted file with requests could be gzipped — tank supports archived ammo files.
To specify external ammo file use ammofile option.
You can specify URL to ammofile, http(s). Small ammofiles (
/tmp/ , large files will be read from stream.
If ammo type is uri-style or request-style, tank will try to guess it. Use ammo_type option to explicitly specify ammo format. Don’t forget to change ammo_type option if you switch format of your ammo, otherwise you might get errors.
URI-style, URIs in load.yaml
YAML-file configuration: Don’t specify ammo_type explicitly for this type of ammo.
Update configuration file with HTTP headers and URIs:
Parameter uris contains uri, which should be used for requests generation.
Pay attention to the sample above, because whitespaces in multiline uris and headers options are important.
URI-style, URIs in file
YAML-file configuration: ammo_type: uri
Create a file with declared requests: ammo.txt
File consists of list of URIs and headers to be added to every request defined below. Every URI must begin from a new line, with leading / . Each line that begins from [ is considered as a header. Headers could be (re)defined in the middle of URIs, as in sample above.
Example: Request /buy/?rt=0&station_to=7&station_from=9 will be sent with Cookie: test , not Cookie: None .
Request may be marked by tag, you can specify it with whitespace following URI.
URI+POST-style
YAML-file configuration: ammo_type: uripost
Create a file with declared requests: ammo.txt
File begins with optional lines […], that contain headers which will be added to every request. After that section there is a list of URIs and POST bodies. Each URI line begins with a number which is the size of the following POST body.
Request-style
YAML-file configuration: ammo_type: phantom
Full requests listed in a separate file. For more complex requests, like POST, you’ll have to create a special file. File format is:
where size_of_request – request size in bytes. вЂrn’ symbols after body are ignored and not sent anywhere, but it is required to include them in a file after each request. Pay attention to the sample above because вЂr’ symbols are strictly required.
Parameter ammo_type is unnecessary, request-style is default ammo type.
sample GET requests (null body)
sample POST requests (binary data)
sample POST multipart:
sample ammo generators you may find on the Ammo generators page.
Run Test!В
- Request specs in load.yaml – run as yandex-tank -c load.yaml
- Request specs in ammo.txt – run as yandex-tank -c load.yaml ammo.txt
Yandex.Tank detects requests format and generates ultimate requests versions.
yandex-tank here is an executable file name of Yandex.Tank.
If Yandex.Tank has been installed properly and configuration file is correct, the load will be given in next few seconds.
Results
During test execution you’ll see HTTP and net errors, answer times distribution, progressbar and other interesting data. At the same time file phout.txt is being written, which could be analyzed later.
If you need more human-readable report, you can try Report plugin, You can found it here
If you need to upload results to an external storage, such as Graphite or InfluxDB, you can use one of existing artifacts uploading modules Modules
Tags
Requests could be grouped and marked by some tag.
good , bad and unknown here are the tags.
RESTRICTION: utf-8 symbols only
To activate SSL add phantom:
Do not forget to specify ssl port to address . Otherwise, you might get вЂprotocol errors’.
Autostop
Autostop is an ability to automatically halt test execution if some conditions are reached.
HTTP and Net codes conditions
There is an option to define specific codes (404,503,100) as well as code groups (3xx, 5xx, xx). Also you can define relative threshold (percent from the whole amount of answer per second) or absolute (amount of answers with specified code per second).
autostop: http(4xx,25%,10) – stop test, if amount of 4xx http codes in every second of last 10s period exceeds 25% of answers (relative threshold).
autostop: net(101,25,10) – stop test, if amount of 101 net-codes in every second of last 10s period is more than 25 (absolute threshold).
autostop: net(xx,25,10) – stop test, if amount of non-zero net-codes in every second of last 10s period is more than 25 (absolute threshold).
Average time conditions
So, if we want to stop test when all answers in 1 second period are 5xx plus some network and timing factors — add autostop line to load.yaml:
Logging
Looking into target’s answers is quite useful in debugging. For doing that use parameter writelog, e.g. add phantom:
Writing answers on high load leads to intensive disk i/o usage and can affect test accuracy.**
Where metrics are:
size_in size_out response_time(interval_real) interval_event net_code (request size, answer size, response time, time to wait for response from the server, answer network code)
For load.yaml like this:
Results in phout
phout.txt — is a per-request log. It could be used for service behaviour analysis (Excel/gnuplot/etc) It has following fields: time, tag, interval_real, connect_time, send_time, latency, receive_time, interval_event, size_out, size_in, net_code proto_code
contents of phout depends on phantom version installed on your Yandex.Tank system.
net codes are system codes from errno.h, on most Debian-based systems those are:
Graph and statistics
Use Report plugin OR use your favorite stats packet, R, for example.
Thread limit
instances: N in load.yaml limits number of simultanious connections (threads).
Example with 10 threads limit:
Dynamic thread limit
You can specify load_type: instances instead of вЂrps’ to schedule a number of active instances which generate as much rps as they manage to. Bear in mind that active instances number cannot be decreased and final number of them must be equal to instances parameter value.
When using load_type: instances you should specify how many loops of ammo you want to generate because tank can’t find out from the schedule how many ammo do you need
Custom stateless protocol
In necessity of testing stateless HTTP-like protocol, Yandex.Tank’s HTTP parser could be switched off, providing ability to generate load with any data, receiving any answer in return. To do that use tank_type parameter:
Indispensable condition: Connection close must be initiated by remote side
Gatling
If server with Yandex.Tank have several IPs, they may be used to avoid outcome port shortage. Use gatling_ip parameter for that. load.yaml:
© Copyright 2016, Yandex Revision 03aa0d9d .
Getting started
Welcome to Yandex.Tank documentation. Yandex.Tank is an extensible load testing utility for unix systems. It is written in Python and uses different load generator modules in different languages.
Getting Help
What are the Yandex.Tank components?В
- Core — basic steps of test prepare, configuration, execution. Artifacts storing. Controls plugins/modules.
- Load generators — modules that uses and controls load generators (load generators NOT included).
- Artifact uploaders — modules that uploads artifacts to external storages and services.
- Handy tools — monitoring tools, console online screen, autostops and so on.
Using phantom as a load generator for mild load tests (less then 1000rps) an average laptop with 64bit Ubuntu (10.04/…/13.10) would be sufficient. The tank could be easily used in virtual machine if queries aren’t too heavy and load isn’t too big. Otherwise it is recommended to request a physical server or a more capable virtual machine from your admin.
Running Yandex.Tank
1.Install tank to your system Installation
3.And run the tutorial Tutorials
4.If you are skilled enough, feel free to use Advanced usage .
See also
Evgeniy Mamchits’ phantom — Phantom scalable IO Engine
Alexey Lavrenuke’s pandora — A load generator in Go language
Gregory Komissarov’s firebat — test tool based on Phantom
BlazeMeter’s Sense — service for storing and analysing performance test results
© Copyright 2016, Yandex Revision 03aa0d9d .
yandex/yandex-tank
People
Repo info
Activity
fomars on master
fomars on master
Merge pull request #839 from ya… add options for influxdb upload… add documentation for ssl and p… and 3 more (compare)
fomars on master
fix binary ammo & caseline + te… YANDEXTANK-456 fix encoding whi… fix test data ref:bc5f5a0d8f30… and 1 more (compare)
Коллеги, установил последнюю версию танка из мастера, перестал работать мониторинг, какие-то обновления в monitoring.xml нужно сделать или баг?
Баг появился скорее всего после обновления питона, в третьем надо передавать host.encode()
@DrBlast а можно подробностей про авторизацию? Невозможно залогиниться в вебсервисе с OAuth?
плюс еще авторизация в overload сломалась
GET https://login.persona.org/include.js net::ERR_NAME_NOT_RESOLVED
Люди добрые!
Подскажите, почему танк отдаёт какие-то страшные значения времени ответа в несколько сотен мс даже для простой заглушки, отдающей заготовленный ответ https://overload.yandex.net/355519 (в графане через influxdb тоже самое)
Тогда как если прямо во время теста параллельно попробовать постманом, то он отдаёт за пару мс, а если к сервису подключить актуатор, то он тоже показывает нормальные данные с минимальными значениями ответа
вот мой load.yaml
Добрый день! Подскажите пожалуйста, можно ли заставить утилиту выполнять редиректы?
А так же получать и отправлять полученные куки вместе с запросами?
Задача: танк заходит на страницу, получает редирект в ответ, там ему вешается кука, он возвращается обратно. Ожидается что полученная кука будет видна в запросе на вернувшейся странице.
Кто-нибудь знает, как поменять настройки (имя диска и имя сетевого адаптера) telegraf?
В логе проскакивает вот такой конфиг для телеграфа:
А у меня в системе нет eth0. Есть enp0s31f6. Ну и такая же история с NVMe дисками.
@QAProvider аналогичная проблема. Обновление и изначальная установка версии питона с 3.7 и позже не помогла.
В итоге через докер делаем весь запуск, т.к. не нашли способ заинсталлить все это добро. Рекомендую делать тоже самое.
Ребят, а сталкивался кто-то с такой проблемой, пытаюсь нагрузить сервис с mTLS авторизацией.
Из yandex-tank, я получаю 401 ошибку постоянно. С postman с тем же приватным ключем и секртификатом — все ок. Захожу в контейнер, пока идет нагрузка и curl тоже проходит с приватным ключем и сертификатом, что в контейнере, (curl использую без «-k»).
Я даже пересобрал контейнер таким образом:
мой конфиг выглядит так:
что делаю не верно? в логах nginx-ingress-controller получаю:


