- 7 ways to fix Windows Error Recovery on laptops
- You can fix Windows Error Recovery errors using these methods:
- How to fix Windows error recovery on laptops?
- Fix 1: Remove recently added hardware
- Fix 2: Run Windows Start Repair
- Fix 3: Boot into LKGC (Last Known Good Configuration)
- Fix 4: Restore Your HP Laptop with System Restore
- Run a System Scan to discover potential errors
- Fix 5: Recover the Laptop
- Using HP Recovery disc to run the recovery
- Boot from USB recovery drive
- Fix 6: Perform Startup Repair with a Windows installation disc
- Fix 7: Reinstall Windows
- Fix Error Repairing Disk Errors on Windows 10 (Solved)
- How to Fix Repairing Disk Errors
- 1. Using Startup Repair
- 2. Fix Disk Errors using Check Disk Command
- 3. Using PowerShell
- 4. Perform System Restore
7 ways to fix Windows Error Recovery on laptops


- Download Restoro PC Repair Tool that comes with Patented Technologies (patent available here).
- Click Start Scan to find Windows issues that could be causing PC problems.
- Click Repair All to fix issues affecting your computer’s security and performance
- Restoro has been downloaded by 0 readers this month.
You can fix Windows Error Recovery errors using these methods:
- Remove recently added hardware
- Run Windows Start Repair
- Boot into LKGC (Last Known Good Configuration)
- Restore Your HP Laptop with System Restore
- Recover the Laptop
- Perform Startup Repair with a Windows installation disc
- Reinstall Windows
The “Windows error recovery” issue is usually caused by problems such as corrupt system files, a hardware change, or a compromised Boot Configuration Data (BCD). The good news is that all of these are easy to resolve.
In fact, some of the situations generating this error have more than one solution meaning there is a huge chance of cracking the matter.
Now, I will be enumerating each of these fixes in this post hoping to help you finally restore your HP laptop to a working condition.
If possible, make sure that the computer is connected to on a reliable internet network as you execute these steps.
Here are the various methods of diagnosing the Windows error recovery HP laptop (Windows 10, 8.1, 8, 7, Vista).
How to fix Windows error recovery on laptops?
Fix 1: Remove recently added hardware
Adding hardware, for example, a new RAM module can sometimes originate Windows instability problems making your HP laptop to fail to reboot.
Use these steps to rectify whatever issues arose as a result of installing a new hardware:
- Turn off your laptop and remove the AC adapter and its battery.
- Disconnect the newly added device. You may have to reopen the laptop to access whatever hardware you had installed (if it was an internal addition).
- Return the battery.
- Turn on the laptop the usual way.
- The laptop may successfully boot to the desktop and the windows recovery error message will not be redisplayed.
- You can now try to reconnect the device and wait for Windows to recognize it (for an external hardware like a USB webcam).
- For hardware that are installed on the motherboard, the best approach is to ensure that you are installing a compatible device and to introduce the right drivers immediately.
TIP: If you are adding more than one device, it’s advisable to connect one at a time and keep restarting the computer with each addition until you locate the device causing the error. We recommend that you ignore the device generating the error.
- Skip to fix 2 if the error still shows up.
Fix 2: Run Windows Start Repair
You can now attempt to repair a faulty Windows startup process by mending the relevant files.
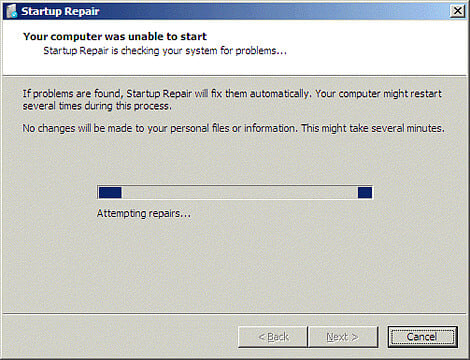
Steps:
- Let the laptop timer countdown to run to zero once the error message appears or just press enter while the launch start repair option is selected. The startup repair interface opens and starts scanning your HP laptop for problems.
- Implement the suggestions made by the startup repair wizard to rectify the pending faults.
- The laptop should soon restart and boot into your normal desktop.
Otherwise, skip to fix 3 if the error fails to go away.
Fix 3: Boot into LKGC (Last Known Good Configuration)
Booting into the last known good configuration is easy and could solve the problem without much fuss. Steps:
- Restart your laptop.
- Press F8 repeatedly until the advanced boot options appear.
- Choose LKGC (last known good configuration -advanced) then press enter.
- Proceed to Fix 4 if the Windows error recovery still persists.
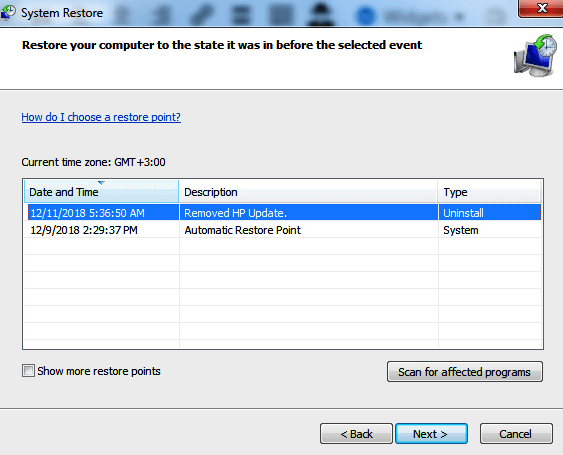
Fix 4: Restore Your HP Laptop with System Restore
Run a System Scan to discover potential errors


Restoring the laptop takes it back to the settings that previously worked. You can execute the system restore directly from the startup repair window if that option pops us. Here is how to initialize restore if the option wasn’t provided:
- Turn off the laptop.
- Turn the machine on (press its power button). Now, start pressing the F8 key as soon as the HP logo appears. Press the said key repeatedly until a startup screen appears.
- Highlight the safe mode option using the up /down arrow keys and press enter .
- Select an administrator user account when the windows login screen displays and enter your password (if any).
- When the desktop appears, press the windows button on the menu then click inside the search bar.
- Type cmd then press Enter .
- At the command prompt window, type rstrui then again press enter . The restore System screen opens.
- Click next then choose the last restore point that worked (from the displayed options) then click next .

- Now click finish then wait for the checkup and restarting process to complete. Again be patient.
- Hopefully, the laptop boots ok and the error disappear.
- Proceed to Fix 6 if no success.
Fix 5: Recover the Laptop

Recovering a HP laptop is equivalent to resetting the computer its factory configuration.
Steps:
- Turn off the laptop.
- Turn it on and press the F11 key repeatedly until the Recovery Manager (Windows 7) opens.
- For Windows 10, it’s until the choose an option window is displayed.
- In Windows 8, it’s until choose your keyboard layout window opens (The laptop restarts).
- Here are the next steps:
- Windows 10
- Click troubleshoot under the choose an option tab
- Click recovery manager on the Troubleshoot tab.
- Click system recovery under help to finally progress to recovery.
- Windows 8
- Click troubleshoot under the choose an option tab.
- Click recovery manager on the troubleshoot window.
- Select Windows 8 to open the all-important recovery manager.
- Now click system recovery for the laptop to be reset to its original factory setup. Another option would be to click the minimized image recovery in order to restore only your windows 8 operating system, drivers, and select software.

- Windows 7
- Click system recovery under the I need help immediately tab.
- Select your preferred backup option when the system recovery asks for your back up preferences.
- Click OK when and if a warning displays.
- Click finish (or continue if its Windows 10/8) to reboot the laptop as soon as the recovery is complete.
- Now go over the typical windows setup until the laptop finishes the fresh reconfiguration.
- Again restart your computer to ensure everything sails smooth.
- You may have to reinstall some or all of your previous software including the antiviruses and business programs (if any) plus any backup files.
- ALSO READ: Fix HP Accelerometer error in Windows 10 with these quick solutions
Using HP Recovery disc to run the recovery
Your HP recovery discs (if you already have them) can also be handy.
Steps:
- Turn on the laptop and then insert your first HP recovery CD/DVD into the drive.
- Turn off the computer.
- Now turn it on.
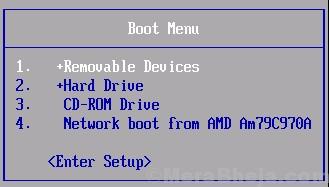
- Press the escape key continuously until a window’s startup menu or the select boot device window opens.
- If you get the select boot device menu, click the correct CD/DVD drive then press enter .
- Else press F9 to access the boot menu/ device option then choose the right CD/DVD drive and press enter .
- If the window requesting you to run recovery from the hard disk appears, choose the “Run program from disc” option and click next.
- Select “Recovery discs created from your computer”/ “Recovery discs received from HP support” option appropriately.
- Select factory reset/ reset the computer by erasing the entire drive and restoring to the factory setup depending on what’s shown on the screen.
- Select a suitable backup optionor otherwise.
- Click OK to hide the warning that appears.
- Follow the steps responding where necessary. Also, insert the next recovery disc when prompted.
- Click finish/next as prompted when the recovery ends .
- The laptop may turn off or restart automatically. If it turned off, wait about 5 seconds before turning it back on.
TIP: The process sometimes takes as long as an hour so practice patience.
- You may have to reinstall some or all of your previous software including the antiviruses and business programs (if any) plus any backup files.
Boot from USB recovery drive
Laptops without a DVD drive will need you to use your HP recovery USB drive.
- Turn on the laptop and insert the recovery USB flash disk into the USB port.
- Now turn off the laptop.
- Turn it back on.
- Press the ESC key continuously until a window’s startup menu or the select boot device window opens.
- The selections you need to make vary slightly depending on the type of menu that displays on your screen:
- For select boot device menu, select the correct USB storage drive then press Enter .
- For the startup menu, press F9 to access the boot menu/ device option. Again select the right USB storage drive and press enter .
- The rest of the steps are as I explained above for CD/DVD.
- Remember to remove the USB drive before restarting the laptop.
Fix 6: Perform Startup Repair with a Windows installation disc
All your methods may fail if there is a critical error with your Windows installation. In such an instance, you need to repair the original windows installation using the disk
Start your computer and insert a working Windows disc into the DVD drive.
- Restart the computer and press F9 (repeatedly) as soon as the HP logo appears until you see the message “Press any key to boot from CD or DVD …”on the screen.
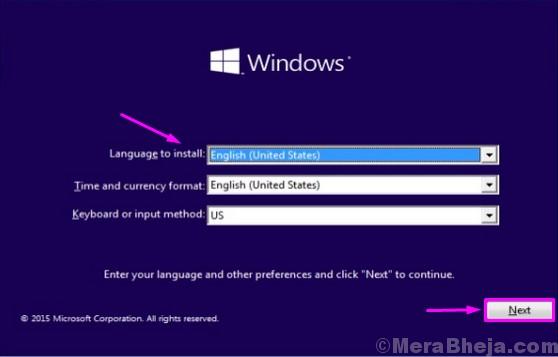
- Select your preferred language, time plus currency, and a favored keyboard/input method, and then click next.
- Choose repair your computer.
- In the next system recovery options window, choose the drive where your Windows installation is and click next.
- Click startup repair in the next dialog.
- Select system restore and follow the steps until the computer is repaired.
Fix 7: Reinstall Windows
Reinstall a fresh copy of Windows if everything else fails.
Fix Error Repairing Disk Errors on Windows 10 (Solved)
August 11, 2018 By Ansh R
Windows 10 comes with a lot of new features. Sure, it is very different from the older Windows OS versions. But, Windows 10 is also very much like its predecessors. Just like Windows XP, Windows 7 and Windows 8/8.1, Windows 10 also comes with a number of errors and bugs.
The latest Windows 10 error which is leaving users scratching their heads is “Repairing disk errors. This might take over an hour to complete”. This is a very annoying error and it shows up on the boot screen. Sometimes the computer will start working after an hour, but the error will most probably show up again. And most of the times it doesn’t even let the Windows to take you to sign in screen.
The error says it is repairing the disk errors and even after waiting for hours, nothing happens. If you are also one of the Windows 10 users who are stuck with this error, you are on the right page. We will help you fix this problem using our methods.
How to Fix Repairing Disk Errors
This error causes the computer to get stuck at booting screen. As we mentioned, sometimes it will let you use your computer. So, some of the methods require you to be logged in on your computer, while others can be performed without signing in. All the details are given below to perform the methods. Simply follow the steps to perform the methods.
1. Using Startup Repair
In this method, we will try to fix this error using Startup Repair. To perform this method, you will need a Windows Installation Media. If you don’t have it, you can create a bootable Windows Installation Media.
If you are unable to sign in, create the Windows Installation Media using some other Windows 10 computer. Make sure to enter the correct version of Windows 10 installed on your computer (the one with disk error) while creating it. When you are ready with the disk/USB drive, follow the steps.
Step 1. Plug in the Windows Installation Media USB flash drive to your computer.
Step 2. Turn on your computer by pressing the power button and start pressing F12 (boot menu option) key.
Step 3. When you see the Boot Menu, use arrow keys to select Bootable USB Drive Name or Removable devices (whichever’s present on screen) or CD-ROM drive and press Enter.
Step 4. Next, you will see the Windows Setup screen. Here, seelct the language and click on Next.
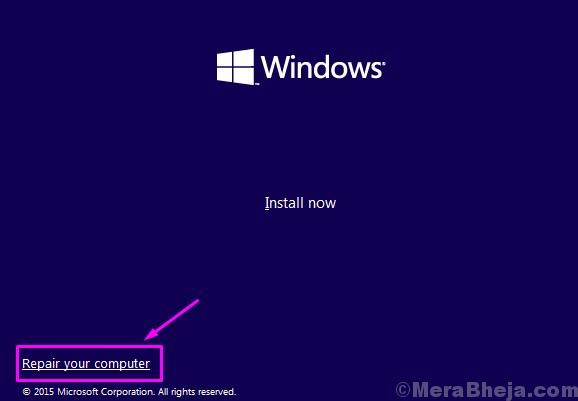
Step 5. Go to Repair your computer.
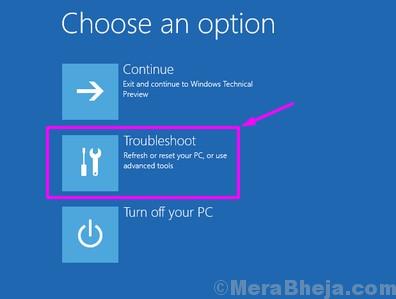
Step 6. Select Troubleshoot in Choose an option screen.
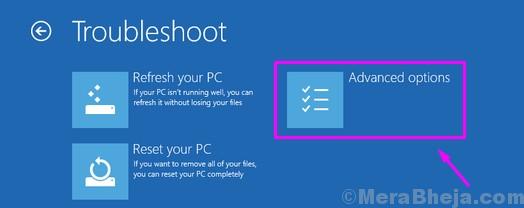
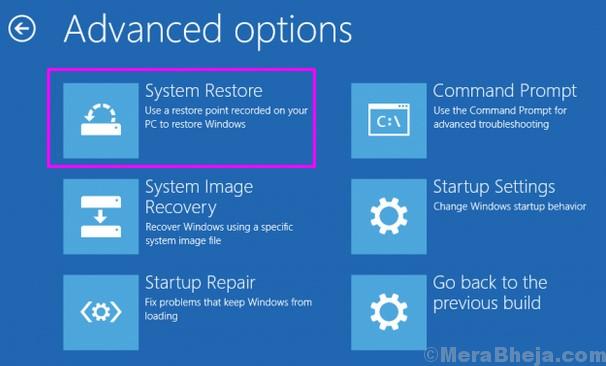
Step 7. Go to Advanced options in Troubleshoot screen.
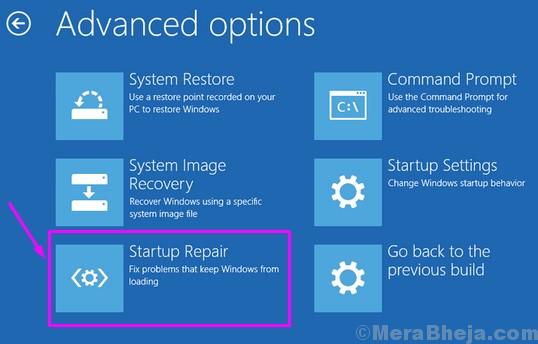
Step 8. Click on Startup Repair on Advanced options screen.
Now, wait for the repairing process to complete. When the process is done, restart your computer. You will no longer see the error. If it is still bothering you, follow the next method.
2. Fix Disk Errors using Check Disk Command
In this method, we will try to solve the problem using the chkdsk command. This command repairs the bad sectors and logical file system, which could be causing the disk error.
Note: To perform this method, you have to be signed in on your computer. So, if you are unable to sign in on your computer, you will have to boot into Safe Mode. To boot into Safe Mode you can use Method 6 from How to Boot Windows 10 into Safe Mode.
When you are signed in on your computer, follow the steps.
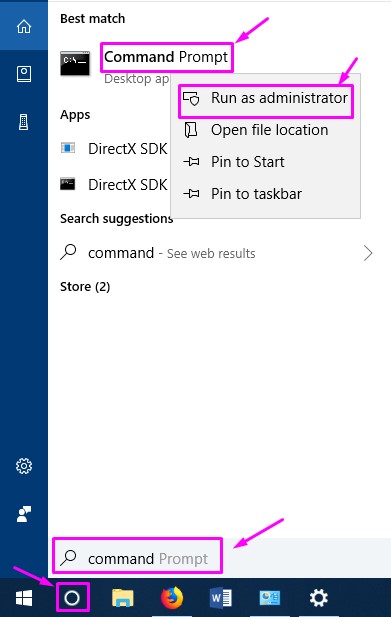
Step 1. Go to Cortana and type Command Prompt. Right-click on Command Prompt from results and select Run as administrator.
Step 2. Now, in the Command Prompt window, you have to enter the following command and press Enter.
Note: here “C” in the command is the drive partition where Windows 10 is installed. If it is installed on some other drive on your computer, then use the alphabet assigned to that drive.
Step 3. When asked if you wish to run the command before next boot, type Y and press Enter.
Step 4. Restart your computer.
When your computer reboots, it will scan and fix the disk errors. Now you will be able to sign in without any errors. If this method didn’t work, follow the next one.
3. Using PowerShell
In this method, we will try to fix the error using Repair-volume command on PowerShell.
Note: To perform this method, you have to be signed in on your computer. So, if you are unable to sign in on your computer, you will have to boot into Safe Mode. To boot into Safe Mode you can use Method 6 from How to Boot Windows 10 into Safe Mode
Follow the steps to perform this method.
Step 1. Go to Cortana and type powershell. Right-click on Windows PowerShell from results and select Run as administrator.

Step 2. Now, enter the following command in PowerShell and press Enter. This command will scan the C drive for errors. If you have Windows installed on another drive, use the respective alphabet in place of C.
Step 3. Now, type the following command and press enter. This command will run a scan and will fix the errors on the drive. Again, if you have Windows installed on another drive, use its letter in place of C.
Step 4. Wait for the process to finish scanning and fixing the disk errors. When it’s done, restart your computer.
The error must be gone by now. If you are still facing the same problem, follow the next method.
4. Perform System Restore
If none of the methods has done the job for you, it’s time to perform a System Restore to the point when your computer was working well. To perform this method, you will need a Windows Installation Media. If you don’t have it, you can create a bootable Windows Installation Media.
Step 1. Plug in the Windows Installation Media USB flash drive to your computer.
Step 2. Turn on your computer by pressing the power button and start pressing F12 (boot menu option) key to acess boot menu.
Step 3. When you see the Boot Menu, use arrow keys to select Bootable USB Drive Name or Removable devices (whichever’s present on screen) or CD-ROM drive and press Enter.
Step 4. Next, you will see the Windows Setup screen. Here, select language and click on Next.
Step 5. Go to Repair your computer on the next screen.
Step 6. Select Troubleshoot on Choose an option screen.
Step 7. Go to Advanced options on Troubleshoot screen.
Step 8. Select System Restore on Advanced options screen.
Now, wait for the process to complete and restore your computer to the earlier working state.
This will fix the error.
In case, even the last method hasn’t worked for you, then your hard drive has malfunctioned. You will need to replace the hard drive. Take your computer to an authorized service centre and ask them to replace the hard drive.
We hope we were able to help you fix this error. If you solved this problem using some other method, or if you have any questions regarding this issue, mention them below in comments.


