- Turn Windows Features on or off: Here’s how to use it
- How do I turn on or off optional Windows features?
- Access this feature from Control Panel
- What features are available to be installed?
- You must use turn windows features on or off in the control panel
- Answered by:
- Question
- Answers
- All replies
- How do you install .NET Framework 3.5 and below in Windows 7?
- Enable and Disable Windows Features
- Windows Vista, 7/8/10
- Windows XP
Turn Windows Features on or off: Here’s how to use it


Windows 10 is a great operating system, but it also comes with several hidden features that you might not know about. All these features are listed in the Turn Windows features on or off section, and in today’s article, we’ll show you how you can enable or disable them.
How do I turn on or off optional Windows features?
Access this feature from Control Panel
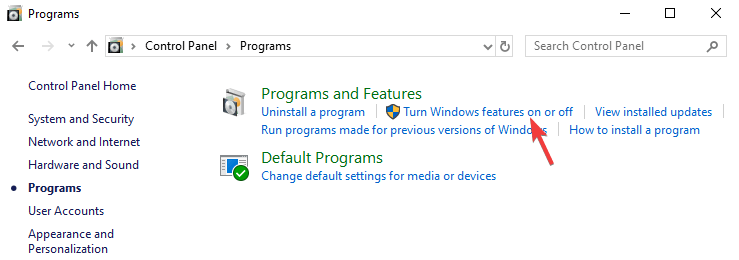
- Open Control Panel and go to Programs.
- Now select Turn Windows features on or off.

- List of features will now appear. Just check the feature you want to install or uncheck the one you want to remove and click OK.
- You’ll be asked to restart your PC in order to apply the changes.
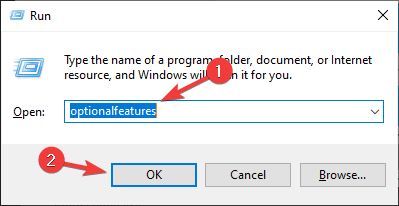
If you want to access this feature quickly, you can use the following method:
- Press Windows Key + R to open the Run window.
- Now enter optionalfeatures and press Enter or click OK.
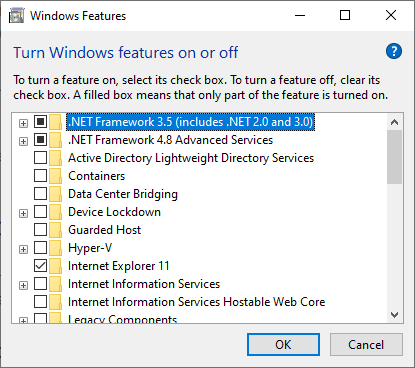
What features are available to be installed?

There are about 30+ optional features available to be installed, but we’re going to focus on several most important ones.
- .NET Framework 3.5 (includes .NET 2.0 and 3.0)and.NET Framework 4.6 Advanced Services– These two features are required in order to run applications created using the .NET Framework 3.5 or 4.6.
- Hyper-V– Microsoft’s virtualization technology that lets you run virtual machines on your PC without third-party software.
- Internet Explorer 11– If you still need to use Internet Explorer on your PC, you should know it’s still available on Windows 10.
- Media Features – This includes Windows Media Player and other multimedia components.
- Microsoft Print to PDF – A feature that lets you “print” your documents straight to PDF files instead of an actual printer.
- Windows PowerShell 2.0 – Command Line interface similar to the Command Prompt, but more advanced.
- Windows Subsystem for Linux (Beta)– This feature gives you the access to the Ubuntu command line and it allows you to use the same commands you’d use on a Linux system.
These are some of the most notable features that you can enable/disable, but there are a lot more available.
There you go, a quick and easy guide on how to use Turn Windows Features on or off on your PC.
As you can see, most of the features available here are made for advanced users, and you most likely won’t have to enable or disable them on your own anytime soon.
We hope you found this article informative and that you now have a better understanding of optional Windows Features.
You must use turn windows features on or off in the control panel
This forum has migrated to Microsoft Q&A. Visit Microsoft Q&A to post new questions.
![]()
Answered by:
![]()
Question
![]()
![]()
When ever I am trying to install .Net framework on my machine (Vista 32 bit machine) it gives above error.
Even after «Turning on or off windows features» through control panel, it continue giving the same error.
Has anybody faced this issue befor?
Answers
![]()
![]()
What .NET Framework version are you trying to install on your machine? Vista already has .NET Framework 3.0 as an OS component in it. So if you are trying to install a version lower than .NET Framework 3.5, you will see this message. All you would need to do in this case would be to goto Control Panel -> Programs and Features -> Turn Windows features on or off -> Check the box next to Microsoft .NET Framework 3.0.
All replies
![]()
![]()
What .NET Framework version are you trying to install on your machine? Vista already has .NET Framework 3.0 as an OS component in it. So if you are trying to install a version lower than .NET Framework 3.5, you will see this message. All you would need to do in this case would be to goto Control Panel -> Programs and Features -> Turn Windows features on or off -> Check the box next to Microsoft .NET Framework 3.0.
![]()
![]()
![]()
![]()
![]()
![]()
![]()
![]()
![]()
![]()
![]()
![]()
![]()
![]()
![]()
![]()
I had exactly the same problem, but i fixed it myself bu going into the windows features and unticking an option that says
«Microsoft .NET Framework 3.5.1»
Unticking this and clicking okay and let it do its thing.. then retry installing .net 3.5
workd for mee 😀
If it works for anyone else then please say soo..
BTW im using windows 7
![]()
![]()
I’am using windows 7 professional
I have that error when i want tick the box on Microsoft .NET Framework 3.5.1
When i tic it its show an error saying «An error has been occurred. Not all of the features were successfully changed».
I also use the cleaner program for the .NET Framework
and also i type in cmd >> sfc \scannow its scaning and nothing happen
hope you make a tutorial about it how to fix it please dude and replay me
and post the link from youtube
or type step by step how to be working
Replay me please with a good solution
![]()
![]()
Solidsnake 89. here ya go . Had the same exact problem. DROVE ME NUTS FOR DAYS. after much searching got clue from another.
Find a computer (my laptop served me well) copied files labled framework and framework 64 (both are win 7 64 bit machines) from C:windows/Microsoft.NET folder. to thumb drive. copy and replace existing files to non working machine in same location.
I WAS THEN ABLE TO CHECK What EVER AND IT WORKS . AND turbo tax then installed also .
![]()
![]()
this way worked for me
but i download 231mb of .net framework 3.5 sp1 from microsoft web site (not 2.7bm)
![]()
![]()
hey sparks i tried to delete the frameworks for replacing them but i couldnt because an error occurs saying that
«you need permission to perform this action
You require permission from TrustedInstaller to make changes to this folder»
I will be waiting for your reply
![]()
![]()
Ah yes the dredded «TrustedInstaller». This is a generic user which is given total Administrative rights for the installation of your operating system at the time it was built by the manufacturer. I have seen this TrustedInstaller user on HP, Dell and standard Windows installs. The way to get around that is to take ownership of your hard drive and give those rights to you, using your current username. This is done by using the security tab in in My Computer. Open My Computer, «right click» on the drive «C» or whatever drive has your operating system on it. Left click properties, there will be seven (7) tabs that open up in a box. Go to the tab that has «Security» on it by left clicking it and brining it to the front, then «Advanced» near the lower right corner of this window. Click on the tab that has «Owner», click on the button that has «edit». This will open a box that should have Administrators and your username in it. Click on your username and it will be come highlighted, then make sure to click in the check box below it «Replace owner on subcontainers and objects:, then click ok. You will probably get two errors, about «pagefile.sys» and another file name of somekind. Just click ok to those and it will change ownership of the drive to your account and that should give you sufficient rights to complete the installation.
![]()
![]()
When ever I am trying to install .Net framework on my machine (Vista 32 bit machine) it gives above error.
Even after «Turning on or off windows features» through control panel, it continue giving the same error.
Solution is that : Open Control panel >>Program(Uninstall a progaram )>>then click at Turn window feature on or off>>uncheck dot net framwork 3.5.
How do you install .NET Framework 3.5 and below in Windows 7?
Perform the steps mentioned below and check if it helps.
1) Download dotnetfx_cleanup_tool.zip from the following site:
2) When you are prompted, click Open, and then click Extract Now.
3) In the files that you extracted, double-click cleanup_tool.exe.
If you are prompted for an administrator password or for a confirmation, provide the password, and then click Continue.
4) In the Do you want to run the .NET Framework Setup Cleanup Utility? message, click Yes.
5) Click Yes to accept the license agreement.
a) In the Product to cleanup window, click the drop-down list, select a .NET Framework version that you want to remove, and then click Cleanup Now.
The cleanup tool does not let you remove the .NET Framework 2.0 in Windows Vista or later versions of Windows because the .NET Framework is installed as an operating system component.
b) After the .NET Framework is removed, restart the computer.
Download and install the following components:
.NET Framework 1.1
.NET Framework 1.1 Service Pack 1 (SP1)
.NET Framework 3.5 SP1 (this will also install the .NET Framework 2.0 SP2 and the .NET Framework 3.0 SP2)
c) Restart the computer.
Note: .Net framework 4 contains all the packages of .Net Framework.
7 people found this reply helpful
Was this reply helpful?
Sorry this didn’t help.
Great! Thanks for your feedback.
How satisfied are you with this reply?
Thanks for your feedback, it helps us improve the site.
Enable and Disable Windows Features
Never use IE? You can uninstall it here!
No matter which version of Windows you use, there is a lot of features that are installed with the system by default, many of which you probably will never use. Disabling Windows features you don’t use can optimize your system, making it faster and saving precious hard disk space.
This article shows you how to enable and disable features in Windows 7/8/10, Vista, and XP.
Windows Vista, 7/8/10
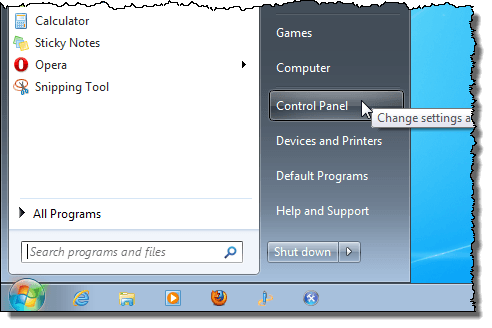
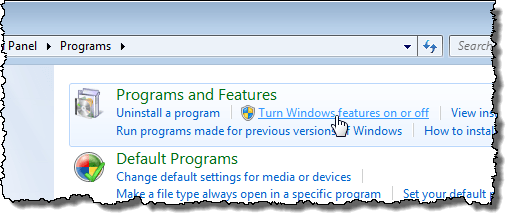
To turn Windows features in Windows Vista to Windows 10 on or off, click Control Panel on the Start menu. You can also click on Start and then type in control panel.
Click the Programs link.
NOTE: If you are in Classic View, the link reads Programs and Features.
Under the Programs and Features heading, click the Turn Windows features on or off link.
NOTE: If you are in the Classic View, the Turn Windows features on or off link is on the left panel.
The Windows Features dialog box displays with a “Please wait…” message, while the features list is loaded.
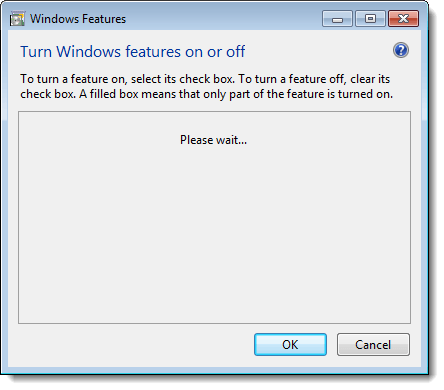
When the list of features displays, you can move your mouse over one of the features and view a description of that feature.
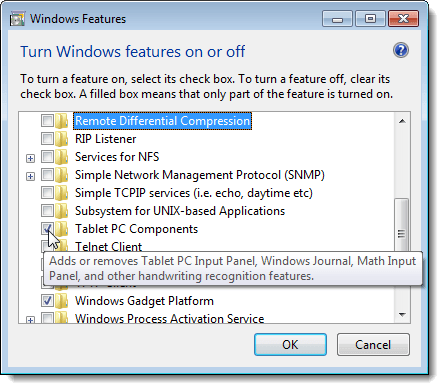
For each feature you want to turn off, select the check box to the left of the feature so there is NO check mark in the box. For example, since we are not using a Tablet PC, we decided to turn off the Tablet PC Components feature, along with some other features we don’t use. Once you have made your changes, click OK to close the Windows Features dialog box.

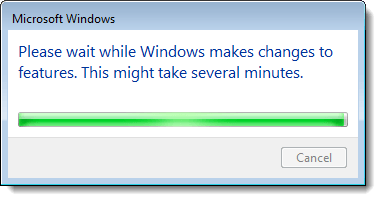
A dialog box displays showing the progress of the changes being made to your Windows system.
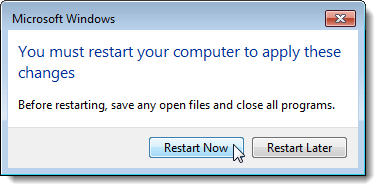
You must restart your computer for the changes to be completed. Click Restart Now if you are ready to restart the computer now. If you want to wait to restart the computer, click Restart Later.
While the computer is shutting down and again while it is starting up, the following message displays. Be sure you don’t shut off the computer while the features are being configured.

Windows XP
To turn Windows features in Windows XP, click Control Panel on the Start menu.
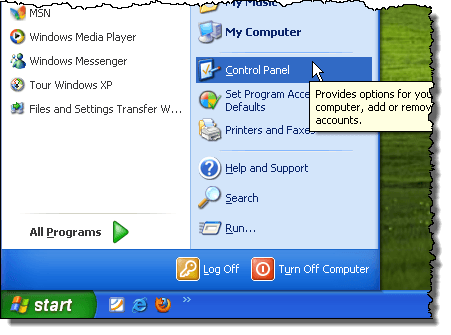
Click the Add or Remove Programs link (or the icon in Classic View) on the Control Panel window.
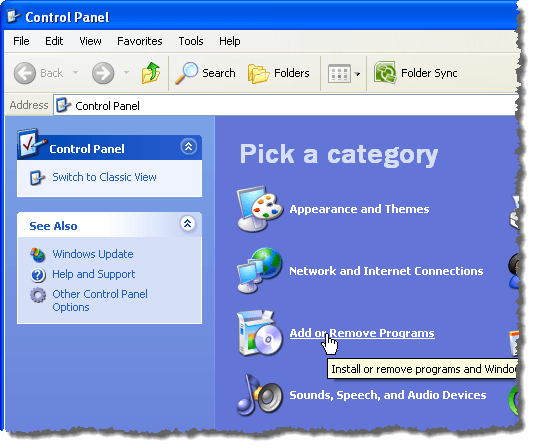
On the Add or Remove Programs dialog box, click Add/Remove Windows Components in the left panel.

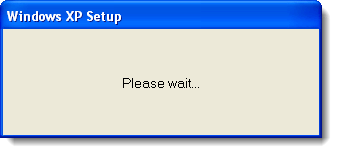
A dialog box displays asking you to wait while the list of Windows features is generated.
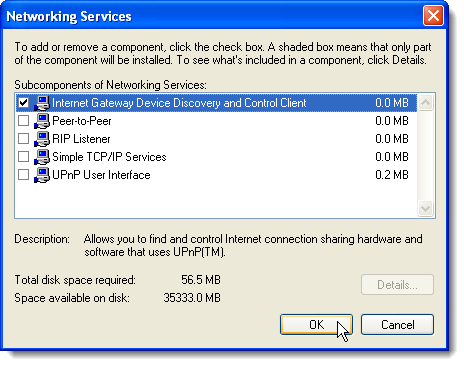
The Windows Components Wizard displays with a list of Components. If the check box to the left of a component has a gray background, there are sub-components within that component. Click Details to view the components under that main component.
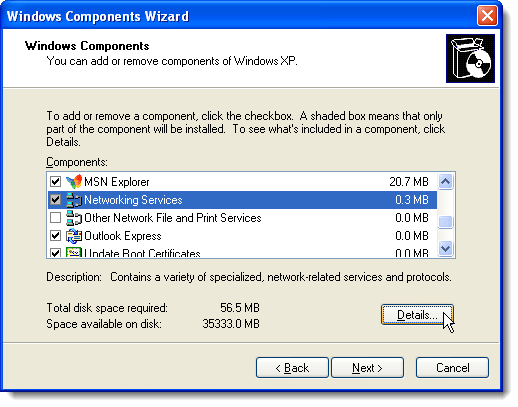
For example, the following dialog box shows the components available under the Network Services main component. You can turn on or off any of these components and click OK to accept your changes and return to the Windows Components Wizard.
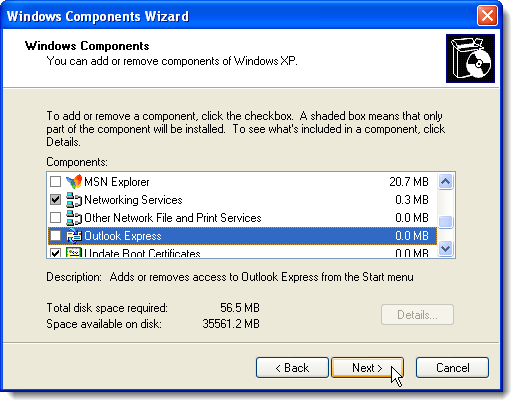
For each feature you want to turn off, select the check box to the left of the feature so there is NO check mark in the box. For example, we are not using MSN Explorer or Outlook Express, in addition to some other features. Once you have made your changes, click Next.
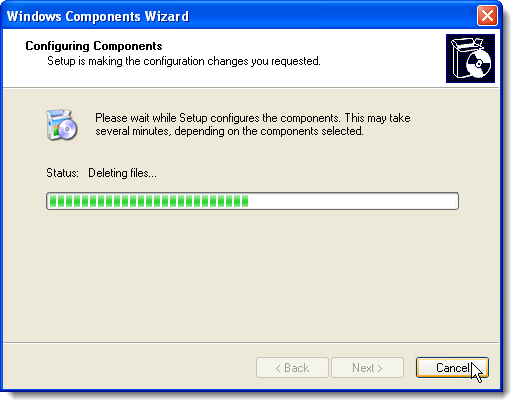
The Configuring Components screen displays the progress of the changes being made to your system.
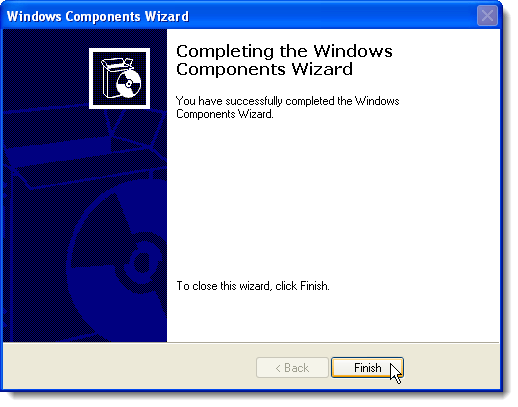
When the changes have been made, the Completing the Windows Components Wizard dialog box displays. Click Finish.
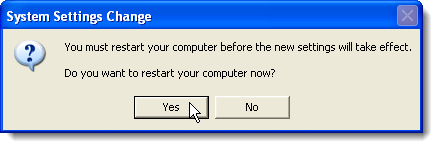
You must restart your computer for the changes to be completed. Click Yes if you are ready to restart the computer now. If you want to wait to restart the computer, click No.
You can turn on any of the Windows features again, if desired, simply by following these procedures and selecting the check boxes for features you want so there is a check mark in each check box. Enjoy!
Founder of Help Desk Geek and managing editor. He began blogging in 2007 and quit his job in 2010 to blog full-time. He has over 15 years of industry experience in IT and holds several technical certifications. Read Aseem’s Full Bio


