- linux-notes.org
- Установка Zabbix-agent в Unix/Linux
- Установка Zabbix-agent в CentOS/Fedora/RedHat
- Установка Zabbix-agent в Debian/Ubuntu
- Установка Zabbix-agent в MacOS X
- Настройка Zabbix-agent в Unix/Linux
- Настройка на стороне zabbix-server
- Настройка на стороне zabbix-agent
- Тестирование
- One thought on “ Установка Zabbix-agent в Unix/Linux ”
- Добавить комментарий Отменить ответ
- Zabbix
- Contents
- Where to use zabbix and alpine
- Zabbix infraestructure
- Part 1 Pre-requisites: php, webserver and database
- 1. The web server: Lighttpd
- Lighttpd Installation
- Lighttpd pre php configuration
- 2. php scripting: PHP fpm
- PHP Installation
- PHP Global Configuration
- PHP-FPM Configuration
- Lighttpd + PHP-FPM
- Multiple PHP-FPM cluster
- 3. The DBMS part: mysql/mariadb
- Installation
- Initialization
- Configuration
- adminer: Web Frontend administration
- See Also
- Part 2: zabbix
- 1. install zabbix packages
- 2. Configure the base service
- 3. Setup and configure web frontend
- Zabbix tools for items maps or scripts
- Zabbix and the Monitored host
- types of monitoring
- Monitoring by Zabbix Agents
- Monitor by SNMP protocol
- DB monitoring
- on the monitored side: DBMS server to monitor
- on the zabbix server side: to configure the monitored host
- Optional: Crash course in adding hosts, checks, and notifications
linux-notes.org

Были статьи о том, как установить zabbix-server в Unix/Linux и сегодняшняя тема, — это установка zabbix-agent-ов.
- 192.168.13.10 — zabbix-server
- 192.168.13.187 — zabbix-agent для CentOS 6
- 192.168.13.175 — zabbix-agent для Debian 8
Установка Zabbix-agent в Unix/Linux
Данная статья, подразумевает то, что имеется zabbix-server и он уже установлен и работает.
Установка Zabbix-agent в CentOS/Fedora/RedHat
Я приводил примеры добавления разных версий репозиториев с zabbix (смотрите статья выше), приведу наглядный пример.
Добавим теперь хотя бы одного агента мониторинга, чтобы проверить работу системы. Устанавливать будем на этот же сервер. Делается это просто:
Нужно еще настроить конфиг с агентом.
Установка Zabbix-agent в Debian/Ubuntu
Я приводил примеры добавления разных версий репозиториев с zabbix (смотрите статья выше), приведу наглядный пример.
Добавим теперь хотя бы одного агента мониторинга, чтобы проверить работу системы. Устанавливать будем на этот же сервер. Делается это просто:
Нужно еще настроить конфиг с агентом.
Установка Zabbix-agent в MacOS X
Скачиваем последнюю версии zabbix_agentd_osx_installer:
PS: Вот полезное чтиво:
Приводим к виду:
Агент запускается автоматически во время следующей загрузки. Для запуска вручную введите:
Если, Launchctl unload не работает, используйте команду ниже:
Собираем zabbix agentd
Вы должны установить инструменты командной строки xcode и PackageMaker.app.
Скачиваем исходный код:
PS: У меня не завелось на новой версии Mac OS X!
Настройка Zabbix-agent в Unix/Linux
Настройка zabbix-agent-а можно несколькими способами:
- Установить агент на нужный хост и потом добавлять вручную на zabbix-server (хорошо подойдет, если имеется не очень большое количество серверов для мониторинга)
- Установить агент на нужный хост и потом настроить «Auto registration» на zabbix-server (хорошо подойдет, если имеется большое количество серверов для мониторинга)
Я расскажу оба варианта.
Настройка на стороне zabbix-server
Подключаемся к серверу где находится сервер и допишем правило:
Именно по 10051 будет ходить заббикс агент на заббикс сервер.
PS: Приведу на всякий случай мои конфиги (без комментариев).
Открываем URL-у заббикса и переходи в « Configuration» -> « Actions «. В поле « Event source» выбираем «Auto registration»:

После этого, нажимаем на «Create action»:
Я создам наглядный пример для Linux хостов:
- Name — В этом поле, прописываем название действия для авторегистрации.
- Conditions — созданные действия.
- New condition — служит для создания действий.
- Enabled — дает возможность включить созданное действие для определения всех Linux хостов.
Это была вкладка с действиями (Action). Переходим на следующую вкладку — «Operations»:
На этой вкладке нужно создать действия которые будет выполняться, если подходит условие:
- Default subject — В этом поле, я ничего не изменял. Оно служит для оповещения ( собственно — это тема).
- Default message — В этом поле, я ничего не изменял. Оно служит для оповещения ( собственно — это сообщение).
- Operations — Описываются некоторые действия. Я создал правило для добавления хоста, применить ему группу и темплейты.
Настройка на стороне zabbix-agent
Для работы с сервером, который установлен локально на этой же машине, больше никаких настроек не надо делать. Если же вы будете устанавливать zabbix agent на удаленную машину, то в файле конфигурации агента /etc/zabbix/zabbix_agentd.conf нужно будет задать следующие параметры:
Вот так выглядит мой zabbix-agent конфиг:
Запускаем агент и добавляем в автозагрузку:
PS: Не забываем выкл\настроить SELinux:
Переходим к тестированию.
Тестирование
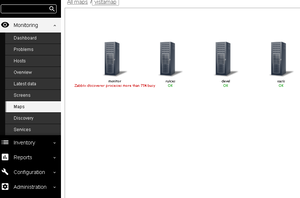
Открываем свой заббикс URL. Переходим в «Configuration» — > « Latest data». Выбираем нужный хост и смотрим что все принимается.
А на этом, у меня все. Статья «Установка Zabbix-agent с добавлением нового хоста в Zabbix» завершена.
One thought on “ Установка Zabbix-agent в Unix/Linux ”
Статья очень помогла. Спасибо Вам большое и удачи во всем.
Добавить комментарий Отменить ответ
Этот сайт использует Akismet для борьбы со спамом. Узнайте, как обрабатываются ваши данные комментариев.
Источник
Zabbix
Zabbix is the most popular monitoring manager in open source world, there’s monitoring itself only like catci, but the hint is that Zabbix is manager also, is ipv6 ready! fully supported, also featured proxy-server for hidden and firewalled networks. Its like nagios one but more big, cutting edge and professional.
In the wiki there are two approaches for its use, the professional one (for servers and deploys) and the fast and simple usage (for developers and/or enthusiasts). For more curses on that (of course focused on alpine) check Complete alpine documentation on english for zabbix curse
This documentation is divided in two big parts.. the prerequisites and the installation of zabbix minimal infrastructure. The first part are in sync with the current alpine wiki pages of Production pages
Note: There is a possibility that this page may have been complexified / obfuscated. See the talk page or review an earlier edit: https://wiki.alpinelinux.org/w/index.php?title=Zabbix&oldid=17984.
Contents
Where to use zabbix and alpine
Since Zabbix it focuses on hosts: So is the right choice for monitoring distributed networks (was originally developed for monitoring servers).
In cases where there is no option to install an agent, Zabbix offers basic agentless monitoring. With it, you can check the availability of network services, as well as execute remote commands
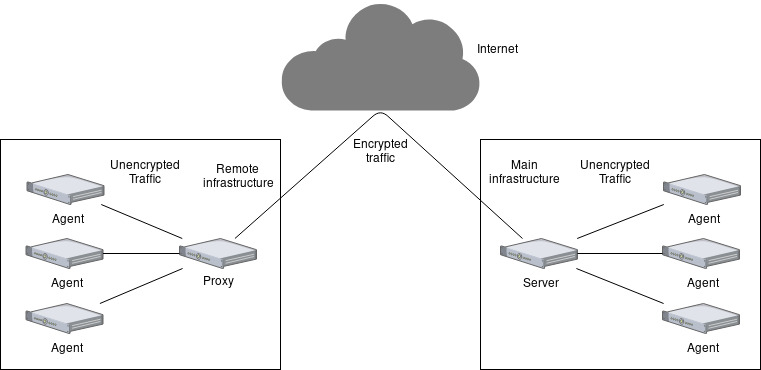
Zabbix infraestructure
Zabbix is divided into two large parts: server(s) and agent(s), and yes «servers» cos can be centralized or decentralized due the «proxyes» semi-servers.
- The servers: represent all the recollected data and has management capabilities. Each one if are more than one, collects and stores statistical data.
- The agents: represent each host, the clients, those machines or devices from which data is collected. Those support both passive (polling) and active checks (trapping).
- The proxys: represent a server that can act as man-in-the-middle for distributed load, cases of hideden networking or firewalled, of course with management capabilities cos act as server for those agents/hosts.
Passive checks mean that the Zabbix server requests a value from the Zabbix agent, and the agent processes the request and returns the value to the Zabbix server.
Active checks mean that the Zabbix agent requests a list of active checks from the Zabbix server and then periodically sends the results.
Part 1 Pre-requisites: php, webserver and database
In production web, LAMP means Linux + Apache + Mysql + Php installed and integrated, but today, more and more, Apache is being replaced by Nginx or Lighttpd and MySQL by Mariadb. The LAMP documents are:
1. The web server: Lighttpd
lighttpd is a simple, standards-compliant, secure, and flexible web server, Nginx is the most used due to beeing manageable by ISP panel’s software, but lighttpd performs better. Nginx cannot process fast-cgi programs. For more lighttpd information, consult the Production Web server: Lighttpd wiki page.
Lighttpd Installation
Production environment will handle only needed packages. So no doc or managers allowed:
- run apk for needed packages
Lighttpd pre php configuration
- make the htdos public web root directories
- change default port to production one, http is used with 80
- use FAM style (gamin) file alteration monitor, increases performance ONLY ON 3.4 to 3.8 releases.
- use linux event handler, increases performance due Alpine are linux only
- added the service to the default runlevel, not to boot, because networking needs to be active first
- started the web server service
- Enable the mod_status at the config files
- change path in the config file, we are using security by obfuscation
- restart the service to see changes at the browser
For testing, open a browser and go to http:// . You will see «it works». The «webserveripaddres» is the ip address of your setup/server machine.
There’s a problem in Alpine linux, FAM (gamin) is activated as a lighttpd only service, that makes sense in docker, but on a server, it could be a problem if FAM (gamin) is also needed for other services at the same time.
OPTIONAL: alpine packagers are a mess, removed FAM on recent, so older releases of alpine can use compiled FAM packages with sed -i -r ‘s#.*server.stat-cache-engine.*=.*# server.stat-cache-engine = «fam»#g’ /etc/lighttpd/lighttpd.conf
2. php scripting: PHP fpm
In Alpine there are two main languages for programming dynamic web pages: PHP and LUA. Alpine is minimalist so not all PHP packages are need in most cases. Both repositories must be enabled (main and community). Here we explain the most common use in production. For PHP development, see the Alpine_newbie_developer wiki page.
PHP Installation
Since version v3.5, PHP 7 is available along with PHP 5.6 coexisting, until version v3.9 where the latter was removed. For Alpine 3.5+m we will assume PHP7, if you need PHP 5.6, you can still use it. That wil be covered in the special Production LAMP system: Lighttpd + PHP5 + MySQL wiki page for older Alpine systems and some specific php software.
A special case is php7-odbc . Unless the others, that are able php to connect to only specific database, unixodbc is a universal way to do so. The most important difference is, for example, the php7-mysqli package has better functions to manage data via php.
PHP Global Configuration
- Use fix.pathinfo
- Set safe mode off
- Dont expose php code if something fails
- Set amount of memory limit for execution to 536Mb (most servers are minimum of 1 GB of RAM)
- Set upload size to 128Mb as maximun.
- Set POST max size to 256Mb based on the upload max size limit.
- Turn on the URL open method
- Set default charset to UTF-8 for increased compatibility
- Increase the execution time and the input time for.
PHP-FPM Configuration
- Create directory for php socket and pid files, MUST BE EQUAL to openrc defined!
- Set into configuration file the socket path, MUST BE EQUAL to openrc defined!
- Set into configuration file the pid file path, MUST BE EQUAL to openrc defined!
The PHP-FPM defines a master process with a process pool for each service request. By default, there’s only one process pool, www.
Default values are good for starting, but will need tuning later. The best is a static one, but testing is needed to get the right configuration.
Lighttpd + PHP-FPM
The web server comes with a minimal config file, so we must handle all the required settings:
- enable the mod_alias at the config file, a specific path is needed for cgi file security
- be sure and disable the fastcgi-php module by cgi only
- and then enable the fastcgi-php-fpm specific module then
- write a much much better approach of the php handler in the local server using the socket
- configure the php to use also the socket for direct connection locally
- restart the service to see changes at the browser
For testing, open a browser and go to http:// /info.php . You will see the info as used in production. There’s no sense givig too much information to crackers. The «webserveripaddres» is the ip address of your setup/server machine.
After that, all the files with php will be procesed faster than used a host based. Under the /var/www/localhost/cgi-bin directory will be shown as http://localhost/cgi-bin/ path.
Multiple PHP-FPM cluster
As we said, FPM is managed by process pools, but the connection can be over a network or over a direct n socket. The configuration for a typical server that can handle an average number requests is with socket and localhost. For high availability, a CAT6 wired network connection of 1000Mbps and php-fpm by network connection in roundrobin mode is needed.
The PHP FPM pool will be on a specific machine and the web server(s) will simply connect to these machines with PHP to serve the PHP pages. The result is a cluster of lighttpd web servers against other PHP-FPM process clusters. The PHP code can be the same on all web servers and can connect to a single database.
At the Linux console the changes are, for example, two machines 10.10.1.10 and 10.10.2.10 both have php and lighttpd, so each will set up the php of the other:
3. The DBMS part: mysql/mariadb
Alpine Linux has dummy counterpart packages for those not changed from mysql to mariadb.
Installation
Take into consideration the user mysql was created during package instalation. In the initialization section two users will be created in database init: root and mysql , and at that point only if they are in their respective system accounts, will they be able to connect to the database service.
Initialization
The datadir located at /var/lib/mysql must be owned by the mysql user and group. You can modify this behavior but you must edit the service file at /etc/init.d directory. Also, you need to set datadir= under section [mysqld] at the config file.
- Initialize the main mysql database, and the data dir as standardized to /var/lib/mysql by the rc script
- Then initialize the service, root account and socket connection are enabled without password at this point
- Set up the root account by asigning a proper password. This is pure paranoia. the next step does just that!
- Set up and init the installation by running the mysql_secure_installation
- Set up permissions for managing other users and databases
- Run the mysql_secure_installation script and answer the questions (see section below)
- Enter current password for root (enter for none): must be provided because we set it previously. Correct response is OK, successfully used password, moving on.
- Switch to unix_socket authentication [Y/n] this must be disabled, so answer NO, and response will be . skipping.
- Change the root password? [Y/n] Just press «n» only if you provided a good password, otherwise change it!
- Remove anonymous users? [Y/n] In any case, production system must remove it, so answer Y and proper respond mus be . Success! .
- Disallow root login remotely? [Y/n] For sure answer Y and proper respond mus be . Success! .
- Remove test database and access to it? [Y/n] Should be removed, so answer Y and proper respond mus be . Success! .
- Reload privilege tables now? [Y/n] Aanswer Y and proper respond mus be . Success! .
After reponse all the questions.. restart the service with rc-service mariadb restart
Configuration
Newer Alpine system packages can set in independent files. In any case, those commands always work and where not applicable, they’ll ignore the output. For more info about that, see the MariaDB Configuration files section of the MariaDB wiki page.
- On older Alpine system you must set config files for MAX ALLOWED PACKETS to minimun proper amount:
- Only allow local connections in cases where there’s only one server or no expected connections from others:
- Set default charset to UTF8MB4
- Add the start service process, but don’t set it as a boot process because networking needs to already be running.
- Restart the service to apply changes.
Upgrading: If you are unable to run any mysql commands after an upgrade, it’s because MySQL cannot start. Try to run MySQL in safe mode with the mysqld_safe —datadir=/var/lib/mysql/ command, then run the mysql_upgrade -u root -p script. For more information see the MariaDB upgrading section of the MariaDB wiki page.
adminer: Web Frontend administration
Adminer is a simple standalone tool, tons of times faster than PhpMysqladmin that is great but has too many security issues and lots of complex settings. We need a single, simpler solution. One that’s easy to manage and upgrade.
Take into consideration this needs as a prerequisite, the previous sections of the web server, php scripting and mysql/mariadb engine configured and running:
The administrator must use the exact URL http:// /adminer/index.php There are two reasons: there’s no directory listing and there’s no direct PHP index reference on the web server, all because of paranoid settings.
See Also
Part 2: zabbix
Zabbix depends on which type of database you will use, here we will show you how to doit with mysql, as more easy to use, for production is recommended posrgresql as in
1. install zabbix packages
Remenber that Zabbix has 3 components, and the server is the main one
- Central servers to represent the data ( can be one zabbix server, o combined zabbix server with more zabbix proxies)
- Clients hosts to monitored (that is made by Agents, SNMP or just ICMP)
- Distributed proxy servers (that is only need for hosts behind firewall or closed networks)
In the server we need the central base service at leas, and of course one agent for monitoring that server:
Now lest configure the server and the UI frontend in that server:
2. Configure the base service
Server zabbix, or proxy one always need a main database, the service of monitoring is running with it, the UI and agents always send the data to the zabbix server or zabbix proxy (and from proxy to server).

3. Setup and configure web frontend
The main server can be managed with the zabbix-frontend:
We do not use the stupid link of direct put on htdocs, we are professional and we use aliasing, now lest configure the webserver to server the frontend by web:
You should now be able to browse to the Zabbix frontend: http://yourservername/zabbix/ or in http://localhost/zabbix.
There’s no need to web setup cos we made all in cli as best hackers admins.
Zabbix tools for items maps or scripts
There’s no complete features in busybox so need more tools, also, Zabbix requires special permissions to use tools
Zabbix and the Monitored host
Zabbix can monitor almost any device system, including Alpine Linux hosts, home computers, celphones, network devices, etc.
types of monitoring
The zabbix agent is a zabbix service that runs on computers and is fully feartured, the SNMP(Simple Network Manager Protocol) is a common standard protocol and is the second most supported, the ICMP(Internet Control Message Protocol) is the most used and simples way but most limited, check the features:
| Feature | By Agent | By SNMP | By ICMP |
|---|---|---|---|
| Ping to check alive (direct ip) | Yes | Yes but with zabbbix proxy if firewall | Only on direct ip, no firewall |
| Retreive data from programs (direct ping) | Yes | Yes but with zabbbix proxy if firewall | No |
| Send commands to manage | Yes | Yes but using zabbix proxy if firewall | No |
| Runs on any device | No, only computers | Mostly any network device | Yes |
| Runs on any OS | YEs, limited in androita and mainframes | Yes | Yes |
| Requires provilegies | Not necesary for most fearures | It depends | No |
Ensure that the readproc group exists (support added since alpine-baselayout-2.0_rc1-r1), by adding the following line to /etc/group:
Monitoring by Zabbix Agents
The agent way to monitoring is the most complete featured, but only applies to computers host, becouse the zabbiz-agent software is only available for those devices, for networking devices you must use ICMP or SNMP (check next subsection).
So, install the agent package and configure it on each host to be monitored/managed (on server too):
Monitor by SNMP protocol
Then in each monitor system, you shoul define a community word due ISP’s always will punish if you used public and open SNMP to world, inclusivelly you shoul protect inside your private network too, so on each host to be monitored you shoul made those commands to configure SNMP (including the zabbix server) using the :
This will allow to any host consult SNMP v2c with word «monitor», but is best you use if have distributed network a SNMP v3 autentiated.
DB monitoring
Due limitations any host server that will have and database, must have and agent aither have behind or not have direct zabbix server/proxy connection.
In this case we used Mysql as example
on the monitored side: DBMS server to monitor
on the zabbix server side: to configure the monitored host
Use the template DB mysql o DB postgresql on the configured host and remenber that hostname in the configured host must be the same in the hostname configured in the agent configuration file of the monitored host.
For most details check the next section crash course:
Optional: Crash course in adding hosts, checks, and notifications
Note: This is optional since it’s not specific to Alpine Linux, but I wanted a couple notes for how to perform a simple check on a server that doesn’t have the agent installed on it, and be notified on state changes.
Administration -> Media Types -> Email
- Setup server, helo, email from address
- Setup each user who’ll get notified, make sure they have media type «Email» added with their address
Configuration -> Hosts -> Create host
- In Linux Servers hostgroup
- Define dns name, ip, connect by IP
- If the machine is a simple networking device that will only be monitored using SNMP, add it to Template_SNMPv2_Device, and you’re done.
Configuration -> Templates -> Create template
- Give it a name (Template_Alpine_Linux_Infra_HTTP)
- In Templates group
Configuration -> Templates -> Template_Alpine_Linux_Infra_HTTP -> Items
- Create Item
- Host: Template_Alpine_Linux_Infra_HTTP
- Description: HTTP Basic Check
- Type: Simple_check
- Key: http,80
Configuration -> Templates -> Template_Alpine_Linux_Infra_HTTP -> Triggers
Источник


