- Установка и настройка zabbix агента в Ubuntu Linux
- Шаг 1: Включите репозиторий Zabbix на удаленном хосте
- Шаг 2: Установка Zabbix агента
- Шаг 3: Настройка Zabbix агента
- Шаг 4: Настройка брандмауэра
- Шаг 5: Добавление Хоста на Zabbix — Server Ubuntu Linux
- Заключение
- How to Install and Configure Zabbix Agents on Remote Linux Systems – Part 3
- Requirements
- Step 1: Install Zabbix Agents in Linux Systems
- On Debian based Systems
- On CentOS based Systems
- Step 2: Configure and Test Zabbix Agent in Linux
- Step 3: Add Zabbix Agent Monitored Host to Zabbix Server
- If You Appreciate What We Do Here On TecMint, You Should Consider:
Установка и настройка zabbix агента в Ubuntu Linux
Zabbix agent устанавливается на удаленном хосте для мониторинга жесткого диска, процессора памяти и т. д. Агент собирает данные и отправляет их обратно на Zabbix — сервер.
Агенты Zabbix могут использовать пассивные или активные проверки для передачи информации. При пассивной проверке Zabbix-сервер (poller) запрашивает у агента определенную информацию, и агент отправляет обратно значение. В активной проверке агент обрабатывает все данные и отправляет их на Zabbix-сервер. Однако агент периодически подключает сервер для сбора метрики, которую необходимо отслеживать.
Эту инструкцию мы начнем с установки Zabbix агента на удаленный хост Ubuntu 20.04, а затем добавим Хост на панель мониторинга Zabbix server.
Рекомендую. к прочтению:
Шаг 1: Включите репозиторий Zabbix на удаленном хосте
Как всегда начните с обновления списков пакетов на удаленном хосте.
Затем загрузите Zabbix файл из репозитория Центра загрузки Zabbix. Делается это следующим образом.
Затем включите его с помощью команды dpkg следующим образом:
$ sudo dpkg -i zabbix-release_5.0-1+focal_all.deb
Далее обновите индекс пакетов Ubuntu, чтобы убедиться, что репозиторий синхронизирован
Шаг 2: Установка Zabbix агента
Как только репозиторий будет создан, установите Zabbix агент в Ubuntu Linux.
После завершения установки проверьте, работает ли демон Zabbix-agent следующим образом:
Zabbix — agent прослушивает порт 10050. Возможно, вы захотите проверить это. Сделать проверку можно с помощью команды netstat:
На изображении выше видно, что Служба Zabbix agent запущена и работает.
Шаг 3: Настройка Zabbix агента
Мы установили агент Zabbix и работает он как ожидалось. Но этого недостаточно. Нам нужно внести несколько изменений в конфигурационный файл. Сделайте изменения в файле /etc/zabbix/zabbix_agentd.conf, чтобы агент мог взаимодействовать с сервером Zabbix..
$ sudo vim /etc/zabbix/zabbix_agentd.conf
Здесь мы собираемся включить пассивные проверки агента. Сначала найдите переменные “server” и “Hostname” в файле zabbix_agentd.conf.
Например, мой IP адрес Zabbix-сервера — 10.128.0.16, а имя хоста (client system).
Сохраните изменения и выйдите из файла. Затем перезапустите службу Zabbix agent для внесения изменений.
$ sudo systemctl restart zabbix-agent
Примечание: Если вы настраиваете активную проверку, то ищите переменную “ServerActive” и используйте порт 10051.
Шаг 4: Настройка брандмауэра
Последним шагом в настройке хоста является разрешение порта, который Zabbix агент слушает через брандмауэр. Если у вас включен брандмауэр UFW, выполните следующие команды:
Затем перезагрузите брандмауэр
А так же убедитесь, что порт был открыт и разрешен на брандмауэре.
Идеально! Теперь zabbix — агент должен работать.
Шаг 5: Добавление Хоста на Zabbix — Server Ubuntu Linux
По умолчанию Zabbix отслеживает только тот сервер, на котором он установлен. В этом разделе мы добавим Zabbix-Host на Zabbix-Server через браузер.
Итак, войдите в свой экземпляр Zabbix-сервера используя браузер.
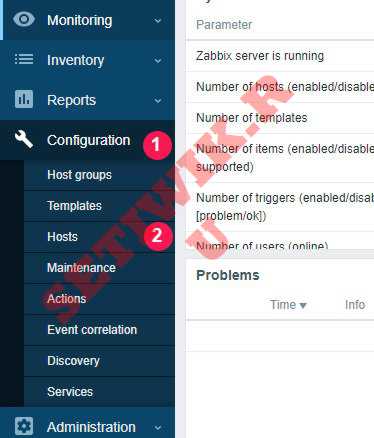
В левой навигационной панели выберите пункт Configuration > > Hosts
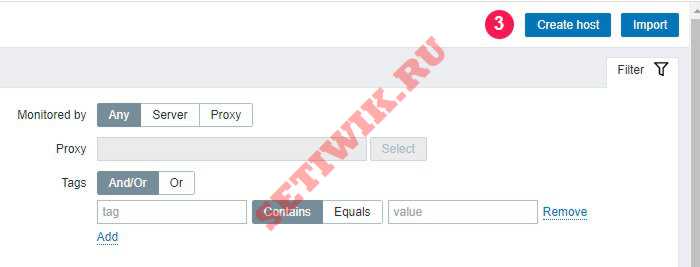
Перейдите в правый верхний угол и нажмите кнопку «Создать хост«. (Create host)
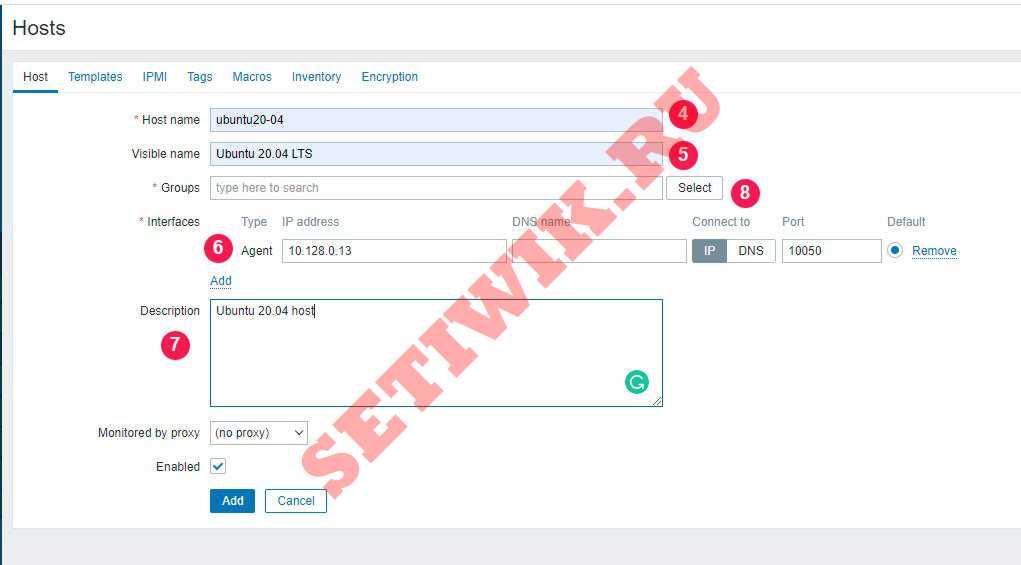
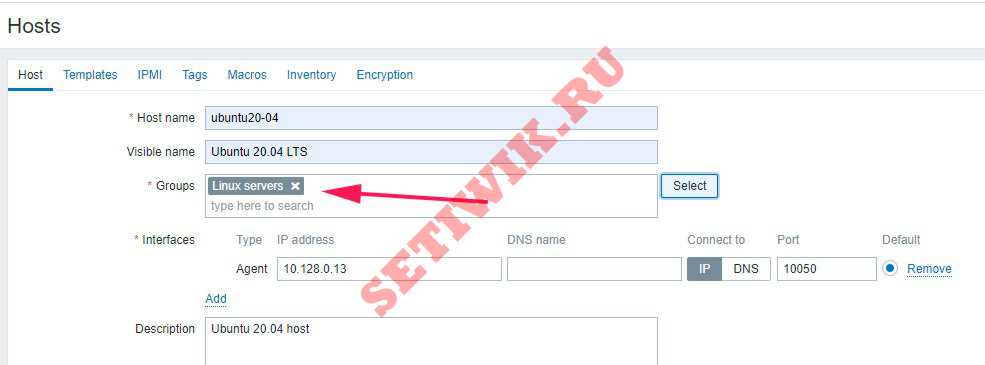
В появившемся окне заполните данные удаленного хоста, такие как имя хоста. видимое имя, IP-адрес, краткое описание и нажмите на кнопку «Выбрать» (Select) рядом с текстовым полем «Группы«.
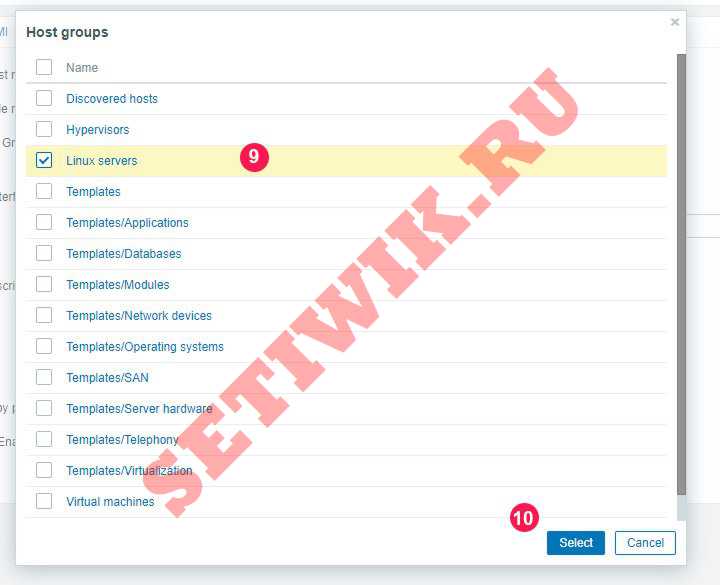
В появившемся списке выберите пункт «Серверы Linux‘ и нажмите кнопку «Выбрать«.
Это приведет вас обратно, и вы сможете просмотреть только что добавленную группу, как показано ниже.
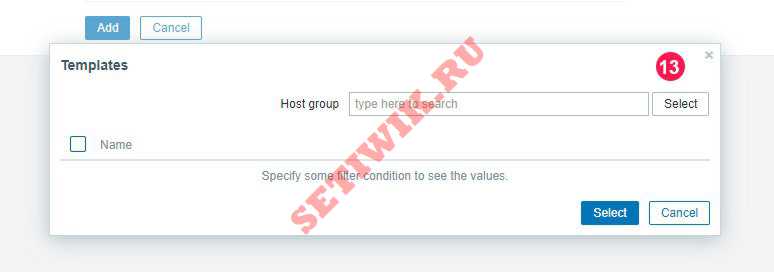
Затем перейдите на вкладку «шаблоны» (Templates) и нажмите кнопку «Выбрать» рядом с текстовым полем «Связать новые шаблоны» (Link new Templates).

Нажмите на кнопку «Выбрать«(Select) рядом с текстовым полем «Группа хостов«, как показано на рисунке.
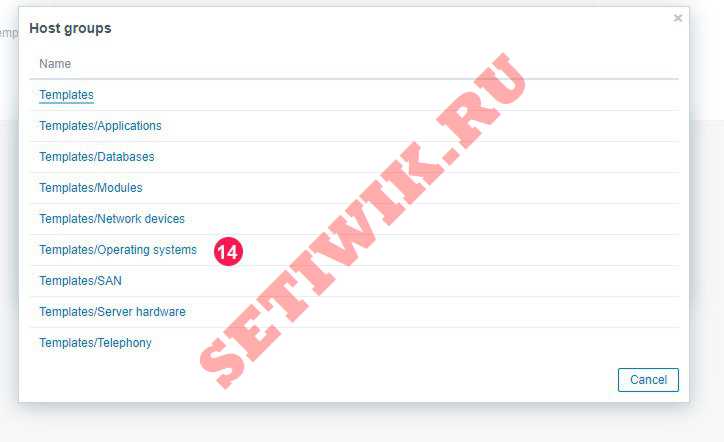
Нажмите на опцию «Шаблоны/операционные системы» (Templates/Operating systems), как показано на рисунке.
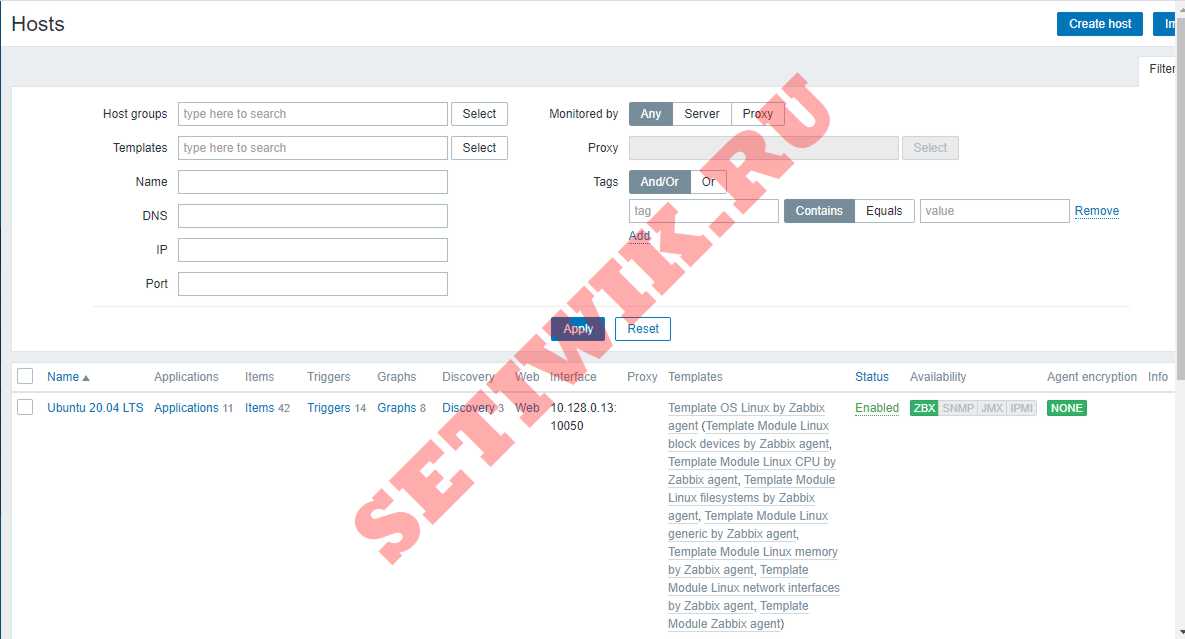
Затем выберите опцию «Template OS Linux by Zabbix agent’ и нажмите кнопку «Выбрать» (Select).

Затем нажмите на кнопку «Добавить» (Add).

Теперь ваш хост будет указан на панели мониторинга, как показано на рисунке ниже.
Заключение
В этой инструкции мы подробно показали, как установить агент Zabbix в системе Ubuntu 20.04 Linux. А так же как настроить его для связи с сервером Zabbix. Это поможет вам активно отслеживать целевые локальные ресурсы и приложения.
Источник
How to Install and Configure Zabbix Agents on Remote Linux Systems – Part 3
Continuing Zabbix series, this tutorial will guide you on how you can install and configure Zabbix agents on Linux (Debian based systems and CentOS) in order to actively monitor local resources on remote systems.

The main job of zabbix agents consists in gathering local information from the targets where they run and send the data to a central Zabbix server to be further processed and analyzed.
Requirements
Install and Configure Zabbix 2.4.5 on Debian 8 and RHEL/CentOS 7.
Step 1: Install Zabbix Agents in Linux Systems
1. Depending on the Linux distribution you are running, go to Zabbix download page, grab the latest version of the available agents binary packages using a tool such as wget or curl and install it on your machine using the distribution specific package manager – Yum, Rpm or Dpkg.
On Debian based Systems
For Debian systems (including latest release – Debian 8 Jessie) use the following steps to download and install Zabbbix Agent:
On CentOS based Systems
For CentOS alike systems, download the .rpm packaged for the distribution specific release number, using the same page as above, and install it using rpm package manager.
In order to automatically manage missing dependency issues and install the agent using one shot use the yum command followed by the binary package download link, as in the example below used for installing the agent on CentOS 7:

Step 2: Configure and Test Zabbix Agent in Linux
2. The next logical step after installing the packages on the system is to open Zabbix agent configuration file located in /etc/zabbix/ system path on both major distributions and instruct the program to send all the collected information to Zabbix server in order to be analyzed and processed.
Therefore, open zabbix_agentd.conf file with your favorite text editor, find the below lines (use the screenshots as a guide), uncomment them and make the following changes:
add zabbix server IP address and hostname as shown below.
3. Once you’ve finished editing the Zabbix agent configuration file with the required values, restart the daemon using the following command, then use netstat command to verify if the daemon has been started and operates on the specific port – 10050/tcp:
For older distributions use the service command to manage zabbix agent daemon:

4. If your system is behind a firewall then you need to open 10050/tcp port on the system in order to reach through Zabbix server.
For Debian based systems, including Ubuntu, you can use ufw tool to open the port and on CentOS 7 you can use Firewalld utility to manage the firewall rules as the below examples:
For older distributions such as centOS 6 or unmanaged firewalls through specific utilities use the powerful iptables command to open ports:
5. Finally, in order to test if you can reach Zabbix Agent from Zabbix Server, use Telnet command from Zabbix server machine to the IP addresses of the machines that run the agents, as illustrated below (don’t worry about the thrown error from agents):

Step 3: Add Zabbix Agent Monitored Host to Zabbix Server
6. On the next step it’s time to move to Zabbix server web console and start adding the hosts which run zabbix agent in order to be monitored by the server.
Go to Configuration -> Hosts -> Create Host -> Host tab and fill the Host name field with the FQDN of the monitored zabbix agent machine, use the same value as above for Visible name field.
Next, add this host to a group of monitored servers and use the IP Address of the monitored machine at Agent interfaces field – alternatively you can also use DNS resolution if it’s the case. Use the below screenshots as a guide.


7. Next, move to Templates tab and hit Select. A new window with templates should open. Choose Template OS Linux then scroll down and hit on Select button to add it and automatically close the window.


8. Once the template appears to Link new template box, hit on Add text to link it to zabbix server, then hit on the lower Add button to finish the process and completely add the monitored host. The visible name of the monitored host should now appear hosts window.


That’s all! Just assure that the host Status is set to Enabled and wait a few minutes in order for Zabbix server to contact the agent, process the received data and inform or eventually alert you if something goes bad on the monitored target.
If You Appreciate What We Do Here On TecMint, You Should Consider:
TecMint is the fastest growing and most trusted community site for any kind of Linux Articles, Guides and Books on the web. Millions of people visit TecMint! to search or browse the thousands of published articles available FREELY to all.
If you like what you are reading, please consider buying us a coffee ( or 2 ) as a token of appreciation.
We are thankful for your never ending support.
Источник


