- Активный и пассивный zabbix агент
- Отличие активного и пассивного агента
- Какой агент лучше использовать?
- Создание шаблона для активного агента
- Установка Zabbix agent на Windows
- Загрузка агента
- Установка агента
- Установка из MSI-пакета
- Установка из архива
- Настройка брандмауэра
- Проверка работы
- Zabbix Agent: Active vs. Passive
- Contents
- Introduction
- Active vs. Passive
- Topology benefits
- Performance benefits
- Agent configuration
- Passive checks
- Active checks
Активный и пассивный zabbix агент
У только начинающих администраторов zabbix часто возникает вопрос. В чем отличие между активным и пассивным агентом? И какой агент лучше использовать. В данной статье постараемся ответить на эти вопросы.
Отличие активного и пассивного агента
При использовании пассивного агента, zabbix сервер отправляет запросы на zabbix агент, в соответствии с настройками элементов данных (например загрузку cpu, памяти и т.д). А в ответ получает значения этих данных.
При активном агенте. Агент сначала запрашивает у zabbix сервера список элементов данных, частота этих запросов указана в параметре RefreshActiveChecks в настройках zabbix агента, обычно это не чаще одного раза в час, если у вас изменения в настройка узлов сети происходят редко, то можно указать обновление раз в сутки что бы меньше нагружать сервер. После получения элементов данных zabbix агент отправляет данные на сервер в соответствием с настройками этих данных.
Как следует из описанного выше. Основное отличие заключается в том, что при пассивном агенте данные запрашиваются сервером, а при активном данные отправляются самими агентами.
Какой агент лучше использовать?
Какой агент использовать это дело вкуса. По моему мнению если у вас небольшая сеть и в которую редко добавляются новые узлы, то можно использовать пассивный агент.
Если же у вас большая сеть и на сервере десятки или сотни тысяч активных элементов данных. А также если в сети постоянно появляются новые узлы. То в этом случае лучше, а также если узлы находятся за НАТом то необходимо использовать активный zabbix агенты.
преимущества пассивного агента
- Не работает если узел находится за NAT
- В отличие от активного агента больше нагрузка на сервер
Преимущества активного агента
- Меньшая нагрузка на сервер
- Возможность работы за NAT
- Авторегистрация узлов
- Необходимо создавать шаблоны, в стандартной установке все шаблоны для пассивной проверке.
Создание шаблона для активного агента
Создать шаблон для активного zabbix агента из уже существующего на самом деле очень просто. Рассмотрим на примере стандартного шаблона «Template OS Linux». Для этого открываем его на редактирование и смотрим какие еще шаблоны к нему присоединены, кликнув по вкладке «Присоединенные шаблоны»
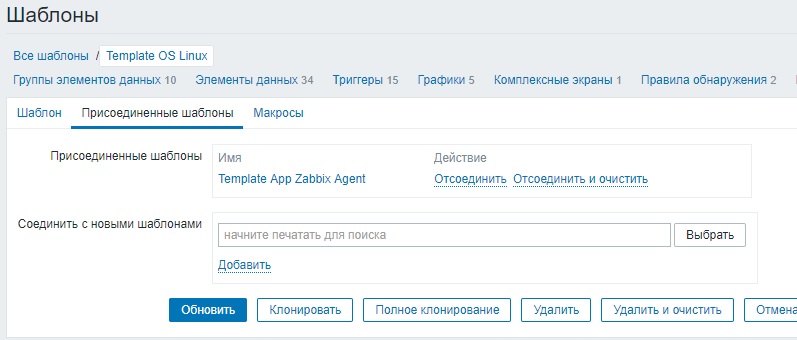
Прямо здесь кликаем по имени «Template App Zabbix Agent» и в открывшемся шаблоне нажимаем кнопку «Полное клонирование». Переименовываем новый шаблон например в «Template App Zabbix Agent_activ». И жмем добавить. Затем открываем созданный шаблон на редактирование, переходим на вкладку «элементы данных» и выделяем все элементы данных.
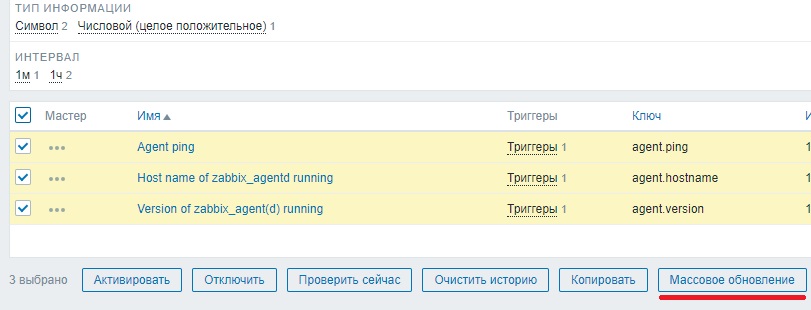
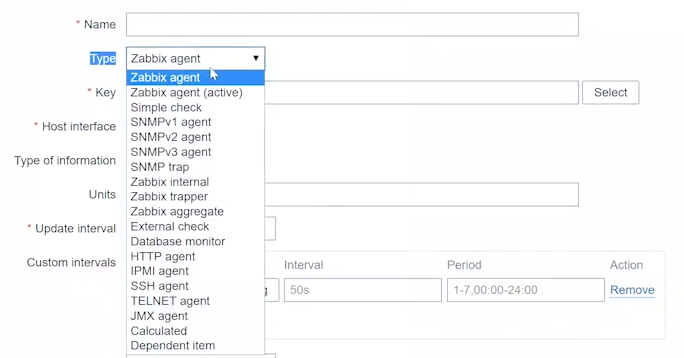
После чего жмем «Массовое обновление». Выбираем тип «Zabbix агент (активный)»

И нажимаем «обновить»
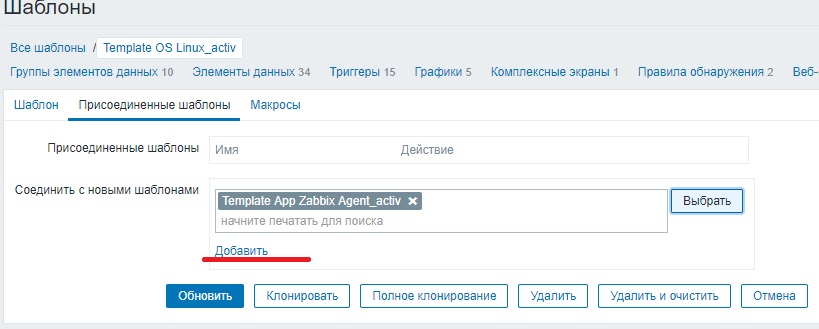
Снова открываем шаблон «Template OS Linux» и здесь нажимаем кнопку «Полное клонирование». И создаем новый шаблон «Template OS Linux_activ». Открываем шаблон «Template OS Linux_activ» на редактирование и переходим на вкладку «Присоединенные шаблоны». Здесь отсоединяем шаблон «Template App Zabbix Agent» и присоединяем «Template App Zabbix Agent_activ».
Затем переходим в элементы данных и также с помощью кнопки «Массовое обновление» меняем тип на «Zabbix агент (активный)». Еще нам нужно изменить тип в правилах обнаружения. Для этого переходим на вкладку «Правила обнаружения» и нажимаем в каждом правиле на ссылку «Прототипы элементов данных». К сожалению здесь массовое обновление не работает. Поэтому проходимся по каждому элементу вручную и меняем тип. Теперь у нас есть новый шаблон «Template OS Linux_activ», который работает с активным zabbix агентами. И уже его мы можем навешивать на хосты.
Если вы нашли ошибку, пожалуйста, выделите фрагмент текста и нажмите Ctrl+Enter.
Установка Zabbix agent на Windows
В нашем примере мы установим агент для Zabbix на Windows в качестве службы, а также сделаем минимальную настройку для отправки данных на сервер.
Загрузка агента
Переходим на страницу загрузки агента Zabbix и выбираем платформу операционной системы (x32 или x64) и версию агента, например:

* помимо этого, мы можем выбрать вариант дистрибутива: с использованием шифрования или нет, а также файл установки — msi пакет или архив. В данном примере мы выбрали версию 5.
В зависимости от выбранных критериев поиска агента, ниже мы можем увидеть несколько вариантов для загрузки. Находим нужный и кликаем по DOWNLOAD для скачивания файла:

Ждем окончания загрузки и переходим к установке.
Установка агента
В зависимости от загрузки типа пакета (MSI или архив) будут разные методы установки. Рассмотрим оба.
Установка из MSI-пакета
Это удобный вариант, который позволит установить агента с помощью мастера. Чтобы начать, кликаем дважды по скачанному пакету и в окне приветствия нажимаем Next:

Принимаем лицензионное соглашение, установив галочку I accept the terms in the License Agreement и нажимаем Next:

В следующем окне оставляем имя компьютера, на который устанавливается агент и вводим имя или IP-адрес сервера zabbix, после кликаем по Next:

* в данном примере имя нашего компьютера Windows PC, а сервера — zabbix-server.dmosk.local.
Выбираем компоненты, которые хотим установить — можно просто оставить все по умолчанию и нажимаем Next:

Подтверждаем установку, кликая по Install:

Ждем завершения процесса — агент установлен.
Установка из архива
Данный метод требует дополнительных манипуляций, но с его помощью можно автоматизировать процесс. Мы рассмотрим только установку.
Распаковываем содержимое скачанного архива в каталог, где будут находиться файлы программы, например в C:\Program Files\Zabbix Agent. В итоге, у нас получится:

Открываем WordPad от администратора и в нем открываем конфигурационный файл conf/zabbix_agentd.conf и правим опцию для сервера zabbix — находим строку:
* где zabbix-server.dmosk.local — имя сервера Zabbix.
Теперь открываем командную строку от администратора и выполняем команду для установки агента:
«C:\Program Files\Zabbix Agent\bin\zabbix_agentd.exe» —config «C:\Program Files\Zabbix Agent\conf\zabbix_agentd.conf» —install
* где C:\Program Files\Zabbix Agent — папка, куда мы распаковали архив.
Мы должны увидеть что-то на подобие:
zabbix_agentd.exe [468]: service [Zabbix Agent] installed successfully
zabbix_agentd.exe [468]: event source [Zabbix Agent] installed successfully
Теперь открываем службы Windows и находим «Zabbix Agent» — кликаем по ней правой кнопкой мыши и выбираем Запустить:

Настройка брандмауэра
Если в нашей системе работает брандмауэр Windows, необходимо разрешить порт 10050 или приложение zabbix agent.
Для этого переходим в Панель управления — Система и безопасность — Брандмауэр Windows (или вводим команду control /name Microsoft.WindowsFirewall). Кликаем по ссылке Разрешение взаимодействия с приложением или компонентов в брандмауэре Windows — добавляем наше приложение zabbix_agentd в исключение.
Это же действие можно выполнить в powershell — запускаем ее от администратора и вводим команду:
New-NetFirewallRule -DisplayName «Разрешить приложение Zabbix Agent» -Direction Inbound -Action Allow -EdgeTraversalPolicy Allow -Program «C:\Program Files\Zabbix Agent\bin\zabbix_agentd.exe»
Или мы можем добавить в исключение порт. Это можно сделать также из командной строки poweshell:
New-NetFirewallRule -DisplayName «Разрешить порт 10050 для Zabbix» -Direction Inbound -Action Allow -EdgeTraversalPolicy Allow -Protocol TCP -LocalPort 10050
Проверка работы
Чтобы убедиться в работоспособности агента, мы можем зайти на сервер zabbix и выполнить подключение по telnet, например, командой:
telnet 192.168.1.15 10050
* где 192.168.1.15 — IP-адрес компьютера с установленным Zabbix.
Мы должны увидеть
Connected to nr-fs-06.
Escape character is ‘^]’.
.. и через небольшой интервал времени:
Connection closed by foreign host.
Но если агент не запущен или не работает, мы увидим ошибку:
telnet: connect to address . Connection refused
В панели сервера в узлах сети при корректной установке и настройке, мы также должны увидеть доступность компьютера по агенту:
Zabbix Agent: Active vs. Passive
Learn how to get the most out of the Zabbix Agent active and passive modes to fix problems proactively with remote commands.
Contents
Introduction
When it comes to Zabbix agent modes, there is a choice between the active and the passive modes. Each time new items or hosts are added in the front end, you need to choose the item type.
Item type dropdown
This is mandatory as the item type determines how the item will work and collect data. For the Zabbix agent, there is a choice between ‘Zabbix agent (passive)’ and ‘Zabbix agent (active)’.
Active vs. Passive
You may already know the difference between the modes, but do you know the actual benefits that come with either option?
The main difference lies in the direction of the connection.

Active vs Passive agent connection
If you use the Zabbix agent in the passive mode, it means that the poller (internal server process) connects to the agent on port 10050/TCP and polls for a certain value (e.g., host CPU load). The poller waits until the agent on the host responds with the value. Then the server gets the value back, and the connection closes.
In the active mode, all data processing is performed on the agent, without the interference of pollers. However, the agent must know what metrics should be monitored, and that is why the agent connects to the trapper port 10051/TCP of the server once every two minutes (by default). The agent requests the information about the items, and then performs the monitoring on the host and pushes the data to the server via the same TCP port.
Topology benefits
The first benefit comes from the topology of the network the Zabbix agent is installed on. For instance, it might be that your customer doesn’t want any incoming connections in their environment, even from the internal network, but allows outbound connections. In this case, you will have to use active checks.
Now, imagine that you intend to set up automatic issue resolution on your hosts in addition to monitoring. The simplest example with Windows services would be configuring the items and triggers to check the health of specific services. But before notifying users about a Windows service that has stopped, you want to try to restart it automatically.
This is possible with remote commands. You can learn more about setting up remote commands by watching the video Zabbix Email Notifications And Actions. In the front end, open Configuration > Actions > Steps > Remote Command. Then enter the following CMD command:
Each time the trigger fires, the Zabbix agent will try to start the service. If it fails to do so, then a notification will be sent. But this remote command will only work with the Zabbix agent in the passive mode.
Performance benefits
Consider the active agent mode. As I already mentioned, the poller connects to the host, requests the data, and then waits until it receives the data or until the timeout is reached.

Server timeout value
The timeout value is stored in the Timeout variable in zabbix_server.conf. The maximum value is 30 seconds, which is too high to ever be used in production without proper reasons.

Agent timeout value
The timeout value can also be set in the Zabbix agent configuration file, zabbix_agentd.conf. If the timeout is set to three seconds, the poller will wait for three seconds or until the requested value is received.
How long does it usually take to receive a value? Find out by running the following command:

Timing an item request
It only takes 0.002 seconds.
Now, imagine that you have a custom parameter executing a Bash script that runs for 15 seconds every minute. Then the poller will wait for 15 seconds until it gets the value, which means that it won’t be able to process any other items in the meantime. The poller downtime will increase dramatically, and you will have to increase the number of these processes to keep up with the number of items.
The same applies to the agent. If you have an agent with a lot of scripts and user parameters, and those are relatively slow, then it will take time for the agent to process them. The number of the default internal agent processes is stored in the StartAgents variable.

Agent processes started by default
There are three internal processes that can perform the required checks, which means that, by default, the agent can process three items simultaneously. This parameter can be increased if you have a lot of slow-running checks, and the agent acts as the bottleneck. By increasing the StartAgents value to 100 you will increase the number of pollers on the Zabbix server. It should be noted that having slow-running checks degrades the performance of your Zabbix server, but sometimes there are no other options.
It might seem that the active mode would be a better fit in this scenario — the server doesn’t interfere at all, and only receives the already collected data, while the processing is done on the agent. It forks the Bash script, waits for 15 seconds, and gets the data. Once the data is collected, the agent immediately sends a response to the server, so the server never has to wait while the script is running.

Active checks on the agent
The downside is that there can only be one such process per each agent in the active mode, and it is impossible to increase the number of the checks. If you have multiple items running for 15 seconds each, with a short update interval on the host, and you configure all of those items as active checks, there will be a queue of pending checks.
The only way to avoid this is to configure those items as passive checks, and then you can increase the number of internal processes handling these checks by changing the StartAgents variable in zabbix_agentd.conf. Note that you have to restart the binary process after changing the config file.
To sum it up, in most cases with quick checks, having an active agent is better in terms of performance. The drawback is that you cannot use remote commands.
Conversely, if you have a lot of slow items taking 30 seconds each, and you cannot process them outside of the agent, then passive checks are your only option. Using those, you can increase the number of processes on the agent side.
The additional benefit of the active checks is that the agent has a memory buffer for those checks. This means that you won’t lose the data in case of a network issue. Using passive checks means that you cannot use the buffer.
Agent configuration
Now, onto the most important part, namely configuring the agent in the active or the passive modes. The default setting is passive, meaning that even the default Zabbix server host has all of the Zabbix agent item types configured as passive.
It should be noted that each agent can run in two modes simultaneously. You could have one machine with ten items running in the passive mode, and ten items running in the active mode. This is done using the same agent installation, the difference being in the configuration file.
Passive checks
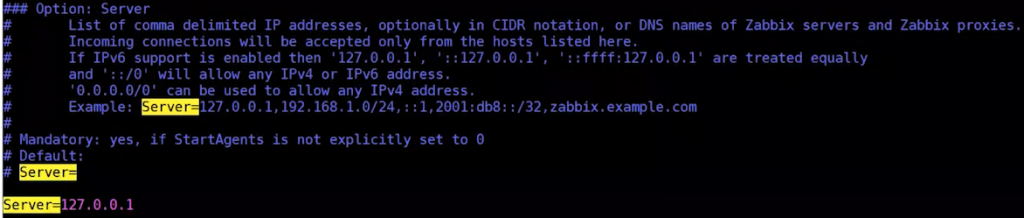
Changing the passive server list
When configuring passive checks in zabbix_agentd.conf, you only need to change one parameter Server. It is a comma-separated list of IP addresses and DNS names from which the agent will accept incoming connections. The Zabbix server connects to this agent and polls the data.
Active checks
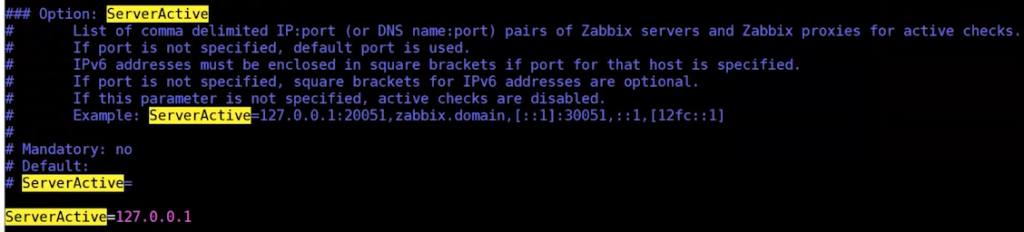
Changing the active server list
Active checks require a more in-depth configuration. First of all, you need the ServerActive variable. This is the list of IP addresses and DNS names of your Zabbix servers or proxies to which the agent will connect once every two minutes to request the configuration. After it receives the configuration, it starts the requested monitoring and pushes the collected data.
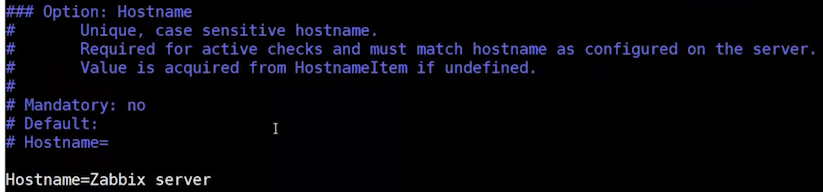
Changing the hostname
In the same zabbix_agentd.conf file, there is also a parameter called Hostname. This hostname must match the hostname specified in the front end (case sensitive).
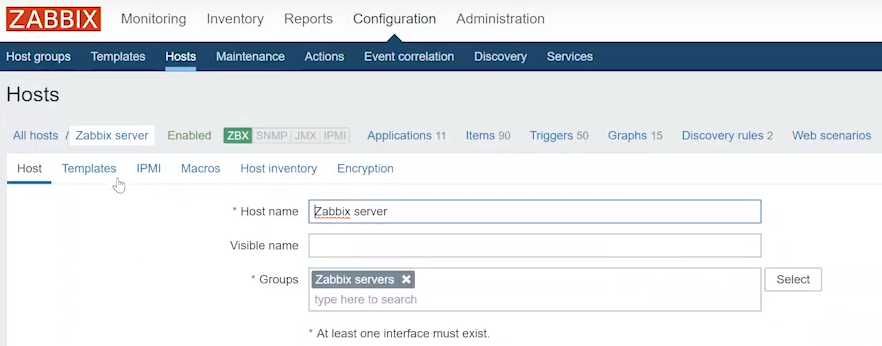
Hostname in the front end
To view the hostname in the front end, go to Configuration > Hosts. Note that this value is case sensitive.

The HostnameItem parameter
Further down in zabbix_agentd.conf, there is also the HostnameItem parameter. If the hostname is not set, then the item specified here is executed on the host, and the returned value of that item is taken as the hostname. The default value is ‘system.hostname’.
When the HostnameItem parameter is not set, the actual system hostname is used. However, the latter doesn’t always match the intended value. You can check the default reported hostname by running the following Bash command:
Imagine you have a Zabbix server and an agent with a hostname ‘Zabbix server’, and there is also a different server running a Zabbix agent with the same hostname. The items from your Zabbix server host will then receive their values from two different servers.
This means that you will start seeing discrepancies in reported values. For instance, free disk space can be changing repeatedly between two different values, each one valid for its respective server, resulting in erroneous reporting. This underpins the importance of assigning unique hostnames to each agent.


